
Growing ginger in pots might sound intimidating, but trust me, it’s one of the most rewarding and surprisingly simple DIY projects you can undertake! Imagine stepping into your kitchen and harvesting fresh, zesty ginger right from your own container garden. Forget those bland, store-bought rhizomes – we’re talking about vibrant, flavorful ginger that will elevate your cooking and boost your well-being.
Ginger has a rich history, deeply intertwined with ancient traditions and culinary practices across Asia. For centuries, it’s been revered not only for its distinctive taste but also for its medicinal properties. From traditional Chinese medicine to Indian Ayurvedic practices, ginger has been a staple remedy for everything from digestive issues to inflammation. Now, you can bring this ancient wisdom into your own home.
Why should you learn this DIY trick? Well, for starters, growing ginger in pots allows you to control the growing environment, ensuring optimal conditions for a bountiful harvest, even if you don’t have a sprawling garden. Plus, it’s incredibly satisfying to nurture a plant from a humble rhizome to a thriving source of fresh ginger. In this article, I’ll guide you through every step, from selecting the right pot and soil to harvesting your very own homegrown ginger. Get ready to unleash your inner gardener and enjoy the delicious rewards!
Growing Ginger in Pots: A Beginner’s Guide
Hey there, fellow plant enthusiasts! Ever thought about growing your own ginger? It’s surprisingly easy and rewarding, and you don’t even need a huge garden. Growing ginger in pots is totally doable, and I’m going to walk you through every step of the process. Get ready to have fresh, homegrown ginger at your fingertips!
Choosing Your Ginger Rhizome
Before we dive into the planting process, let’s talk about selecting the right ginger rhizome. This is basically the root that you’ll be planting, and it’s crucial to start with a healthy one.
* Look for plump, healthy rhizomes: When you’re at the grocery store or garden center, choose ginger rhizomes that are firm, plump, and free from wrinkles or blemishes. Avoid any that look shriveled or moldy.
* Choose organic if possible: Organic ginger is less likely to have been treated with growth inhibitors, which can hinder sprouting.
* Look for “eyes”: These are small, green buds or “eyes” on the rhizome. These are where the new shoots will emerge, so the more eyes, the better!
* Consider size: You can plant a whole rhizome or cut it into smaller pieces, as long as each piece has at least one or two eyes.
Preparing Your Ginger for Planting
Okay, you’ve got your ginger. Now, let’s get it ready for its new home!
1. Soaking the Rhizome (Optional but Recommended): I like to soak my ginger rhizome in lukewarm water for 12-24 hours before planting. This helps to rehydrate it and encourage sprouting. Just place it in a bowl of water and let it sit.
2. Cutting the Rhizome (If Necessary): If your rhizome is large, you can cut it into smaller pieces. Make sure each piece has at least one or two healthy eyes. Use a clean, sharp knife to prevent the spread of disease. Let the cut pieces air dry for a day or two to allow the cut surfaces to callous over. This helps prevent rotting.
Preparing Your Pot and Soil
Now, let’s get our hands dirty and prepare the pot and soil. This is a crucial step for successful ginger growing.
* Choosing the Right Pot: Ginger needs room to spread horizontally, so choose a wide, shallow pot rather than a tall, narrow one. A pot that’s at least 12 inches in diameter and 8 inches deep is a good starting point. Make sure the pot has drainage holes to prevent waterlogging.
* Selecting the Right Soil: Ginger thrives in well-draining, nutrient-rich soil. I recommend using a potting mix that’s specifically formulated for vegetables or herbs. You can also amend regular potting mix with compost, perlite, or vermiculite to improve drainage and fertility.
* My Favorite Soil Mix: I personally like to use a mix of equal parts potting soil, compost, and perlite. The potting soil provides a good base, the compost adds nutrients, and the perlite improves drainage.
Planting Your Ginger
Alright, the moment we’ve been waiting for! Let’s get that ginger in the ground (or, in this case, the pot).
1. Fill the Pot: Fill your pot with the prepared soil mix, leaving about an inch or two of space at the top.
2. Planting the Rhizome: Place the ginger rhizome on top of the soil, with the eyes facing upwards.
3. Cover with Soil: Gently cover the rhizome with about 1-2 inches of soil.
4. Water Thoroughly: Water the pot thoroughly until water drains out of the drainage holes. This helps to settle the soil and provide moisture to the rhizome.
Caring for Your Ginger Plant
Now that your ginger is planted, it’s time to provide it with the care it needs to thrive.
* Location, Location, Location: Ginger loves warmth and humidity. Place your pot in a location that receives bright, indirect sunlight. Avoid direct sunlight, which can scorch the leaves. An east-facing window or a spot under a shade cloth is ideal.
* Watering: Keep the soil consistently moist, but not waterlogged. Water when the top inch of soil feels dry to the touch. During the growing season (spring and summer), you may need to water more frequently. Reduce watering in the fall and winter when the plant is dormant.
* Humidity: Ginger thrives in humid environments. If you live in a dry climate, you can increase humidity by misting the plant regularly, placing a tray of water near the pot, or using a humidifier.
* Fertilizing: Feed your ginger plant every 2-3 weeks during the growing season with a balanced liquid fertilizer. Follow the instructions on the fertilizer label.
* Temperature: Ginger prefers temperatures between 65°F and 90°F (18°C and 32°C). Protect your plant from frost and cold temperatures. If you live in a cold climate, you may need to bring your pot indoors during the winter.
* Pest Control: Ginger is relatively pest-resistant, but it can occasionally be affected by aphids or spider mites. If you notice any pests, treat them with insecticidal soap or neem oil.
* Be Patient: Ginger can take several weeks or even months to sprout, so don’t be discouraged if you don’t see any growth right away. Just keep the soil moist and be patient.
Harvesting Your Ginger
The best part! Harvesting your own homegrown ginger is so satisfying.
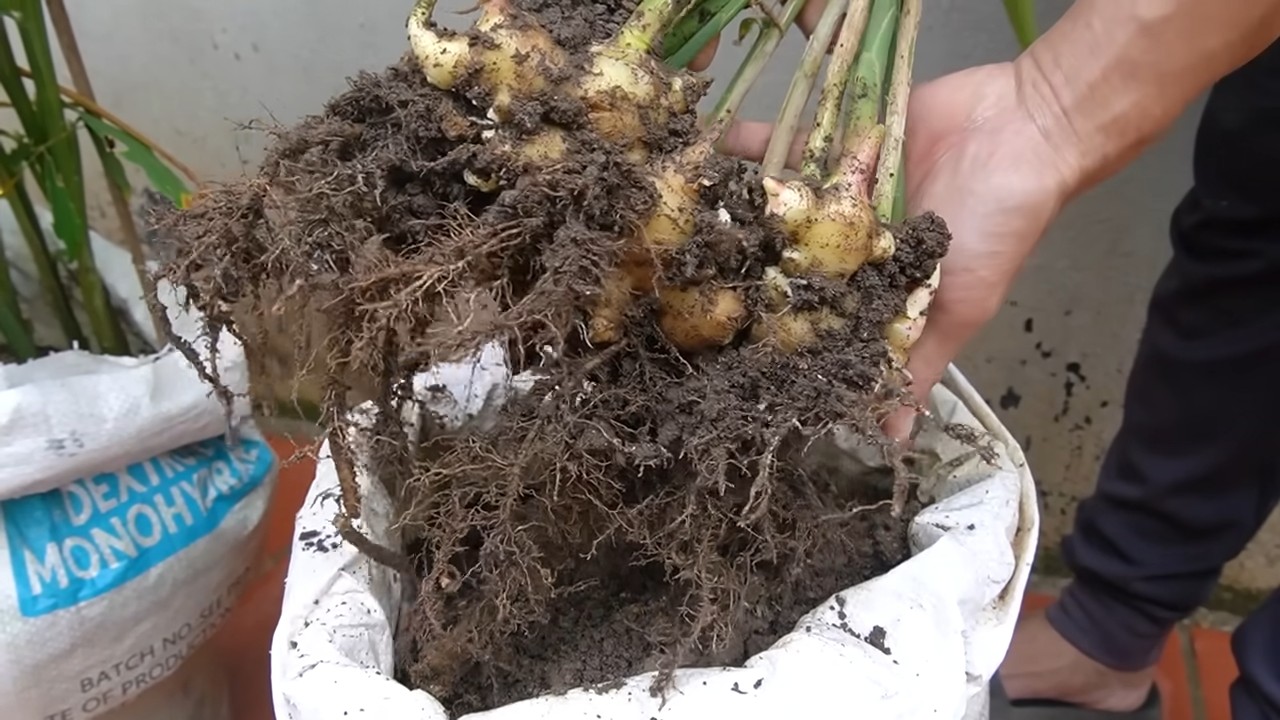
* When to Harvest: You can start harvesting ginger about 8-10 months after planting. The leaves will start to turn yellow and die back when the ginger is ready to harvest.
* How to Harvest: Gently dig around the plant and lift the rhizomes out of the soil. You can harvest the entire plant or just a portion of the rhizomes, leaving the rest to continue growing.
* Storing Your Ginger: Freshly harvested ginger can be stored in the refrigerator for several weeks. You can also freeze it for longer storage. To freeze ginger, peel it and grate it or slice it into small pieces. Place the ginger in a freezer bag or container and store it in the freezer.
Troubleshooting
Even with the best care, you might encounter a few challenges along the way. Here are some common problems and how to fix them:
* Yellowing Leaves: Yellowing leaves can be caused by overwatering, underwatering, nutrient deficiencies, or pests. Check the soil moisture and adjust your watering accordingly. Fertilize the plant if necessary. Inspect the plant for pests and treat them if present.
* No Sprouting: If your ginger isn’t sprouting, it could be due to several factors, including poor quality rhizomes, cold temperatures, or dry soil. Make sure you’re using healthy rhizomes with visible eyes. Keep the soil consistently moist and provide warmth.
* Rotting Rhizomes: Rotting rhizomes are usually caused by overwatering or poor drainage. Make sure your pot has drainage holes and avoid overwatering. If you suspect rotting, carefully dig up the rhizome and remove any affected areas. Replant the healthy portion in fresh soil.
Propagating Ginger
Want more ginger plants? Propagating ginger is easy!
1. Divide the Rhizomes: When you harvest your ginger, you can divide the rhizomes into smaller pieces, making sure each piece has at least one or two eyes.
2. Plant the Divisions: Plant the divisions in separate pots, following the same instructions as above.
3. Enjoy Your New Ginger Plants: With a little care, your new ginger plants will thrive and provide you with even more fresh ginger!
Uses for Your Homegrown Ginger
Now that you’ve got a bounty of fresh ginger, what can you do with it? The possibilities are endless!
* Cooking: Ginger is a staple in many cuisines around the world. Use it to flavor stir-fries, soups, curries, marinades, and sauces.
* Tea: Ginger tea is a soothing and warming beverage that’s perfect for cold days. Simply steep a few slices of fresh ginger in hot water for 10-15 minutes.
* Baking: Ginger adds a warm, spicy flavor to baked goods like gingerbread, cookies, and cakes.
* Medicinal Uses: Ginger has been used for centuries for its medicinal properties. It can help to relieve nausea, reduce inflammation, and boost the immune system.
Final Thoughts
Growing ginger in pots is a fun and rewarding project that anyone can do. With a little patience and care, you can enjoy fresh, homegrown ginger all year round. So, what are you waiting for? Get planting! I hope this guide has been helpful. Happy gardening!

Conclusion
So, there you have it! Growing ginger in pots is not only achievable, but it’s also a remarkably rewarding experience. Forget relying solely on store-bought ginger, often of questionable freshness and origin. Imagine the satisfaction of harvesting your own vibrant, aromatic ginger root, knowing exactly where it came from and how it was grown. This DIY project brings a touch of the exotic right to your home, transforming your windowsill or patio into a miniature spice garden.
But why is this DIY trick a must-try? Beyond the sheer convenience of having fresh ginger readily available, growing your own offers a superior flavor profile. Homegrown ginger tends to be more pungent and zesty than its commercially grown counterpart, adding a delightful kick to your culinary creations. Plus, you can harvest it at different stages of maturity, experimenting with the subtle nuances of young ginger versus the more intense flavor of mature rhizomes.
Furthermore, growing ginger in pots is an incredibly sustainable practice. You’re reducing your carbon footprint by minimizing transportation and packaging waste. You’re also gaining control over the growing process, ensuring that your ginger is free from harmful pesticides and chemicals. It’s a small step towards a more eco-conscious lifestyle that yields delicious results.
Looking for variations? Absolutely! Consider experimenting with different varieties of ginger. While common ginger (Zingiber officinale) is the most readily available, you might explore other options like galangal or turmeric, which share similar growing requirements and offer unique flavor profiles. You can also play around with different potting mixes to find the perfect balance of drainage and moisture retention. Some gardeners swear by adding a bit of composted manure to their mix for an extra boost of nutrients.
Another fun variation is to grow ginger indoors during the colder months and then move it outdoors to a sheltered spot during the warmer seasons. This allows you to extend the growing season and potentially harvest multiple crops throughout the year. Just be sure to acclimate your ginger plants gradually to the outdoor environment to prevent shock.
Don’t be afraid to get creative with your container choices, too. While standard plastic pots work perfectly well, you can also use repurposed containers like old buckets, tubs, or even fabric grow bags. Just make sure that your chosen container has adequate drainage holes to prevent waterlogging.
We wholeheartedly encourage you to embark on this ginger-growing adventure. It’s a simple, satisfying, and ultimately delicious way to connect with nature and enhance your culinary experiences. Once you’ve harvested your first batch of homegrown ginger, you’ll wonder why you didn’t start sooner!
So, grab a ginger rhizome, a pot, and some potting mix, and get ready to experience the joy of growing your own ginger. And most importantly, don’t forget to share your experiences with us! We’d love to hear about your successes, your challenges, and your favorite ways to use your homegrown ginger. Share your photos and stories on social media using #HomegrownGinger or leave a comment below. Let’s build a community of ginger-growing enthusiasts and inspire others to discover the magic of this amazing spice. This **DIY ginger growing** project is sure to bring you joy and deliciousness!
Frequently Asked Questions (FAQ)
1. What kind of ginger should I use to start growing?
You can use ginger root purchased from your local grocery store, but it’s best to choose organic ginger if possible. This reduces the risk of the ginger being treated with growth inhibitors. Look for rhizomes that are plump, firm, and have visible “eyes” or buds. These are the points from which new shoots will emerge. Avoid ginger that is shriveled, soft, or has signs of mold.
2. How big of a pot do I need for growing ginger?
Ginger needs room to spread horizontally, so choose a wide, shallow pot rather than a tall, narrow one. A pot that is at least 12 inches in diameter and 8 inches deep is a good starting point. As your ginger plant grows, you may need to transplant it to a larger container. Ensure the pot has adequate drainage holes.
3. What kind of soil is best for growing ginger in pots?
Ginger prefers well-draining, fertile soil that is rich in organic matter. A good potting mix for ginger would consist of equal parts of potting soil, compost, and perlite or vermiculite. The compost provides nutrients, while the perlite or vermiculite improves drainage and aeration. Avoid heavy clay soils, as they can become waterlogged and lead to root rot.
4. How much sunlight does ginger need?
Ginger thrives in bright, indirect sunlight. Avoid placing your ginger plant in direct sunlight, especially during the hottest part of the day, as this can scorch the leaves. A spot near an east-facing window is ideal, or a location that receives filtered sunlight throughout the day. If you’re growing ginger outdoors, choose a spot that is shaded during the afternoon.
5. How often should I water my ginger plant?
Ginger needs consistent moisture, but it’s important to avoid overwatering. Water your ginger plant when the top inch of soil feels dry to the touch. Water thoroughly until excess water drains out of the bottom of the pot. Reduce watering during the winter months when the plant is not actively growing.
6. How long does it take for ginger to grow?
It typically takes several months for ginger to mature and be ready for harvest. You can start harvesting small pieces of ginger about 3-4 months after planting, but the main harvest usually occurs after 8-10 months. The leaves will start to turn yellow and die back when the ginger is ready to harvest.
7. How do I harvest ginger from a pot?
To harvest ginger, gently dig around the edges of the pot and lift the entire plant out. You can then break off pieces of the rhizome as needed, leaving some of the plant intact to continue growing. Alternatively, you can harvest the entire plant and replant a small piece of the rhizome to start a new plant.
8. Can I grow ginger indoors year-round?
Yes, you can grow ginger indoors year-round, provided you provide it with the right conditions. Ensure that your ginger plant receives adequate light, moisture, and warmth. You may need to supplement with artificial light during the winter months.
9. What are some common problems when growing ginger in pots?
Some common problems when growing ginger in pots include root rot, leaf spot, and pests like aphids and spider mites. Root rot is caused by overwatering, so it’s important to ensure that your soil is well-draining and that you’re not watering too frequently. Leaf spot can be caused by fungal diseases, so it’s important to provide good air circulation and avoid overhead watering. Pests can be controlled with insecticidal soap or neem oil.
10. Can I eat the ginger leaves?
Yes, ginger leaves are edible and have a mild ginger flavor. They can be used in salads, soups, and stir-fries. The leaves are most flavorful when they are young and tender.
11. How do I store my harvested ginger?
Freshly harvested ginger can be stored in the refrigerator for several weeks. Wrap the ginger in a paper towel and place it in a plastic bag. You can also freeze ginger for longer storage. Peel the ginger and chop it into small pieces or grate it before freezing. Store the ginger in an airtight container or freezer bag.
12. What are some uses for homegrown ginger?
Homegrown ginger can be used in a variety of culinary applications, including stir-fries, soups, stews, curries, teas, and baked goods. It can also be used to make ginger ale, ginger beer, and other beverages. The possibilities are endless!
Leave a Comment