
Indoor Sponge Gourd Growing might sound like a far-fetched dream, especially if you’re short on space or live in a cooler climate. But trust me, it’s absolutely achievable, and I’m here to show you how! Forget those sprawling vines taking over your entire garden; we’re bringing the magic of fresh, homegrown sponge gourds right into your home.
For centuries, sponge gourds, also known as loofahs, have been cultivated in Asia and Africa, not just for their delicious fruit but also for their incredible fibrous skeletons used as natural sponges. Imagine, growing your own sustainable cleaning tool right on your windowsill!
Why bother with indoor sponge gourd growing? Well, for starters, it’s incredibly rewarding to nurture a plant from seed to harvest, especially when that harvest provides you with both food and a useful household item. Plus, it’s a fantastic way to extend your growing season, allowing you to enjoy fresh produce even when the weather outside is frightful. And let’s be honest, who wouldn’t want to impress their friends with a homegrown loofah?
This DIY guide will walk you through every step, from selecting the right seeds and containers to providing the perfect lighting and support for your growing vines. Get ready to unleash your inner gardener and transform your home into a thriving indoor oasis!
Growing Sponge Gourds Indoors: A Comprehensive DIY Guide
Hey there, fellow gardening enthusiasts! Ever dreamt of harvesting your own loofah sponges right from the comfort of your home? Well, dream no more! Growing sponge gourds (also known as loofah gourds) indoors is totally achievable, and I’m here to guide you through every step of the process. It might seem a little daunting at first, but trust me, with a little patience and the right setup, you’ll be scrubbing away with your homegrown sponges in no time.
What You’ll Need: The Essential Supplies
Before we dive into the nitty-gritty, let’s gather our supplies. Here’s a checklist of everything you’ll need to successfully grow sponge gourds indoors:
* Sponge Gourd Seeds: Obviously! Make sure you get good quality seeds from a reputable source. Look for varieties that are known to produce well.
* Seed Starting Trays or Small Pots: These will be used to germinate your seeds.
* Seed Starting Mix: A light, well-draining mix is crucial for successful germination.
* Large Pots or Containers: Sponge gourds need plenty of room to grow, so choose pots that are at least 15-20 gallons in size. The bigger, the better!
* Potting Soil: A rich, well-draining potting mix is essential for healthy growth.
* Trellis or Support Structure: These vines can get HUGE! You’ll need a sturdy trellis or support system for them to climb on. Think tall and strong.
* Grow Lights: Since we’re growing indoors, supplemental lighting is a must. Full-spectrum LED grow lights are a great option.
* Fertilizer: A balanced fertilizer, followed by a bloom-boosting fertilizer, will help your gourds thrive.
* Watering Can or Hose: For, you guessed it, watering!
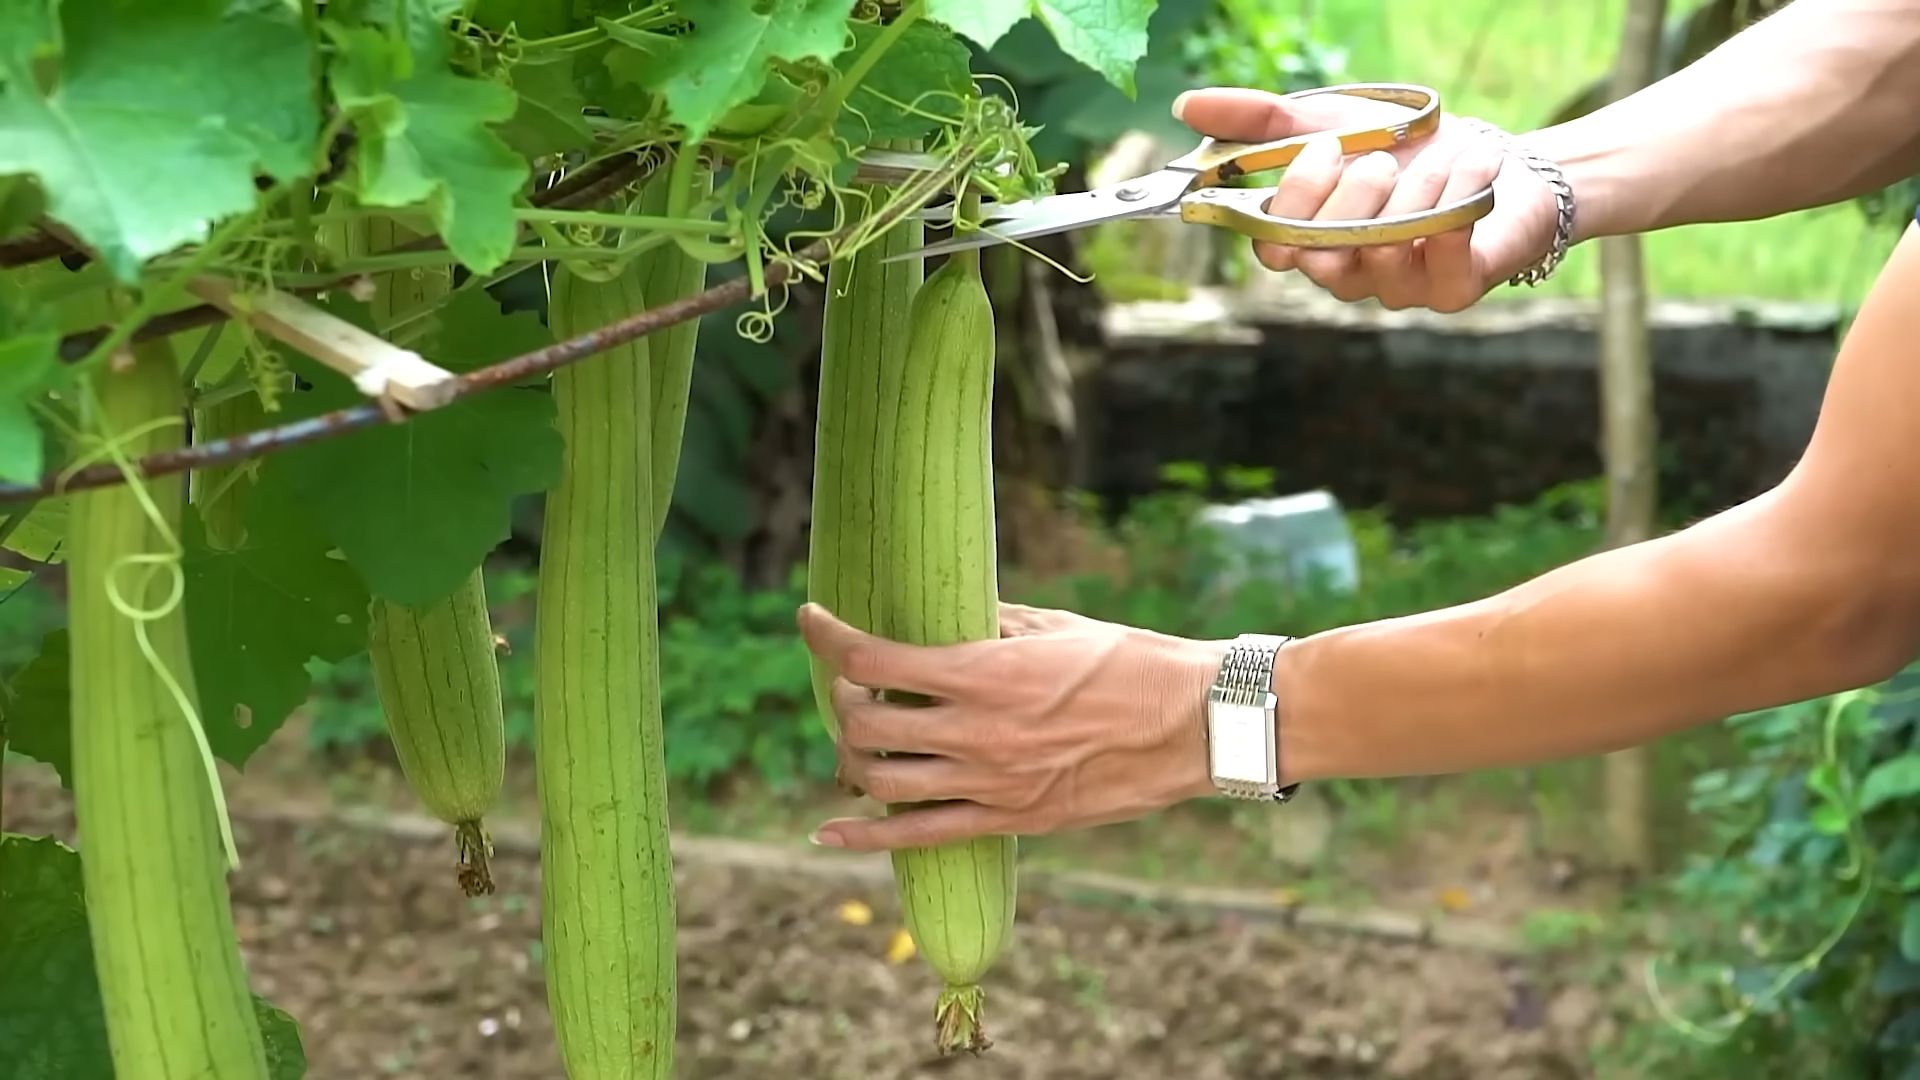
* Pruning Shears: To keep your vines under control and encourage fruit production.
* Spray Bottle: For misting seedlings and controlling pests.
* Well-Ventilated Space: Good airflow is important to prevent fungal diseases.
* Patience: This is a long-term project, so be prepared to wait several months for your gourds to mature.
Phase 1: Germinating Your Sponge Gourd Seeds
This is where the magic begins! Getting your seeds to sprout is the first hurdle, but don’t worry, I’ll walk you through it.
1. Soak the Seeds: To help speed up germination, soak your sponge gourd seeds in warm water for 24-48 hours. This softens the seed coat and makes it easier for the seedling to emerge. I usually put them in a small bowl on my kitchen counter.
2. Prepare Your Seed Starting Trays or Pots: Fill your seed starting trays or small pots with seed starting mix. Moisten the mix thoroughly, but don’t let it get soggy.
3. Sow the Seeds: Plant the seeds about 1 inch deep in the soil. I usually plant 2-3 seeds per pot, just in case some don’t germinate.
4. Provide Warmth and Humidity: Sponge gourd seeds need warmth to germinate. The ideal temperature is around 70-80°F (21-27°C). You can use a heat mat to provide bottom heat, or simply place the trays in a warm location. Cover the trays with a clear plastic dome or plastic wrap to create a humid environment.
5. Monitor and Water: Keep the soil consistently moist, but not waterlogged. Check the trays daily and mist the soil with a spray bottle if it starts to dry out.
6. Wait Patiently: Germination can take anywhere from 7-21 days, so be patient! Once the seedlings emerge, remove the plastic dome or wrap and place the trays under grow lights.
Phase 2: Transplanting and Setting Up Your Indoor Garden
Once your seedlings have developed a few sets of true leaves, it’s time to transplant them into their permanent homes.
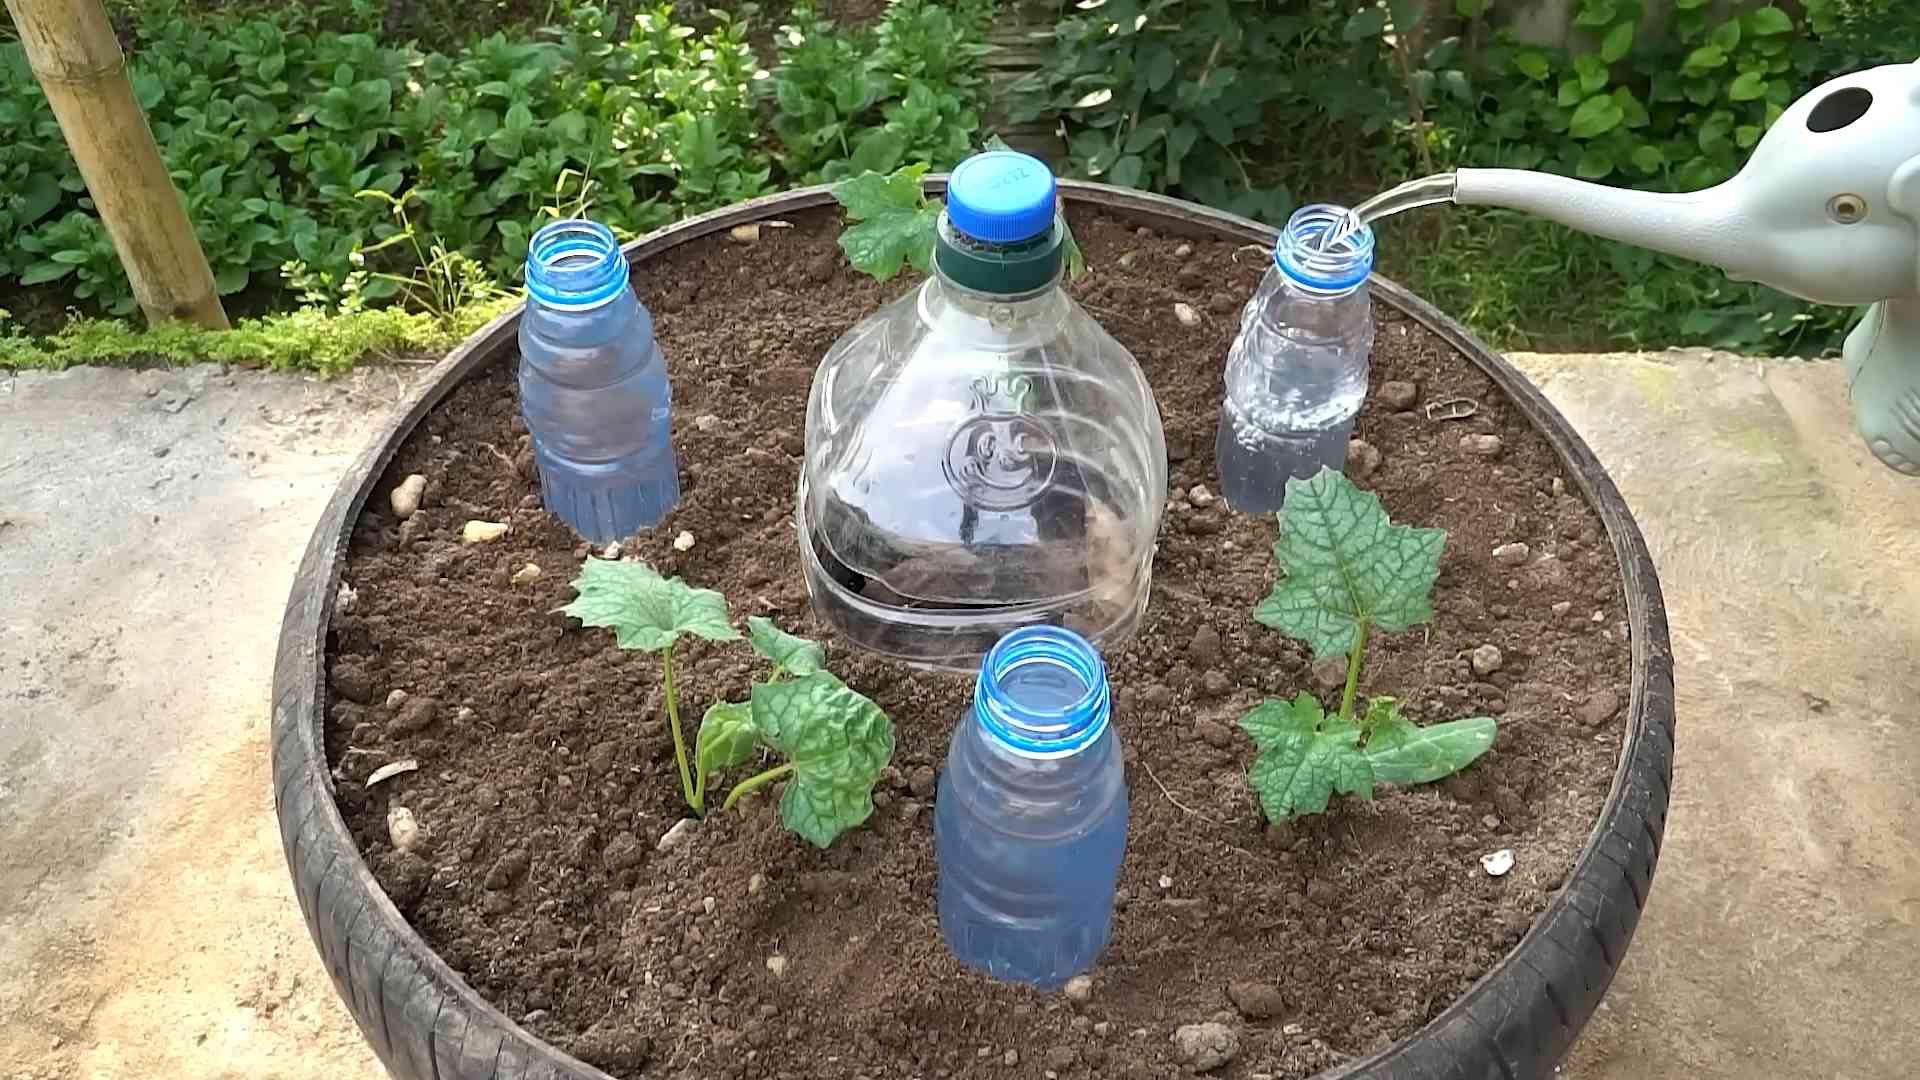
1. Prepare Your Large Pots: Fill your large pots (at least 15-20 gallons) with a rich, well-draining potting mix. I like to add some compost or aged manure to the mix for extra nutrients.
2. Transplant the Seedlings: Gently remove the seedlings from the seed starting trays or pots. Be careful not to damage the roots. Plant one seedling per pot.
3. Set Up Your Trellis or Support Structure: Install your trellis or support structure behind the pots. Make sure it’s sturdy enough to support the weight of the mature vines and gourds. I’ve used everything from bamboo poles to metal garden arches.
4. Position Your Grow Lights: Place your grow lights above the plants, ensuring that they provide adequate coverage. The distance between the lights and the plants will depend on the type of lights you’re using, so follow the manufacturer’s instructions. I usually start with the lights about 12-18 inches above the plants and adjust as needed.
5. Water Thoroughly: After transplanting, water the plants thoroughly to help them settle in.
Phase 3: Caring for Your Growing Sponge Gourds
Now comes the ongoing care. This is where you’ll nurture your plants and watch them flourish.
1. Watering: Sponge gourds need consistent watering, especially during hot weather. Water deeply whenever the top inch of soil feels dry to the touch. Avoid overwatering, as this can lead to root rot. I usually water every 2-3 days, but it depends on the humidity and temperature in my growing space.
2. Fertilizing: Feed your plants regularly with a balanced fertilizer, following the instructions on the package. Once the plants start to flower, switch to a bloom-boosting fertilizer to encourage fruit production. I like to use a liquid fertilizer diluted to half strength and apply it every 2 weeks.
3. Pruning: Pruning is essential for controlling the size of your vines and encouraging fruit production. Remove any yellowing or dead leaves, and prune back any excessive growth. You can also pinch off the tips of the vines to encourage branching. I usually prune my vines every week or two to keep them manageable.
4. Pollination: Sponge gourds have separate male and female flowers. In order for the female flowers to produce fruit, they need to be pollinated. If you don’t have any pollinators in your indoor garden, you’ll need to hand-pollinate the flowers. To do this, use a small paintbrush to transfer pollen from the male flowers to the female flowers. The female flowers have a small gourd-like structure at the base, while the male flowers do not. I usually hand-pollinate my flowers in the morning, when the pollen is most viable.
5. Pest and Disease Control: Keep an eye out for pests and diseases. Common pests that can affect sponge gourds include aphids, spider mites, and whiteflies. You can control these pests with insecticidal soap or neem oil. Fungal diseases can also be a problem, especially in humid environments. To prevent fungal diseases, ensure good airflow around your plants and avoid overwatering. If you notice any signs of disease, treat the plants with a fungicide. I regularly inspect my plants for pests and diseases and take action as soon as I notice any problems.
6. Provide Adequate Light: Ensure your plants are getting enough light. If you’re using grow lights, adjust the height and intensity as needed. Sponge gourds need at least 6-8 hours of light per day. I usually keep my grow lights on for 14-16 hours per day.
7. Maintain Good Airflow: Good airflow is essential for preventing fungal diseases. You can improve airflow by opening windows or using a fan. I have a small oscillating fan that I keep running in my growing space to ensure good air circulation.
Phase 4: Harvesting and Processing Your Sponge Gourds
The moment you’ve been waiting for! Harvesting your homegrown loofah sponges is incredibly rewarding.
1. Harvesting: Sponge gourds are ready to harvest when they turn yellow or brown and the skin starts to dry out. The gourd should feel lightweight and the seeds should rattle inside. I usually wait until the gourd is completely dry before harvesting.
2. Peeling: Once you’ve harvested your gourds, it’s time to peel them. You can do this by soaking the gourds in water for a few days to soften the skin, or you can simply peel them with your hands. I find that soaking them makes the peeling process easier.
3. Seed Removal: After peeling, remove the seeds from the gourd. You can save these seeds for planting next year. I usually spread the seeds out on a paper towel to dry before storing them in an airtight container.
4. Washing and Drying: Wash the sponge thoroughly with water to remove any remaining pulp. Then, hang the sponge to dry in a well-
Conclusion
So, there you have it! Growing sponge gourd indoors might seem like a challenge, but with a little planning and these simple DIY tricks, you can absolutely enjoy fresh, homegrown gourds even without a sprawling outdoor garden. We’ve covered everything from seed starting and choosing the right container to providing adequate support and ensuring proper pollination. The beauty of this method lies in its accessibility and control. You’re no longer at the mercy of unpredictable weather or limited space. You become the master of your own miniature gourd farm!
Why is this DIY trick a must-try? Because it empowers you to cultivate a unique and delicious vegetable right in your home. Imagine the satisfaction of harvesting your own sponge gourd, knowing you nurtured it from a tiny seed to a thriving vine. Think of the fresh, vibrant flavor you can add to your stir-fries, soups, and curries. And consider the sheer novelty of showing off your indoor gourd-growing prowess to friends and family. It’s a conversation starter, a culinary adventure, and a testament to your green thumb, all rolled into one.
But don’t stop there! Experiment with different varieties of sponge gourd. Try growing the smaller, more compact cultivars if space is truly limited. Consider adding companion plants like marigolds or basil to deter pests naturally. You can also explore different trellising methods to find what works best for your space and aesthetic preferences. Perhaps a decorative bamboo structure or a simple string system – the possibilities are endless.
And speaking of possibilities, think about the variations you can introduce to the growing process itself. Some gardeners have found success using hydroponic systems for indoor gourd cultivation, while others swear by incorporating worm castings into their soil mix for added nutrients. The key is to observe your plants closely, listen to their needs, and adapt your approach accordingly.
Ultimately, the success of your indoor sponge gourd growing endeavor hinges on your willingness to experiment, learn, and adapt. Don’t be afraid to make mistakes – they’re valuable learning opportunities. And most importantly, don’t forget to enjoy the process! There’s something incredibly rewarding about nurturing a plant from seed to harvest, especially when that plant yields such a delicious and versatile vegetable.
We wholeheartedly encourage you to give this DIY trick a try. It’s a fun, rewarding, and ultimately delicious way to connect with nature and expand your culinary horizons. And once you’ve harvested your first indoor sponge gourd, we’d love to hear about your experience! Share your photos, tips, and stories in the comments below. Let’s create a community of indoor gourd growers and inspire others to embark on this exciting journey. Let us know what worked for you, what challenges you faced, and what delicious dishes you created with your homegrown bounty. Your insights could be invaluable to other aspiring gourd growers. So, grab your seeds, prepare your pots, and get ready to experience the joy of growing sponge gourd indoors! This is your chance to master the art of indoor sponge gourd growing and enjoy the fruits (or rather, vegetables) of your labor.
Frequently Asked Questions (FAQ)
What is the ideal temperature for growing sponge gourd indoors?
Sponge gourd thrives in warm temperatures, ideally between 70°F and 85°F (21°C and 29°C). Maintaining a consistent temperature is crucial, especially during the germination and early growth stages. If your indoor environment tends to be cooler, consider using a heat mat or grow lights to provide supplemental warmth. Avoid placing your plants near drafty windows or doors, as sudden temperature fluctuations can stress them. Monitoring the temperature regularly with a thermometer will help you ensure optimal growing conditions.
How much sunlight does indoor sponge gourd need?
Sponge gourd requires at least 6-8 hours of direct sunlight per day to thrive. If you don’t have a south-facing window that provides sufficient sunlight, you’ll need to supplement with grow lights. Full-spectrum LED grow lights are an excellent option, as they provide the necessary wavelengths for photosynthesis without generating excessive heat. Position the grow lights a few inches above the plants and adjust the height as they grow. Rotate the plants regularly to ensure even light exposure on all sides. Insufficient sunlight can lead to leggy growth, reduced flowering, and smaller fruit.
What type of soil is best for growing sponge gourd in containers?
A well-draining, nutrient-rich potting mix is essential for growing sponge gourd in containers. Avoid using garden soil, as it tends to compact and doesn’t provide adequate drainage. A good potting mix should consist of a combination of peat moss, perlite, and vermiculite. You can also amend the mix with compost or aged manure to provide additional nutrients. Ensure that the pH of the soil is slightly acidic to neutral, around 6.0 to 7.0. Proper soil drainage is crucial to prevent root rot, which can be a common problem in container gardening.
How often should I water my indoor sponge gourd plants?
Water your sponge gourd plants regularly, keeping the soil consistently moist but not waterlogged. The frequency of watering will depend on factors such as the size of the container, the temperature, and the humidity level. Check the soil moisture by inserting your finger about an inch deep. If the soil feels dry, it’s time to water. Water deeply, allowing the excess water to drain out of the bottom of the container. Avoid overhead watering, as it can promote fungal diseases. During hot weather, you may need to water more frequently.
How do I pollinate my indoor sponge gourd flowers?
Sponge gourd plants have separate male and female flowers. In an outdoor setting, pollination is typically carried out by insects. However, indoors, you’ll need to hand-pollinate the flowers to ensure fruit production. Identify the male and female flowers – the female flowers have a small, immature gourd at the base. Use a small paintbrush or cotton swab to collect pollen from the male flower and gently transfer it to the stigma of the female flower. It’s best to pollinate in the morning when the flowers are fully open. Repeat the process for several days to increase the chances of successful pollination.
What kind of support system does sponge gourd need indoors?
Sponge gourd vines can grow quite long, so they require a sturdy support system to climb on. A trellis, bamboo stakes, or even a sturdy tomato cage can be used. Ensure that the support system is tall enough to accommodate the mature size of the vine. Train the vines to climb the support system by gently guiding them and tying them loosely with twine or plant ties. A well-supported vine will be less prone to breakage and will produce more fruit.
How do I fertilize my indoor sponge gourd plants?
Sponge gourd plants are heavy feeders and require regular fertilization to thrive. Use a balanced liquid fertilizer, such as a 20-20-20, diluted to half strength. Fertilize every two weeks during the growing season. You can also supplement with organic fertilizers, such as compost tea or fish emulsion. Avoid over-fertilizing, as it can lead to excessive foliage growth and reduced fruit production. Monitor the plants for signs of nutrient deficiencies, such as yellowing leaves, and adjust the fertilization accordingly.
What are some common pests and diseases that affect sponge gourd, and how can I prevent them indoors?
Common pests that can affect sponge gourd include aphids, spider mites, and whiteflies. Regularly inspect your plants for signs of infestation, such as sticky residue, webbing, or distorted leaves. Treat infestations promptly with insecticidal soap or neem oil. To prevent pests, maintain good air circulation, keep the growing area clean, and avoid overwatering. Common diseases that can affect sponge gourd include powdery mildew and fungal leaf spots. Prevent these diseases by providing good air circulation, avoiding overhead watering, and removing any infected leaves promptly. You can also use a fungicide if necessary.
When can I harvest my indoor sponge gourd?
The time to harvest sponge gourd depends on the variety and your personal preference. Generally, sponge gourds are ready to harvest when they are about 8-12 inches long and still tender. The skin should be smooth and green. Use a sharp knife or pruning shears to cut the gourd from the vine, leaving a short stem attached. Overripe gourds will become tough and fibrous. Harvest regularly to encourage continued fruit production.
Can I save seeds from my indoor sponge gourd for future planting?
Yes, you can save seeds from your indoor sponge gourd for future planting. Allow a few gourds to mature fully on the vine until they turn brown and dry. Once the gourds are completely dry, cut them open and remove the seeds. Wash the seeds thoroughly and allow them to dry completely before storing them in an airtight container in a cool, dark place. Keep in mind that seeds saved from hybrid varieties may not produce plants that are true to type.

Leave a Comment