
Balcony Mint Growing Tips: Unlock the secrets to a thriving herb garden, even in the smallest of spaces! Have you ever dreamed of stepping onto your balcony and snipping fresh mint for a refreshing mojito or a fragrant cup of tea? I know I have! But the reality of limited space can often feel like a barrier to achieving that green oasis. Well, fret no more! This article is your ultimate guide to mastering the art of balcony mint growing.
Mint, with its vibrant history stretching back to ancient Egypt where it was used for medicinal purposes and in religious ceremonies, has always been a beloved herb. Its invigorating aroma and versatile uses have made it a staple in cuisines and cultures worldwide. But let’s face it, mint can be a bit of a garden bully, spreading aggressively if left unchecked. That’s where balcony gardening comes in – it’s the perfect way to contain this flavorful herb and enjoy its benefits without the worry of it taking over your entire yard.
In this DIY guide, I’ll share my tried-and-true balcony mint growing tips, from choosing the right container and soil to providing the perfect amount of sunlight and water. I’ll also reveal some clever hacks to keep your mint thriving and prevent common problems. Whether you’re a seasoned gardener or a complete beginner, these easy-to-follow instructions will empower you to create a lush and fragrant mint garden right on your balcony. Get ready to transform your outdoor space into a haven of fresh herbs and delightful aromas!
Growing Mint on Your Balcony: A DIY Guide for Fresh Flavor
Okay, so you want to grow mint on your balcony? Awesome! Fresh mint is a game-changer for everything from mojitos to teas to adding a vibrant touch to your cooking. And the best part? It’s surprisingly easy, even if you don’t have a green thumb. I’m going to walk you through everything you need to know to have a thriving mint patch right outside your door.
Choosing the Right Mint Variety
First things first, let’s talk about mint varieties. There’s more than just “mint” out there! Each type has a slightly different flavor profile, so picking the right one is key.
* **Peppermint:** This is your classic, strong mint flavor, perfect for teas and desserts.
* **Spearmint:** Milder and sweeter than peppermint, spearmint is fantastic in mojitos and savory dishes.
* **Chocolate Mint:** Yes, you read that right! It has a subtle chocolatey aroma and flavor, making it a fun addition to desserts and drinks.
* **Apple Mint:** A fruity and slightly fuzzy variety, great for adding a refreshing twist to salads and beverages.
* **Orange Mint:** As the name suggests, it has a citrusy aroma and flavor, perfect for adding a zesty touch to your creations.
I personally love having both peppermint and spearmint on hand, but feel free to experiment and find your favorites! You can usually find these at your local garden center or even online.
Essential Supplies for Your Balcony Mint Garden
Before we get our hands dirty, let’s gather all the supplies we’ll need. This will make the whole process much smoother.
* **Pots or Containers:** Choose pots that are at least 12 inches in diameter. Mint spreads like crazy, so giving it ample space is crucial. Make sure your pots have drainage holes!
* **Potting Soil:** Use a good quality potting mix. Avoid using garden soil, as it can become compacted in containers.
* **Mint Seeds or Seedlings:** You can start from seeds, but I find that seedlings are much easier and faster.
* **Watering Can or Hose:** For regular watering.
* **Gardening Gloves (Optional):** To keep your hands clean.
* **Small Trowel or Shovel:** For planting.
* **Fertilizer (Optional):** A balanced liquid fertilizer can help your mint thrive.
* **Pruning Shears or Scissors:** For harvesting and maintaining your mint.
Step-by-Step Planting Guide
Alright, let’s get planting! This is the fun part.
1. **Prepare Your Pots:** Fill your pots with potting mix, leaving about an inch of space at the top.
2. **Planting Seedlings:** If you’re using seedlings, gently remove them from their containers. Loosen the roots a bit with your fingers.
3. **Dig a Hole:** Dig a small hole in the potting mix, large enough to accommodate the root ball of the seedling.
4. **Place the Seedling:** Place the seedling in the hole and gently backfill with potting mix. Make sure the top of the root ball is level with the soil surface.
5. **Planting Seeds (Alternative):** If you’re starting from seeds, sprinkle them evenly over the surface of the potting mix. Cover them with a thin layer of soil.
6. **Water Thoroughly:** Water the pots thoroughly until water drains out of the drainage holes. This helps settle the soil and get the roots off to a good start.
7. **Label Your Pots:** This is especially important if you’re planting multiple varieties of mint. You don’t want to mix them up!
Finding the Perfect Spot on Your Balcony
Mint loves sunlight, but it can also tolerate partial shade. Here’s what to consider when choosing a location on your balcony:
* **Sunlight:** Aim for at least 4-6 hours of sunlight per day. A south-facing balcony is ideal, but east or west-facing balconies can also work.
* **Protection from Wind:** Strong winds can dry out your mint plants, so try to find a spot that’s somewhat sheltered.
* **Accessibility:** Choose a spot that’s easy to access for watering and harvesting.
Watering and Feeding Your Mint
Proper watering is crucial for healthy mint plants. Here’s what you need to know:
* **Watering Frequency:** Water your mint plants whenever the top inch of soil feels dry to the touch. In hot weather, you may need to water them daily.
* **Watering Technique:** Water thoroughly, until water drains out of the drainage holes. Avoid getting the leaves wet, as this can lead to fungal diseases.
* **Fertilizing (Optional):** If you want to give your mint plants a boost, you can fertilize them every 2-4 weeks with a balanced liquid fertilizer. Follow the instructions on the fertilizer label.
Harvesting Your Mint
Harvesting your mint regularly encourages new growth and keeps your plants looking their best.
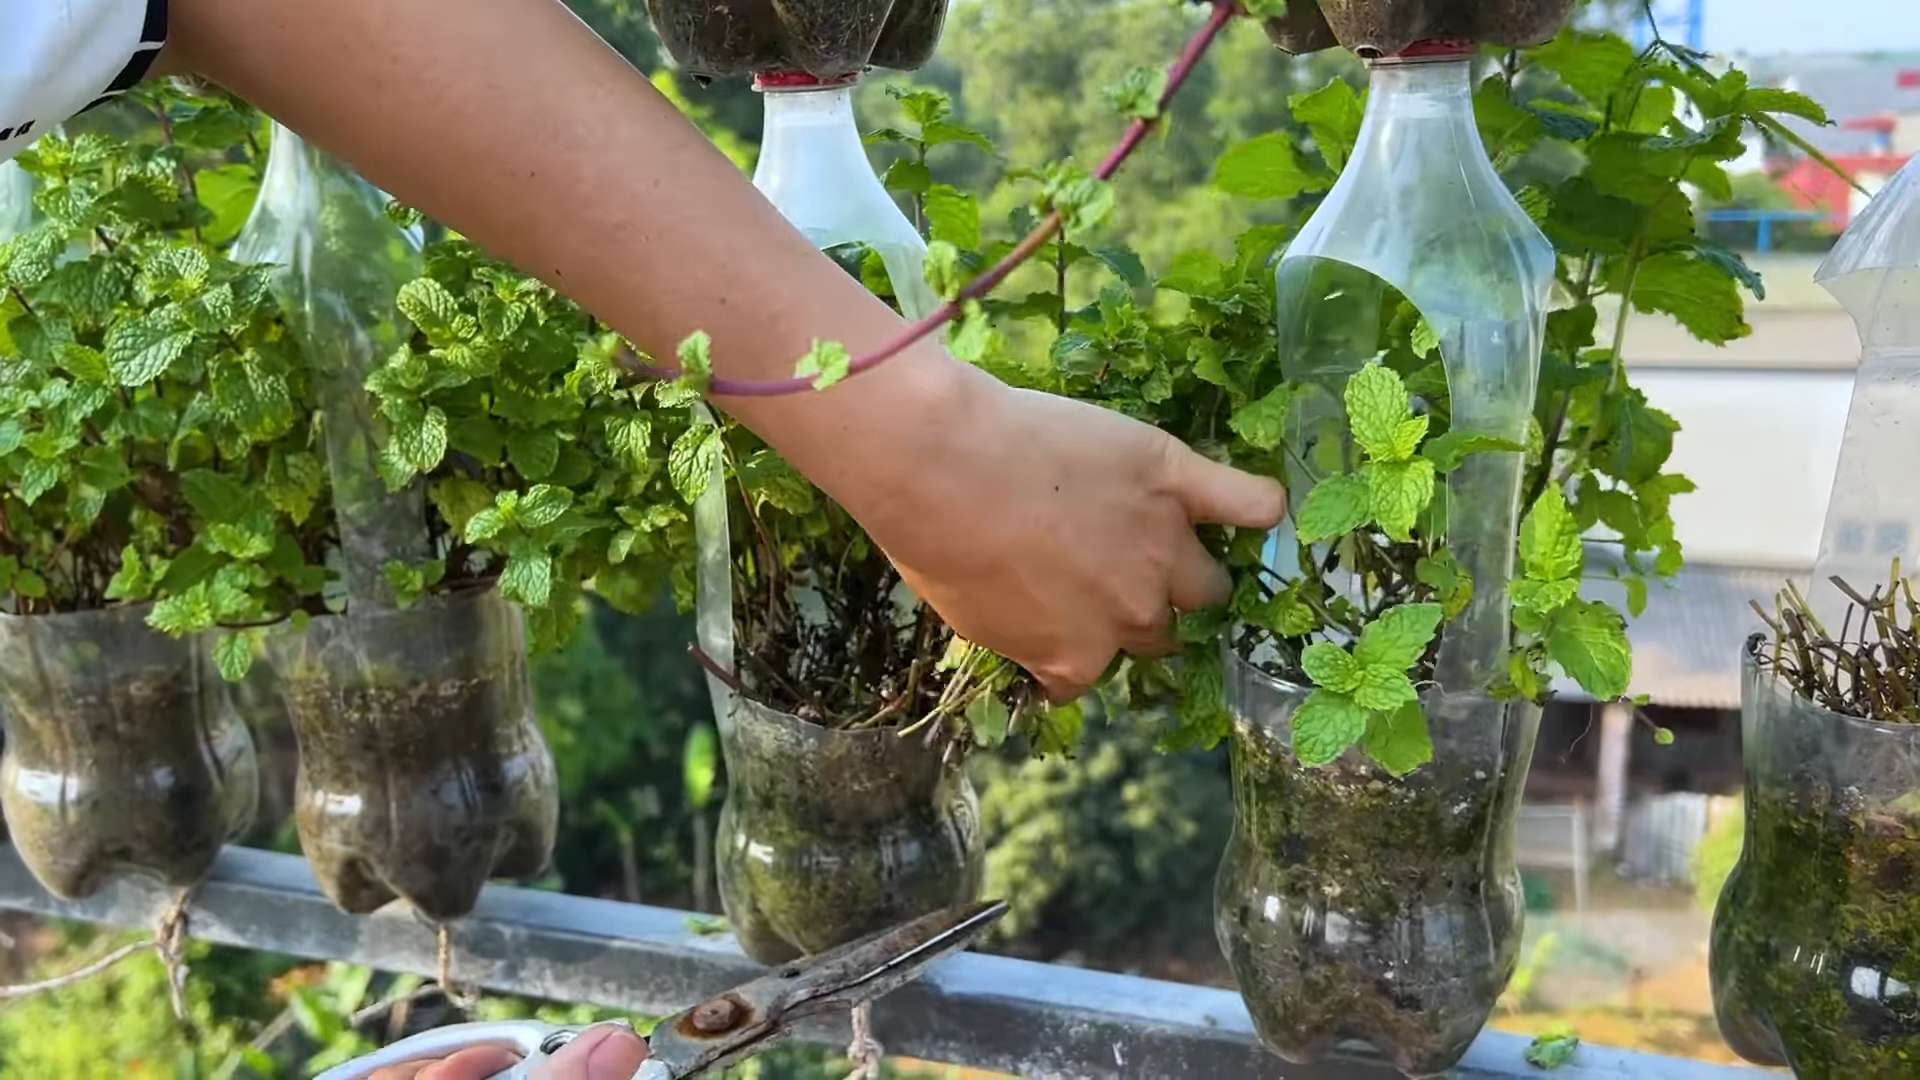
* **When to Harvest:** You can start harvesting mint as soon as the plants are a few inches tall.
* **How to Harvest:** Use pruning shears or scissors to cut off stems just above a leaf node (the point where leaves grow out of the stem). This will encourage the plant to branch out and produce more leaves.
* **Harvesting Technique:** Don’t remove more than one-third of the plant at a time. This will give it time to recover and continue growing.
* **Preserving Your Harvest:** Fresh mint is best, but you can also dry it for later use. To dry mint, hang the stems upside down in a cool, dry place until the leaves are brittle. You can then crumble the leaves and store them in an airtight container.
Dealing with Common Mint Problems
Mint is generally easy to grow, but it can be susceptible to a few problems. Here’s what to watch out for:
* **Powdery Mildew:** This is a fungal disease that appears as a white, powdery coating on the leaves. To prevent powdery mildew, make sure your plants have good air circulation and avoid getting the leaves wet when watering. If you see signs of powdery mildew, you can treat it with a fungicide.
* **Aphids:** These tiny insects can suck the sap from your mint plants, causing them to become weak and stunted. You can get rid of aphids by spraying them with a strong stream of water or by using an insecticidal soap.
* **Rust:** This is another fungal disease that appears as orange or brown spots on the leaves. To prevent rust, make sure your plants have good air circulation and avoid getting the leaves wet when watering. If you see signs of rust, you can treat it with a fungicide.
* Mint’s Aggressive Nature: This isn’t really a “problem” per se, but it’s something you need to be aware of. Mint spreads like crazy! That’s why it’s so important to grow it in containers. If you plant it directly in the ground, it will quickly take over your entire garden.
Keeping Mint Contained: The Key to Balcony Harmony
I cannot stress this enough: mint is a spreader. It’s like the energizer bunny of the plant world. It just keeps going and going. That’s why containing it is absolutely crucial for balcony success.
* Container Gardening is a Must: Never, ever plant mint directly in your balcony garden bed (if you have one). Always use pots or containers.
* Consider a Double Potting System: For extra security, you can place your mint pot inside a larger pot. This creates a barrier that can help prevent the mint from sending out runners through the drainage holes.
* Regularly Check for Escapees: Even with precautions, mint can sometimes find a way to escape. Regularly inspect the area around your mint pots for any runners that may be trying to take root. Pull them out immediately.
Mint Propagation: Expanding Your Balcony Garden
Once you have a thriving mint plant, you can easily propagate it to create even more plants. This is a great way to expand your balcony garden or share mint with friends and family.
* Stem Cuttings: This is the easiest method. Simply cut off a stem that’s a few inches long, remove the lower leaves, and place the stem in a glass of water. Roots will typically start to form within a week or two. Once the roots are a few inches long, you can plant the cutting in a pot of potting mix.
* Root Division: This method is best done in the spring or fall. Carefully remove the mint plant from its pot and gently divide the root ball into several sections. Each section should have its own roots and stems. Plant each section in its own pot.
Creative Uses for Your Balcony Mint
Now that you have a bountiful supply of fresh mint, let’s talk about some creative ways to use it!
* Culinary Delights:
* **Mojitos and Mint Juleps:** The classic mint cocktails.
* **Mint Tea:** A refreshing and soothing beverage.

Conclusion
So, there you have it! Transforming your balcony into a fragrant, mint-filled oasis is not only achievable, but surprisingly simple. We’ve walked you through the essential steps, from selecting the right container and soil to providing the perfect amount of sunlight and water. But why is this DIY balcony mint growing trick a must-try?
Firstly, imagine stepping onto your balcony and being greeted by the invigorating scent of fresh mint. It’s an instant mood booster, a natural aromatherapy session right at your doorstep. Secondly, having a readily available supply of mint means you can elevate your culinary creations with ease. Think refreshing mojitos on a warm evening, a sprig of mint to garnish your iced tea, or a flavorful addition to your salads and sauces. Forget those wilted, overpriced bunches from the grocery store – you’ll have vibrant, organic mint at your fingertips.
Beyond the immediate benefits, growing your own mint is a rewarding experience in itself. It connects you to nature, even in the heart of the city, and provides a sense of accomplishment as you watch your plants thrive. Plus, it’s an incredibly sustainable practice, reducing your reliance on commercially grown produce and minimizing your carbon footprint.
But don’t stop there! Experiment with different varieties of mint to discover your favorites. Peppermint, spearmint, chocolate mint, even apple mint – the possibilities are endless. You can also try companion planting, pairing your mint with other herbs like rosemary or thyme to create a miniature herb garden on your balcony. Consider using vertical planters to maximize space and add visual interest. Get creative with your container choices, repurposing old buckets or baskets for a rustic, eco-friendly look.
Ready to embark on your balcony mint growing adventure? We encourage you to give this DIY trick a try. It’s a simple, affordable, and incredibly rewarding way to bring a touch of nature into your urban life. And most importantly, don’t forget to share your experiences with us! We’d love to see photos of your thriving mint plants and hear about your favorite ways to use your homegrown harvest. Share your tips, tricks, and triumphs in the comments below – let’s create a community of balcony mint enthusiasts! Your success story could inspire others to discover the joys of growing their own fresh herbs. So, grab your pots, soil, and mint seedlings, and get ready to transform your balcony into a fragrant, flavorful paradise. Happy growing!
Frequently Asked Questions (FAQ)
1. What is the best type of container for growing mint on a balcony?
The best type of container for growing mint on a balcony is one that provides adequate drainage and is large enough to accommodate the plant’s root system. Mint can be quite invasive, so it’s generally recommended to grow it in a container rather than directly in the ground. Opt for pots made of terracotta, plastic, or even repurposed materials like buckets or baskets. Ensure the container has drainage holes to prevent waterlogging, which can lead to root rot. A container that is at least 12 inches in diameter and 12 inches deep is ideal for allowing the mint to spread and thrive. Consider the weight of the container, especially if your balcony has weight restrictions. Lightweight plastic pots might be a better option than heavy terracotta ones in some cases.
2. What kind of soil should I use for my balcony mint?
Mint thrives in well-draining, fertile soil. A good potting mix specifically formulated for herbs is an excellent choice. You can also create your own mix by combining equal parts of potting soil, compost, and perlite or vermiculite. The compost provides essential nutrients, while the perlite or vermiculite improves drainage and aeration. Avoid using garden soil, as it can be too heavy and compact, hindering root growth. Before planting, amend the soil with a slow-release fertilizer to provide a steady supply of nutrients throughout the growing season. Regularly replenishing the soil with compost will also help maintain its fertility and structure.
3. How much sunlight does balcony mint need?
Mint prefers partial shade to full sun, but it will generally thrive best with at least 4-6 hours of sunlight per day. On a balcony, this might mean placing your mint in a location that receives morning sun and afternoon shade, especially in hotter climates. Too much intense afternoon sun can scorch the leaves. If your balcony is mostly shaded, you can supplement with grow lights to ensure your mint receives enough light. Observe your mint plants closely. If the leaves are pale or leggy, it might indicate that they are not getting enough sunlight. If the leaves are scorched or wilted, it might mean they are getting too much direct sun. Adjust the location of your containers accordingly.
4. How often should I water my balcony mint?
Watering frequency depends on several factors, including the weather, the type of container, and the soil. Generally, you should water your balcony mint when the top inch of soil feels dry to the touch. Avoid overwatering, as this can lead to root rot. During hot, dry weather, you might need to water daily, while during cooler, wetter periods, you might only need to water every few days. Use a watering can or hose with a gentle spray nozzle to avoid damaging the leaves. Water deeply, ensuring that the water reaches the roots. Check the drainage holes to make sure the water is draining properly. If the water is pooling on the surface of the soil, it might indicate that the soil is compacted or that the drainage holes are blocked.
5. How do I harvest mint from my balcony garden?
Harvesting mint is easy and encourages the plant to grow bushier. Simply snip off stems with scissors or pruning shears, cutting just above a leaf node (the point where leaves grow from the stem). This will encourage new growth from that point. You can harvest mint throughout the growing season, but avoid removing more than one-third of the plant at a time. The best time to harvest mint is in the morning, after the dew has dried but before the sun gets too hot. This is when the leaves are at their most flavorful. You can use the fresh mint immediately or store it in the refrigerator for a few days. To dry mint, hang the stems upside down in a cool, dark, and well-ventilated place.
6. How do I prevent mint from spreading too much in its container?
Mint is known for its invasive nature, so it’s important to keep it contained, even in a pot. Regular pruning is key to preventing it from becoming too unruly. Trim back the stems regularly to encourage bushier growth and prevent the plant from flowering, which can weaken it. You can also use a barrier, such as a plastic liner, inside the container to prevent the roots from spreading to other parts of the pot. If you notice runners (stems that grow horizontally along the surface of the soil) emerging from the container, trim them off immediately. Repotting the mint every year or two will also help to control its growth and refresh the soil.
7. What are some common pests and diseases that affect balcony mint?
While mint is relatively pest-resistant, it can be susceptible to certain pests and diseases, especially in humid conditions. Common pests include aphids, spider mites, and whiteflies. These pests can be controlled with insecticidal soap or neem oil. Diseases that can affect mint include powdery mildew and rust. Powdery mildew appears as a white, powdery coating on the leaves, while rust appears as orange or brown spots. To prevent these diseases, ensure good air circulation around the plants and avoid overwatering. If you notice signs of pests or diseases, treat them promptly to prevent them from spreading. Remove any affected leaves or stems and dispose of them properly.
8. Can I grow different varieties of mint in the same container?
While it’s technically possible to grow different varieties of mint in the same container, it’s generally not recommended. Mint varieties can cross-pollinate, which can result in unpredictable flavors and growth habits. Additionally, some varieties may be more aggressive than others and outcompete their neighbors. If you want to grow multiple varieties of mint, it’s best to keep them in separate containers to maintain their distinct characteristics. This will also allow you to control their growth and prevent them from becoming entangled.
9. How do I overwinter my balcony mint?
Mint is a perennial plant, meaning it can survive for multiple years. However, in colder climates, it might need some protection during the winter months. Before the first frost, trim back the mint to a few inches above the soil. Move the container to a sheltered location, such as a garage or shed, or wrap it in burlap to protect the roots from freezing. Water sparingly during the winter, only when the soil feels dry. In the spring, once the weather warms up, move the container back to its sunny location and resume regular watering and fertilizing. You can also propagate mint from cuttings in the fall to ensure you have new plants for the following spring.
10. What are some creative ways to use my balcony-grown mint?
Beyond the classic mojitos and mint tea, there are countless ways to incorporate your balcony-grown mint into your culinary creations and beyond. Add it to salads, sauces, and soups for a refreshing flavor boost. Use it to garnish desserts, such as chocolate mousse or fruit salads. Infuse it into water or lemonade for a refreshing drink. Make mint-infused oil or vinegar for salad dressings. You can even use mint to make homemade beauty products, such as face masks or scrubs. The possibilities are


Leave a Comment