
Grow Rutabaga and Swede at Home? Absolutely! I know what you might be thinking: “Rutabaga and Swede? Aren’t those the slightly intimidating vegetables lurking in the produce aisle?” Well, fear not, my friend! I’m here to tell you that growing these nutritional powerhouses in your own backyard is not only achievable but surprisingly rewarding. Forget those bland, store-bought versions; imagine the sweet, earthy flavor of freshly harvested rutabagas and swedes gracing your dinner table.
These root vegetables have a rich history, particularly in Northern Europe, where they’ve been a staple for centuries, providing sustenance through long, harsh winters. Think of them as the unsung heroes of the vegetable world! But why should you bother growing them yourself? In today’s world, where we’re increasingly conscious of where our food comes from and eager to embrace sustainable practices, grow rutabaga and swede at home allows you to control the entire process, from seed to plate. You’ll avoid harmful pesticides, reduce your carbon footprint, and enjoy a flavor that simply can’t be matched by commercially grown produce. Plus, let’s be honest, there’s something incredibly satisfying about nurturing a plant from a tiny seed to a bountiful harvest. So, let’s dive into the simple DIY tricks and hacks that will have you enjoying homegrown rutabagas and swedes in no time!
Growing Rutabaga and Swede at Home: A Gardener’s Guide
Okay, so you want to grow your own rutabagas and swedes? Awesome! These root vegetables are surprisingly easy to cultivate, and nothing beats the taste of homegrown produce. I’m going to walk you through everything you need to know, from choosing the right variety to harvesting your bounty. Let’s get started!
Choosing Your Variety
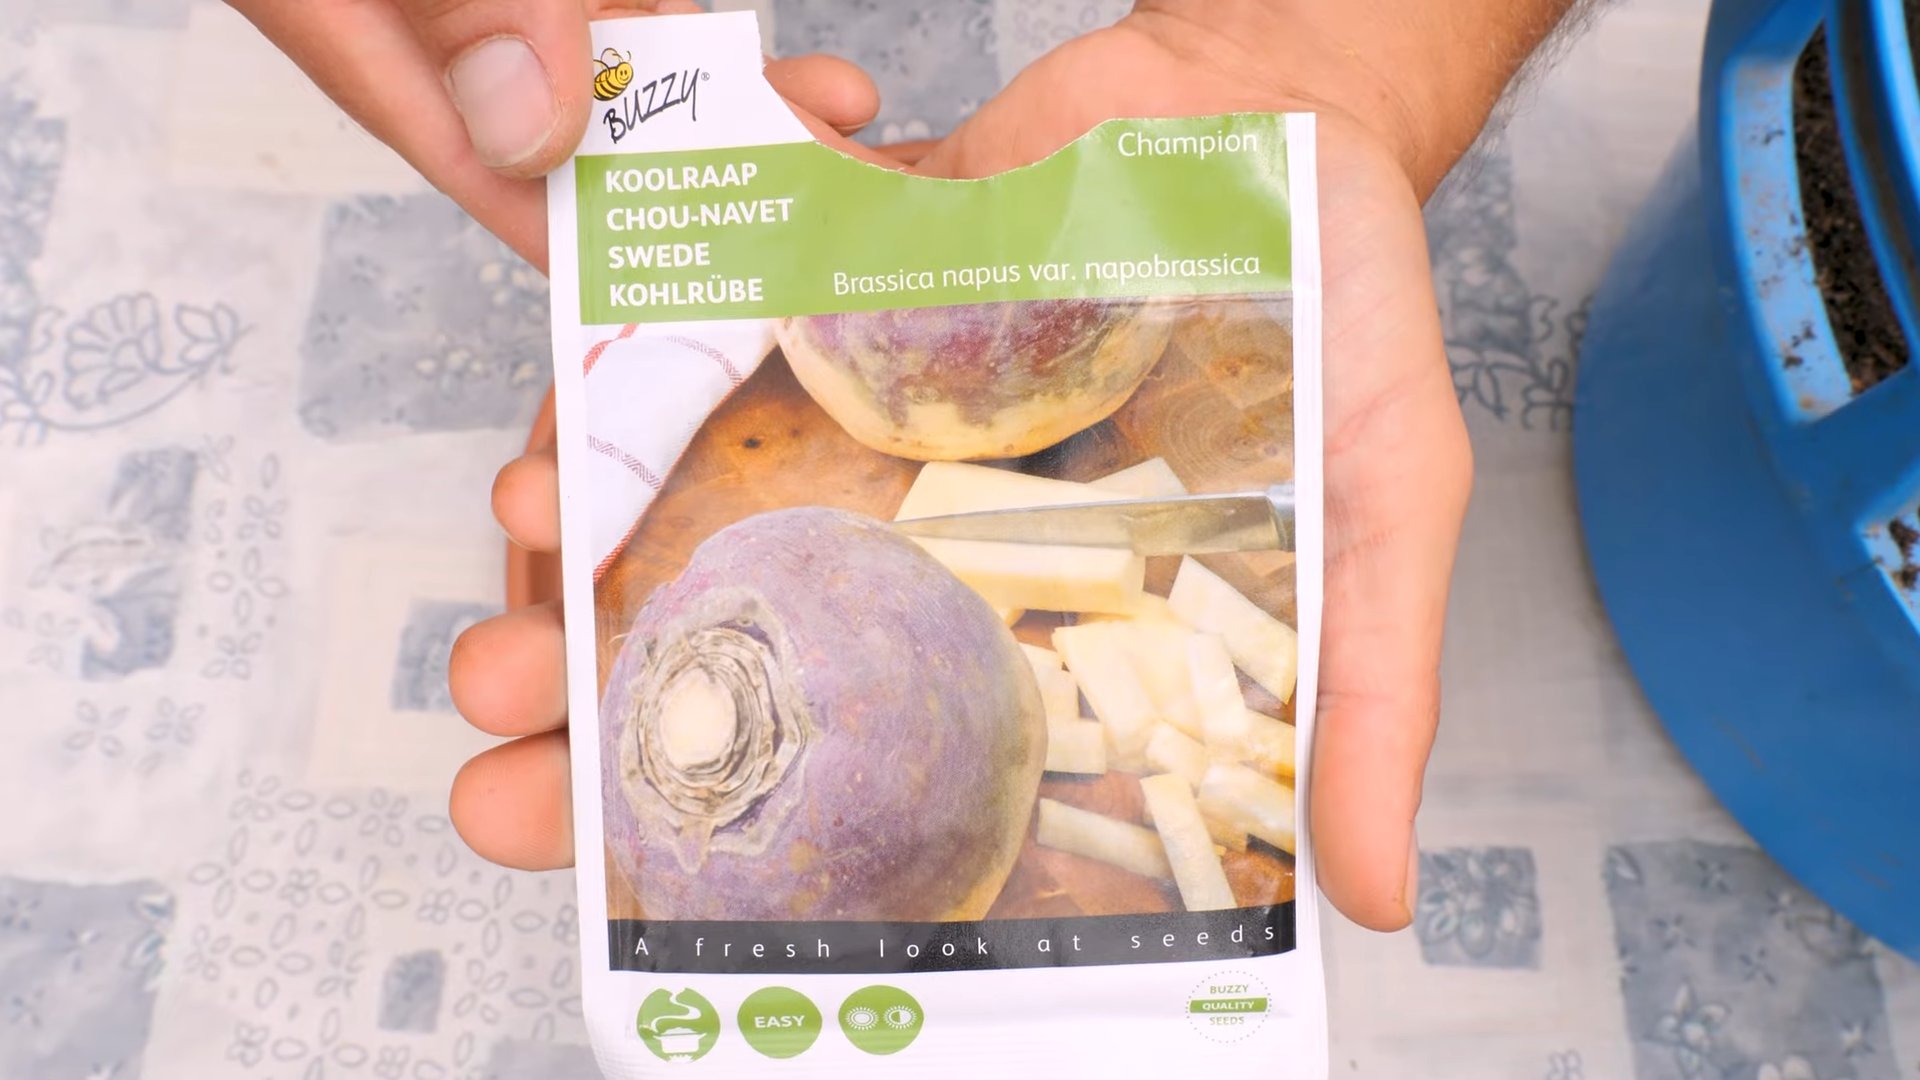
First things first, let’s talk about varieties. While often used interchangeably, rutabagas and swedes are actually the same plant! “Swede” is the common name used in the UK and some other parts of the world, while “rutabaga” is more common in North America. So, don’t get confused! When you’re looking at seed packets, you’ll likely see them labeled as either.
Here are a few popular and reliable varieties to consider:
* ‘American Purple Top’: This is a classic rutabaga, known for its large size, purple top, and yellow flesh. It’s a great all-around choice.
* ‘Laurentian’: Another popular variety, ‘Laurentian’ is known for its smooth skin and sweet flavor. It stores well, making it a good option for winter eating.
* ‘Joan’: If you’re looking for something a little different, ‘Joan’ is a white-fleshed variety with a mild flavor.
* ‘Marian’: This variety is known for its disease resistance, making it a good choice for beginners.
Preparing the Soil
Rutabagas and swedes need well-drained, fertile soil to thrive. Here’s how to get your soil ready:
* Timing is Key: The best time to plant rutabagas and swedes is in mid-summer, about 90-100 days before the first expected frost. This gives them plenty of time to mature before the cold weather sets in.
* Soil Testing: Before you do anything, it’s a good idea to get your soil tested. This will tell you the pH level and nutrient content. Rutabagas and swedes prefer a slightly acidic soil, with a pH between 6.0 and 6.8.
* Amendments: Based on your soil test results, you may need to add amendments. If your soil is too acidic, add lime to raise the pH. If it’s too alkaline, add sulfur to lower it.
* Organic Matter: Incorporate plenty of organic matter, such as compost or well-rotted manure, into the soil. This will improve drainage, fertility, and water retention. Aim for at least 2-3 inches of organic matter.
* Fertilizing: Rutabagas and swedes are heavy feeders, so they need plenty of nutrients. Before planting, work in a balanced fertilizer, such as 10-10-10, according to the package directions.
Planting Your Seeds
Now comes the fun part – planting! Here’s how to get your seeds in the ground:
1. Create Furrows: Use a hoe or trowel to create furrows in the soil, about 1/2 inch deep and 18-24 inches apart.
2. Sow the Seeds: Sow the seeds thinly in the furrows, about 1 inch apart. Rutabaga seeds are tiny, so don’t worry if you accidentally sow them a little too thickly.
3. Cover the Seeds: Gently cover the seeds with soil and pat it down lightly.
4. Water Thoroughly: Water the area thoroughly with a gentle spray. Keep the soil moist until the seeds germinate.
5. Thinning Seedlings: Once the seedlings emerge and have a few true leaves, thin them to 6-8 inches apart. This will give them enough room to grow and develop. Don’t be afraid to be ruthless! It’s better to have fewer, healthier plants than a crowded mess.
Caring for Your Plants
Rutabagas and swedes are relatively low-maintenance plants, but they do need some care to thrive. Here’s what you need to do:
* Watering: Water regularly, especially during dry periods. Rutabagas and swedes need consistent moisture to develop large, healthy roots. Aim for about 1 inch of water per week.
* Weeding: Keep the area around your plants free of weeds. Weeds compete with your rutabagas and swedes for water and nutrients. Hand-pull weeds regularly or use a hoe to cultivate the soil.
* Fertilizing: Side-dress your plants with a nitrogen-rich fertilizer about 4-6 weeks after planting. This will give them a boost of energy and help them grow.
* Pest Control: Keep an eye out for pests, such as aphids, flea beetles, and cabbage worms. If you see any pests, treat them with an appropriate insecticide or organic pest control method. I prefer using insecticidal soap or neem oil for organic control.
* Disease Prevention: Rutabagas and swedes are susceptible to some diseases, such as clubroot and powdery mildew. To prevent these diseases, practice good crop rotation and avoid planting rutabagas and swedes in the same area year after year. Also, ensure good air circulation around your plants.
Harvesting Your Rutabagas and Swedes
The moment you’ve been waiting for! Harvesting your delicious root vegetables.
1. Timing: Rutabagas and swedes are typically ready to harvest in the fall, about 90-100 days after planting. The roots should be about 4-6 inches in diameter.
2. Loosening the Soil: Before you start pulling, loosen the soil around the roots with a garden fork or trowel. This will make it easier to pull them out of the ground.
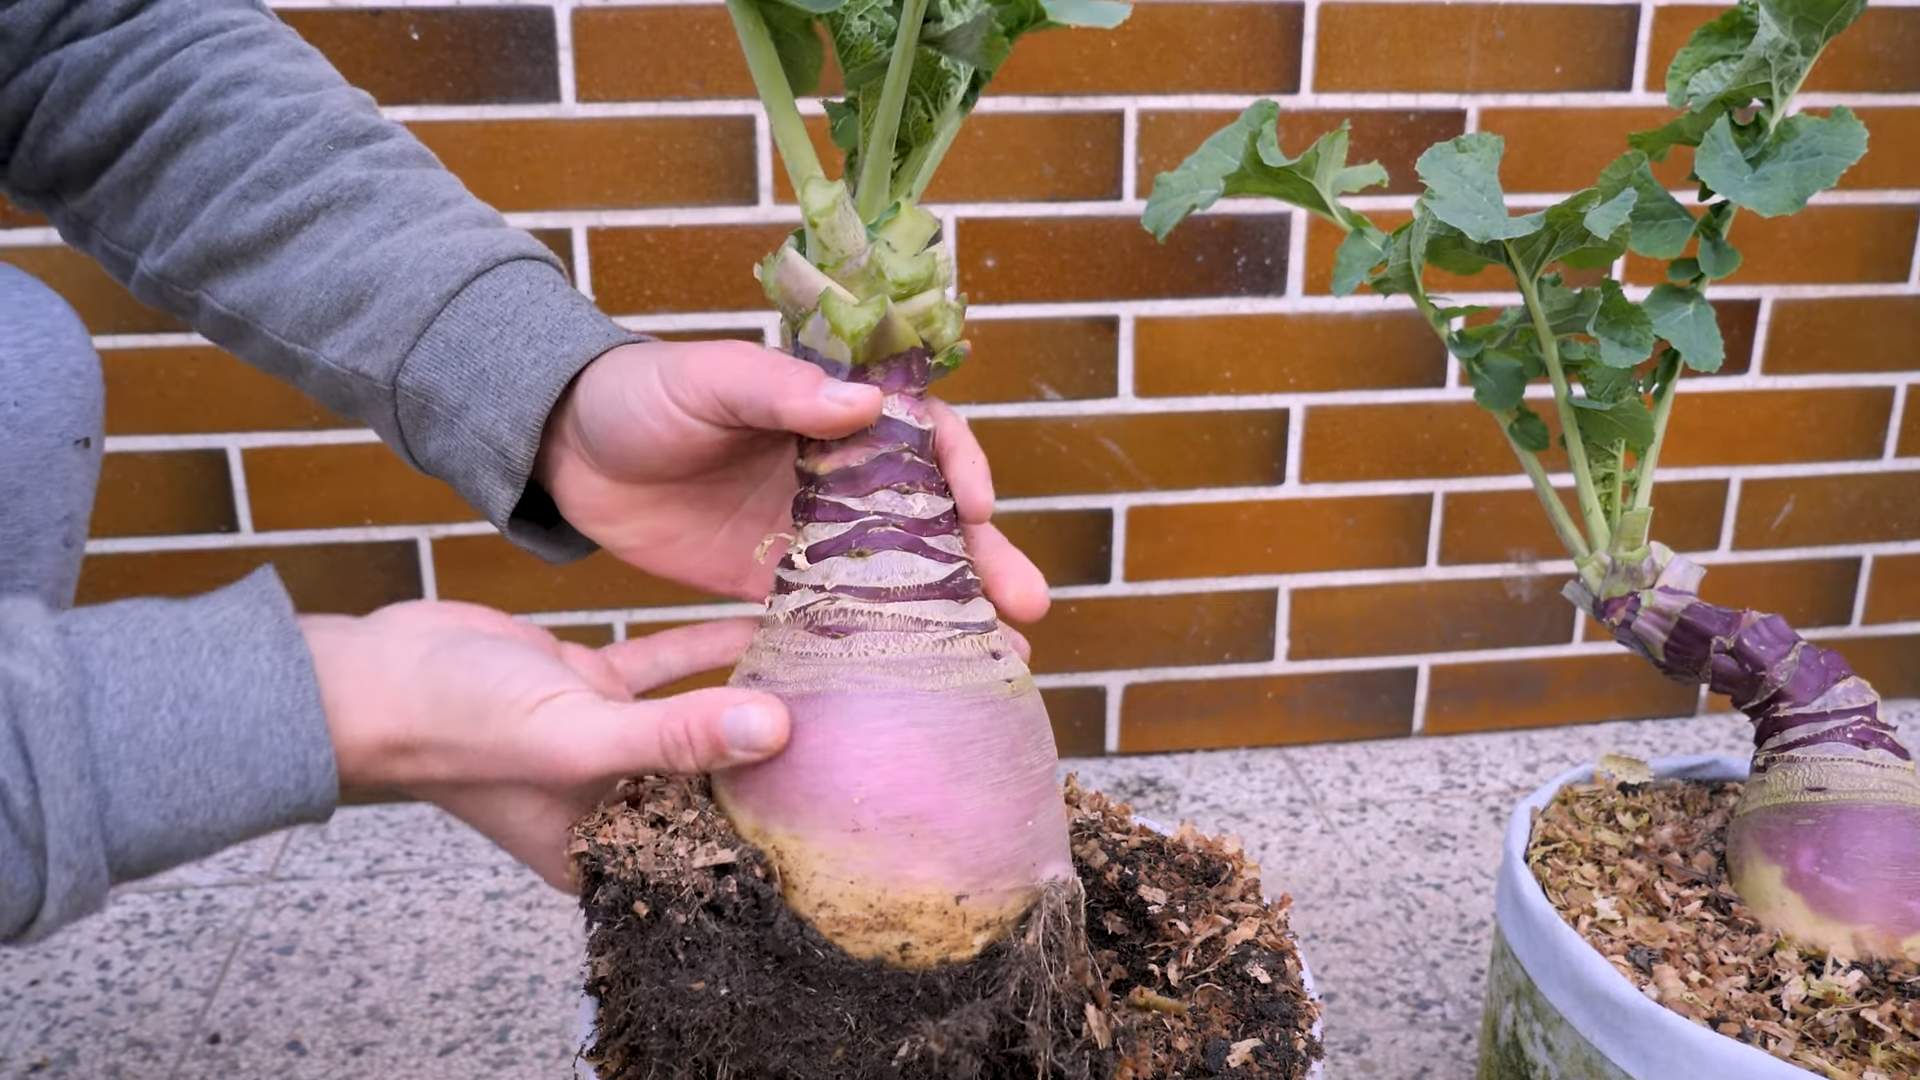
3. Pulling: Grasp the base of the plant and gently pull upwards. If the roots are large, you may need to wiggle them back and forth to loosen them.
4. Trimming: Once you’ve pulled the roots out of the ground, trim off the tops, leaving about 1 inch of stem.
5. Cleaning: Brush off any excess soil from the roots. You can also wash them with water if you prefer.
Storing Your Harvest
Proper storage is key to enjoying your rutabagas and swedes throughout the winter.
1. Curing: Cure the roots for a few days in a cool, dry place. This will help them develop a thicker skin and prevent them from rotting.
2. Storage Conditions: Store the cured roots in a cool, dark, and humid place, such as a root cellar or unheated garage. The ideal temperature is between 32-40°F (0-4°C) and the humidity should be around 90%.
3. Storage Methods: You can store rutabagas and swedes in several ways:
* In Sand: Pack the roots in boxes or bins filled with damp sand. This will help keep them moist and prevent them from drying out.
* In Plastic Bags: Store the roots in perforated plastic bags in the refrigerator. This will help maintain humidity and prevent them from rotting.
* In the Ground: In mild climates, you can leave the roots in the ground and harvest them as needed. Just be sure to protect them from frost with a layer of mulch.
4. Checking Regularly: Check your stored roots regularly for signs of rot or spoilage. Remove any damaged roots to prevent the rot from spreading.
Troubleshooting
Even with the best care, you may encounter some problems when growing rutabagas and swedes. Here are a few common issues and how to deal with them:
* Small Roots: If your rutabagas and swedes are small, it could be due to several factors, such as poor soil, lack of water, or overcrowding. Make sure your soil is fertile, water regularly, and thin your seedlings properly.
* Bitter Taste: A bitter taste can be caused by hot weather or lack of water. Keep your plants well-watered and provide shade during the hottest part of the day.
* Splitting: Splitting can occur if the roots grow too quickly after a period of drought. Water regularly and consistently to prevent this.
* Pest Infestations: As mentioned earlier, keep an eye out for pests and treat them promptly.
* Diseases: Practice good crop rotation and avoid planting rutabagas and swedes in the same area year after year to prevent diseases.
Enjoying Your Harvest
Now that you’ve successfully grown and stored your rutabagas and swedes, it’s time to enjoy them! These versatile root vegetables can be used in a variety of dishes.
* Roasting: Roasting rutabagas and swedes brings out their natural sweetness. Simply toss them with olive oil, salt, and pepper, and roast them in the oven until tender.
* Mashing: Mashed
Conclusion
So, there you have it! Growing your own rutabaga and swede at home isn’t just a gardening project; it’s a gateway to fresher, more flavorful meals and a deeper connection with the food you eat. We’ve walked through the entire process, from selecting the right varieties and preparing your soil to nurturing your plants and harvesting your bounty. And while it might seem daunting at first, the rewards – the satisfaction of pulling a plump, homegrown rutabaga from the earth, the vibrant taste of a swede roasted to perfection – are well worth the effort.
Why is this DIY trick a must-try? Because it empowers you to control the quality and freshness of your produce. Store-bought rutabagas and swedes can often be waxed, treated, and transported long distances, impacting their flavor and nutritional value. When you grow your own, you know exactly what’s going into your food – no mystery chemicals, just good old-fashioned sunshine, water, and care. Plus, the taste difference is undeniable. Homegrown rutabagas and swedes boast a sweetness and depth of flavor that you simply can’t find in commercially grown varieties.
But the benefits extend beyond just taste and quality. Growing your own vegetables is a fantastic way to reduce your carbon footprint, support sustainable practices, and connect with nature. It’s also a surprisingly therapeutic activity, offering a welcome escape from the stresses of daily life.
Ready to take your rutabaga and swede growing to the next level? Consider these variations and suggestions:
* Succession Planting: Plant seeds every few weeks to ensure a continuous harvest throughout the growing season. This is especially useful if you have a large family or plan to use rutabagas and swedes frequently in your cooking.
* Companion Planting: Plant rutabagas and swedes alongside beneficial companion plants like chamomile, rosemary, or thyme. These herbs can help deter pests and attract pollinators, creating a healthier and more productive garden.
* Experiment with Varieties: Don’t be afraid to try different varieties of rutabagas and swedes to find your favorites. Some varieties are sweeter, while others are more resistant to pests or diseases.
* Creative Cooking: Explore different ways to use your homegrown rutabagas and swedes in your cooking. Roast them with other root vegetables, mash them with butter and cream, add them to soups and stews, or even grate them into salads for a crunchy, nutritious boost.
* Seed Saving: If you’re feeling adventurous, try saving seeds from your best-performing plants to grow next year. This is a great way to develop varieties that are perfectly adapted to your local climate and growing conditions.
Ultimately, the best way to learn is by doing. So, grab your seeds, prepare your soil, and get ready to embark on your own rutabaga and swede growing adventure. We’re confident that you’ll be amazed by the results.
We encourage you to try this DIY trick and share your experience with us! Post photos of your homegrown rutabagas and swedes on social media using #HomegrownRutabaga and #SwedeSuccess. Tell us about your favorite varieties, your biggest challenges, and your most delicious recipes. Let’s build a community of passionate gardeners who are dedicated to growing their own fresh, flavorful food. Growing your own rutabaga and swede is a rewarding experience that will enrich your life in countless ways. So, what are you waiting for? Get growing!
FAQ
What are the most common problems when growing rutabaga and swede, and how can I prevent them?
The most common problems include clubroot, flea beetles, and root maggots. Clubroot is a soilborne disease that causes swollen, distorted roots. To prevent it, ensure your soil is well-drained and has a pH of 6.5-7.5. Crop rotation is also crucial; avoid planting brassicas (cabbage, broccoli, cauliflower, etc.) in the same spot for at least three years. Flea beetles are tiny jumping insects that chew small holes in the leaves. Cover young plants with floating row covers to protect them. Root maggots are fly larvae that feed on the roots. Use row covers or apply diatomaceous earth around the base of the plants to deter them. Good soil health and proper watering practices can also help prevent these problems.
How often should I water my rutabaga and swede plants?
Rutabaga and swede plants need consistent moisture, especially during hot, dry weather. Water deeply once or twice a week, providing about 1 inch of water each time. Check the soil moisture regularly by sticking your finger about an inch into the soil. If it feels dry, it’s time to water. Avoid overwatering, as this can lead to root rot. Mulching around the plants can help retain moisture and suppress weeds.
When is the best time to harvest rutabaga and swede?
Rutabagas are typically ready to harvest 90-100 days after planting, while swedes are ready in 80-90 days. The ideal size for harvesting rutabagas is about 4-6 inches in diameter, and for swedes, it’s about 3-5 inches. You can harvest them earlier if you prefer smaller, more tender roots. To harvest, loosen the soil around the plant and gently pull it up. If the soil is hard, use a garden fork to lift the roots. The best time to harvest is after a light frost, as this can improve the flavor of the roots.
Can I grow rutabaga and swede in containers?
Yes, you can grow rutabaga and swede in containers, but you’ll need to choose a large container (at least 12 inches in diameter and depth) to accommodate the roots. Use a well-draining potting mix and ensure the container has drainage holes. Water regularly and fertilize every few weeks with a balanced fertilizer. Container-grown plants may need more frequent watering than those grown in the ground. Choose smaller varieties that are better suited for container growing.
How do I store rutabaga and swede after harvesting?
To store rutabaga and swede, cut off the tops, leaving about an inch of stem. Brush off any excess soil, but don’t wash them. Store them in a cool, dark, and humid place, such as a root cellar or refrigerator. The ideal storage temperature is 32-40°F (0-4°C) with high humidity. You can store them in perforated plastic bags or in boxes filled with damp sand or sawdust. Properly stored rutabagas and swedes can last for several months.
What are some creative ways to cook with rutabaga and swede?
Rutabaga and swede are incredibly versatile vegetables that can be used in a variety of dishes. Roast them with other root vegetables like carrots, potatoes, and parsnips for a hearty and flavorful side dish. Mash them with butter, cream, and herbs for a comforting alternative to mashed potatoes. Add them to soups and stews for a nutritious and flavorful boost. Grate them into salads for a crunchy and slightly sweet addition. You can also use them to make fries, chips, or even puree them into sauces and dips. Don’t be afraid to experiment and try new recipes!
Are rutabaga and swede nutritious? What are their health benefits?
Yes, rutabaga and swede are highly nutritious vegetables. They are excellent sources of vitamin C, potassium, and fiber. They also contain antioxidants and other beneficial plant compounds. Vitamin C is important for immune function, while potassium helps regulate blood pressure. Fiber promotes digestive health and can help lower cholesterol levels. The antioxidants in rutabaga and swede can help protect against cell damage and reduce the risk of chronic diseases. Incorporating these vegetables into your diet can contribute to overall health and well-being.
How do I deal with pests organically when growing rutabaga and swede?
There are several organic methods to manage pests. Floating row covers are effective in preventing many pests from reaching your plants. Companion planting with herbs like rosemary and thyme can deter pests. Introduce beneficial insects like ladybugs and lacewings to your garden to prey on pests. Handpicking pests off the plants is also an option. Neem oil is a natural insecticide that can be used to control a variety of pests. Diatomaceous earth is a natural powder that can be sprinkled around the base of the plants to deter slugs and snails. Regularly inspect your plants for signs of pests and take action promptly to prevent infestations from spreading.

Leave a Comment