
Grow Summer Squash Containers: Imagine stepping onto your patio, not to a barren concrete slab, but to a vibrant oasis overflowing with lush greenery and, most importantly, delicious, homegrown summer squash! For centuries, cultivating our own food has been a deeply ingrained human practice, connecting us to the earth and providing sustenance. From ancient Egyptians tending their gardens along the Nile to modern-day urban dwellers embracing balcony gardening, the desire to nurture life from seed to harvest remains a powerful force.
But let’s face it, not everyone has acres of land to dedicate to a sprawling vegetable patch. That’s where the magic of container gardening comes in! Growing summer squash in containers opens up a world of possibilities, allowing you to enjoy fresh, flavorful produce even with limited space. I’m here to show you how to grow summer squash containers successfully, transforming your small space into a productive and rewarding garden.
This DIY guide is your ticket to bypassing those bland, store-bought squashes and savoring the unparalleled taste of homegrown goodness. We’ll cover everything from choosing the right container and soil to providing the perfect amount of sunlight and water. Get ready to roll up your sleeves and embark on a journey to delicious, homegrown summer squash – all from the comfort of your own container garden!
Growing Summer Squash in Containers: A Comprehensive DIY Guide
Hey there, fellow gardening enthusiasts! I’m so excited to share my tried-and-true method for growing bountiful summer squash right in containers. If you’re short on space, or just prefer the convenience of container gardening, this guide is for you. Get ready for fresh zucchini, yellow squash, and more, straight from your patio or balcony!
Why Grow Summer Squash in Containers?
Before we dive in, let’s talk about why container gardening is a fantastic option for summer squash:
* Space Saving: Perfect for small yards, patios, balconies, or even apartment living.
* Control: You have complete control over the soil, watering, and sunlight exposure.
* Mobility: Easily move your plants to follow the sun or protect them from harsh weather.
* Pest Management: Containers can help reduce pest and disease problems.
* Early Harvest: Container plants often warm up faster in the spring, leading to an earlier harvest.
Choosing the Right Summer Squash Variety
Not all summer squash varieties are created equal when it comes to container gardening. Bush varieties are generally better suited than vining types, as they take up less space. Here are a few of my favorites:
* ‘Spacemiser’ Zucchini: A compact bush variety that produces dark green zucchini.
* ‘Bush Baby’ Butternut: A smaller butternut squash that does well in containers.
* ‘Eight Ball’ Zucchini: Round, dark green zucchini that’s perfect for stuffing.
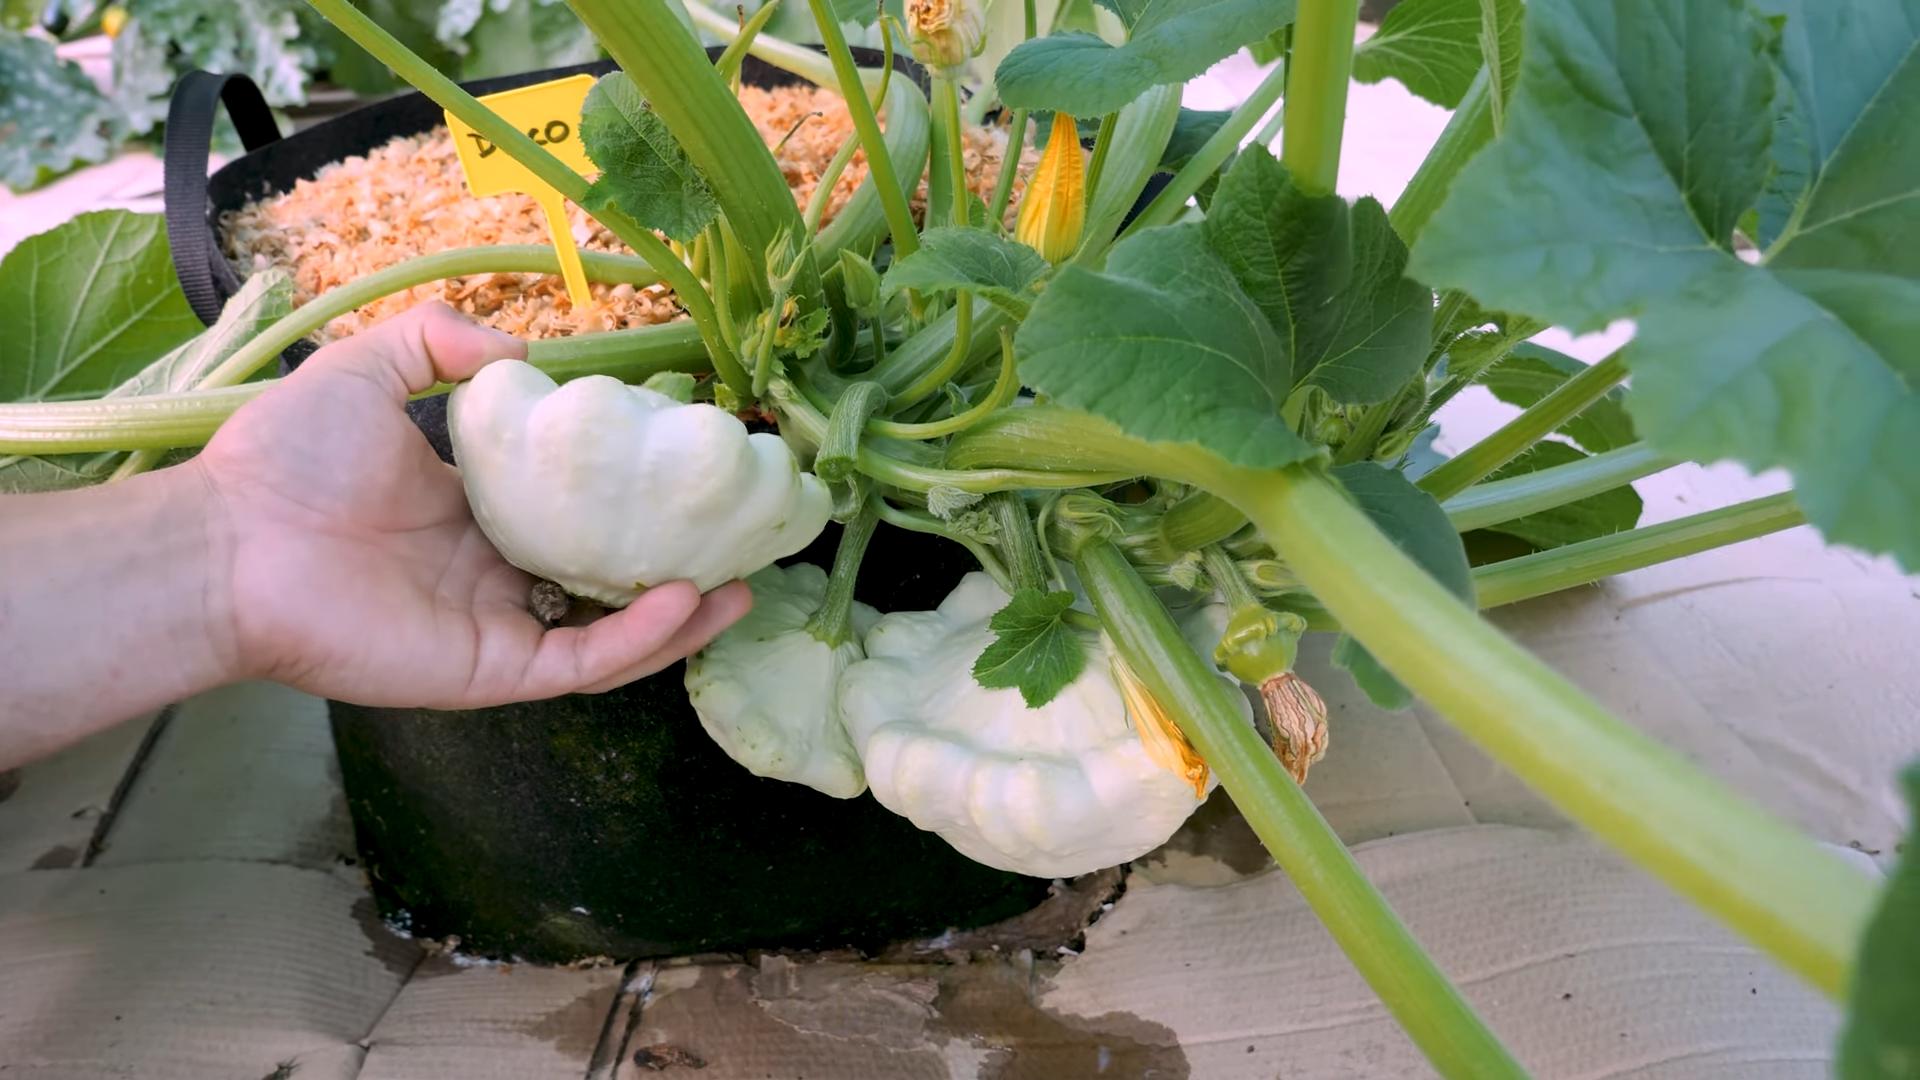
* ‘Sunburst’ Patty Pan: A yellow patty pan squash with a unique shape and delicious flavor.
* ‘Gold Rush’ Zucchini: A golden yellow zucchini variety that’s both beautiful and productive.
Materials You’ll Need
Okay, let’s gather our supplies. Here’s what you’ll need to get started:
* Large Containers: At least 24 inches in diameter and 12 inches deep. Bigger is better!
* High-Quality Potting Mix: Avoid garden soil, as it can compact in containers. I recommend a mix of peat moss, perlite, and vermiculite.
* Slow-Release Fertilizer: This will provide your plants with a steady supply of nutrients.
* Water-Soluble Fertilizer: For supplemental feeding during the growing season.
* Seeds or Seedlings: Choose your favorite summer squash variety.
* Trowel or Shovel: For planting.
* Watering Can or Hose: For watering your plants.
* Mulch: To help retain moisture and suppress weeds.
* Optional: Tomato cage or small trellis for support (especially for slightly larger bush varieties).
Step-by-Step Planting Guide
Alright, let’s get our hands dirty! Here’s how to plant your summer squash in containers:
1. Prepare Your Containers: Make sure your containers have drainage holes. If not, drill some! Add a layer of gravel or broken pottery to the bottom of the container to improve drainage.
2. Fill with Potting Mix: Fill the container with your high-quality potting mix, leaving about 2-3 inches of space at the top.
3. Add Slow-Release Fertilizer: Mix in the slow-release fertilizer according to the package directions. This will provide a steady supply of nutrients for the first few months.
4. Plant Your Seeds or Seedlings:
* From Seed: Sow 2-3 seeds per container, about 1 inch deep. Water gently and keep the soil moist. Once the seedlings emerge, thin them to one plant per container.
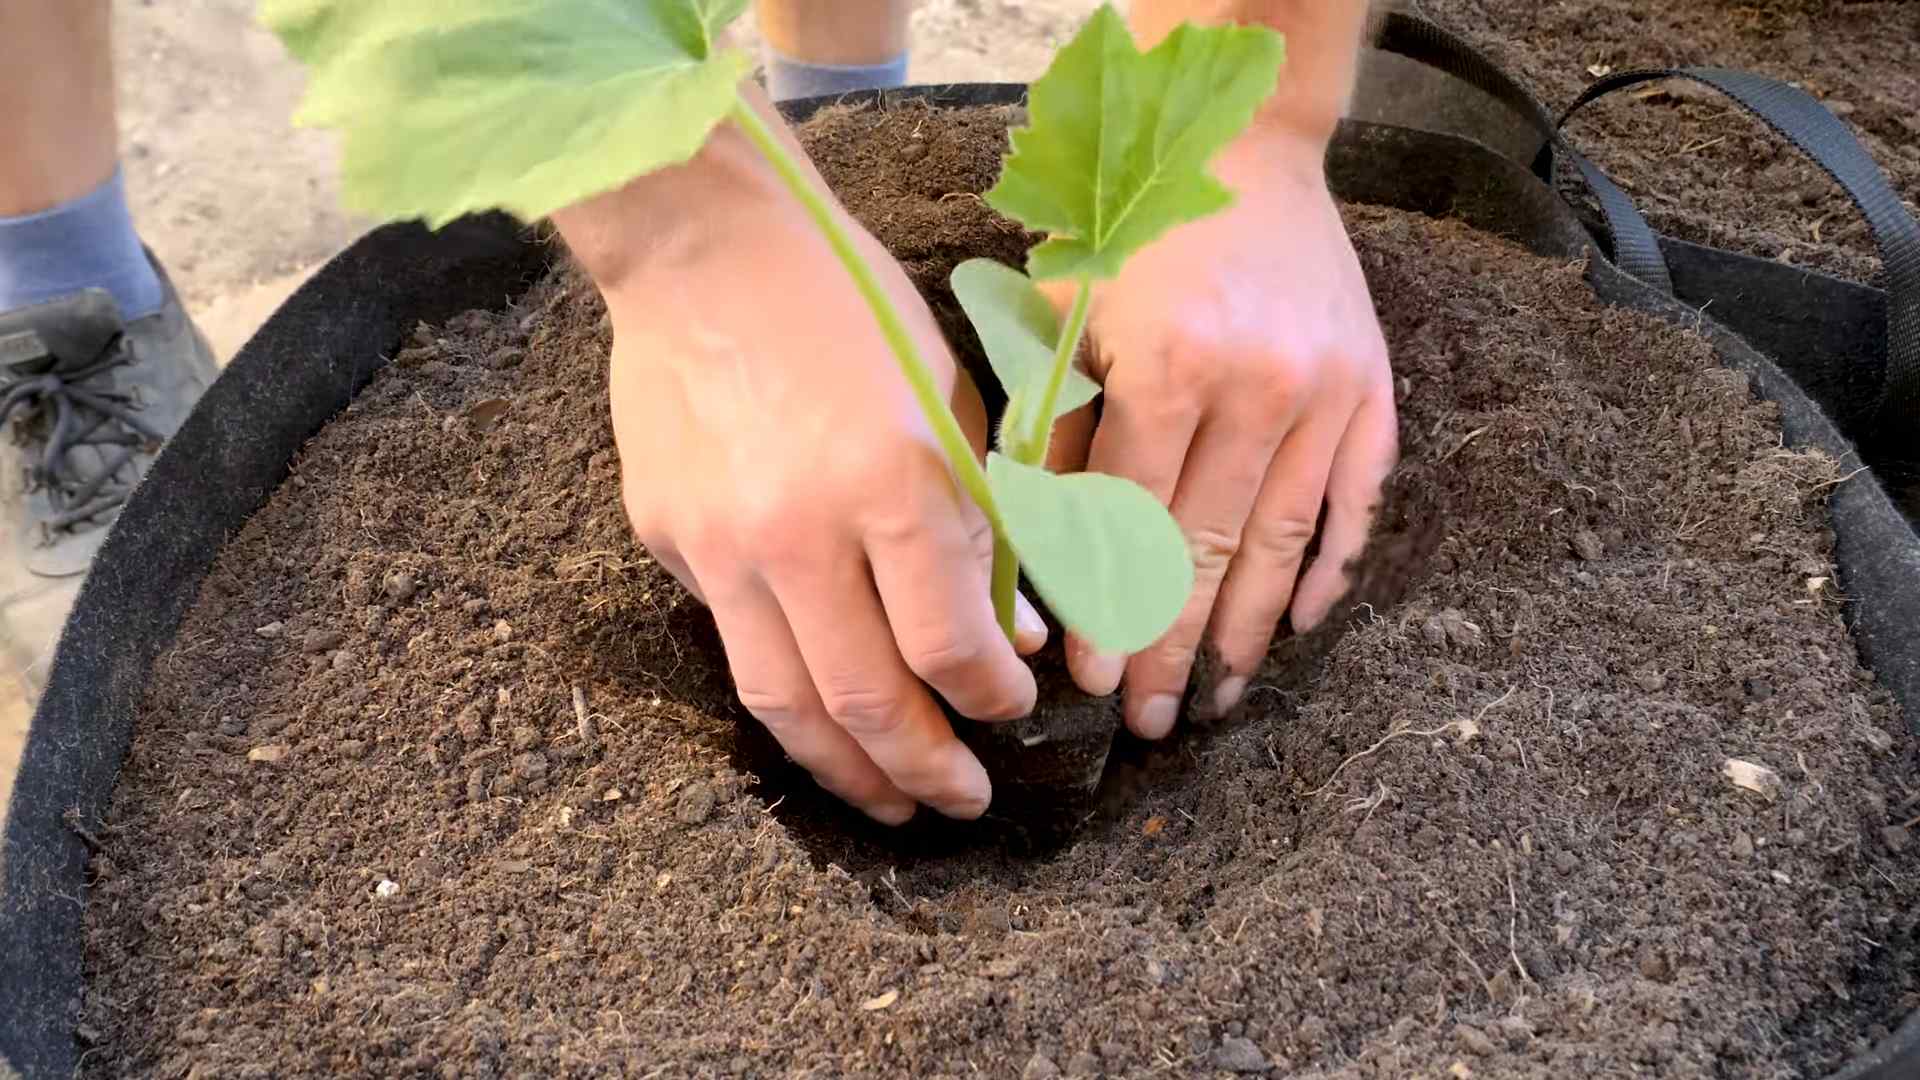
* From Seedlings: Gently remove the seedling from its container and loosen the roots. Dig a hole in the potting mix that’s large enough to accommodate the root ball. Place the seedling in the hole and backfill with potting mix. Water thoroughly.
5. Mulch: Add a layer of mulch around the base of the plant to help retain moisture and suppress weeds. I like to use straw or shredded bark.
6. Water Thoroughly: Water your newly planted squash deeply, until water drains out of the bottom of the container.
Caring for Your Container Squash Plants
Now that your squash is planted, it’s time to provide the care it needs to thrive.
1. Sunlight: Summer squash needs at least 6-8 hours of direct sunlight per day. Choose a sunny location for your containers. If you don’t have enough sunlight, you may need to supplement with grow lights.
2. Watering: Water your squash plants regularly, especially during hot, dry weather. Check the soil moisture by sticking your finger into the soil. If the top inch feels dry, it’s time to water. Avoid overwatering, as this can lead to root rot. Water deeply, until water drains out of the bottom of the container.
3. Fertilizing: In addition to the slow-release fertilizer you added at planting time, you’ll need to supplement with water-soluble fertilizer every 2-3 weeks. Follow the package directions for application rates. I like to use a balanced fertilizer, such as 10-10-10.
4. Pruning: While not always necessary, pruning can help improve air circulation and sunlight penetration. Remove any yellowing or damaged leaves. You can also prune some of the larger leaves to encourage more fruit production.
5. Pest and Disease Control: Keep an eye out for common squash pests, such as squash bugs, squash vine borers, and aphids. Inspect your plants regularly and take action if you see any signs of infestation. You can use insecticidal soap, neem oil, or other organic pest control methods. Also, watch for signs of powdery mildew, a common fungal disease. Improve air circulation by pruning and avoid overhead watering. You can also use a fungicide if necessary.
6. Pollination: Summer squash requires pollination to produce fruit. If you’re not seeing any fruit set, you may need to hand-pollinate the flowers. To do this, use a small paintbrush to transfer pollen from the male flowers (which have a long, thin stem) to the female flowers (which have a small fruit at the base). The best time to hand-pollinate is in the morning.
7. Support: Some bush varieties, especially if they become laden with fruit, might benefit from some support. A tomato cage or small trellis can help prevent the plant from sprawling and breaking.
Harvesting Your Summer Squash
The best part of growing summer squash is, of course, the harvest! Here’s how to know when your squash is ready to pick:
* Size: Harvest your squash when it’s young and tender. Zucchini and yellow squash are usually ready to harvest when they’re 6-8 inches long. Patty pan squash can be harvested when they’re 3-4 inches in diameter.
* Skin: The skin should be smooth and glossy. Avoid harvesting squash with dull or wrinkled skin.
* Fingernail Test: Gently press your fingernail into the skin of the squash. If it’s easy to puncture, it’s ready to harvest.
To harvest, use a sharp knife or pruners to cut the squash from the plant. Leave a short stem attached.
Troubleshooting Common Problems
Even with the best care, you may encounter some problems when growing summer squash in containers. Here are a few common issues and how to address them:
* Yellowing Leaves: This could be a sign of overwatering, underwatering, nutrient deficiency, or pest infestation. Check the soil moisture, fertilize your plants, and inspect for pests.
* Lack of Fruit Set: This could be due to poor pollination, high temperatures, or nutrient deficiency. Hand-pollinate your flowers, provide shade during the hottest part of the day, and fertilize your plants.
* Powdery Mildew: This fungal disease can cause white, powdery spots on the leaves. Improve air circulation, avoid overhead watering, and use a fungicide if necessary.
* Squash Bugs: These pests can suck the sap from your plants, causing them to wilt and die. Handpick the bugs, use insecticidal soap, or apply neem oil.
* Squash Vine Borers: These pests can tunnel into the stems of your plants, causing them to collapse. Wrap the stems with aluminum foil to prevent the borers from entering. If you see signs of infestation, you can try to remove the borers by slitting the stem and extracting them.
Tips for Success
Here are a few extra tips to help you grow the best summer squash in containers:
* Choose the Right Container: Make sure your container is large enough to accommodate the plant’s root system.
* Use High-Quality Potting Mix: Avoid garden soil, as it can compact in containers.
* Provide Plenty of Sunlight: Summer squash needs at least 6-
Conclusion
So, there you have it! Growing summer squash in containers isn’t just possible; it’s a rewarding and surprisingly simple way to enjoy fresh, homegrown vegetables, even if you’re short on space. We’ve walked you through the essentials, from selecting the right container and soil to providing the necessary sunlight and water. But the real magic lies in the experience itself – the satisfaction of nurturing a tiny seed into a bountiful plant, and the unparalleled flavor of a summer squash you’ve grown with your own two hands.
Why is this DIY trick a must-try? Because it democratizes gardening. It removes the barriers of large yards and extensive gardening knowledge, making fresh, healthy produce accessible to everyone. Imagine stepping onto your balcony or patio and harvesting a zucchini for tonight’s dinner, or picking a handful of yellow squash to grill alongside your favorite protein. That’s the power of container gardening.
Beyond the basic guidelines, there’s plenty of room for experimentation and personalization. Consider these variations to tailor your container squash growing experience:
* Vertical Gardening: Train your squash vines up a trellis or tomato cage to maximize space and create a stunning visual display. This is particularly effective for smaller bush varieties.
* Companion Planting: Plant basil, marigolds, or nasturtiums alongside your squash to deter pests and attract beneficial insects. These companion plants can also enhance the flavor of your squash.
* Succession Planting: Stagger your planting dates by a few weeks to ensure a continuous harvest throughout the summer. This way, you’ll never be without fresh squash.
* Heirloom Varieties: Explore the world of heirloom summer squash! Varieties like ‘Costata Romanesco’ or ‘Zephyr’ offer unique flavors, textures, and colors that you won’t find in the grocery store.
* Fertilizer Adjustments: Monitor your plants closely and adjust your fertilizer regimen as needed. If your squash are developing slowly, consider adding a bloom-boosting fertilizer to encourage fruit production.
Growing summer squash in containers is more than just a gardening project; it’s an opportunity to connect with nature, learn new skills, and enjoy the fruits (or vegetables!) of your labor. It’s a chance to embrace sustainability, reduce your carbon footprint, and nourish your body with fresh, wholesome food. And most importantly, it’s a whole lot of fun!
We wholeheartedly encourage you to give this DIY trick a try. Don’t be intimidated by the prospect of gardening; start small, be patient, and learn as you go. The rewards are well worth the effort. And once you’ve harvested your first container-grown summer squash, we want to hear all about it! Share your experiences, tips, and photos with us in the comments below. Let’s build a community of container gardening enthusiasts and inspire others to grow their own food, one squash at a time. We are confident that you will find that growing summer squash containers is a very rewarding experience.
FAQ
Q: What is the best type of container to use for growing summer squash?
A: The ideal container for growing summer squash should be at least 24 inches in diameter and 12 inches deep. This provides ample space for the roots to develop and support the plant’s growth. Choose a container made from durable materials like plastic, terracotta, or wood. Ensure the container has drainage holes to prevent waterlogging, which can lead to root rot. Fabric pots are also a great option as they allow for excellent drainage and aeration.
Q: What kind of soil should I use for container-grown summer squash?
A: Summer squash thrives in well-draining, nutrient-rich soil. Avoid using garden soil, as it can be too heavy and compact for containers. Instead, opt for a high-quality potting mix specifically formulated for vegetables. You can also amend the potting mix with compost or aged manure to boost its fertility. A good mix would be equal parts of potting soil, compost, and perlite or vermiculite for drainage.
Q: How much sunlight do summer squash plants need?
A: Summer squash requires at least 6-8 hours of direct sunlight per day to produce a bountiful harvest. Choose a location for your container that receives plenty of sunlight throughout the day. If you live in a particularly hot climate, consider providing some afternoon shade to prevent the plants from overheating.
Q: How often should I water my container-grown summer squash?
A: Water your summer squash plants deeply and regularly, especially during hot, dry weather. Check the soil moisture daily by sticking your finger about an inch into the soil. If the soil feels dry, it’s time to water. Avoid overwatering, as this can lead to root rot. Aim to keep the soil consistently moist but not soggy. Mulching around the base of the plant can help retain moisture and suppress weeds.
Q: What kind of fertilizer should I use for summer squash?
A: Summer squash are heavy feeders and benefit from regular fertilization. Use a balanced fertilizer (e.g., 10-10-10) at planting time, and then switch to a fertilizer higher in phosphorus (e.g., 5-10-5) once the plants begin to flower. Follow the instructions on the fertilizer package for application rates. You can also supplement with organic fertilizers like compost tea or fish emulsion.
Q: How do I deal with pests and diseases on my summer squash plants?
A: Monitor your plants regularly for signs of pests and diseases. Common pests of summer squash include squash bugs, squash vine borers, and aphids. You can control these pests with insecticidal soap, neem oil, or by handpicking them off the plants. Diseases like powdery mildew and squash mosaic virus can also affect summer squash. To prevent these diseases, ensure good air circulation around the plants, avoid overhead watering, and choose disease-resistant varieties.
Q: When is the best time to harvest summer squash?
A: Summer squash is typically ready to harvest about 50-60 days after planting. Harvest the squash when they are young and tender, typically when they are 6-8 inches long. Use a sharp knife or pruners to cut the squash from the vine, leaving a short stem attached. Regular harvesting encourages the plant to produce more fruit.
Q: Can I grow different varieties of summer squash in the same container?
A: While it’s possible to grow multiple summer squash plants in a large container, it’s generally best to stick to one plant per container, especially for larger varieties. If you want to grow multiple varieties, consider using separate containers for each. This will ensure that each plant has enough space and resources to thrive.
Q: My summer squash plant is producing flowers but no fruit. What could be the problem?
A: There are several reasons why your summer squash plant might be producing flowers but no fruit. One common cause is a lack of pollination. Summer squash requires pollination to set fruit. You can hand-pollinate the flowers by transferring pollen from the male flowers to the female flowers using a small brush. Other possible causes include insufficient sunlight, nutrient deficiencies, or extreme temperatures.
Q: Can I save seeds from my container-grown summer squash for next year?
A: Saving seeds from hybrid summer squash varieties is not recommended, as the resulting plants may not be true to type. However, you can save seeds from open-pollinated or heirloom varieties. Allow the squash to mature fully on the vine, then harvest the seeds and dry them thoroughly before storing them in a cool, dry place.
Leave a Comment