
Growing Celery Rock Method: Unlock the secrets to endless celery with this simple, yet revolutionary DIY trick! Have you ever tossed the base of your celery stalk, feeling a pang of guilt about the waste? Well, prepare to transform that guilt into green goodness! For generations, resourceful gardeners have sought ways to maximize their yields and minimize waste. While the exact origins of the celery regrowth technique are shrouded in mystery, its spirit echoes the age-old tradition of thrifty gardening – making the most of what you have.
This isn’t just about saving a few bucks; it’s about connecting with the earth, understanding the resilience of plants, and enjoying the unparalleled flavor of homegrown celery. Imagine fresh, crisp celery sticks always at your fingertips, ready for snacking, juicing, or adding a vibrant crunch to your favorite dishes. I’m going to show you how to easily implement the growing celery rock method, and you will never have to buy celery again. This DIY project is perfect for beginners and seasoned gardeners alike, offering a sustainable and rewarding way to enjoy this versatile vegetable. Let’s dive in and discover how to turn kitchen scraps into a thriving celery patch!
Growing Celery from a Celery Heart: A DIY Guide
Hey there, fellow gardening enthusiasts! Have you ever wondered if you could regrow celery from that leftover celery heart you usually toss in the compost? Well, guess what? You absolutely can! It’s a super easy and rewarding DIY project, perfect for beginners and seasoned gardeners alike. I’m going to walk you through the whole process, step-by-step, so you can enjoy fresh, homegrown celery without spending a fortune at the grocery store. Let’s get started!
What You’ll Need
Before we dive in, let’s gather our supplies. This project is pretty low-maintenance, so you probably already have most of these items lying around:
* A celery stalk (the base with the roots intact is key!)
* A shallow dish or bowl
* Water (tap water is fine)
* A sunny windowsill or well-lit area
* Potting soil
* A pot or container (at least 6 inches in diameter)
* Optional: Rooting hormone (this can help, but isn’t essential)
Phase 1: Rooting the Celery Heart
This is where the magic begins! We’re going to coax those dormant roots back to life.
1. Prepare the Celery Heart: Carefully cut off the celery stalks about 2 inches from the base. You want to keep the heart (the bottom part where the stalks were attached) intact. Don’t worry about being too precise; just make sure you have a solid base. I usually use a sharp knife to get a clean cut.
2. Place in Water: Fill your shallow dish or bowl with about an inch of water. Place the celery heart, cut-side up, in the water. Make sure the water level doesn’t completely submerge the heart; you only want the bottom part to be in contact with the water.
3. Find a Sunny Spot: Place the dish with the celery heart on a sunny windowsill or in a well-lit area. Celery needs plenty of light to thrive. I’ve found that an east-facing window works best, as it provides gentle morning sun.
4. Change the Water Regularly: This is crucial! Change the water every day or every other day to prevent bacteria growth and keep the water fresh. Stagnant water can lead to rot, and we definitely don’t want that.
5. Observe and Wait: Now comes the patience part. Over the next few days, you should start to see small roots emerging from the bottom of the celery heart. You might also notice new green shoots sprouting from the top. This is a sign that your celery is coming back to life! It usually takes about 5-7 days to see significant root growth, but it can vary depending on the celery and the environment.
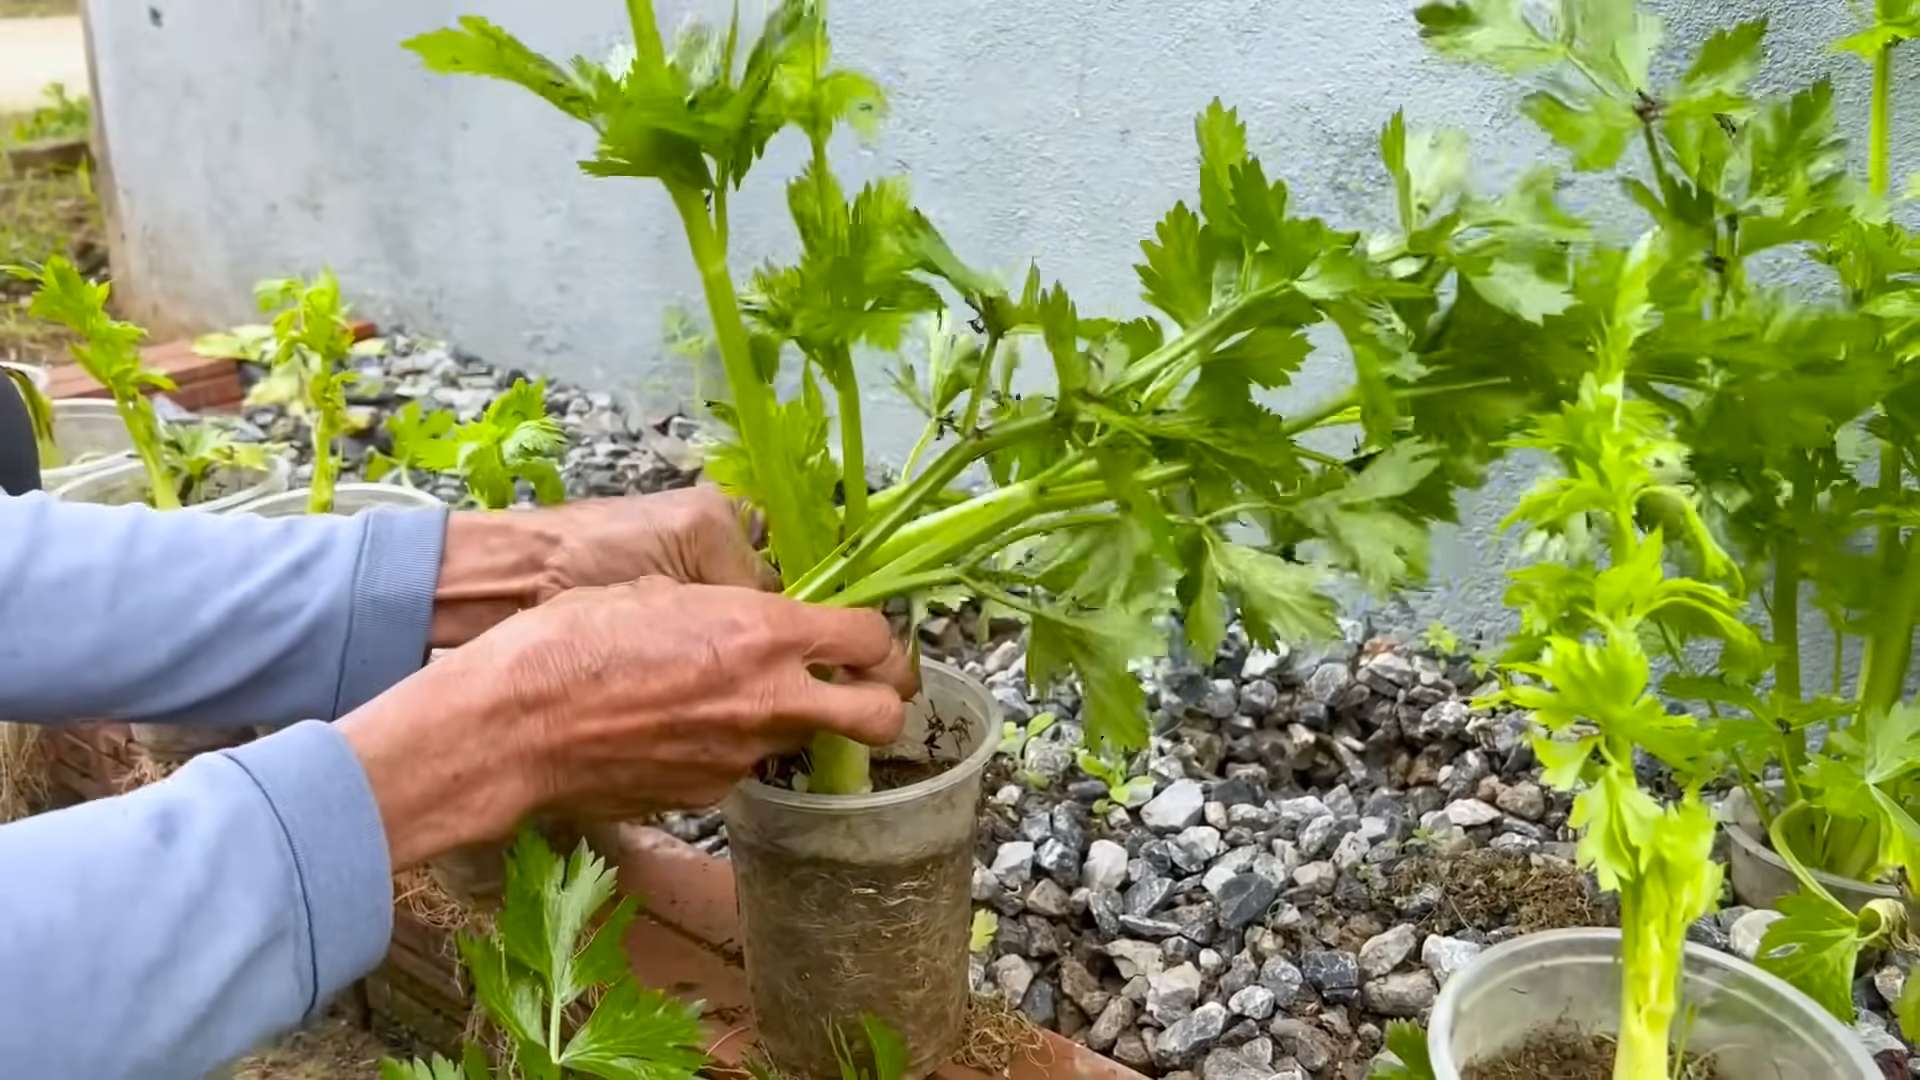
Phase 2: Planting Your Celery
Once your celery heart has developed a good network of roots (about an inch or two long), it’s time to move it to a pot with soil.
1. Prepare the Pot: Fill your pot or container with potting soil. Make sure the pot has drainage holes to prevent waterlogging. Celery likes well-draining soil, so avoid using heavy clay soil. I like to use a mix of potting soil and compost for added nutrients.
2. Create a Hole: Make a hole in the center of the soil large enough to accommodate the celery heart.
3. Plant the Celery Heart: Carefully remove the celery heart from the water and gently place it in the hole. Make sure the roots are spread out and not bunched together.
4. Cover with Soil: Gently fill the hole with soil, covering the roots and the bottom part of the celery heart. Leave the top part of the heart (where the new shoots are growing) exposed.
5. Water Thoroughly: Water the soil thoroughly until water drains out of the drainage holes. This will help settle the soil and ensure the roots are well-hydrated.
Phase 3: Caring for Your Growing Celery
Now that your celery is planted, it’s time to provide it with the care it needs to thrive.
1. Sunlight: Celery needs at least 6 hours of sunlight per day. If you don’t have a sunny windowsill, you can use a grow light to supplement the sunlight.
2. Watering: Keep the soil consistently moist, but not soggy. Water when the top inch of soil feels dry to the touch. Avoid overwatering, as this can lead to root rot. I usually water my celery every other day, but it depends on the weather and the humidity.
3. Fertilizing: Celery is a heavy feeder, so it benefits from regular fertilization. Use a balanced liquid fertilizer every two weeks to provide your celery with the nutrients it needs. Follow the instructions on the fertilizer label.
4. Pest Control: Keep an eye out for pests like aphids and slugs. If you notice any pests, you can try spraying your celery with insecticidal soap or neem oil. You can also hand-pick the pests off the plants.
5. Blanching (Optional): Blanching is a technique used to make celery stalks more tender and less bitter. About two weeks before you plan to harvest your celery, you can blanch the stalks by wrapping them with newspaper or cardboard. This will block sunlight from reaching the stalks, which will reduce the amount of chlorophyll and make them more tender.
Phase 4: Harvesting Your Celery
After a few months of care, your celery should be ready to harvest!
1. Harvesting: You can harvest individual stalks as needed, or you can harvest the entire plant at once. To harvest individual stalks, simply cut them off at the base with a sharp knife. To harvest the entire plant, cut it off at the base just below the soil line.
2. Enjoy Your Harvest: Now you can enjoy your fresh, homegrown celery! Use it in salads, soups, stews, or as a healthy snack.
Troubleshooting Tips
Even with the best care, sometimes things don’t go as planned. Here are a few common problems you might encounter and how to fix them:
* Celery isn’t growing: Make sure your celery is getting enough sunlight and water. Also, check the soil to make sure it’s not too compacted. If the soil is compacted, you can loosen it up with a garden fork.
* Celery leaves are turning yellow: This could be a sign of overwatering or nutrient deficiency. Check the soil moisture and adjust your watering schedule accordingly. You can also fertilize your celery with a balanced liquid fertilizer.
* Celery is bolting (going to seed): Bolting is usually caused by stress, such as extreme heat or drought. Make sure your celery is getting enough water and shade during hot weather.
* Celery is attracting pests: Regularly inspect your celery for pests and take action as soon as you notice them. You can use insecticidal soap, neem oil, or hand-pick the pests off the plants.
Extra Tips for Success
* Choose the right celery: When buying celery to regrow, look for a stalk with a healthy-looking base and roots. Avoid celery that is wilted or has brown spots.
* Use fresh water: Always use fresh water when rooting your celery heart. Stagnant water can lead to rot.
* Be patient: Regrowing celery takes time and patience. Don’t get discouraged if you don’t see results immediately.
* Experiment: Try different varieties of celery to see which ones grow best in your area.
* Have fun! Gardening should be enjoyable. Don’t be afraid to experiment and learn from your mistakes.
Growing celery from a celery heart is a fun and rewarding DIY project that anyone can do. With a little bit of care and attention, you can enjoy fresh, homegrown celery all season long. So, go ahead and give it a try! I promise you’ll be amazed at how easy it is. Happy gardening!

Conclusion
So, there you have it! The “Growing Celery Rock Method” – a simple, cost-effective, and surprisingly rewarding way to enjoy fresh celery right from your own kitchen. This isn’t just about saving a few dollars at the grocery store; it’s about connecting with the food you eat, reducing waste, and experiencing the satisfaction of nurturing something from scraps.
Why is this a must-try? Because it’s incredibly easy. You don’t need a green thumb, a sprawling garden, or fancy equipment. All you need is the base of a celery stalk, some water, and a little patience. In a matter of weeks, you’ll witness the magic of regeneration as new stalks sprout, offering a continuous supply of crisp, flavorful celery for your salads, soups, smoothies, and snacks.
Beyond the basic method, there’s plenty of room for experimentation. Consider these variations to personalize your celery-growing journey:
* Different Containers: While a simple glass or jar works perfectly, you can also use a small pot filled with soil after the initial water propagation. This can provide more nutrients and support for the growing plant.
* Fertilizing: Once the celery has established roots, you can add a diluted liquid fertilizer to the water every couple of weeks to boost growth. Look for a balanced fertilizer or one specifically formulated for vegetables.
* Sunlight Exposure: Experiment with different levels of sunlight. While celery thrives in bright, indirect light, too much direct sun can scorch the leaves. Observe your plant and adjust its location accordingly.
* Celery Varieties: While any celery stalk will work for this method, try using organic celery if possible, as it may be less likely to have been treated with growth inhibitors. You can also explore different celery varieties for subtle flavor variations.
* From Water to Soil: After the celery base has sprouted roots in water, you can transplant it to a pot with soil. This will allow the celery to grow larger and potentially produce more stalks. Ensure the pot has good drainage and use a well-draining potting mix.
The “Growing Celery Rock Method” is more than just a gardening hack; it’s a sustainable practice that reduces food waste and brings a touch of nature into your home. It’s a fantastic project for kids, teaching them about plant life cycles and the importance of reducing waste. It’s also a great way for adults to de-stress and connect with nature, even in the middle of a bustling city.
We wholeheartedly encourage you to give this DIY trick a try. It’s a simple, rewarding, and sustainable way to enjoy fresh celery. Once you’ve experienced the joy of growing your own celery from scraps, we’re confident you’ll be hooked!
Don’t forget to share your experiences with us! We’d love to see your celery regrowing success stories. Post photos and videos of your celery rocks on social media using #GrowingCeleryRockMethod and tag us. We can’t wait to see your green thumbs in action! Let’s spread the word about this fantastic way to reduce waste and enjoy fresh, homegrown celery.
FAQ
Frequently Asked Questions About Growing Celery from Scraps
Q: How long does it take for celery to regrow using the “Growing Celery Rock Method”?
A: Typically, you’ll start to see new growth within 5-7 days. Small leaves will begin to emerge from the center of the celery base. It usually takes about 2-3 weeks to have a noticeable amount of new celery stalks that are ready to harvest. However, the exact timeframe can vary depending on factors like temperature, sunlight, and the initial health of the celery base.
Q: What kind of water should I use?
A: Tap water is generally fine, but if your tap water is heavily chlorinated, it’s best to let it sit out for 24 hours before using it to allow the chlorine to dissipate. Filtered water or rainwater are also excellent options. Avoid using distilled water, as it lacks the minerals that plants need.
Q: How often should I change the water?
A: Change the water every 1-2 days to prevent bacterial growth and keep the celery base healthy. This is crucial, especially in the initial stages of regrowth.
Q: My celery base is turning brown and mushy. What am I doing wrong?
A: This is usually a sign of rot, which can be caused by several factors:
* Stagnant Water: Not changing the water frequently enough can lead to bacterial growth and rot.
* Overwatering: While the celery base needs water, it shouldn’t be completely submerged. Only the bottom inch or two should be in water.
* Poor Quality Celery: If the celery base was already starting to rot when you started, it may not be viable.
* Contamination: Ensure the container you’re using is clean to prevent the spread of bacteria.
To prevent rot, change the water more frequently, ensure only the bottom of the base is submerged, and start with a fresh, healthy celery base.
Q: How much sunlight does the celery need?
A: Celery thrives in bright, indirect sunlight. Avoid placing it in direct sunlight, especially during the hottest part of the day, as this can scorch the leaves. A spot near a window that receives morning sun or filtered light is ideal.
Q: Can I grow celery indoors permanently using this method?
A: While you can continue to grow celery indoors, it may not reach the same size or produce as many stalks as celery grown outdoors in soil. The “Growing Celery Rock Method” is best suited for regrowing celery for a limited time. For long-term growth, transplanting the celery to a pot with soil is recommended.
Q: When should I transplant the celery to soil?
A: Once the celery base has developed a good root system (about 2-3 inches long) and has several new stalks, it’s ready to be transplanted to soil. Choose a pot that’s at least 6 inches in diameter and use a well-draining potting mix.
Q: What kind of soil should I use?
A: Use a well-draining potting mix that’s rich in organic matter. You can also amend the soil with compost or aged manure to provide additional nutrients.
Q: How do I harvest the celery?
A: You can harvest the celery stalks as needed by cutting them off at the base. The plant will continue to produce new stalks as long as it’s healthy.
Q: Can I grow celery from seed instead of using the base?
A: Yes, you can grow celery from seed, but it’s a much longer and more involved process. The “Growing Celery Rock Method” is a faster and easier way to get a small supply of fresh celery.
Q: Is the regrown celery as nutritious as store-bought celery?
A: The nutritional content of regrown celery can vary depending on factors like soil quality, sunlight exposure, and watering practices. However, it will still provide essential vitamins and minerals, making it a healthy and sustainable addition to your diet.
Q: Can I use this method with other vegetables?
A: Yes, this method can also be used with other vegetables like lettuce, bok choy, and green onions. The basic principle is the same: place the base of the vegetable in water and allow it to regrow.
Q: My celery is growing tall but the stalks are thin and weak. What can I do?
A: This could be due to a lack of nutrients or insufficient sunlight. Try adding a diluted liquid fertilizer to the water every couple of weeks and ensure the celery is receiving adequate sunlight.
Q: Is it safe to eat the regrown celery?
A: Yes, as long as you’re using clean water and the celery base is healthy, the regrown celery is perfectly safe to eat. Wash it thoroughly before consuming.
Q: Can I grow celery rocks in cold weather?
A: Celery prefers warmer temperatures, so if you’re growing it indoors during cold weather, make sure it’s not exposed to drafts or extreme temperature fluctuations. A warm, sunny spot is ideal.
Q: How long will the celery rock continue to produce new stalks?
A: The lifespan of a celery rock varies. Some may continue to produce for several weeks or even months, while others may only last for a few weeks. Eventually, the base will exhaust its resources and stop producing new growth. At that point, you can start a new celery rock with another celery base.

Leave a Comment