
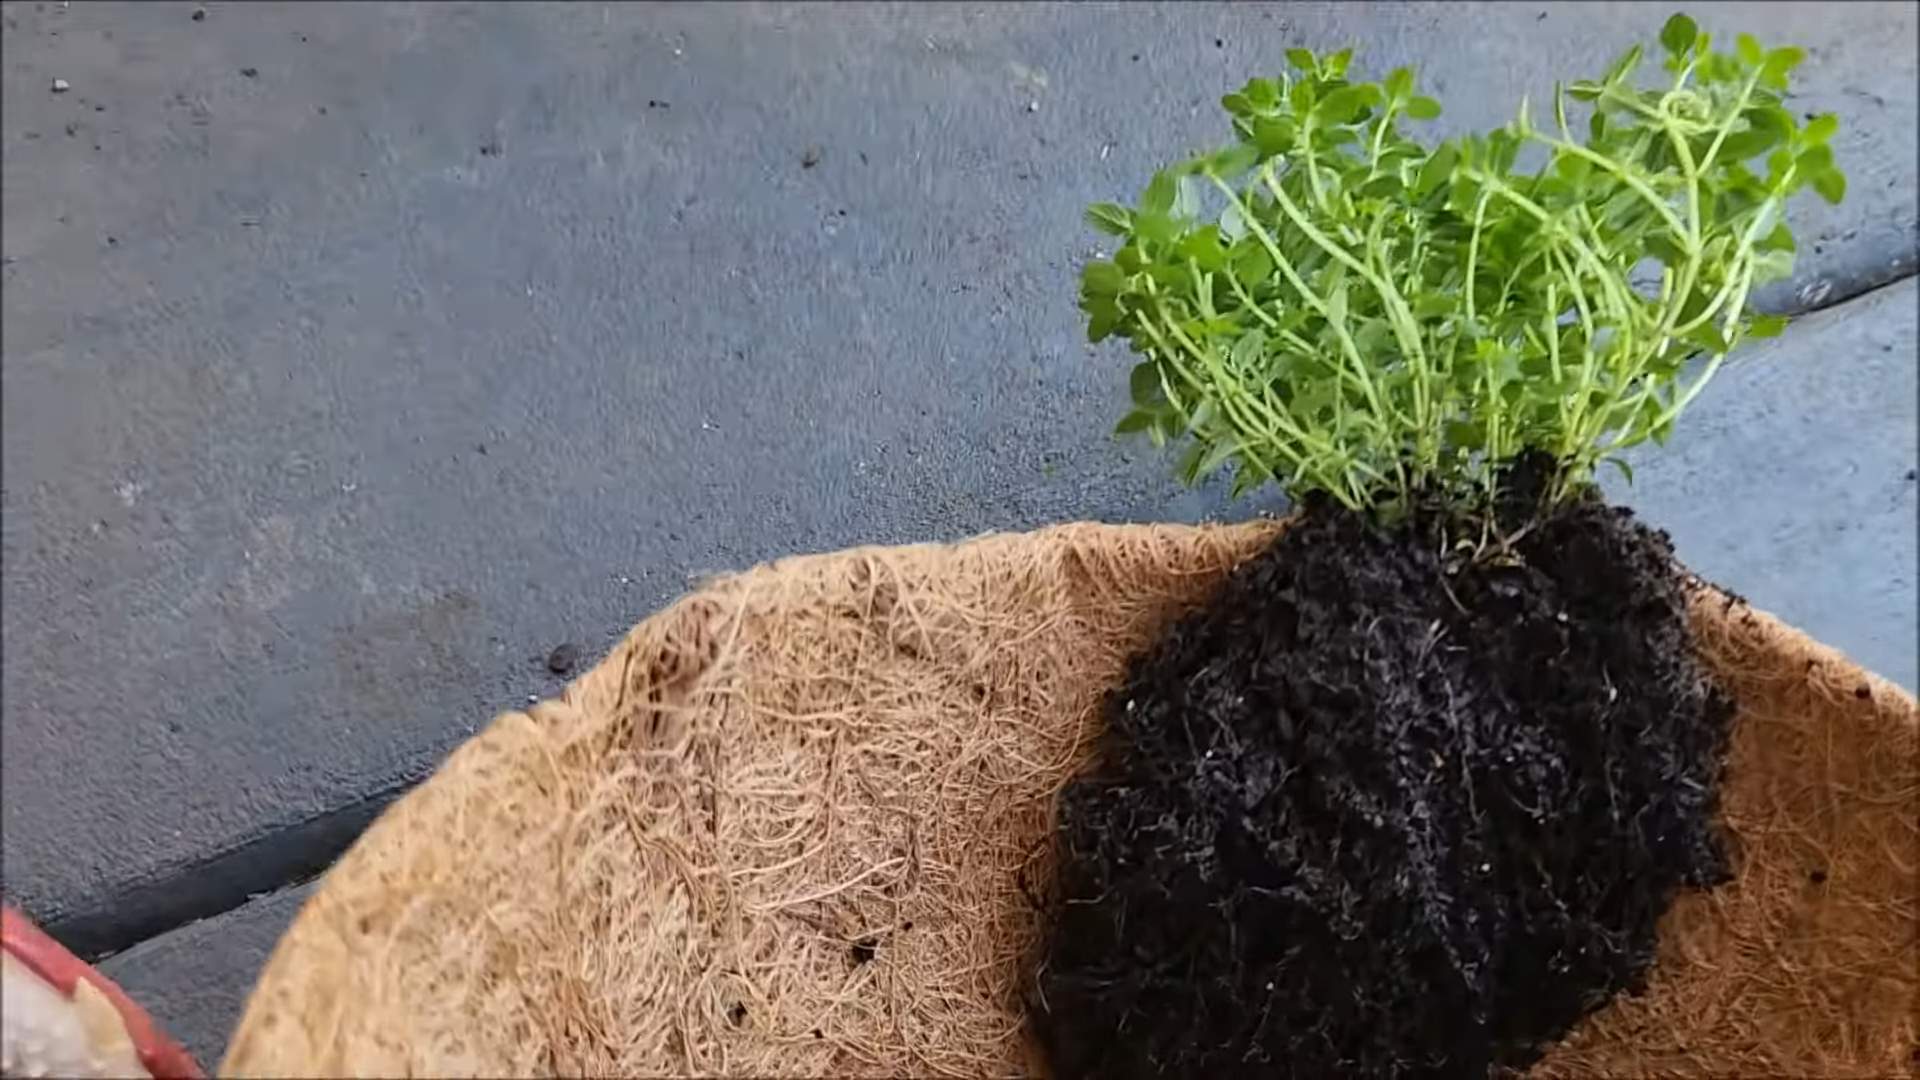
Grow Thyme Indoors? Absolutely! Imagine having the fresh, aromatic flavor of thyme readily available, right in your kitchen, no matter the season. Forget those sad, wilted sprigs from the grocery store – we’re talking vibrant, flavorful thyme at your fingertips. For centuries, thyme has been cherished not only for its culinary uses but also for its medicinal properties and symbolic meaning, representing courage and bravery in ancient times.
But let’s be honest, sometimes life gets in the way, and maintaining an outdoor herb garden just isn’t feasible. That’s where the magic of indoor gardening comes in! This DIY guide is your passport to successfully grow thyme indoors, even if you think you have a “brown thumb.” We’ll break down the process into simple, manageable steps, covering everything from choosing the right pot and soil to providing the perfect amount of sunlight and water.
Why do you need this DIY trick? Because fresh thyme elevates any dish, from roasted chicken to hearty soups. Plus, nurturing a little bit of green indoors can be incredibly therapeutic, bringing a touch of nature into your home and boosting your mood. So, let’s ditch the store-bought herbs and embark on this rewarding journey of growing your own thyme indoors!
Grow Your Own Radishes: A Beginner’s Guide to a Speedy Harvest
Hey there, fellow gardening enthusiasts! I’m so excited to share my experience with growing radishes at home. These little guys are incredibly rewarding because they’re super fast-growing, perfect for impatient gardeners like myself! Plus, they add a peppery kick to salads and are delicious roasted. Let’s dive into how you can cultivate your own radish patch, even if you’re a complete beginner.
Choosing the Right Radish Variety
First things first, let’s talk about radish varieties. There’s more to radishes than just the classic red globe!
* **Cherry Belle:** This is your quintessential round, red radish. It’s reliable and matures quickly.
* **French Breakfast:** These are elongated, red radishes with a white tip. They have a milder flavor.
* **Easter Egg:** A mix of radishes in various colors – red, pink, purple, and white! Adds a fun touch to your garden.
* **Black Spanish:** A larger, black-skinned radish with a strong, pungent flavor. These take a bit longer to mature.
* **Watermelon Radish:** This one’s a showstopper! Green on the outside and bright pink on the inside, with a mild, slightly sweet flavor.
I usually recommend starting with Cherry Belle or French Breakfast if you’re new to radish growing. They’re easy and quick!
Preparing Your Radish Bed
Radishes aren’t fussy, but they do appreciate well-prepared soil.
* **Sunlight:** Radishes need at least 6 hours of sunlight per day. Choose a sunny spot in your garden.
* **Soil:** They prefer loose, well-drained soil. Compacted soil can lead to misshapen radishes.
* **Soil Amendment:** Amend your soil with compost or well-rotted manure to improve drainage and fertility. I like to add a generous amount – about 2-3 inches worked into the top 6-8 inches of soil.
* **pH:** Radishes prefer a soil pH between 6.0 and 7.0. You can test your soil pH with a kit from your local garden center.
* **Remove Rocks and Debris:** Clear the area of any rocks, sticks, or other debris that could hinder root growth.
Planting Your Radish Seeds
Now for the fun part – planting!
1. **Timing is Key:** Radishes are a cool-season crop, meaning they thrive in cooler temperatures. Plant them in early spring or late summer/early fall. In most areas, you can plant radishes every 2-3 weeks for a continuous harvest. I usually start planting about 4-6 weeks before the last expected frost in spring and again in late summer for a fall harvest.
2. **Direct Sowing:** Radishes are best direct-sown, meaning you plant the seeds directly into the ground. They don’t transplant well.
3. **Spacing:** Sow seeds about ½ inch deep and 1 inch apart. I use my finger to make a small furrow, sprinkle the seeds in, and then gently cover them with soil.
4. **Rows:** Space your rows about 6 inches apart.
5. **Watering:** Gently water the soil after planting. Keep the soil consistently moist, but not waterlogged, until the seeds germinate.
Caring for Your Radishes
Radishes are relatively low-maintenance, but here are a few things to keep in mind:
* **Watering:** Consistent watering is crucial for plump, flavorful radishes. Inconsistent watering can lead to tough, woody radishes. Aim for about 1 inch of water per week, especially during dry spells.
* **Thinning:** Once your seedlings emerge, thin them to about 2 inches apart. This gives them enough space to develop properly. Don’t be afraid to pull out the extra seedlings!
* **Weeding:** Keep your radish bed free of weeds. Weeds compete with radishes for nutrients and water. I like to hand-weed regularly to prevent weeds from getting out of control.
* **Fertilizing:** Radishes don’t need a lot of fertilizer, but a light feeding of a balanced fertilizer (like 10-10-10) a few weeks after germination can help boost growth. Follow the instructions on the fertilizer package.
* **Pest Control:** Radishes are generally pest-resistant, but flea beetles can sometimes be a problem. These tiny beetles chew small holes in the leaves. You can control flea beetles with insecticidal soap or by covering your plants with row covers.
Harvesting Your Radishes
This is the best part! Radishes are ready to harvest in as little as 3-4 weeks, depending on the variety.
1. **Check for Size:** Gently brush away the soil around the base of the radish to check its size. They’re usually ready when they’re about 1 inch in diameter (for round varieties).
2. **Pull Gently:** Grasp the radish leaves near the base and gently pull straight up. If the soil is dry, you may need to loosen it with a garden fork first.
3. **Harvest Promptly:** Don’t let your radishes get too big, or they can become tough and bitter. Harvest them as soon as they’re ready.
4. **Storage:** Remove the leaves and store the radishes in a plastic bag in the refrigerator. They’ll keep for about a week. You can also store the leaves separately – they’re edible and can be used in salads or stir-fries!
Troubleshooting Common Radish Problems
Even with the best care, you might encounter a few problems. Here’s how to troubleshoot them:
* **Radishes are small and skinny:** This is usually due to overcrowding or lack of water. Make sure you thin your seedlings properly and water consistently.
* **Radishes are tough and woody:** This is often caused by inconsistent watering or letting the radishes get too big before harvesting.
* **Radishes are cracked:** This can be caused by uneven watering. Try to keep the soil consistently moist.
* **Radishes are bitter:** This can be due to hot weather or letting the radishes get too big. Harvest them promptly and try planting in a shadier location during hot weather.
* **Flea beetles are eating the leaves:** Use insecticidal soap or row covers to control flea beetles.
Succession Planting for a Continuous Harvest
To enjoy radishes throughout the growing season, practice succession planting. This means planting a new batch of seeds every 2-3 weeks. This ensures that you always have a fresh supply of radishes ready to harvest. I find this especially useful in the spring and fall when the weather is ideal for radish growth.
Radish Greens: Don’t Throw Them Away!
Did you know that radish greens are edible? They have a peppery flavor similar to the radishes themselves. Don’t throw them away! You can use them in salads, stir-fries, soups, or even pesto. Just be sure to wash them thoroughly before using them. I love adding them to my morning smoothies for an extra boost of nutrients.
Radish Recipes to Try
Now that you’ve harvested your radishes, it’s time to enjoy them! Here are a few of my favorite radish recipes:
* **Radish and Butter Sandwiches:** This is a classic! Thinly slice radishes and spread them on buttered bread. Sprinkle with sea salt and enjoy.
* **Radish Salad:** Combine sliced radishes, cucumbers, and a simple vinaigrette.
* **Roasted Radishes:** Toss radishes with olive oil, salt, and pepper and roast them in the oven until tender. Roasting mellows out the peppery flavor and brings out their sweetness.
* **Radish Salsa:** Dice radishes and combine them with tomatoes, onions, cilantro, and lime juice.
* **Radish Top Pesto:** Blend radish greens with garlic, Parmesan cheese, pine nuts, and olive oil to make a delicious pesto.
Growing Radishes in Containers
If you don’t have a garden, you can still grow radishes in containers! Choose a container that is at least 6 inches deep and has drainage holes. Use a good quality potting mix and follow the same planting and care instructions as you would for growing radishes in the ground. Container-grown radishes may need more frequent watering, especially during hot weather. I’ve had great success growing radishes in pots on my balcony.
Saving Radish Seeds (Advanced)
If you want to get really adventurous, you can even save your own radish seeds! This is a bit more involved, but it’s a great way to save money and preserve your favorite radish varieties.
1. **Let a Few Plants Bolt:** Allow a few of your radish plants to bolt, meaning they will send up a flower stalk.
2. **Pollination:** Radishes are insect-pollinated, so you may need to hand-pollinate them if you don’t have many pollinators in your area.
3. **Seed Pods:** Once the flowers are pollinated, they will form seed pods.
4. **Harvest
Conclusion
So, there you have it! Growing thyme indoors is not only achievable, but it’s also incredibly rewarding. Imagine having fresh, fragrant thyme readily available at your fingertips, no matter the season. Forget those sad, dried-out jars from the supermarket; with a little effort, you can cultivate your own thriving thyme plant right in your kitchen.
This DIY trick is a must-try for several reasons. First, it’s incredibly cost-effective. A single packet of thyme seeds or a small starter plant is far cheaper than constantly buying fresh thyme from the grocery store. Second, it’s environmentally friendly. You’re reducing your carbon footprint by eliminating the need for transportation and packaging associated with store-bought herbs. Third, and perhaps most importantly, it’s incredibly satisfying. There’s something truly special about nurturing a plant from seed to harvest, knowing that you’re providing yourself with fresh, healthy ingredients.
But the benefits don’t stop there. Growing your own thyme allows you to experiment with different varieties. Consider trying lemon thyme for a citrusy twist, or creeping thyme for its delicate flavor and beautiful foliage. You can even create a miniature herb garden by planting thyme alongside other indoor herbs like rosemary, oregano, and basil. Think of the culinary possibilities!
For those who are short on space, consider using a vertical planter or a hanging basket. These options are perfect for maximizing your growing area and adding a touch of greenery to your home. You can also experiment with different types of containers, from terracotta pots to repurposed jars and cans. Just make sure your chosen container has adequate drainage to prevent root rot.
And don’t be afraid to get creative with your lighting. If you don’t have a sunny windowsill, you can supplement with a grow light. These lights are specifically designed to provide plants with the light they need to thrive, even in low-light conditions.
Ultimately, the key to successfully growing thyme indoors is to provide it with the right conditions: plenty of sunlight, well-draining soil, and regular watering. With a little patience and attention, you’ll be rewarded with a bountiful harvest of fresh, flavorful thyme.
We wholeheartedly encourage you to give this DIY trick a try. It’s a simple, affordable, and rewarding way to enhance your cooking and bring a touch of nature into your home. And once you’ve experienced the joy of harvesting your own fresh thyme, we’re confident that you’ll be hooked!
Don’t forget to share your experiences with us! We’d love to see photos of your thriving thyme plants and hear about your favorite ways to use your homegrown herbs. Share your tips, tricks, and recipes in the comments below. Let’s create a community of indoor herb gardeners and inspire others to discover the joys of growing their own food. So, grab your seeds, pots, and soil, and get ready to embark on a thyme-growing adventure! You’ll be amazed at how easy and rewarding it is to grow thyme indoors.
FAQ
What kind of soil is best for growing thyme indoors?
Thyme thrives in well-draining soil. A mixture of potting soil, perlite, and sand is ideal. This combination ensures that the soil retains enough moisture to nourish the plant but also allows excess water to drain away, preventing root rot. Avoid using heavy, clay-based soils, as these can become waterlogged and suffocate the roots. You can also find specialized herb potting mixes at most garden centers, which are formulated to provide the specific nutrients that herbs like thyme need to flourish.
How much sunlight does indoor thyme need?
Thyme needs at least six hours of direct sunlight per day to thrive. A south-facing window is usually the best option, as it provides the most sunlight throughout the day. If you don’t have a south-facing window, an east- or west-facing window can also work, but you may need to supplement with a grow light, especially during the winter months when sunlight is less intense. If your thyme plant isn’t getting enough sunlight, it may become leggy and produce fewer leaves.
How often should I water my indoor thyme plant?
Water your thyme plant when the top inch of soil feels dry to the touch. Avoid overwatering, as this can lead to root rot. Thyme prefers slightly dry conditions, so it’s better to err on the side of underwatering than overwatering. When you do water, water thoroughly until water drains out of the bottom of the pot. This ensures that the entire root system is moistened.
How do I harvest thyme from my indoor plant?
You can start harvesting thyme once the plant is about 4-6 inches tall. To harvest, simply snip off stems with scissors or pruning shears. Avoid cutting more than one-third of the plant at a time, as this can stress the plant and slow its growth. Regular harvesting encourages the plant to produce more leaves, so don’t be afraid to harvest frequently. You can use the fresh thyme immediately or dry it for later use.
How do I dry thyme from my indoor plant?
There are several ways to dry thyme. One method is to tie the stems together in a bundle and hang them upside down in a cool, dry, and well-ventilated place. Another method is to spread the stems out on a baking sheet and dry them in a low oven (around 170°F) for a few hours. You can also use a dehydrator to dry thyme. Once the thyme is completely dry, crumble the leaves and store them in an airtight container.
What are some common problems when growing thyme indoors, and how can I fix them?
One common problem is root rot, which is caused by overwatering. To prevent root rot, make sure your thyme plant is planted in well-draining soil and avoid watering too frequently. Another common problem is pests, such as aphids and spider mites. These pests can be controlled with insecticidal soap or neem oil. Finally, thyme can sometimes become leggy if it’s not getting enough sunlight. To fix this, move the plant to a sunnier location or supplement with a grow light.
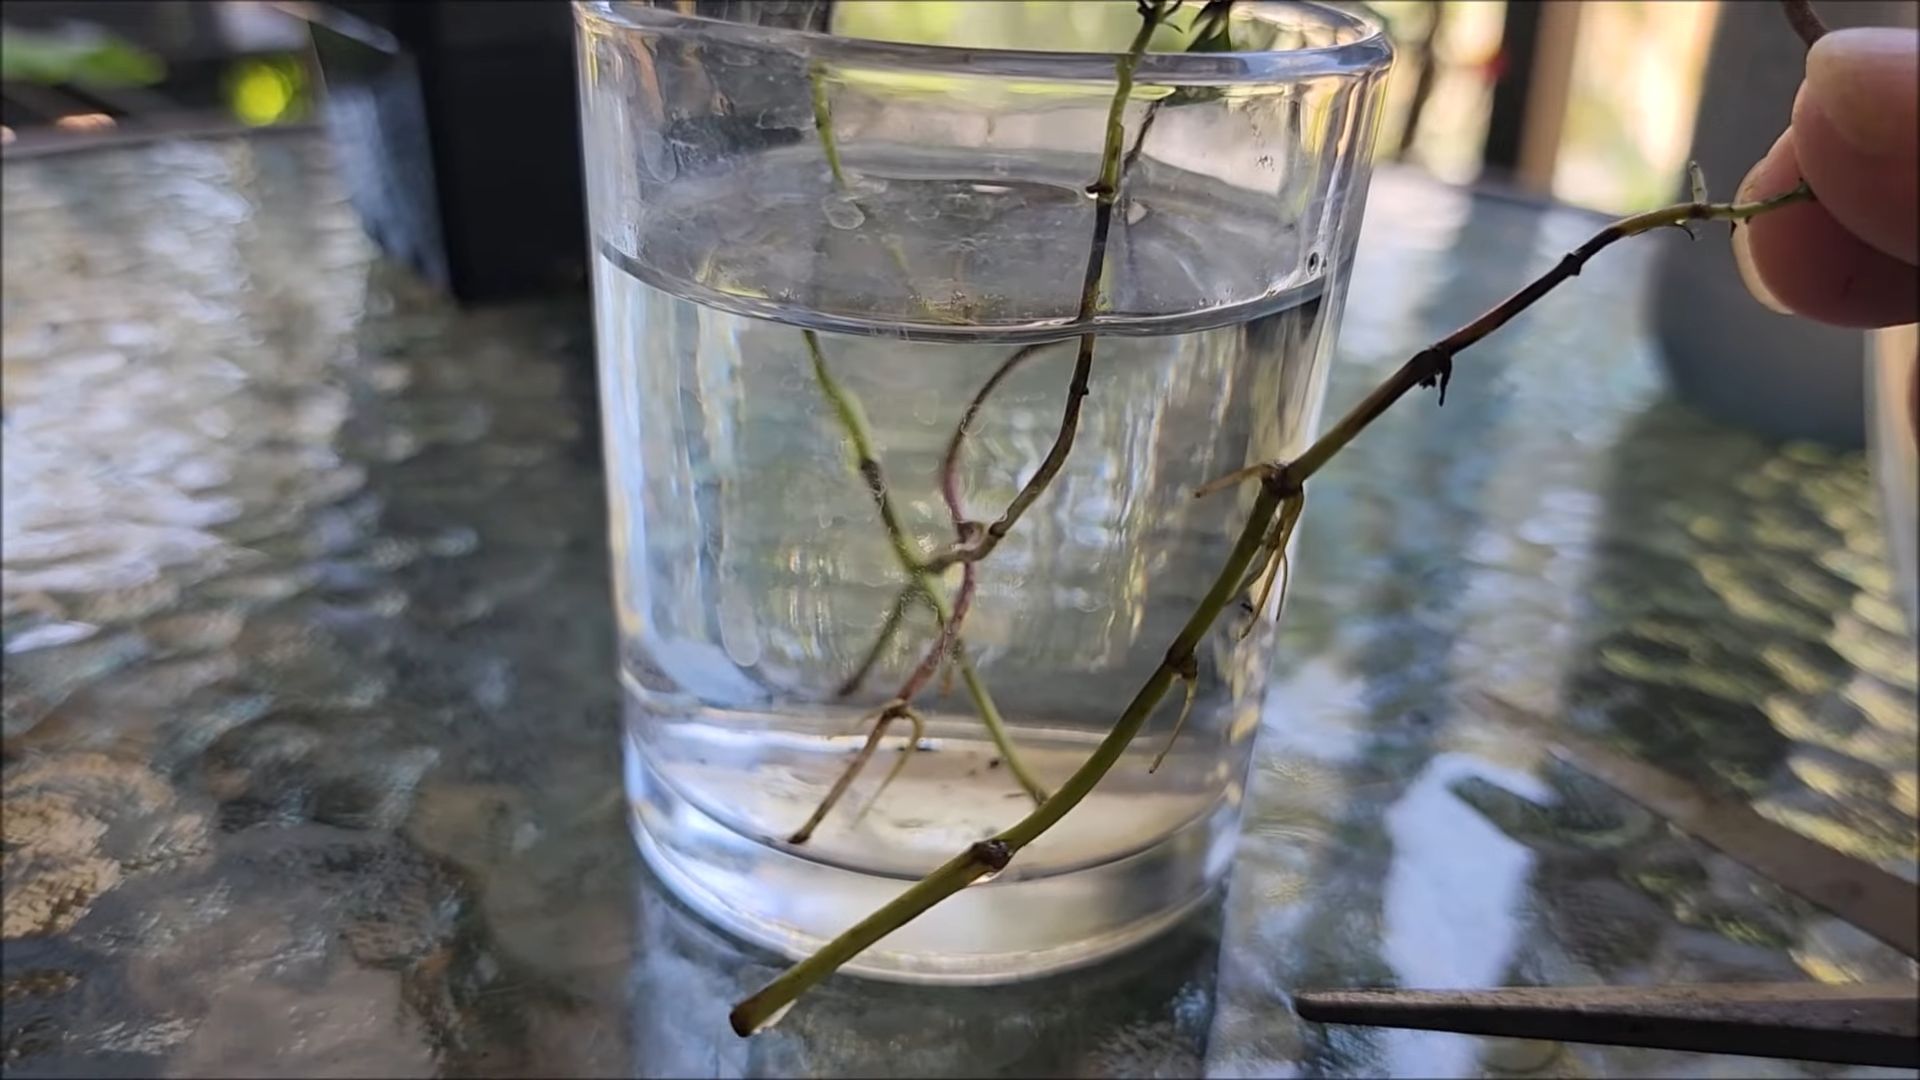
Can I grow thyme from seed indoors?
Yes, you can grow thyme from seed indoors. Start the seeds indoors 6-8 weeks before the last frost. Sow the seeds in a seed-starting mix and keep them moist until they germinate. Once the seedlings are large enough to handle, transplant them into individual pots. Thyme seeds can be slow to germinate, so be patient.
What are some different varieties of thyme that I can grow indoors?
There are many different varieties of thyme that you can grow indoors, each with its own unique flavor and aroma. Some popular varieties include common thyme, lemon thyme, creeping thyme, and woolly thyme. Experiment with different varieties to find your favorites.
How do I fertilize my indoor thyme plant?
Thyme doesn’t need a lot of fertilizer. Fertilize it sparingly, about once a month during the growing season (spring and summer), with a balanced liquid fertilizer diluted to half strength. Avoid over-fertilizing, as this can lead to leggy growth and a less intense flavor.
My thyme plant is turning yellow. What’s wrong?
Yellowing leaves can be a sign of several problems, including overwatering, underwatering, nutrient deficiency, or pest infestation. Check the soil moisture to see if you’re watering too much or too little. If the soil is dry, water the plant thoroughly. If the soil is soggy, allow it to dry out before watering again. If the yellowing persists, consider fertilizing the plant or checking for pests.
Leave a Comment