
Growing Spinach in Pots: Imagine stepping outside your door and harvesting fresh, vibrant spinach for your salad, smoothie, or side dish. Sounds idyllic, right? Well, it’s absolutely achievable, even if you don’t have a sprawling backyard! For centuries, cultures around the globe have cultivated spinach, valuing it for its nutritional power and versatility in the kitchen. From ancient Persia, where it originated, to its widespread adoption in European and American cuisine, spinach has always been a garden staple.
But let’s face it, not everyone has the space or time for a traditional garden. That’s where the magic of container gardening comes in! I’m here to show you how easy and rewarding growing spinach in pots can be. This DIY guide will equip you with simple, effective tricks and hacks to cultivate a thriving spinach crop right on your balcony, patio, or even a sunny windowsill. Why spend money on store-bought spinach when you can enjoy the satisfaction of harvesting your own, knowing exactly where it came from and how it was grown? Plus, it tastes so much better!
This article is your go-to resource for everything you need to know, from choosing the right pot and soil to preventing pests and maximizing your harvest. Get ready to unleash your inner gardener and enjoy a continuous supply of fresh, delicious spinach, all thanks to the power of pot gardening!
Growing Spinach in Pots: A Beginner’s Guide
Hey there, fellow gardening enthusiasts! I’m so excited to share my experience with growing spinach in pots. It’s surprisingly easy, even if you’re a complete newbie like I was. Fresh, homegrown spinach is so much tastier than the store-bought stuff, and it’s incredibly rewarding to harvest your own greens. Let’s dive in!
Choosing the Right Pot and Soil
Before we even think about seeds, we need to get the foundation right. The pot and soil are crucial for happy spinach plants.
* Pot Size: Spinach needs room for its roots to grow. I recommend a pot that’s at least 6-8 inches deep and wide. A 12-inch pot is even better, especially if you plan on growing multiple plants together. Remember, crowded plants won’t thrive.
* Drainage: This is non-negotiable! Make sure your pot has drainage holes. Spinach hates sitting in soggy soil, which can lead to root rot.
* Pot Material: Plastic, terracotta, or even fabric pots will work. I personally prefer terracotta because it allows the soil to breathe a bit better, but plastic is a more budget-friendly option.
* Soil: Forget using garden soil straight from the ground. It’s often too heavy and doesn’t drain well. Instead, opt for a high-quality potting mix. I like to use a mix specifically formulated for vegetables, as it contains the right nutrients for leafy greens. You can also amend regular potting mix with compost for added richness.
Planting Your Spinach Seeds
Now for the fun part – planting!
1. Prepare the Pot: Fill your chosen pot with the potting mix, leaving about an inch of space at the top. Gently pat down the soil to remove any large air pockets.
2. Sow the Seeds: Spinach seeds are small, so handle them carefully. I usually sow the seeds about ½ inch deep and 1-2 inches apart. If you’re using a larger pot, you can sow multiple seeds, but remember to thin them out later if they all sprout.
3. Cover the Seeds: Lightly cover the seeds with more potting mix.
4. Water Gently: Use a watering can with a gentle rose attachment or a spray bottle to water the soil thoroughly. You want the soil to be moist but not waterlogged.
5. Find the Right Spot: Spinach loves sunlight, but it doesn’t like intense heat. Place your pot in a location that receives at least 4-6 hours of sunlight per day. If you live in a hot climate, try to provide some afternoon shade to prevent the leaves from wilting. I’ve found that morning sun is ideal.
Caring for Your Spinach Plants
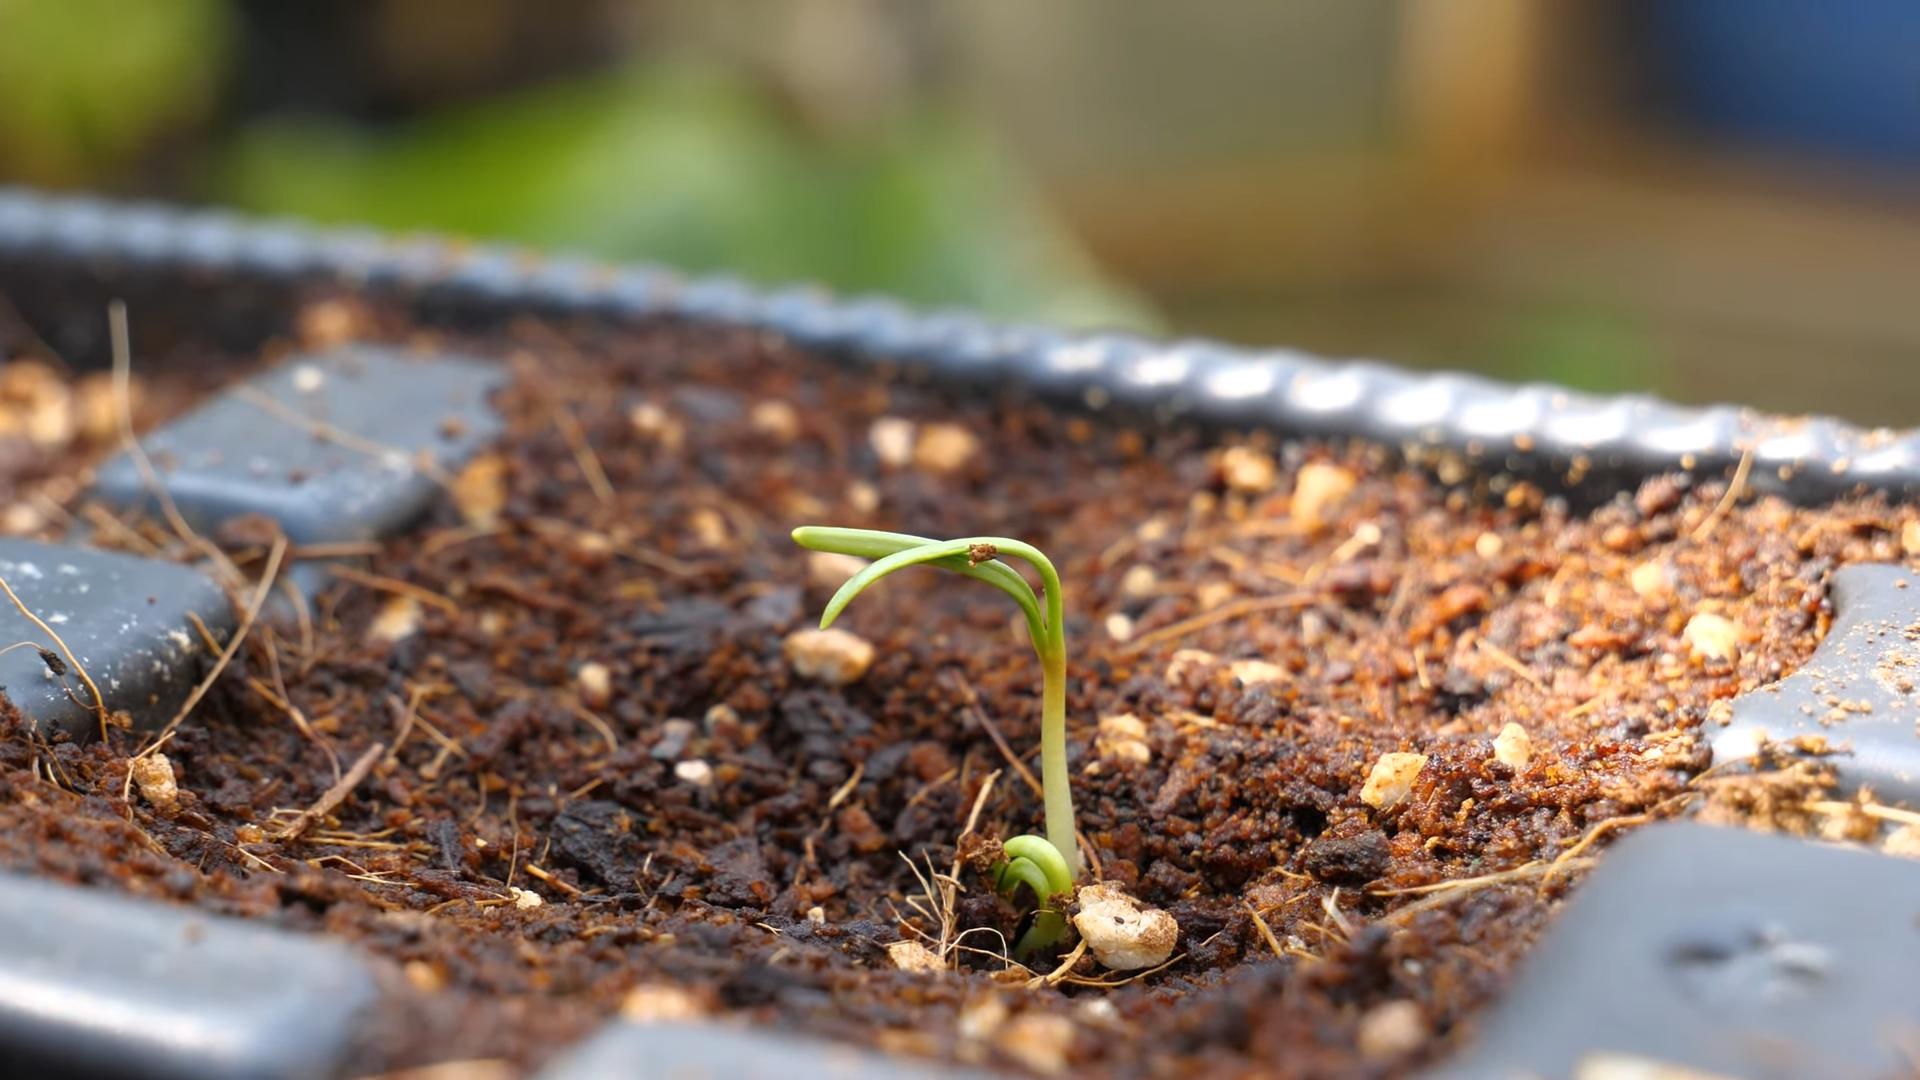
Once your seeds have sprouted (usually within 5-10 days), it’s time to provide them with the care they need to flourish.
1. Watering: Keep the soil consistently moist, but avoid overwatering. Check the soil moisture by sticking your finger about an inch deep. If it feels dry, it’s time to water. I usually water every other day, but this will depend on the weather and the type of pot you’re using.
2. Thinning: If you sowed multiple seeds in the same pot and they all sprouted, you’ll need to thin them out. This means removing some of the seedlings to give the remaining plants enough space to grow. Choose the strongest-looking seedlings and snip off the weaker ones at the soil level. Don’t pull them out, as this can disturb the roots of the other plants.
3. Fertilizing: Spinach is a heavy feeder, so it benefits from regular fertilization. I like to use a liquid fertilizer specifically formulated for leafy greens. Follow the instructions on the fertilizer package, and apply it every 2-3 weeks. You can also use compost tea as a natural fertilizer.
4. Weed Control: Keep an eye out for weeds and remove them promptly. Weeds compete with your spinach plants for nutrients and water.
5. Pest Control: Spinach can be susceptible to pests like aphids and slugs. Inspect your plants regularly for signs of infestation. If you find any pests, you can try spraying them with insecticidal soap or neem oil. I prefer to use organic pest control methods whenever possible.
6. Bolting Prevention: Bolting is when spinach plants start to produce flowers and seeds, which makes the leaves bitter. This usually happens when the weather gets too hot. To prevent bolting, try to provide some afternoon shade during hot weather. You can also choose bolt-resistant spinach varieties.
Harvesting Your Spinach
The best part! You can usually start harvesting your spinach about 6-8 weeks after planting.
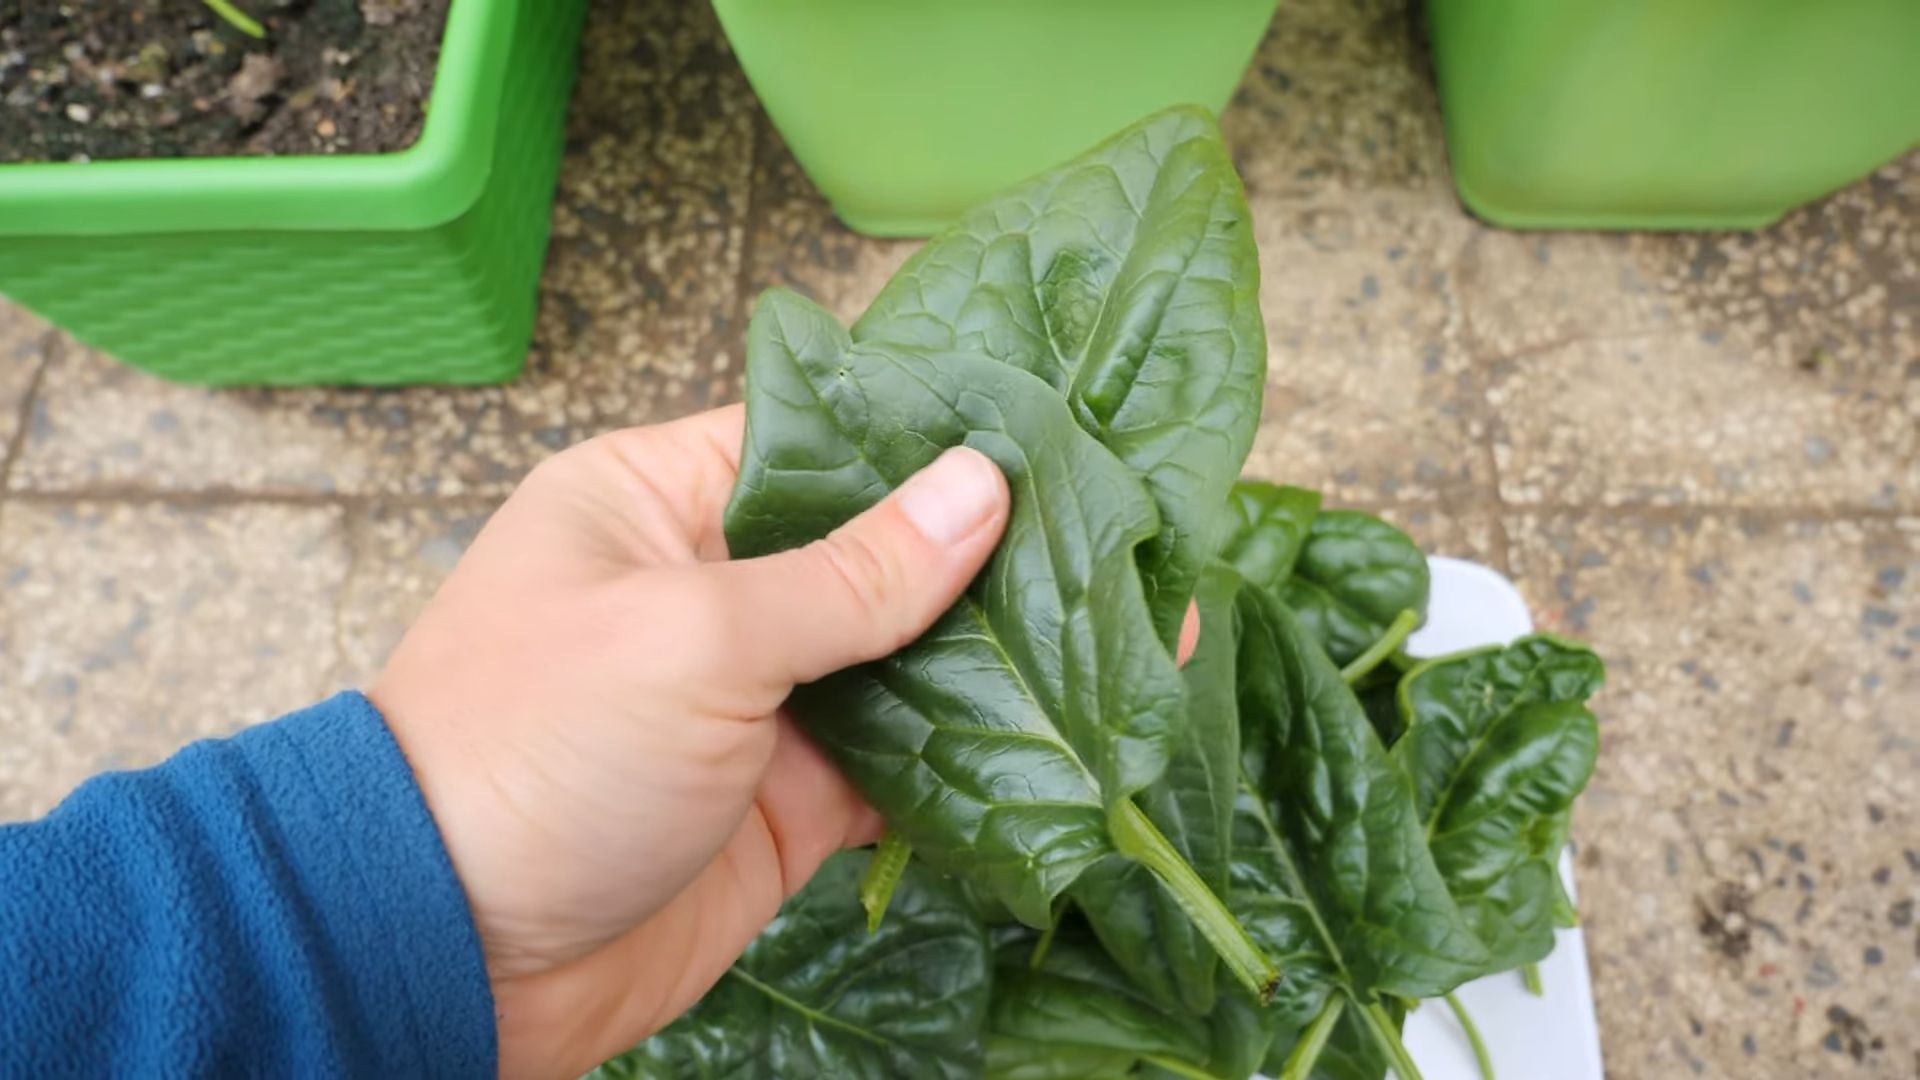
1. Harvesting Technique: You can harvest the entire plant at once, or you can harvest individual leaves as needed. I prefer to harvest individual leaves, as this allows the plant to continue producing more leaves.
2. When to Harvest: Harvest the leaves when they are about 4-6 inches long.
3. How to Harvest: Use scissors or a sharp knife to cut the leaves off at the base of the plant.
4. Succession Planting: To ensure a continuous supply of spinach, sow new seeds every 2-3 weeks. This is called succession planting.
Troubleshooting
Even with the best care, you might encounter some problems along the way. Here are a few common issues and how to address them:
* Yellowing Leaves: This could be a sign of overwatering, underwatering, or nutrient deficiency. Check the soil moisture and adjust your watering accordingly. If the soil is consistently moist, you may be overwatering. If the soil is dry, you may be underwatering. If you suspect a nutrient deficiency, try fertilizing with a balanced fertilizer.
* Wilting Leaves: This could be a sign of heat stress or underwatering. Provide some afternoon shade during hot weather and make sure to water regularly.
* Pests: As mentioned earlier, spinach can be susceptible to pests like aphids and slugs. Inspect your plants regularly for signs of infestation and take action promptly.
* Bolting: If your spinach plants start to bolt, harvest the leaves immediately. Once the plants have bolted, the leaves will become bitter.
Choosing the Right Spinach Variety
There are many different spinach varieties to choose from, each with its own unique characteristics. Here are a few popular options:
* Bloomsdale Long Standing: This is a classic spinach variety that is known for its large, crinkled leaves and its resistance to bolting.
* Tyee: This is another popular spinach variety that is known for its smooth leaves and its resistance to bolting.
* Malabar Spinach: Although technically not a true spinach, Malabar spinach is a heat-tolerant alternative that can be grown in warm climates. It has a slightly different flavor than regular spinach, but it is still delicious.
* Red Cardinal: This variety has beautiful red veins and a mild flavor. It’s also relatively bolt-resistant.
Extending Your Spinach Season
Spinach is a cool-season crop, which means it grows best in the spring and fall. However, with a little bit of planning, you can extend your spinach season.
* Start Seeds Indoors: Start your spinach seeds indoors 4-6 weeks before the last expected frost. This will give you a head start on the growing season.
* Use Row Covers: Row covers can protect your spinach plants from frost and cold weather.
* Plant in a Shady Location: During the summer, plant your spinach in a shady location to prevent bolting.
* Choose Bolt-Resistant Varieties: As mentioned earlier, choose bolt-resistant spinach varieties to extend your growing season.
Spinach Recipes to Enjoy
Now that you’ve harvested your delicious homegrown spinach, it’s time to enjoy it! Here are a few of my favorite spinach recipes:
* Spinach Salad: A classic spinach salad with your favorite toppings. I love adding strawberries, goat cheese, and a balsamic vinaigrette.
* Spinach and Artichoke Dip: A crowd-pleasing appetizer that’s perfect for parties.
* Spinach Smoothie: A healthy and delicious way to start your day.
* Spinach and Feta Pie (Spanakopita): A savory Greek pie that’s perfect for lunch or dinner.
* Sautéed Spinach: A simple and quick side dish that’s packed with nutrients.
Final Thoughts
Growing spinach in pots is a rewarding and easy way to enjoy fresh, homegrown greens. With a little bit of care and attention, you can have a continuous supply of spinach throughout the growing season. So, grab a pot, some seeds, and get started! Happy gardening!
Conclusion
So, there you have it! Growing spinach in pots is not only achievable, but it’s also incredibly rewarding. We’ve walked through the simple steps, from selecting the right pot and soil to nurturing your leafy greens until they’re ready for harvest. Why is this DIY trick a must-try? Because it puts fresh, organic spinach right at your fingertips, regardless of whether you have a sprawling garden or just a sunny balcony. Imagine stepping outside and snipping off exactly the amount of spinach you need for a salad, smoothie, or side dish – no more wilted bags from the grocery store!
Beyond the convenience, growing your own spinach allows you to control exactly what goes into your food. No pesticides, no questionable fertilizers, just pure, healthy goodness. Plus, it’s a fantastic way to connect with nature and experience the satisfaction of nurturing something from seed to table.
But the fun doesn’t stop there! Feel free to experiment with different varieties of spinach. Try baby spinach for tender leaves, or explore savoy spinach for a more robust flavor and texture. You can also companion plant your spinach with herbs like basil or mint to deter pests and enhance the flavor of both plants. Another variation is to try succession planting. Sow new seeds every few weeks to ensure a continuous harvest throughout the growing season. This way, you’ll always have fresh spinach on hand.
Consider adding a layer of mulch, such as straw or shredded leaves, to help retain moisture and suppress weeds. This is especially helpful during hotter months. You can also use a liquid fertilizer, diluted according to the package instructions, every few weeks to give your spinach a boost. Remember to monitor your plants regularly for any signs of pests or diseases, and address them promptly to prevent them from spreading.
Growing spinach in pots is a gateway to a healthier lifestyle and a more sustainable way of eating. It’s a simple, accessible project that anyone can undertake, regardless of their gardening experience.
We wholeheartedly encourage you to give this DIY trick a try. It’s an investment in your health, your well-being, and your connection to the natural world. Once you’ve harvested your first batch of homegrown spinach, we’re confident you’ll be hooked!
Don’t forget to share your experiences with us! We’d love to hear about your successes, your challenges, and any tips or tricks you’ve discovered along the way. Post photos of your potted spinach on social media using [Your Hashtag Here] and let’s inspire others to join the fun of growing their own food. Happy gardening!
FAQ
What is the best size pot for growing spinach?
The ideal pot size for growing spinach is at least 6 inches deep and 6 inches in diameter. However, a larger pot, such as a 12-inch pot, is even better as it provides more room for the roots to grow and allows you to plant multiple spinach plants in the same container. Make sure the pot has drainage holes to prevent waterlogging, which can lead to root rot. If you’re planning to grow several spinach plants together, consider using a rectangular planter box. This will give them ample space to spread out and maximize your harvest.
What kind of soil should I use for growing spinach in pots?
Spinach thrives in well-draining, nutrient-rich soil with a pH between 6.5 and 7.0. A good potting mix specifically formulated for vegetables is an excellent choice. You can also create your own mix by combining equal parts of compost, peat moss (or coconut coir), and perlite or vermiculite. Compost provides essential nutrients, peat moss or coconut coir helps retain moisture, and perlite or vermiculite improves drainage. Avoid using garden soil in pots, as it can become compacted and doesn’t drain well. Before planting, amend the soil with a slow-release fertilizer to provide a steady supply of nutrients throughout the growing season.
How much sunlight does spinach need?
Spinach needs at least 3-6 hours of direct sunlight per day to thrive. However, in hotter climates, it’s best to provide some afternoon shade to prevent the leaves from wilting or bolting (going to seed prematurely). If you don’t have a sunny spot, you can supplement with grow lights. Place the grow lights a few inches above the plants and keep them on for 12-14 hours per day. Rotate the pots regularly to ensure that all sides of the plants receive adequate sunlight.
How often should I water spinach in pots?
Spinach needs consistent moisture to grow well. Water your spinach plants whenever the top inch of soil feels dry to the touch. Avoid overwatering, as this can lead to root rot. Water deeply, allowing the water to drain out of the drainage holes. During hot weather, you may need to water more frequently. Check the soil moisture levels daily and adjust your watering schedule accordingly. Mulching around the plants can help retain moisture and reduce the need for frequent watering.
How do I fertilize spinach in pots?
Spinach is a heavy feeder and benefits from regular fertilization. Use a balanced liquid fertilizer, such as a 10-10-10 or 20-20-20, diluted to half strength. Apply the fertilizer every 2-3 weeks, following the instructions on the package. You can also use organic fertilizers, such as compost tea or fish emulsion. These are gentler on the plants and provide a slow-release source of nutrients. Avoid over-fertilizing, as this can lead to excessive leaf growth and a bitter taste.
When is spinach ready to harvest?
Spinach is typically ready to harvest about 40-50 days after planting. You can start harvesting the outer leaves when they are about 4-6 inches long. Use scissors or a knife to cut the leaves close to the base of the plant. Avoid pulling the leaves, as this can damage the plant. You can harvest spinach multiple times from the same plant. Just continue to harvest the outer leaves as they mature, and the plant will continue to produce new leaves. If the plant starts to bolt (send up a flower stalk), harvest all the remaining leaves, as they will become bitter.
What are some common pests and diseases that affect spinach?
Spinach can be susceptible to several pests and diseases, including aphids, spider mites, leaf miners, and downy mildew. Aphids and spider mites can be controlled with insecticidal soap or neem oil. Leaf miners can be removed by hand or treated with spinosad. Downy mildew is a fungal disease that can be prevented by providing good air circulation and avoiding overhead watering. If you notice any signs of pests or diseases, treat them promptly to prevent them from spreading.
Can I grow spinach in pots indoors?
Yes, you can grow spinach in pots indoors, provided you have adequate lighting. Place the pots near a sunny window that receives at least 6 hours of direct sunlight per day. If you don’t have enough natural light, you can supplement with grow lights. Keep the grow lights on for 12-14 hours per day. Maintain a consistent temperature between 60-70°F (15-21°C) and provide good air circulation. Water regularly and fertilize every 2-3 weeks.
How do I prevent spinach from bolting?
Bolting is when spinach sends up a flower stalk and the leaves become bitter. It is often triggered by hot weather or stress. To prevent bolting, choose bolt-resistant varieties of spinach. Provide afternoon shade during hot weather. Water regularly to keep the soil consistently moist. Harvest the leaves regularly to encourage new growth. If the plant starts to bolt, harvest all the remaining leaves immediately.


Leave a Comment