
Growing Pineapples at Home might seem like an exotic dream reserved for tropical climates, but I’m here to tell you it’s totally achievable, even if you’re miles away from Hawaii! Forget those expensive grocery store pineapples – imagine plucking a sweet, juicy pineapple straight from your own backyard (or even your windowsill!).
For centuries, the pineapple has been a symbol of hospitality and luxury. Originating in South America, it was so prized that it became a status symbol in Europe, often rented out as a centerpiece for lavish parties! Now, you can bring that touch of tropical elegance to your own home.
Why should you embark on this DIY adventure? Well, besides the sheer bragging rights, growing pineapples at home is incredibly rewarding. It’s a fun, educational project for the whole family, and you’ll know exactly where your food is coming from. Plus, store-bought pineapples can be expensive and often lack the intense flavor of a homegrown one. This DIY trick will save you money, reduce your carbon footprint, and give you a delicious, all-natural treat. Let’s dive in and unlock the secrets to successfully cultivating your own pineapple paradise!
Ananas selber ziehen: Dein tropischer Traum für Zuhause
Hey Leute! Habt ihr euch jemals gefragt, wie es wäre, eure eigene Ananas zu züchten? Ich zeige euch, wie ihr diesen tropischen Traum ganz einfach in eurem eigenen Zuhause verwirklichen könnt. Es ist einfacher als ihr denkt und macht super viel Spaß!
Was du brauchst:
* Eine reife Ananas (am besten aus dem Bioladen, da diese oft nicht mit Wachstumsinhibitoren behandelt wurden)
* Ein scharfes Messer
* Einen Topf (ca. 15-20 cm Durchmesser)
* Blumenerde (am besten Anzuchterde oder eine Mischung aus Blumenerde und Sand)
* Wasser
* Optional: Bewurzelungspulver
* Optional: Plastiktüte oder Mini-Gewächshaus
Ananas vorbereiten: Der Kopf muss ab!
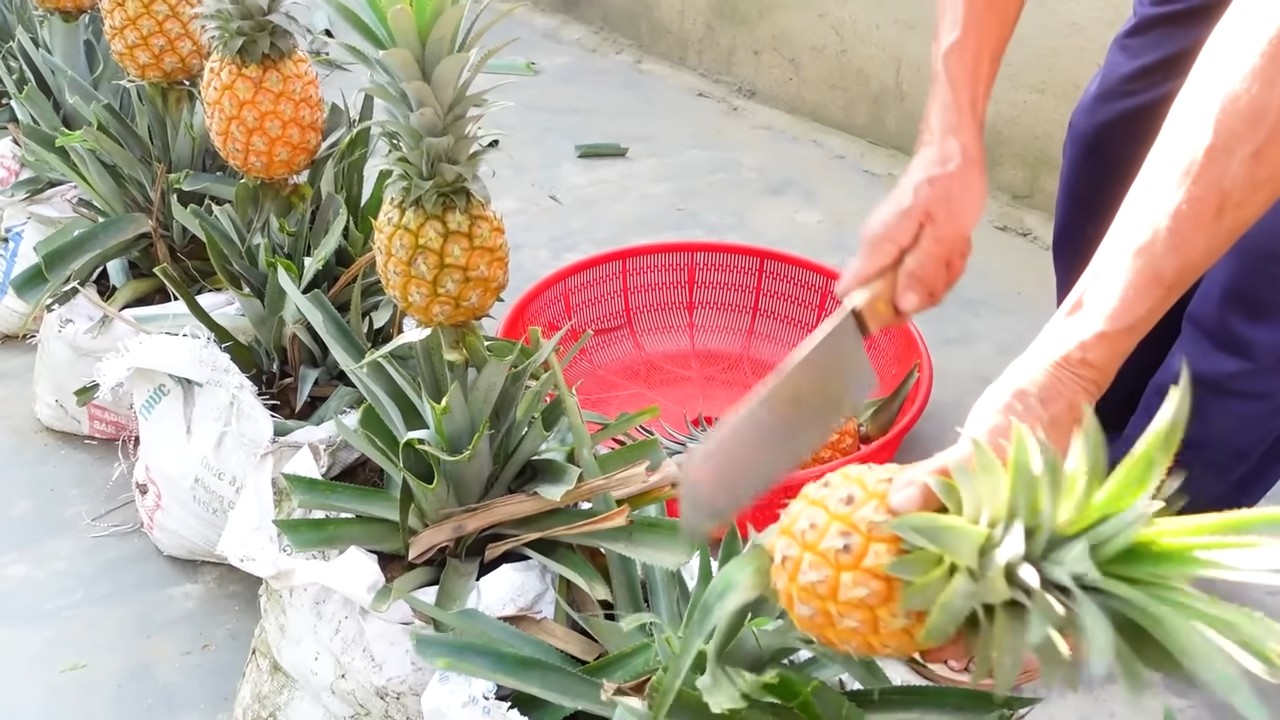
1. Ananas auswählen: Wähle eine reife Ananas mit gesunden, grünen Blättern. Die Blätter sollten fest sitzen und nicht braun oder welk sein. Die Frucht selbst sollte angenehm duften.
2. Blätterkrone abschneiden: Nimm dein scharfes Messer und schneide die Blätterkrone mit etwa 2-3 cm Fruchtfleisch ab. Achte darauf, dass du einen sauberen Schnitt machst.
3. Fruchtfleisch entfernen: Entferne vorsichtig das restliche Fruchtfleisch von der Blätterkrone. Das ist wichtig, da das Fruchtfleisch sonst faulen und die Wurzelbildung behindern kann. Du kannst das Fruchtfleisch entweder mit dem Messer abschneiden oder es vorsichtig abziehen.
4. Blätter vorbereiten: Entferne die untersten Blätter der Blätterkrone (ca. 2-3 Reihen). Dadurch werden die Wurzelansätze freigelegt und die Wurzelbildung gefördert.
5. Optional: Bewurzelungspulver: Tauche die freigelegten Wurzelansätze in Bewurzelungspulver. Das ist kein Muss, aber es kann die Wurzelbildung beschleunigen.
Einpflanzen: Ab in die Erde!
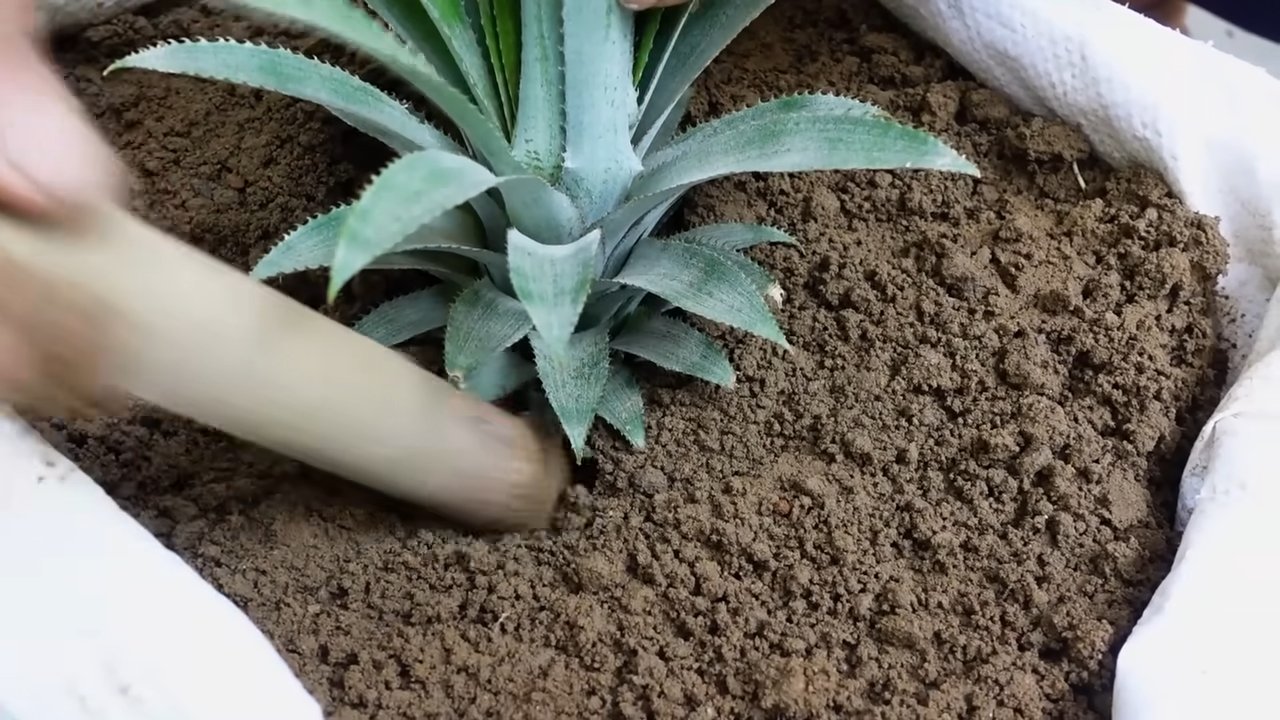
1. Topf vorbereiten: Fülle den Topf mit Blumenerde. Achte darauf, dass die Erde locker und gut durchlässig ist.
2. Ananas einpflanzen: Mache ein kleines Loch in die Erde und setze die Blätterkrone hinein. Die untersten Blätter sollten knapp über der Erde sein.
3. Andrücken: Drücke die Erde um die Blätterkrone herum vorsichtig an, damit sie stabil steht.
4. Gießen: Gieße die Ananas vorsichtig an. Die Erde sollte feucht, aber nicht nass sein.
Pflege: Geduld ist gefragt!
1. Standort: Stelle den Topf an einen warmen und hellen Ort. Ananas lieben die Sonne! Ein Südfenster ist ideal.
2. Gießen: Gieße die Ananas regelmäßig, aber nicht zu viel. Die Erde sollte immer leicht feucht sein. Vermeide Staunässe, da dies zu Fäulnis führen kann. Ich gieße meine Ananas etwa einmal pro Woche, aber das hängt natürlich von der Temperatur und Luftfeuchtigkeit ab.
3. Luftfeuchtigkeit: Ananas lieben eine hohe Luftfeuchtigkeit. Du kannst die Luftfeuchtigkeit erhöhen, indem du den Topf auf einen Untersetzer mit Wasser und Kieselsteinen stellst. Das Wasser verdunstet und erhöht die Luftfeuchtigkeit in der Umgebung. Du kannst die Blätter auch regelmäßig mit Wasser besprühen.
4. Düngen: Dünge die Ananas während der Wachstumsperiode (Frühling und Sommer) alle zwei Wochen mit einem Flüssigdünger für Zimmerpflanzen.
5. Überwintern: Im Winter solltest du die Ananas etwas weniger gießen und nicht düngen. Stelle sie an einen kühlen, aber hellen Ort.
6. Geduld: Hab Geduld! Es kann einige Monate dauern, bis die Ananas Wurzeln schlägt und neues Wachstum zeigt. Sei nicht entmutigt, wenn es nicht sofort klappt.
Optional: Das Mini-Gewächshaus
Um die Luftfeuchtigkeit zu erhöhen und die Wurzelbildung zu beschleunigen, kannst du eine Plastiktüte oder ein Mini-Gewächshaus über die Ananas stülpen. Achte darauf, dass die Tüte nicht direkt auf den Blättern aufliegt und lüfte sie regelmäßig, um Schimmelbildung zu vermeiden.
Wann gibt es Früchte?
Das ist die große Frage! Es kann bis zu 2-3 Jahre dauern, bis deine Ananas Früchte trägt. Das hängt von verschiedenen Faktoren ab, wie z.B. der Sorte, dem Standort und der Pflege. Aber keine Sorge, auch wenn es lange dauert, ist es ein tolles Gefühl, die eigene Ananas zu ernten!
Wie bringe ich die Ananas zum Blühen?
Es gibt einen Trick, um die Ananas zum Blühen zu bringen:
1. Apfel-Trick: Lege einen reifen Apfel in eine Plastiktüte und stülpe die Tüte über die Ananas. Der Apfel gibt Ethylen ab, ein Gas, das die Blütenbildung anregen kann.
2. Tüte verschließen: Verschließe die Tüte gut, damit das Ethylen nicht entweichen kann.
3. Ein paar Tage warten: Lasse die Tüte für etwa eine Woche über der Ananas.
4. Tüte entfernen: Entferne die Tüte und warte ab. Mit etwas Glück wird deine Ananas bald Blüten bilden.
Häufige Probleme und Lösungen:
* Blätter werden braun: Das kann verschiedene Ursachen haben, z.B. zu viel Sonne, zu wenig Wasser oder zu niedrige Luftfeuchtigkeit. Überprüfe die Standortbedingungen und passe die Pflege entsprechend an.
* Fäulnis: Fäulnis tritt meistens auf, wenn die Erde zu nass ist. Achte darauf, dass die Erde gut durchlässig ist und vermeide Staunässe.
* Kein Wachstum: Wenn die Ananas nicht wächst, kann das daran liegen, dass sie noch keine Wurzeln geschlagen hat. Hab Geduld und warte a
Hey Leute! Habt ihr euch jemals gefragt, wie es wäre, eure eigene Ananas zu züchten? Ich zeige euch, wie ihr diesen tropischen Traum ganz einfach in eurem eigenen Zuhause verwirklichen könnt. Es ist einfacher als ihr denkt und macht super viel Spaß!
Was du brauchst:
* Eine reife Ananas (am besten aus dem Bioladen, da diese oft nicht mit Wachstumsinhibitoren behandelt wurden)
* Ein scharfes Messer
* Einen Topf (ca. 15-20 cm Durchmesser)
* Blumenerde (am besten Anzuchterde oder eine Mischung aus Blumenerde und Sand)
* Wasser
* Optional: Bewurzelungspulver
* Optional: Plastiktüte oder Mini-Gewächshaus
Ananas vorbereiten: Der Kopf muss ab!
1. Ananas auswählen: Wähle eine reife Ananas mit gesunden, grünen Blättern. Die Blätter sollten fest sitzen und nicht braun oder welk sein. Die Frucht selbst sollte angenehm duften.
2. Blätterkrone abschneiden: Nimm dein scharfes Messer und schneide die Blätterkrone mit etwa 2-3 cm Fruchtfleisch ab. Achte darauf, dass du einen sauberen Schnitt machst.
3. Fruchtfleisch entfernen: Entferne vorsichtig das restliche Fruchtfleisch von der Blätterkrone. Das ist wichtig, da das Fruchtfleisch sonst faulen und die Wurzelbildung behindern kann. Du kannst das Fruchtfleisch entweder mit dem Messer abschneiden oder es vorsichtig abziehen.
4. Blätter vorbereiten: Entferne die untersten Blätter der Blätterkrone (ca. 2-3 Reihen). Dadurch werden die Wurzelansätze freigelegt und die Wurzelbildung gefördert.
5. Optional: Bewurzelungspulver: Tauche die freigelegten Wurzelansätze in Bewurzelungspulver. Das ist kein Muss, aber es kann die Wurzelbildung beschleunigen.
Einpflanzen: Ab in die Erde!
1. Topf vorbereiten: Fülle den Topf mit Blumenerde. Achte darauf, dass die Erde locker und gut durchlässig ist.
2. Ananas einpflanzen: Mache ein kleines Loch in die Erde und setze die Blätterkrone hinein. Die untersten Blätter sollten knapp über der Erde sein.
3. Andrücken: Drücke die Erde um die Blätterkrone herum vorsichtig an, damit sie stabil steht.
4. Gießen: Gieße die Ananas vorsichtig an. Die Erde sollte feucht, aber nicht nass sein.
Pflege: Geduld ist gefragt!
1. Standort: Stelle den Topf an einen warmen und hellen Ort. Ananas lieben die Sonne! Ein Südfenster ist ideal.
2. Gießen: Gieße die Ananas regelmäßig, aber nicht zu viel. Die Erde sollte immer leicht feucht sein. Vermeide Staunässe, da dies zu Fäulnis führen kann. Ich gieße meine Ananas etwa einmal pro Woche, aber das hängt natürlich von der Temperatur und Luftfeuchtigkeit ab.
3. Luftfeuchtigkeit: Ananas lieben eine hohe Luftfeuchtigkeit. Du kannst die Luftfeuchtigkeit erhöhen, indem du den Topf auf einen Untersetzer mit Wasser und Kieselsteinen stellst. Das Wasser verdunstet und erhöht die Luftfeuchtigkeit in der Umgebung. Du kannst die Blätter auch regelmäßig mit Wasser besprühen.
4. Düngen: Dünge die Ananas während der Wachstumsperiode (Frühling und Sommer) alle zwei Wochen mit einem Flüssigdünger für Zimmerpflanzen.
5. Überwintern: Im Winter solltest du die Ananas etwas weniger gießen und nicht düngen. Stelle sie an einen kühlen, aber hellen Ort.
6. Geduld: Hab Geduld! Es kann einige Monate dauern, bis die Ananas Wurzeln schlägt und neues Wachstum zeigt. Sei nicht entmutigt, wenn es nicht sofort klappt.
Optional: Das Mini-Gewächshaus
Um die Luftfeuchtigkeit zu erhöhen und die Wurzelbildung zu beschleunigen, kannst du eine Plastiktüte oder ein Mini-Gewächshaus über die Ananas stülpen. Achte darauf, dass die Tüte nicht direkt auf den Blättern aufliegt und lüfte sie regelmäßig, um Schimmelbildung zu vermeiden.
Wann gibt es Früchte?
Das ist die große Frage! Es kann bis zu 2-3 Jahre dauern, bis deine Ananas Früchte trägt. Das hängt von verschiedenen Faktoren ab, wie z.B. der Sorte, dem Standort und der Pflege. Aber keine Sorge, auch wenn es lange dauert, ist es ein tolles Gefühl, die eigene Ananas zu ernten!
Wie bringe ich die Ananas zum Blühen?
Es gibt einen Trick, um die Ananas zum Blühen zu bringen:
1. Apfel-Trick: Lege einen reifen Apfel in eine Plastiktüte und stülpe die Tüte über die Ananas. Der Apfel gibt Ethylen ab, ein Gas, das die Blütenbildung anregen kann.
2. Tüte verschließen: Verschließe die Tüte gut, damit das Ethylen nicht entweichen kann.
3. Ein paar Tage warten: Lasse die Tüte für etwa eine Woche über der Ananas.
4. Tüte entfernen: Entferne die Tüte und warte ab. Mit etwas Glück wird deine Ananas bald Blüten bilden.
Häufige Probleme und Lösungen:
* Blätter werden braun: Das kann verschiedene Ursachen haben, z.B. zu viel Sonne, zu wenig Wasser oder zu niedrige Luftfeuchtigkeit. Überprüfe die Standortbedingungen und passe die Pflege entsprechend an.
* Fäulnis: Fäulnis tritt meistens auf, wenn die Erde zu nass ist. Achte darauf, dass die Erde gut durchlässig ist und vermeide Staunässe.
* Kein Wachstum: Wenn die Ananas nicht wächst, kann das daran liegen, dass sie noch keine Wurzeln geschlagen hat. Hab Geduld und warte ab. Du kannst auch versuchen, die Luftfeuchtigkeit zu erhöhen oder die Ananas an einen wärmeren Ort zu stellen.
Zusammenfassung:
Ananas selber zu ziehen ist ein spannendes Projekt, das mit etwas Geduld und Sorgfalt gelingen kann. Es ist nicht nur eine tolle Möglichkeit, frische Ananas zu genießen, sondern auch eine schöne Dekoration für dein Zuhause. Also, worauf wartest du noch? Ran an die Ananas!
Ich hoffe, diese Anleitung hilft dir dabei, deine eigene Ananas zu züchten. Viel Erfolg und viel Spaß dabei! Und denk dran: Geduld ist der Schlüssel zum Erfolg!
Conclusion
So, there you have it! Growing pineapples at home, while it might seem like a tropical dream reserved for expert gardeners, is surprisingly achievable with a little patience and the right approach. We’ve walked you through the process, from selecting the perfect pineapple top to nurturing your plant to its fruiting glory. But why should you even bother embarking on this pineapple-growing adventure?
Firstly, the satisfaction of harvesting a pineapple you’ve personally cultivated is unparalleled. Forget the store-bought variety; the flavor of a homegrown pineapple, ripened to perfection under your care, is simply exquisite. It’s sweeter, juicier, and bursting with a tropical aroma that will transport you straight to a sun-drenched beach.
Secondly, growing your own pineapple is a fantastic way to reduce your environmental footprint. You’re cutting down on transportation emissions and supporting sustainable practices by sourcing your food locally – even if “local” means your own backyard or balcony!
Thirdly, it’s a fascinating learning experience. You’ll gain a deeper understanding of plant biology, horticulture, and the intricate processes that bring food to our tables. It’s a rewarding hobby that connects you with nature and provides a sense of accomplishment.
But the best part? You can customize your pineapple-growing journey!
Variations and Suggestions:
* Container Size Matters: As your pineapple plant grows, don’t hesitate to upgrade its pot. A larger container allows for more root development, leading to a healthier and more productive plant.
* Soil Amendments: Experiment with different soil amendments to find what works best for your growing conditions. Adding compost, aged manure, or even a bit of bone meal can provide essential nutrients.
* Foliar Feeding: Supplement your regular watering with occasional foliar feeding. A diluted seaweed extract or fish emulsion can provide a boost of micronutrients.
* Climate Considerations: If you live in a colder climate, consider growing your pineapple in a pot that can be easily moved indoors during the winter months. A sunny windowsill or a grow light will help keep your plant thriving.
* Propagating Pups: As your pineapple plant matures, it may produce “pups” or offshoots. These can be carefully separated and planted to create new pineapple plants, expanding your tropical garden.
* Different Pineapple Varieties: While the Smooth Cayenne is a popular choice, explore other pineapple varieties like the MD-2 or the Red Spanish. Each variety has its unique flavor profile and characteristics.
Growing pineapples at home is more than just a gardening project; it’s an investment in flavor, sustainability, and personal growth. So, grab a pineapple, follow our guide, and get ready to experience the joy of harvesting your own tropical treasure.
We encourage you to embark on this exciting journey and share your experiences with us! Post pictures of your pineapple plants, share your tips and tricks, and let us know how your homegrown pineapple tastes. Let’s create a community of pineapple enthusiasts and spread the joy of growing this delicious fruit at home. Don’t be afraid to experiment, learn, and most importantly, have fun! Your very own homegrown pineapple awaits!
Frequently Asked Questions (FAQ)
1. What kind of pineapple should I use to start growing pineapples at home?
The best type of pineapple to use is one that is fresh, ripe, and preferably organic. Look for a pineapple with healthy, green leaves. The Smooth Cayenne variety is a popular and readily available choice, but you can experiment with other varieties if you can find them. Avoid pineapples that are bruised, damaged, or have brown or wilted leaves. The key is to select a pineapple that is as healthy as possible to give your new plant the best start.
2. How long does it take to grow a pineapple from a top?
Patience is key! It typically takes anywhere from 2 to 3 years for a pineapple plant grown from a top to produce its first fruit. The exact timeframe depends on various factors, including climate, sunlight, soil quality, and the specific pineapple variety. Don’t get discouraged if it takes longer than expected; just continue to provide your plant with the care it needs, and eventually, you’ll be rewarded with a delicious homegrown pineapple.
3
So, there you have it! Growing pineapples at home, while it might seem like a tropical dream reserved for expert gardeners, is surprisingly achievable with a little patience and the right approach. We’ve walked you through the process, from selecting the perfect pineapple top to nurturing your plant to its fruiting glory. But why should you even bother embarking on this pineapple-growing adventure?
Firstly, the satisfaction of harvesting a pineapple you’ve personally cultivated is unparalleled. Forget the store-bought variety; the flavor of a homegrown pineapple, ripened to perfection under your care, is simply exquisite. It’s sweeter, juicier, and bursting with a tropical aroma that will transport you straight to a sun-drenched beach.
Secondly, growing your own pineapple is a fantastic way to reduce your environmental footprint. You’re cutting down on transportation emissions and supporting sustainable practices by sourcing your food locally – even if “local” means your own backyard or balcony!
Thirdly, it’s a fascinating learning experience. You’ll gain a deeper understanding of plant biology, horticulture, and the intricate processes that bring food to our tables. It’s a rewarding hobby that connects you with nature and provides a sense of accomplishment.
But the best part? You can customize your pineapple-growing journey!
Variations and Suggestions:
* Container Size Matters: As your pineapple plant grows, don’t hesitate to upgrade its pot. A larger container allows for more root development, leading to a healthier and more productive plant.
* Soil Amendments: Experiment with different soil amendments to find what works best for your growing conditions. Adding compost, aged manure, or even a bit of bone meal can provide essential nutrients.
* Foliar Feeding: Supplement your regular watering with occasional foliar feeding. A diluted seaweed extract or fish emulsion can provide a boost of micronutrients.
* Climate Considerations: If you live in a colder climate, consider growing your pineapple in a pot that can be easily moved indoors during the winter months. A sunny windowsill or a grow light will help keep your plant thriving.
* Propagating Pups: As your pineapple plant matures, it may produce “pups” or offshoots. These can be carefully separated and planted to create new pineapple plants, expanding your tropical garden.
* Different Pineapple Varieties: While the Smooth Cayenne is a popular choice, explore other pineapple varieties like the MD-2 or the Red Spanish. Each variety has its unique flavor profile and characteristics.
Growing pineapples at home is more than just a gardening project; it’s an investment in flavor, sustainability, and personal growth. So, grab a pineapple, follow our guide, and get ready to experience the joy of harvesting your own tropical treasure.
We encourage you to embark on this exciting journey and share your experiences with us! Post pictures of your pineapple plants, share your tips and tricks, and let us know how your homegrown pineapple tastes. Let’s create a community of pineapple enthusiasts and spread the joy of growing this delicious fruit at home. Don’t be afraid to experiment, learn, and most importantly, have fun! Your very own homegrown pineapple awaits!
Frequently Asked Questions (FAQ)
1. What kind of pineapple should I use to start growing pineapples at home?
The best type of pineapple to use is one that is fresh, ripe, and preferably organic. Look for a pineapple with healthy, green leaves. The Smooth Cayenne variety is a popular and readily available choice, but you can experiment with other varieties if you can find them. Avoid pineapples that are bruised, damaged, or have brown or wilted leaves. The key is to select a pineapple that is as healthy as possible to give your new plant the best start.
2. How long does it take to grow a pineapple from a top?
Patience is key! It typically takes anywhere from 2 to 3 years for a pineapple plant grown from a top to produce its first fruit. The exact timeframe depends on various factors, including climate, sunlight, soil quality, and the specific pineapple variety. Don’t get discouraged if it takes longer than expected; just continue to provide your plant with the care it needs, and eventually, you’ll be rewarded with a delicious homegrown pineapple.
3. What kind of soil is best for growing pineapples?
Pineapples thrive in well-draining, slightly acidic soil. A mixture of equal parts potting soil, perlite, and sand is a good starting point. The perlite and sand help improve drainage, which is crucial for preventing root rot. You can also add some compost or aged manure to provide essential nutrients. Avoid heavy clay soils, as they tend to retain too much moisture.
4. How much sunlight does a pineapple plant need?
Pineapples need plenty of sunlight to thrive. Aim for at least 6 hours of direct sunlight per day. If you’re growing your pineapple indoors, place it near a sunny window or supplement with a grow light. Insufficient sunlight can lead to slow growth and reduced fruit production.
5. How often should I water my pineapple plant?
Water your pineapple plant regularly, but avoid overwatering. Allow the soil to dry out slightly between waterings. During the warmer months, you may need to water more frequently than during the cooler months. A good rule of thumb is to water when the top inch of soil feels dry to the touch. Ensure that the pot has good drainage to prevent waterlogging.
6. Do I need to fertilize my pineapple plant?
Yes, fertilizing your pineapple plant is essential for healthy growth and fruit production. Use a balanced fertilizer (e.g., 10-10-10) diluted to half strength. Fertilize every 2-3 months during the growing season (spring and summer). Avoid fertilizing during the dormant season (fall and winter). You can also supplement with foliar feeding using a diluted seaweed extract or fish emulsion.
7. How do I encourage my pineapple plant to fruit?
Getting your pineapple plant to fruit can sometimes be a challenge. One trick is to expose the plant to ethylene gas, which can stimulate flowering. You can do this by placing a ripe apple or banana near the plant and covering it with a plastic bag for a few days. The ripening fruit will release ethylene gas, which can trigger flowering. Another method is to water the plant with a solution of calcium carbide (available at some garden centers) diluted in water. However, use this method with caution, as calcium carbide can be harmful if used improperly.
8. What are some common problems when growing pineapples at home?
Some common problems include root rot (caused by overwatering), mealybugs, scale, and nutrient deficiencies. Root rot can be prevented by using well-draining soil and avoiding overwatering. Mealybugs and scale can be treated with insecticidal soap or neem oil. Nutrient deficiencies can be addressed by fertilizing with a balanced fertilizer. Regularly inspect your plant for any signs of pests or diseases and take action promptly.
9. Can I grow a pineapple plant indoors?
Yes, you can grow a pineapple plant indoors, especially if you live in a colder climate. Choose a pot that is large enough to accommodate the plant’s root system and provide plenty of sunlight. A sunny windowsill or a grow light will help keep your plant thriving. Be sure to water regularly and fertilize as needed.
10. What do I do with the pineapple after I harvest it?
Congratulations on harvesting your homegrown pineapple! Enjoy it fresh, grilled, or in your favorite recipes. You can also use the top of the harvested pineapple to start a new plant, continuing the cycle of growing your own tropical fruit. Don’t forget to share your delicious pineapple with friends and family!


Leave a Comment