
Umbrella DIY Projects: Ever looked at that old, tattered umbrella in your closet and thought, “There has to be something more I can do with this?” I know I have! Before you toss it in the trash, get ready to unleash your inner DIY enthusiast because we’re diving headfirst into a world of creative upcycling.
For centuries, umbrellas have been symbols of protection and status, evolving from simple sunshades in ancient Egypt to the rain-repelling marvels we know today. But their story doesn’t have to end when the fabric rips or a spoke breaks. In fact, that’s where the fun begins!
In today’s world, where sustainability and resourcefulness are more important than ever, finding new uses for old items is not just a hobby; it’s a responsibility. Plus, let’s be honest, who doesn’t love a good DIY project that saves money and reduces waste? That’s why these Umbrella DIY Projects are perfect for you. I’m going to show you how to transform those discarded umbrellas into stunning, functional, and totally unique creations. From stylish shopping bags to whimsical wind chimes, the possibilities are endless. So, grab your toolbox, dust off that old umbrella, and let’s get crafting!
Upcycling Umbrellas: From Rainy Day Gear to Gorgeous Decor!
Hey there, fellow DIY enthusiasts! Got a broken umbrella lying around? Don’t toss it! I’m going to show you some amazing ways to transform those discarded umbrellas into beautiful and functional items for your home. We’ll cover everything from stylish tote bags to unique wall art. Get ready to unleash your creativity!
What You’ll Need (General Supplies)
Before we dive into the specific projects, let’s gather some essential supplies. These are items you’ll likely need for most of the umbrella upcycling projects we’ll be tackling:
* **Broken Umbrellas:** Obviously! The more, the merrier. Different colors and patterns will give you more options.
* **Seam Ripper:** This little tool is a lifesaver for carefully removing the fabric panels from the umbrella frame.
* **Scissors:** Sharp fabric scissors are crucial for clean cuts.
* **Sewing Machine:** While some hand-sewing might be involved, a sewing machine will make most projects much faster and easier.
* **Thread:** Choose thread that matches or complements the umbrella fabric.
* **Sewing Needles:** Make sure you have needles suitable for the type of fabric you’re working with (umbrella fabric is usually water-resistant).
* **Pins:** For holding fabric pieces together before sewing.
* **Measuring Tape or Ruler:** Accuracy is key for many of these projects.
* **Iron and Ironing Board:** For pressing seams and creating crisp edges.
* **Cutting Mat:** Protect your work surface when cutting fabric.
* **Rotary Cutter (Optional):** This can be helpful for cutting long, straight lines.
* **Pencil or Fabric Marker:** For marking measurements and patterns on the fabric.
* **Safety Glasses:** When working with the umbrella frame, especially when removing metal parts.
* **Pliers:** For bending or removing stubborn metal pieces.
* **Gloves:** To protect your hands when handling the umbrella frame.
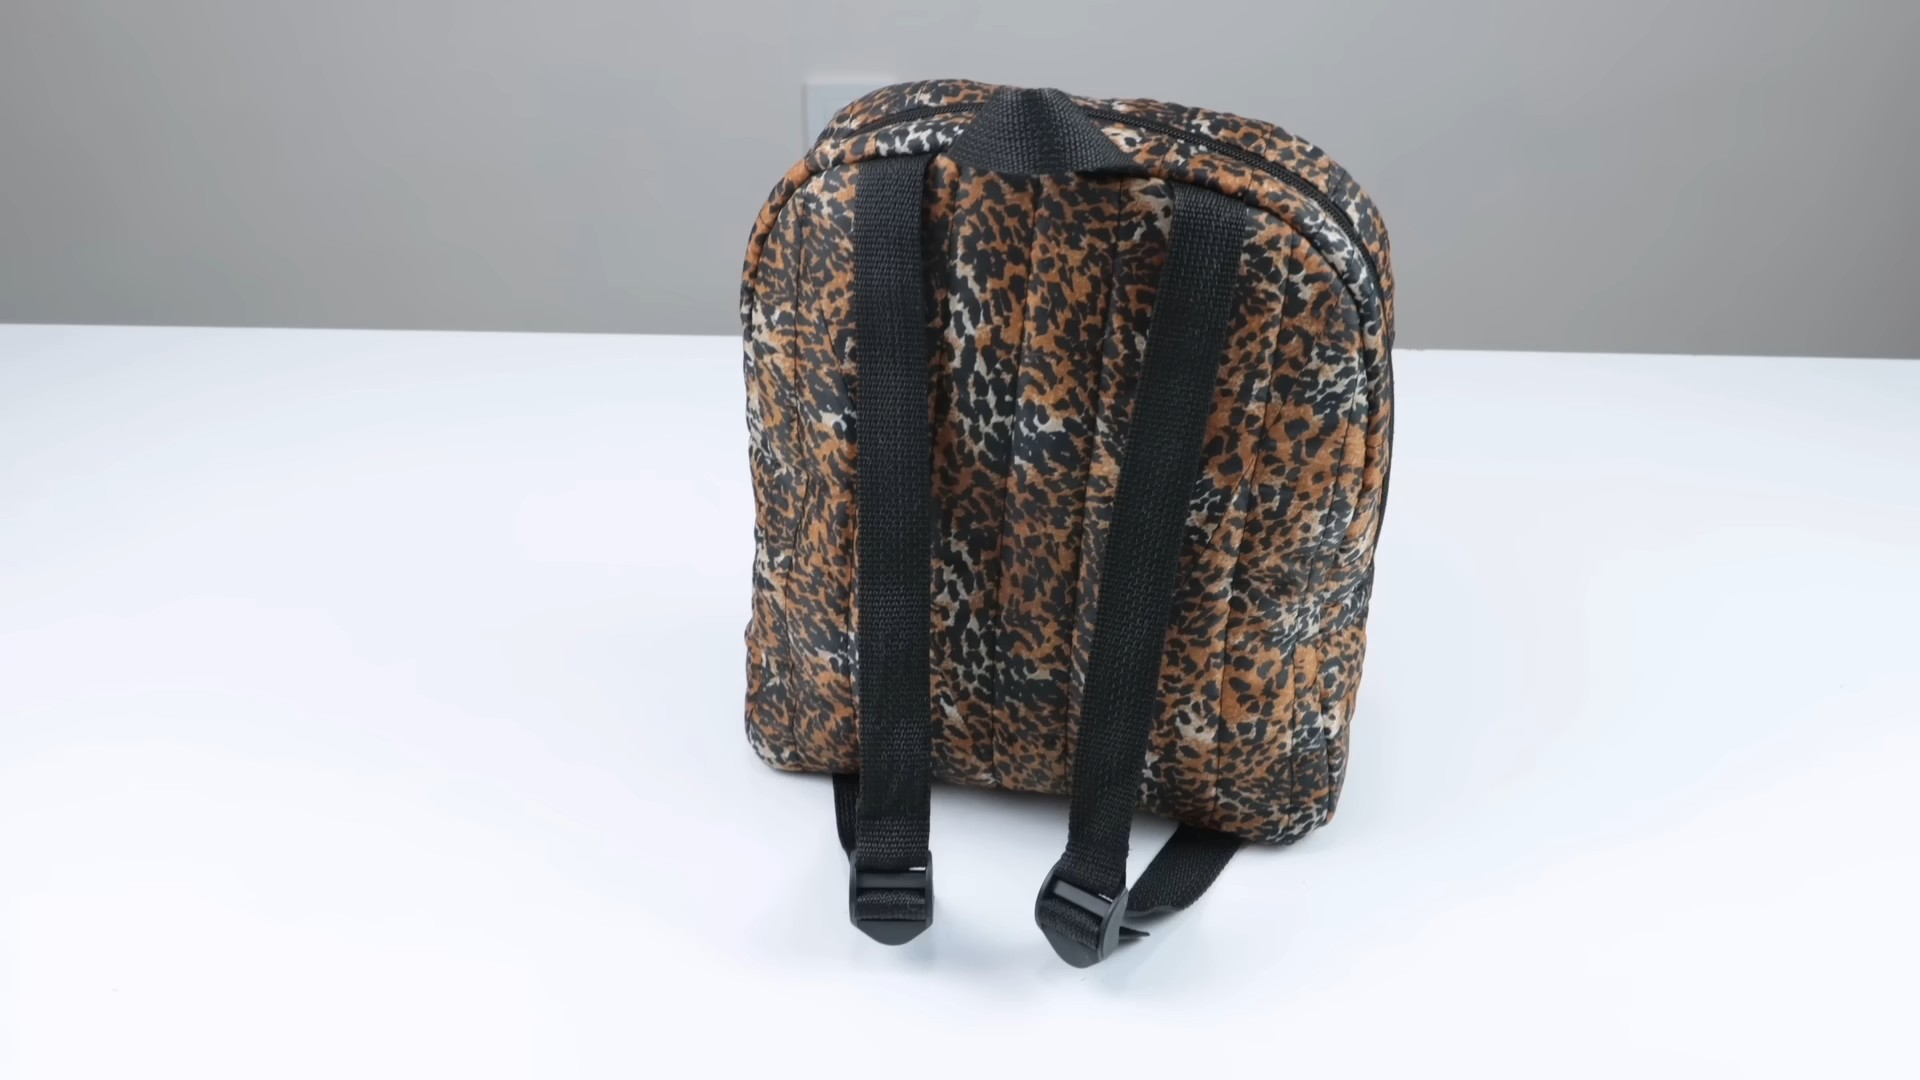
Project 1: Stylish Umbrella Tote Bag
This is a fantastic way to repurpose an umbrella and create a unique and eco-friendly tote bag. I love how durable and water-resistant these bags are!
Materials Specific to the Tote Bag:
* One broken umbrella (preferably with a fun pattern)
* Fabric for lining (optional, but recommended for added durability)
* Webbing or sturdy fabric for handles
* Magnetic snap or button closure (optional)
Step-by-Step Instructions:
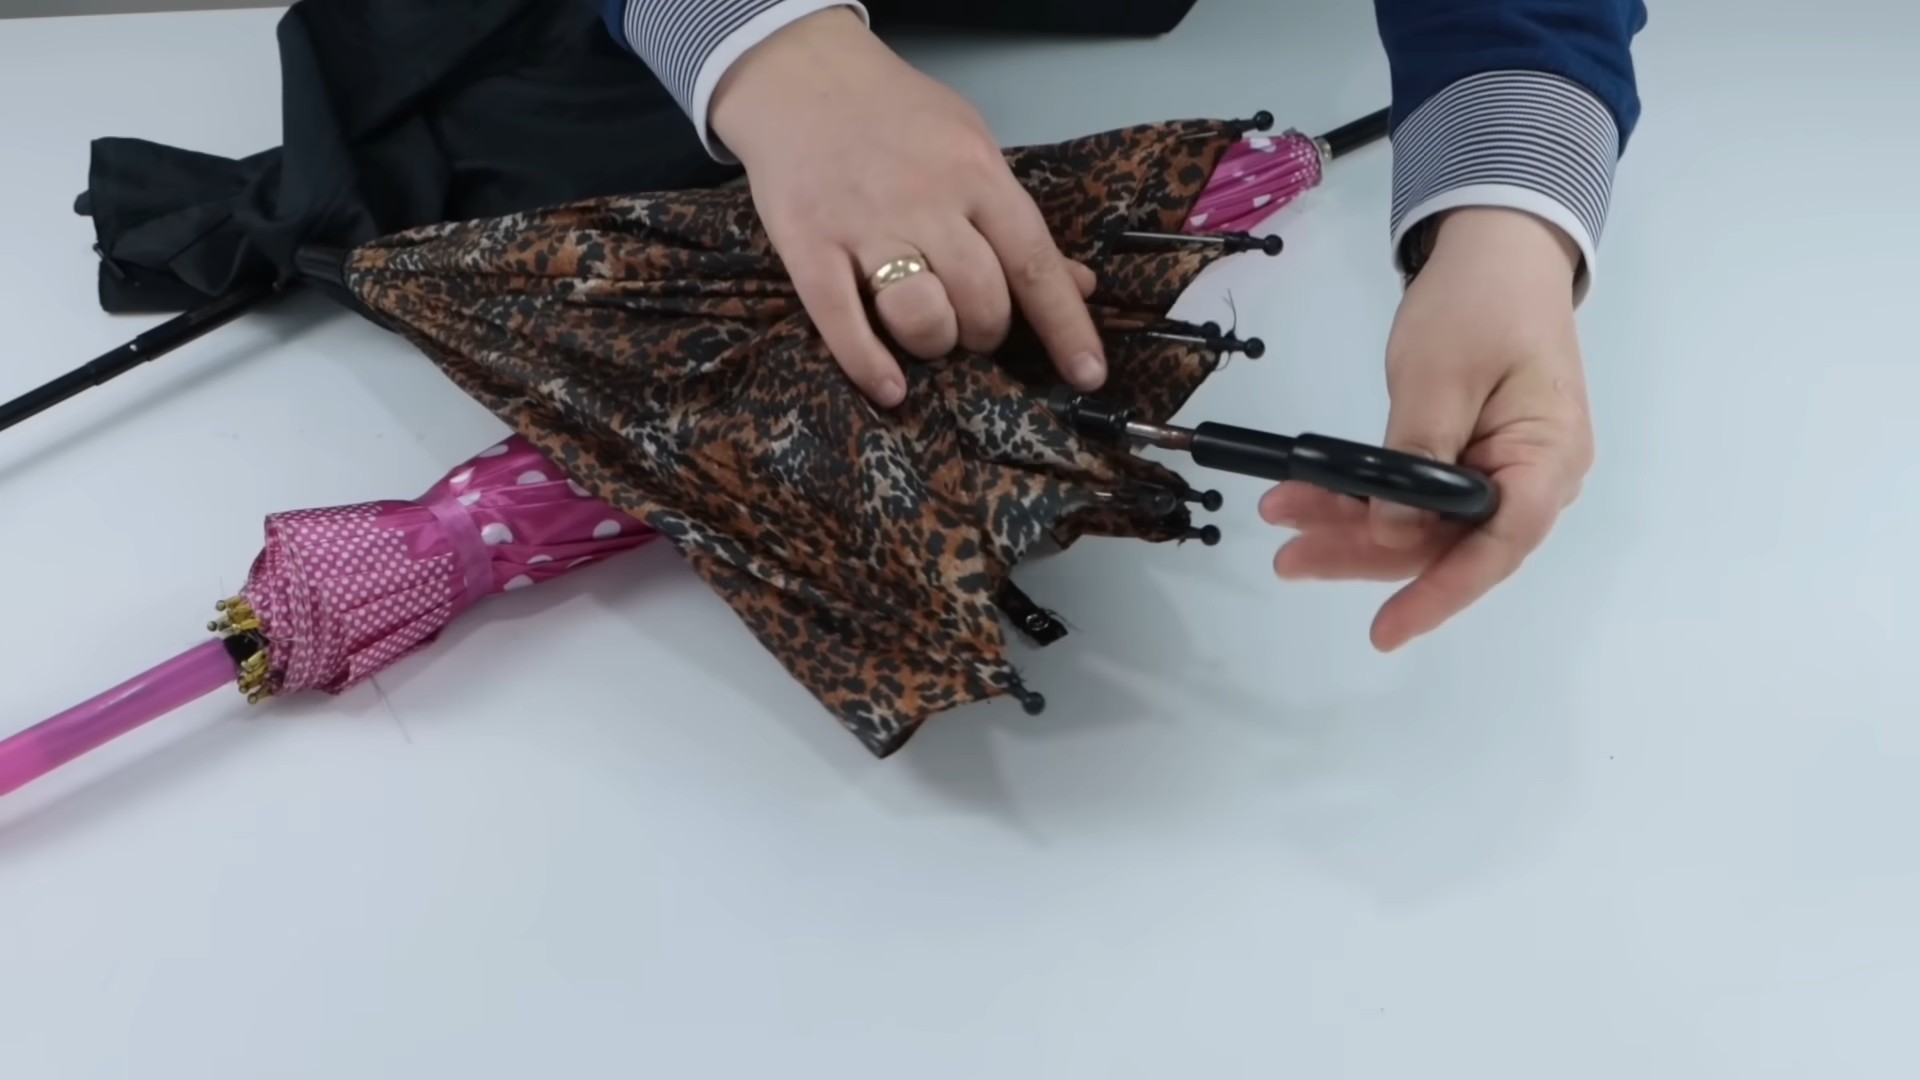
1. **Disassemble the Umbrella:** Carefully use the seam ripper to detach the fabric panels from the umbrella frame. Be patient and avoid tearing the fabric. Remove all the metal tips and any remaining thread.
2. **Prepare the Fabric Panels:** Iron the fabric panels to remove any creases. This will make it easier to work with.
3. **Cut the Fabric:** Decide on the size of your tote bag. I usually aim for a bag that’s about 15 inches wide and 12 inches tall. Cut the umbrella fabric into two rectangular pieces that are slightly larger than your desired bag size (to allow for seam allowances). For example, if you want a 15×12 inch bag, cut two pieces that are 16×13 inches.
4. **Cut the Lining (Optional):** If you’re using a lining, cut two pieces of lining fabric to the same size as the umbrella fabric pieces.
5. **Sew the Bag Body:**
* Place the two umbrella fabric pieces right sides together and pin along the sides and bottom.
* Sew along the pinned edges with a 1/2-inch seam allowance.
* If you’re using a lining, repeat this process with the lining fabric pieces.
6. **Box the Corners (Optional):** To give your tote bag a flat bottom, you can box the corners.
* Fold each bottom corner so that the side seam aligns with the bottom seam, creating a triangle.
* Measure and mark a line across the triangle, perpendicular to the fold. The length of this line will determine the depth of the bag’s bottom. For example, if you want a 3-inch deep bottom, mark a line that is 3 inches long.
* Sew along the marked line.
* Trim off the excess fabric, leaving a 1/2-inch seam allowance.
* Repeat for the other corner.
* Repeat the boxing corner process for the lining.
7. **Attach the Lining (Optional):**
* Place the lining inside the umbrella fabric bag, wrong sides together.
* Fold the top edges of both the umbrella fabric and the lining inward by 1/2 inch and press with an iron.
* Pin the folded edges together.
8. **Create the Handles:** Cut two pieces of webbing or sturdy fabric for the handles. The length will depend on your preference, but I usually go for around 24 inches each.
9. **Attach the Handles:**
* Position the handles on the outside of the bag, spacing them evenly.
* Pin the handles in place, making sure they are securely attached to both the umbrella fabric and the lining (if you’re using one).
* Sew the handles to the bag, using a strong stitch. I like to sew a square with an “X” inside for extra reinforcement.
10. **Add a Closure (Optional):** If you want to add a magnetic snap or button closure, now is the time to do it. Follow the instructions that come with your chosen closure.
11. **Finishing Touches:** Give your tote bag a final press with the iron to smooth out any wrinkles.
Project 2: Umbrella Wall Art
This is a super creative way to add a pop of color and personality to your walls. I love how unique and eye-catching these pieces can be!
Materials Specific to the Wall Art:
* One or more broken umbrellas (different colors and patterns work well)
* Canvas or wooden frames (various sizes)
* Staple gun (if using canvas frames)
* Hot glue gun (if using wooden frames)
* Scissors
* Pencil or fabric marker
Step-by-Step Instructions:
1. **Disassemble the Umbrella:** As with the tote bag, carefully remove the fabric panels from the umbrella frame using a seam ripper.
2. **Prepare the Fabric Panels:** Iron the fabric panels to remove any creases.
3. **Choose Your Design:** Decide how you want to arrange the fabric panels on the canvas or wooden frames. You can use a single panel per frame, or create a collage with multiple panels. Consider the colors and patterns of the fabric and how they will complement each other.
4. **Cut the Fabric (if necessary):** If you’re using multiple panels per frame, or if the panels are too large for the frames, cut them to the desired size and shape.
5. **Attach the Fabric to the Frames:**
* **For Canvas Frames:** Stretch the fabric panel tightly over the canvas frame and staple it to the back of the frame using a staple gun. Start by stapling the center of each side, then work your way outwards, pulling the fabric taut as you go. Trim off any excess fabric.
* **For Wooden Frames:** Apply a thin layer of hot glue to the front of the wooden frame. Carefully position the fabric panel on the frame and press it down firmly. Trim off any excess fabric.
6. **Add Embellishments (Optional):** You can add embellishments to your wall art, such as buttons, beads, or embroidery. Use hot glue or fabric glue to attach the embellishments.
7. **Hang Your Artwork:** Once the glue is dry, hang your umbrella wall art on your walls and enjoy!
Project 3: Umbrella Canopy for a Child’s Play Area
This project transforms an old umbrella into a whimsical and shaded area for kids to play. It’s perfect for creating a cozy reading nook or a fun outdoor play space.
Materials Specific to the Canopy:
* One large, sturdy broken umbrella
* Rope or strong cord
* Fabric scraps (optional, for decorating)
* Hot glue gun (optional, for decorating)
Step-by-Step Instructions:
1. **Prepare the Umbrella:** Remove the handle from the umbrella. You’ll be hanging the umbrella upside down, so the handle is no longer needed.
2. **Reinforce the Frame (Optional):** If the umbrella frame seems flimsy, you can reinforce it by wrapping rope or cord around the ribs and securing it with knots or hot glue.
3. **Attach Hanging Ropes:** Cut three or four lengths of rope or cord, each long enough to hang the umbrella from a tree branch or ceiling. Attach the ropes to the umbrella frame, spacing them evenly around the circumference. Make sure the ropes are securely attached. You can use knots, zip ties, or hot glue to secure them.
4. **Decorate the Canopy (Optional):** Use fabric scraps, ribbons, or other
Conclusion
So, there you have it! Transforming old umbrellas into something new and useful isn’t just a fun craft project; it’s a fantastic way to reduce waste, unleash your creativity, and add a unique touch to your life. We’ve explored a range of possibilities, from stylish tote bags that brave the elements to protective plant covers that nurture your garden. The beauty of these umbrella DIY projects lies in their adaptability. You’re not confined to rigid instructions; instead, you’re encouraged to experiment, personalize, and truly make each creation your own.
Why is this a must-try? Because it’s more than just crafting; it’s about resourcefulness. Think about it: that umbrella, once destined for the landfill, now has a vibrant new purpose. It’s a tangible way to contribute to a more sustainable lifestyle, one stitch, one cut, one upcycled project at a time. Plus, the satisfaction of creating something beautiful and functional from something discarded is incredibly rewarding.
Consider these variations to spark your imagination:
* **Color Blocking Tote:** Use umbrellas of different colors and patterns to create a bold, color-blocked tote bag.
* **Personalized Plant Covers:** Add stencils or paint designs to your plant covers to match your garden’s aesthetic.
* **Umbrella Lanterns:** String together small pieces of umbrella fabric to create whimsical lanterns for your patio.
* **Kids’ Play Tent:** Use a large umbrella frame and colorful fabric to build a fun and weatherproof play tent for children.
* **Rainy Day Art Supplies Organizer:** Sew pockets into umbrella fabric and hang it to organize art supplies, keeping them dry and accessible.
Don’t be afraid to deviate from the instructions and let your creativity guide you. Perhaps you’ll discover a new and innovative way to repurpose umbrella fabric. The possibilities are truly endless!
We wholeheartedly encourage you to try one (or all!) of these umbrella DIY projects. Gather your old umbrellas, dust off your sewing machine (or grab your glue gun!), and prepare to be amazed at what you can create. The process is as enjoyable as the end result.
But the journey doesn’t end here. We want to hear about your experiences! Share your creations, your challenges, and your tips in the comments below. Let’s build a community of resourceful crafters who are passionate about upcycling and making a difference. Show us your unique umbrella transformations! Your insights and inspiration could spark even more creative ideas for others. Let’s turn those discarded umbrellas into treasures together!
Frequently Asked Questions (FAQ)
What types of umbrellas are best for DIY projects?
The best umbrellas for DIY projects are those with sturdy frames and relatively intact fabric. While a few small holes might be manageable, avoid umbrellas with severely damaged frames or extensively torn fabric. Consider the size of the umbrella as well; larger umbrellas will provide more material for larger projects like tote bags or plant covers. Also, think about the fabric type. Polyester is generally durable and water-resistant, making it ideal for projects that need to withstand the elements. Nylon is another good option, though it may not be as water-resistant as polyester. Avoid umbrellas with heavily stained or mildewed fabric, as these may be difficult to clean and could pose health risks.
What tools and materials do I need for most umbrella DIY projects?
The specific tools and materials will vary depending on the project, but some essentials include:
* **Scissors or a rotary cutter:** For cutting the umbrella fabric.
* **Seam ripper:** For carefully removing the fabric from the umbrella frame.
* **Sewing machine (optional):** For sewing seams and creating more durable projects. Hand sewing is also an option, but it will take longer.
* **Needle and thread:** For hand sewing. Choose a thread that matches the color of the umbrella fabric.
* **Pins:** For holding fabric pieces together before sewing.
* **Measuring tape or ruler:** For accurate measurements.
* **Iron and ironing board:** For pressing seams and creating a professional finish.
* **Glue gun (optional):** For projects that don’t require sewing or for adding embellishments.
* **Fabric markers or paint (optional):** For adding designs or personalization.
* **Buttons, zippers, or other closures (optional):** For adding functionality to your projects.
* **Lining fabric (optional):** For adding structure and durability to bags or other projects.
How do I safely remove the fabric from the umbrella frame?
Removing the fabric from the umbrella frame requires patience and care. Start by carefully cutting the threads that attach the fabric to the frame at each rib. A seam ripper can be very helpful for this. Be mindful of the sharp metal edges of the frame. Once you’ve detached the fabric from all the ribs, you can usually slide it off the frame. If the fabric is glued in certain areas, you may need to gently peel it away. Dispose of the umbrella frame responsibly, as the sharp metal parts can be dangerous.
How do I clean the umbrella fabric before using it for a DIY project?
Cleaning the umbrella fabric is essential, especially if the umbrella has been stored for a while. You can hand wash the fabric in a sink or tub with mild detergent and warm water. Gently scrub any stains or dirt. Rinse thoroughly with clean water. Alternatively, you can machine wash the fabric on a delicate cycle with cold water. Avoid using bleach or harsh chemicals, as these can damage the fabric. Hang the fabric to dry or tumble dry on low heat. Iron the fabric on a low setting to remove any wrinkles.
What are some safety precautions I should take when working on umbrella DIY projects?
Safety should always be a priority when working on any DIY project. Here are some precautions to keep in mind:
* **Protect your eyes:** Wear safety glasses or goggles when cutting or sewing to protect your eyes from flying debris or needle pricks.
* **Use sharp tools carefully:** Be careful when using scissors, rotary cutters, or seam rippers. Always cut away from your body and keep your fingers out of the path of the blade.
* **Be mindful of the umbrella frame:** The metal parts of the umbrella frame can be sharp. Handle them with care and dispose of them responsibly.
* **Protect your hands:** Wear gloves when using glue guns or working with hot materials.
* **Work in a well-ventilated area:** If you’re using paints, glues, or other chemicals, work in a well-ventilated area to avoid inhaling harmful fumes.
* **Keep children and pets away:** Keep children and pets away from your work area to prevent accidents.
Can I use umbrella fabric for outdoor projects?
Yes, umbrella fabric is generally water-resistant and durable, making it suitable for outdoor projects like plant covers, garden decorations, or even small awnings. However, keep in mind that the fabric may fade over time with prolonged exposure to sunlight. Consider using UV-resistant sprays or coatings to protect the fabric from fading. Also, ensure that any seams or closures are properly sealed to prevent water from seeping through.
What if I don’t have a sewing machine? Can I still do these projects?
Absolutely! While a sewing machine can make some projects easier and faster, many umbrella DIY projects can be completed entirely by hand. Hand sewing is a great option for smaller projects or for adding details to larger projects. Just be sure to use a strong thread and take your time to create neat and secure stitches. You can also use fabric glue for projects that don’t require a lot of stress or wear.
Where can I find inspiration for more umbrella DIY projects?
The internet is a treasure trove of inspiration for umbrella DIY projects! Search online for tutorials, patterns, and ideas. Websites like Pinterest, YouTube, and Instructables are great resources. You can also find inspiration in crafting books and magazines. Don’t be afraid to experiment and come up with your own unique designs!
Leave a Comment