
Easiest Potatoes to Grow? You bet! Imagine harvesting a bounty of delicious, homegrown potatoes right from your own backyard, even if you think you have a “brown thumb.” It’s easier than you think, and I’m here to show you how. Forget those complicated gardening guides – we’re diving into simple, effective techniques that will have you enjoying fresh, flavorful potatoes in no time.
Potatoes have been a staple food for centuries, with a rich history spanning continents. From their origins in the Andes Mountains to their vital role in feeding populations worldwide, potatoes have truly earned their place in our hearts (and on our plates!). But you don’t need to be a seasoned farmer to cultivate these versatile tubers.
In today’s busy world, finding time for complex gardening projects can be a challenge. That’s why I’m sharing these DIY tricks and hacks for growing the easiest potatoes to grow. Whether you have a sprawling garden or just a small patio, these methods are designed to be accessible and rewarding. You’ll save money, enjoy healthier, fresher produce, and experience the satisfaction of nurturing your own food. Plus, there’s nothing quite like the taste of a potato you’ve grown yourself! So, let’s get started and transform your space into a potato-growing paradise!
Easiest Potatoes to Grow: A Beginner’s Guide to Bountiful Harvests
Growing your own potatoes can seem daunting, but trust me, it’s surprisingly simple and incredibly rewarding! Forget fancy gardening setups; we’re going for ease and maximum yield with minimal effort. This guide will walk you through the easiest methods to grow potatoes, even if you’ve never gardened before. Get ready for some delicious, homegrown spuds!
Choosing the Right Potatoes
Before we get our hands dirty, let’s talk about seed potatoes. These aren’t the potatoes you buy at the grocery store (though you *can* use those in a pinch, more on that later). Seed potatoes are specifically grown for planting and are certified disease-free.
* Certified Seed Potatoes: These are your best bet. They’re guaranteed to be healthy and produce a good crop. You can find them at most garden centers or online retailers. Look for varieties like ‘Yukon Gold,’ ‘Red Pontiac,’ or ‘Kennebec’ – these are generally considered easy to grow and produce reliable harvests.
* Grocery Store Potatoes (Use with Caution!): While not ideal, you *can* use potatoes from the grocery store if you’re on a budget or can’t find seed potatoes. However, there are a few things to keep in mind:
* Organic is Best: Choose organic potatoes to avoid any sprout inhibitors that might have been used.
* Look for Eyes: The potatoes need to have “eyes” (those little bumps where sprouts will emerge).
* Disease Risk: Be aware that grocery store potatoes might carry diseases that could affect your crop.
* Size Matters: You don’t need huge potatoes to plant. In fact, smaller seed potatoes (about the size of a chicken egg) are perfect. Larger potatoes can be cut into pieces, ensuring each piece has at least one or two eyes.
Sprouting Your Seed Potatoes (Chitting)
This step isn’t strictly necessary, but it gives your potatoes a head start and can lead to an earlier harvest. “Chitting” simply means encouraging the potatoes to sprout before planting.
* How to Chit:
1. Place your seed potatoes in a cool, bright location (but not in direct sunlight). An egg carton or a shallow tray works well.
2. Allow the potatoes to sit for 2-3 weeks, until they develop short, green sprouts.
3. Turn the potatoes occasionally to ensure even sprouting.
Planting Potatoes in a Garden Bed
This is the traditional method, and it works great if you have the space.
* Preparing the Soil:
1. Choose a sunny location with well-drained soil. Potatoes need at least 6-8 hours of sunlight per day.
2. Loosen the soil to a depth of at least 12 inches. Remove any rocks, weeds, or debris.
3. Amend the soil with compost or well-rotted manure to improve drainage and fertility. Potatoes are heavy feeders!
* Planting the Potatoes:
1. Dig trenches that are about 6 inches deep and 2-3 feet apart.
2. Place the seed potatoes (or potato pieces with eyes facing up) in the trenches, spacing them about 12 inches apart.
3. Cover the potatoes with about 4 inches of soil.
* Hilling:
1. As the potato plants grow, gradually “hill” the soil around the stems. This encourages more potato production along the buried stems.
2. When the plants are about 6 inches tall, use a hoe or shovel to pull soil from between the rows and mound it around the base of the plants, leaving only the top few inches of foliage exposed.
3. Repeat this process every 2-3 weeks until the hills are about 12 inches high.
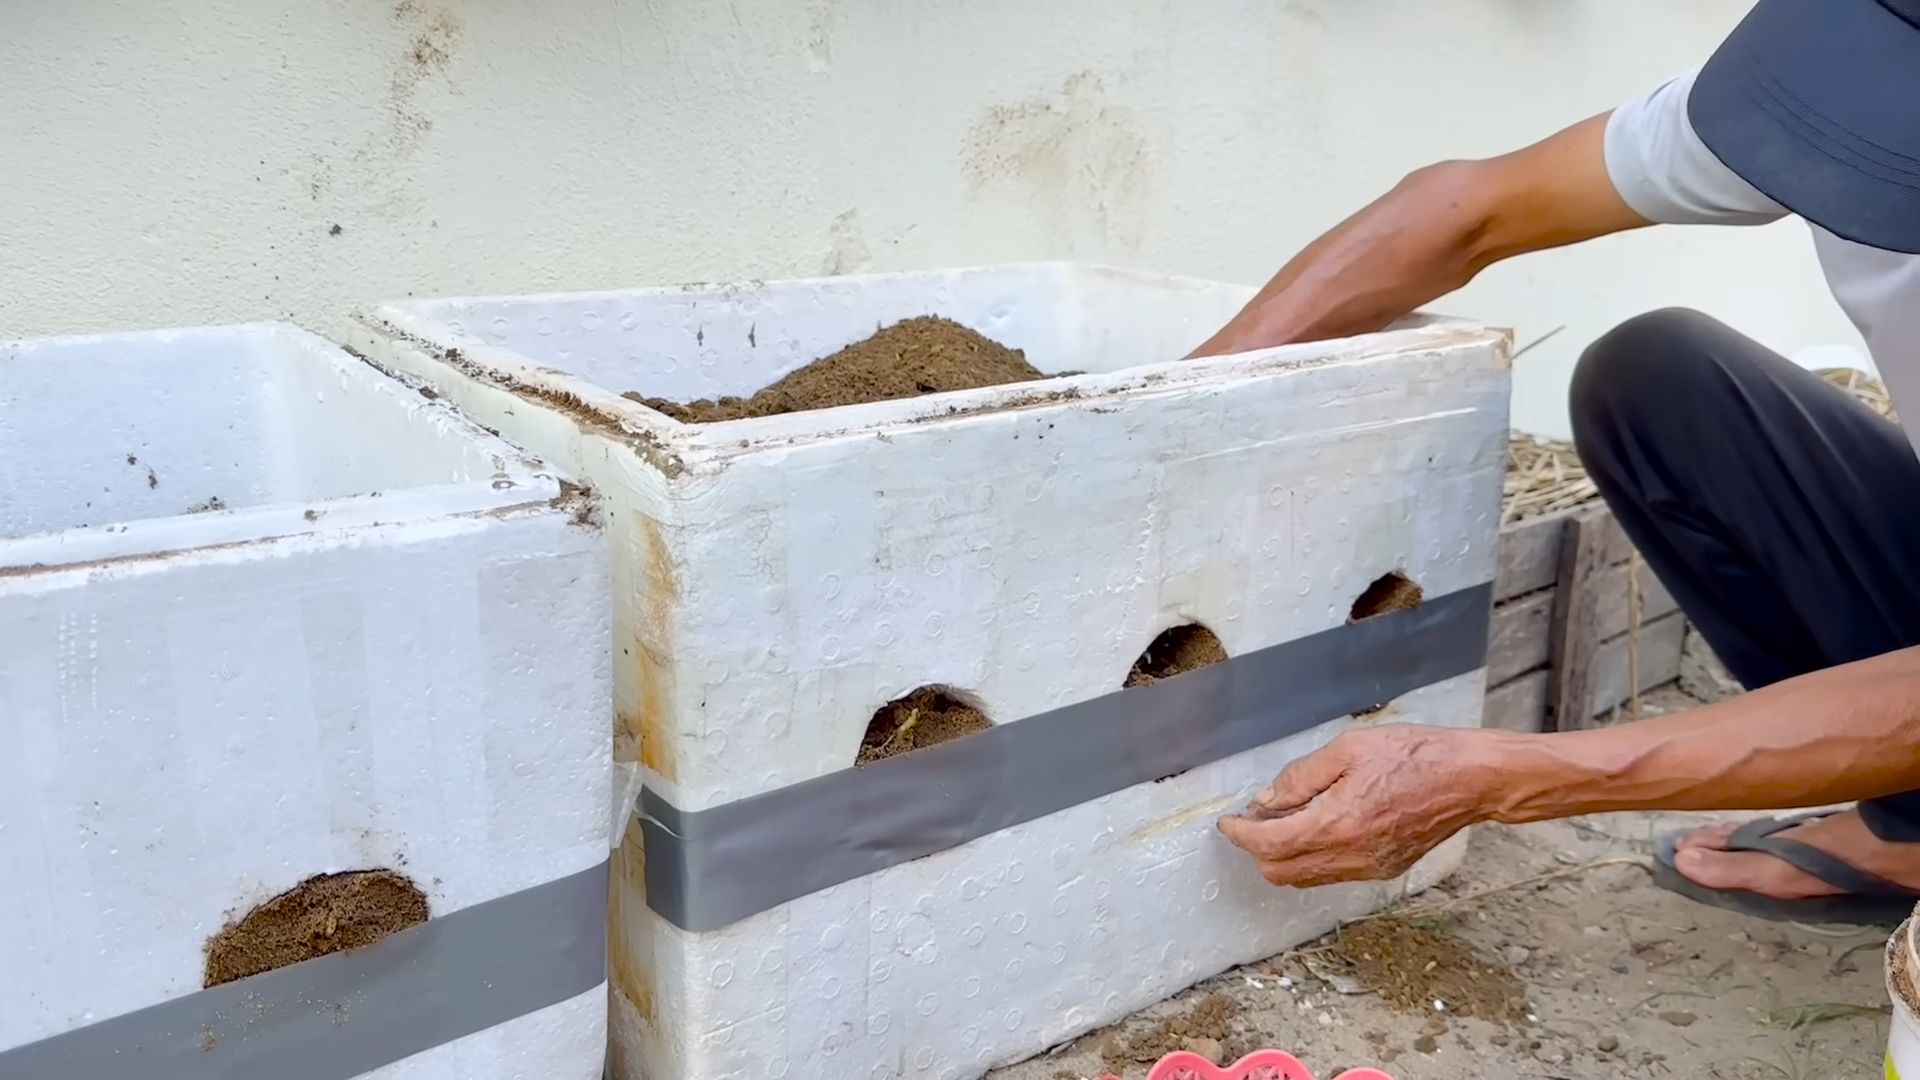
Growing Potatoes in Containers: Perfect for Small Spaces!
If you don’t have a garden, don’t worry! You can easily grow potatoes in containers. This method is perfect for patios, balconies, or even indoors with enough light.
* Choosing the Right Container:
1. Select a large container that is at least 15-20 gallons in size. A plastic garbage can, a large bucket, or a grow bag will work well.
2. Make sure the container has drainage holes to prevent waterlogging.
* Preparing the Soil:
1. Use a well-draining potting mix. You can also add compost or other organic matter to improve fertility.
* Planting the Potatoes:
1. Fill the container with about 4 inches of potting mix.
2. Place the seed potatoes (or potato pieces with eyes facing up) on top of the soil.
3. Cover the potatoes with another 4 inches of potting mix.
* Hilling (Container Style!):
1. As the potato plants grow, continue to add more potting mix to the container, burying the stems as they emerge.
2. This encourages more potato production along the buried stems.
3. Continue adding soil until the container is almost full.
The Potato Tower Method: Maximize Your Yield!
This is a fun and space-saving method that allows you to grow a lot of potatoes in a small area. You can build a potato tower using various materials, such as chicken wire, wooden pallets, or even old tires.
* Building the Tower:
1. Choose your material. Chicken wire is easy to work with, but pallets or tires can be more sturdy.
2. Create a circular or square structure that is about 3-4 feet tall.
3. Line the inside of the tower with burlap or landscape fabric to prevent the soil from falling out.
* Planting the Potatoes:
1. Start by filling the bottom of the tower with about 6 inches of soil.
2. Place the seed potatoes (or potato pieces with eyes facing up) on top of the soil, spacing them about 12 inches apart.
3. Cover the potatoes with another 6 inches of soil.
4. As the potato plants grow, continue to add more soil to the tower, burying the stems as they emerge.
5. This encourages more potato production along the buried stems.
6. Continue adding soil until the tower is full.
* Watering and Maintenance:
1. Water the potato tower regularly, especially during dry periods.
2. Make sure the soil is moist but not waterlogged.
Caring for Your Potato Plants
No matter which method you choose, here are some general tips for caring for your potato plants:
* Watering: Potatoes need consistent moisture, especially during tuber formation. Water deeply whenever the top inch of soil feels dry. Avoid overwatering, which can lead to rot.
* Fertilizing: Potatoes are heavy feeders, so fertilize them regularly with a balanced fertilizer. You can also side-dress with compost or well-rotted manure.
* Pest Control: Keep an eye out for common potato pests like potato beetles and aphids. Hand-picking them off the plants is often effective. You can also use organic insecticides if necessary.
* Weed Control: Keep the area around your potato plants free of weeds. Weeds compete with the potatoes for nutrients and water.
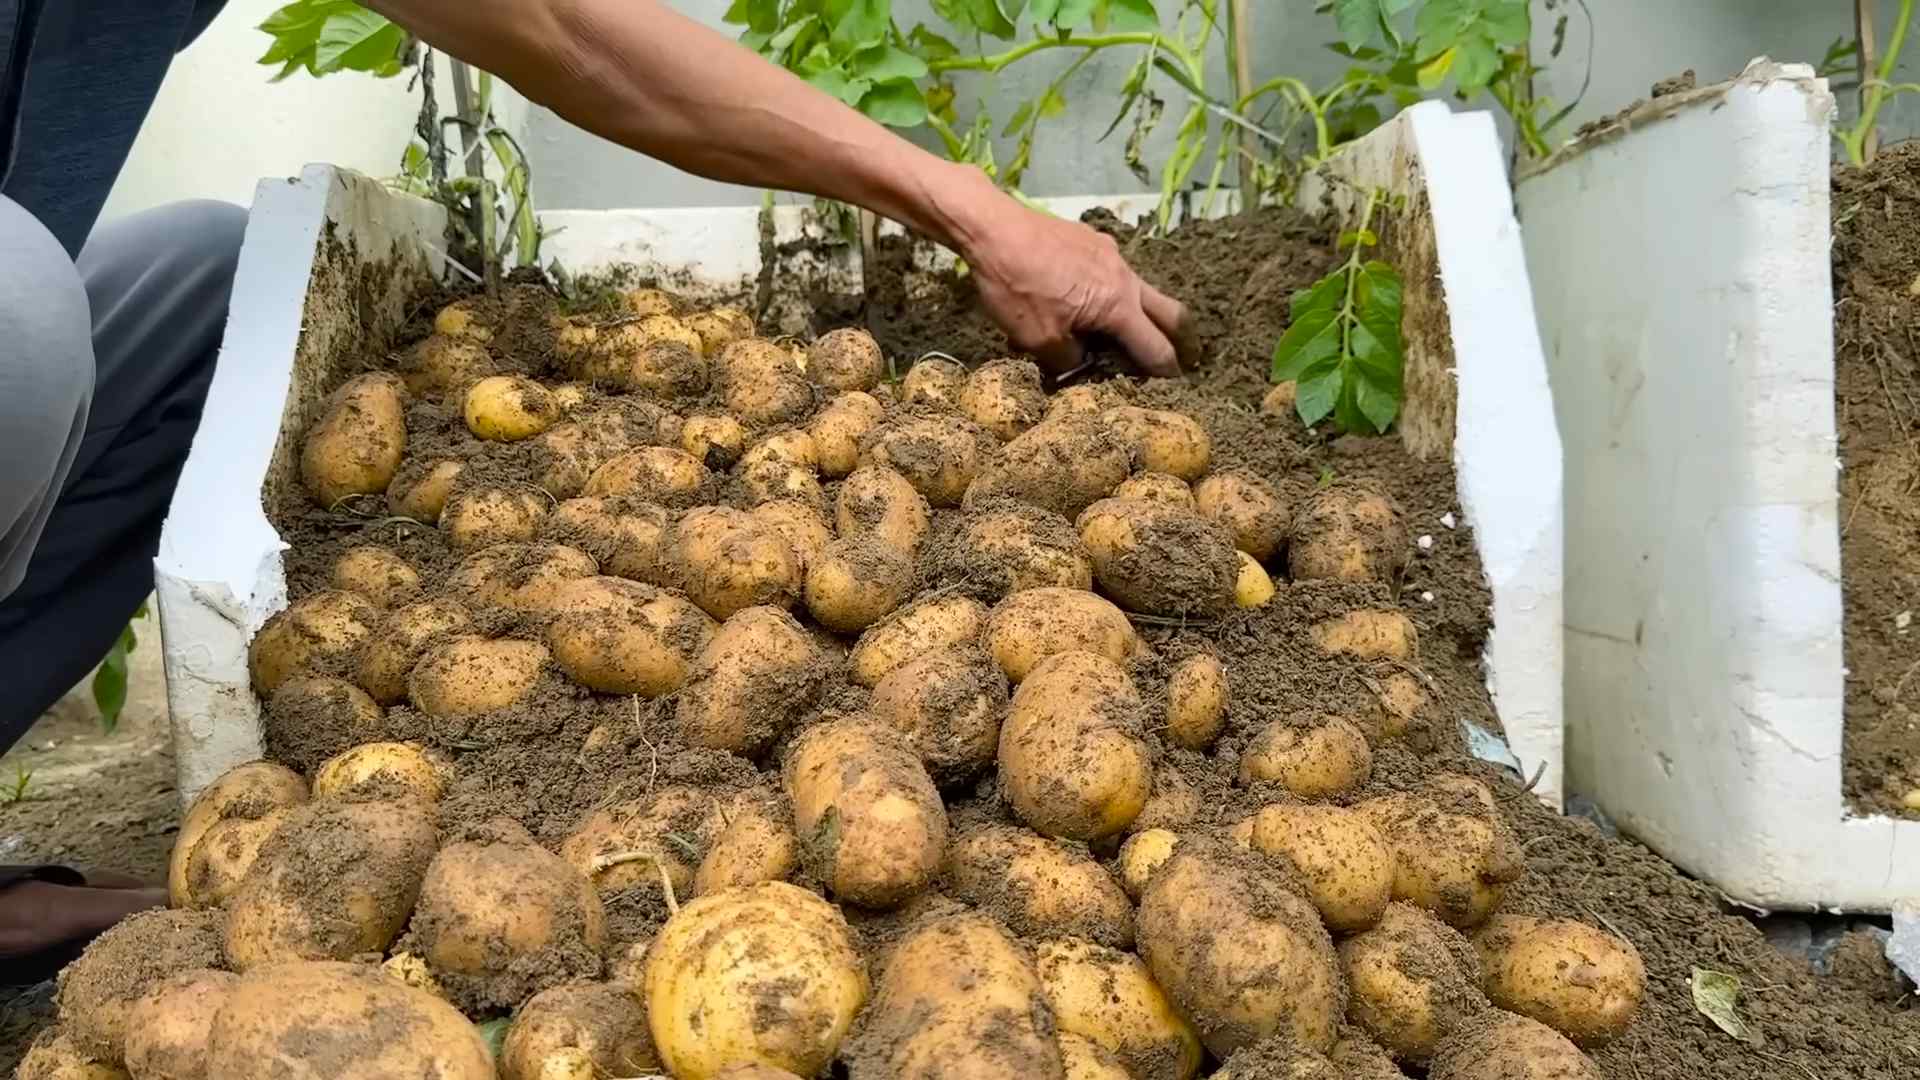
Harvesting Your Potatoes
This is the most exciting part! You’ll know your potatoes are ready to harvest when the plants start to flower and the foliage begins to die back.
* When to Harvest:
1. “New potatoes” can be harvested a few weeks after flowering. These are small, tender potatoes with thin skins.
2. For mature potatoes, wait until the foliage has completely died back. This usually takes about 2-3 months after planting.
* How to Harvest:
1. Carefully dig around the base of the plants with a garden fork or shovel.
2. Lift the potatoes out of the soil, being careful not to damage them.
3. For container and tower methods, you can simply dump out the contents and pick out the potatoes.
Growing your own potatoes can seem daunting, but trust me, it’s surprisingly simple and incredibly rewarding! Forget fancy gardening setups; we’re going for ease and maximum yield with minimal effort. This guide will walk you through the easiest methods to grow potatoes, even if you’ve never gardened before. Get ready for some delicious, homegrown spuds!
Choosing the Right Potatoes
Before we get our hands dirty, let’s talk about seed potatoes. These aren’t the potatoes you buy at the grocery store (though you *can* use those in a pinch, more on that later). Seed potatoes are specifically grown for planting and are certified disease-free.
* Certified Seed Potatoes: These are your best bet. They’re guaranteed to be healthy and produce a good crop. You can find them at most garden centers or online retailers. Look for varieties like ‘Yukon Gold,’ ‘Red Pontiac,’ or ‘Kennebec’ – these are generally considered easy to grow and produce reliable harvests.
* Grocery Store Potatoes (Use with Caution!): While not ideal, you *can* use potatoes from the grocery store if you’re on a budget or can’t find seed potatoes. However, there are a few things to keep in mind:
* Organic is Best: Choose organic potatoes to avoid any sprout inhibitors that might have been used.
* Look for Eyes: The potatoes need to have “eyes” (those little bumps where sprouts will emerge).
* Disease Risk: Be aware that grocery store potatoes might carry diseases that could affect your crop.
* Size Matters: You don’t need huge potatoes to plant. In fact, smaller seed potatoes (about the size of a chicken egg) are perfect. Larger potatoes can be cut into pieces, ensuring each piece has at least one or two eyes.
Sprouting Your Seed Potatoes (Chitting)
This step isn’t strictly necessary, but it gives your potatoes a head start and can lead to an earlier harvest. “Chitting” simply means encouraging the potatoes to sprout before planting.
* How to Chit:
1. Place your seed potatoes in a cool, bright location (but not in direct sunlight). An egg carton or a shallow tray works well.
2. Allow the potatoes to sit for 2-3 weeks, until they develop short, green sprouts.
3. Turn the potatoes occasionally to ensure even sprouting.
Planting Potatoes in a Garden Bed
This is the traditional method, and it works great if you have the space.
* Preparing the Soil:
1. Choose a sunny location with well-drained soil. Potatoes need at least 6-8 hours of sunlight per day.
2. Loosen the soil to a depth of at least 12 inches. Remove any rocks, weeds, or debris.
3. Amend the soil with compost or well-rotted manure to improve drainage and fertility. Potatoes are heavy feeders!
* Planting the Potatoes:
1. Dig trenches that are about 6 inches deep and 2-3 feet apart.
2. Place the seed potatoes (or potato pieces with eyes facing up) in the trenches, spacing them about 12 inches apart.
3. Cover the potatoes with about 4 inches of soil.
* Hilling:
1. As the potato plants grow, gradually “hill” the soil around the stems. This encourages more potato production along the buried stems.
2. When the plants are about 6 inches tall, use a hoe or shovel to pull soil from between the rows and mound it around the base of the plants, leaving only the top few inches of foliage exposed.
3. Repeat this process every 2-3 weeks until the hills are about 12 inches high.
Growing Potatoes in Containers: Perfect for Small Spaces!
If you don’t have a garden, don’t worry! You can easily grow potatoes in containers. This method is perfect for patios, balconies, or even indoors with enough light.
* Choosing the Right Container:
1. Select a large container that is at least 15-20 gallons in size. A plastic garbage can, a large bucket, or a grow bag will work well.
2. Make sure the container has drainage holes to prevent waterlogging.
* Preparing the Soil:
1. Use a well-draining potting mix. You can also add compost or other organic matter to improve fertility.
* Planting the Potatoes:
1. Fill the container with about 4 inches of potting mix.
2. Place the seed potatoes (or potato pieces with eyes facing up) on top of the soil.
3. Cover the potatoes with another 4 inches of potting mix.
* Hilling (Container Style!):
1. As the potato plants grow, continue to add more potting mix to the container, burying the stems as they emerge.
2. This encourages more potato production along the buried stems.
3. Continue adding soil until the container is almost full.
The Potato Tower Method: Maximize Your Yield!
This is a fun and space-saving method that allows you to grow a lot of potatoes in a small area. You can build a potato tower using various materials, such as chicken wire, wooden pallets, or even old tires.
* Building the Tower:
1. Choose your material. Chicken wire is easy to work with, but pallets or tires can be more sturdy.
2. Create a circular or square structure that is about 3-4 feet tall.
3. Line the inside of the tower with burlap or landscape fabric to prevent the soil from falling out.
* Planting the Potatoes:
1. Start by filling the bottom of the tower with about 6 inches of soil.
2. Place the seed potatoes (or potato pieces with eyes facing up) on top of the soil, spacing them about 12 inches apart.
3. Cover the potatoes with another 6 inches of soil.
4. As the potato plants grow, continue to add more soil to the tower, burying the stems as they emerge.
5. This encourages more potato production along the buried stems.
6. Continue adding soil until the tower is full.
* Watering and Maintenance:
1. Water the potato tower regularly, especially during dry periods.
2. Make sure the soil is moist but not waterlogged.
Caring for Your Potato Plants
No matter which method you choose, here are some general tips for caring for your potato plants:
* Watering: Potatoes need consistent moisture, especially during tuber formation. Water deeply whenever the top inch of soil feels dry. Avoid overwatering, which can lead to rot.
* Fertilizing: Potatoes are heavy feeders, so fertilize them regularly with a balanced fertilizer. You can also side-dress with compost or well-rotted manure.
* Pest Control: Keep an eye out for common potato pests like potato beetles and aphids. Hand-picking them off the plants is often effective. You can also use organic insecticides if necessary.
* Weed Control: Keep the area around your potato plants free of weeds. Weeds compete with the potatoes for nutrients and water.
Harvesting Your Potatoes
This is the most exciting part! You’ll know your potatoes are ready to harvest when the plants start to flower and the foliage begins to die back.
* When to Harvest:
1. “New potatoes” can be harvested a few weeks after flowering. These are small, tender potatoes with thin skins.
2. For mature potatoes, wait until the foliage has completely died back. This usually takes about 2-3 months after planting.
* How to Harvest:
1. Carefully dig around the base of the plants with a garden fork or shovel.
2. Lift the potatoes out of the soil, being careful not to damage them.
3. For container and tower methods, you can simply dump out the contents and pick out the potatoes.
* Curing and Storing:
1. After harvesting, cure the potatoes by spreading them out in a cool, dark, and well-ventilated place for about a week. This allows the skins to harden and helps prevent rot.
2. Store the cured potatoes in a cool, dark, and dry place, such as a root cellar or a basement. They should last for several months.
Troubleshooting Common Potato Problems
Even with the easiest methods, you might encounter a few challenges. Here’s how to deal with some common potato problems:
* Potato Blight: This fungal disease can cause the foliage to turn brown and die. To prevent blight, choose disease-resistant varieties and ensure good air circulation. If blight does occur, remove affected foliage immediately
Conclusion
So, there you have it! Growing your own potatoes doesn’t have to be a daunting task reserved for seasoned gardeners. This simple, straightforward method for cultivating potatoes is a game-changer, especially for beginners or those with limited space. The ease of this DIY trick, focusing on minimal effort and maximum yield, makes it a must-try for anyone looking to enjoy the unparalleled flavor of homegrown potatoes. Forget the store-bought varieties that often lack that earthy, fresh taste; with this method, you’ll be harvesting a bounty of delicious potatoes in no time.
But the beauty of this approach lies not only in its simplicity but also in its adaptability. Feel free to experiment with different potato varieties to discover your personal favorites. Russets, Yukon Golds, red potatoes – each offers a unique flavor profile and texture that will elevate your culinary creations. Consider adding companion plants like marigolds or basil to your potato patch to deter pests naturally and enhance the overall health of your plants. You can also adjust the size of your growing container to suit your available space, making this method ideal for both balcony gardens and larger plots.
Furthermore, think about the possibilities for enriching your soil. Composting kitchen scraps and incorporating them into your potato-growing medium will not only reduce waste but also provide your plants with essential nutrients. You can also explore using different types of mulch to retain moisture and suppress weeds, further simplifying the maintenance process.
The satisfaction of harvesting your own potatoes, knowing that you nurtured them from seed to table, is truly rewarding. It’s a connection to nature that’s often missing in our modern lives. Plus, you’ll have a readily available supply of fresh, healthy potatoes for all your favorite recipes, from crispy roasted potatoes to creamy mashed potatoes and everything in between.
Don’t just take our word for it, though. We wholeheartedly encourage you to give this DIY trick a try. It’s an investment of time and effort that will pay off handsomely in the form of delicious, homegrown potatoes. And once you’ve experienced the joy of harvesting your own crop, we’d love to hear about your experience. Share your tips, tricks, and triumphs in the comments below. Let’s build a community of potato-growing enthusiasts and learn from each other’s successes. So, grab your seed potatoes, prepare your growing medium, and get ready to embark on a rewarding journey of growing your own potatoes. Happy planting!
Frequently Asked Questions (FAQs)
What kind of potatoes are best for this method?
While this method is quite versatile, some potato varieties tend to perform better than others. Seed potatoes are always recommended, as they are specifically grown for planting and are disease-free. For beginners, we suggest starting with varieties like Yukon Gold or Red Pontiac. Yukon Golds are known for their creamy texture and buttery flavor, while Red Pontiacs are early-maturing and produce a good yield. Russet potatoes, while popular, can be a bit more demanding in terms of soil and water requirements. Experimenting with different varieties is part of the fun, so don’t be afraid to try something new! Just ensure the variety you choose is well-suited to your local climate and growing conditions.
How often should I water my potato plants?
Watering is crucial for healthy potato growth, but overwatering can be just as detrimental as underwatering. The key is to maintain consistently moist soil, but not soggy. A good rule of thumb is to water deeply whenever the top inch of soil feels dry to the touch. During hot, dry periods, you may need to water more frequently. Conversely, during rainy periods, you may need to reduce watering or even skip it altogether. Monitor your plants closely and adjust your watering schedule accordingly. Using a moisture meter can be helpful in determining the moisture level of the soil.
How do I know when my potatoes are ready to harvest?
The timing of your potato harvest will depend on the variety you’re growing and your local climate. Generally, potatoes are ready to harvest when the foliage begins to yellow and die back. This usually occurs about 80-100 days after planting. You can also gently dig around the base of the plant to check the size of the potatoes. If they are the size you desire, you can begin harvesting. For “new potatoes,” which are smaller and have thinner skins, you can harvest them earlier, about 60-70 days after planting.
What kind of soil is best for growing potatoes?
Potatoes thrive in well-drained, loose soil that is rich in organic matter. Avoid heavy clay soils, as they can become waterlogged and hinder potato development. Amend your soil with compost, aged manure, or other organic materials to improve drainage and fertility. A slightly acidic soil pH of 6.0 to 6.5 is ideal for potato growth. You can test your soil pH using a soil testing kit and adjust it accordingly with lime or sulfur.
Can I grow potatoes in containers? What size container should I use?
Yes, growing potatoes in containers is a great option, especially for those with limited space. Choose a container that is at least 15-20 gallons in size to allow ample room for the potatoes to develop. The container should also have drainage holes to prevent waterlogging. Fabric grow bags are a popular choice for growing potatoes in containers, as they allow for good air circulation and drainage.
What are some common pests and diseases that affect potatoes, and how can I prevent them?
Potatoes can be susceptible to various pests and diseases, including potato beetles, aphids, blight, and scab. To prevent these problems, start with disease-free seed potatoes and practice good crop rotation. Companion planting with marigolds or basil can help deter pests naturally. Regularly inspect your plants for signs of pests or diseases and take action promptly. Organic pest control methods, such as insecticidal soap or neem oil, can be effective in controlling pests. Ensure good air circulation around your plants to prevent fungal diseases.
Can I grow potatoes from store-bought potatoes?
While it’s possible to grow potatoes from store-bought potatoes, it’s generally not recommended. Store-bought potatoes may be treated with chemicals to prevent sprouting, and they may also carry diseases that can affect your crop. Seed potatoes, which are specifically grown for planting, are a much safer and more reliable option.
How do I store my harvested potatoes?
Proper storage is essential for preserving the quality of your harvested potatoes. Cure your potatoes by allowing them to dry in a dark, well-ventilated place for about a week. This will help to toughen the skins and prevent spoilage. Store your cured potatoes in a cool, dark, and dry place with good ventilation. A temperature of 40-50°F (4-10°C) is ideal. Avoid storing potatoes near apples or onions, as they release gases that can cause potatoes to sprout or rot.
Leave a Comment