
Growing Asparagus on Terrace gardens might seem like a dream reserved for sprawling country estates, but trust me, it’s totally achievable, even if your “estate” is a cozy city balcony! Have you ever imagined stepping outside and snipping fresh, vibrant asparagus spears for your dinner? It’s a culinary delight and a rewarding gardening experience all rolled into one.
Asparagus has a rich history, dating back to ancient Greece and Rome, where it was prized for its medicinal properties and delicate flavor. For centuries, it was a symbol of luxury and springtime renewal. Now, you can bring that touch of elegance and freshness to your own home, regardless of your garden size.
Why should you try growing asparagus on your terrace? Well, for starters, store-bought asparagus simply can’t compare to the taste of freshly harvested spears. Plus, it’s a fantastic way to embrace sustainable living, reduce your carbon footprint, and connect with nature, even in an urban environment. I’m going to show you some simple DIY tricks and hacks that will make growing asparagus on your terrace a breeze. Get ready to transform your terrace into a mini-farm and enjoy the delicious rewards for years to come!
Growing Asparagus on Your Terrace: A Beginner’s Guide
Hey there, fellow gardening enthusiasts! Ever dreamt of snipping fresh asparagus spears right from your own terrace? Well, dream no more! Growing asparagus in containers is totally doable, and I’m here to walk you through every step. It might seem a little daunting at first, but trust me, the reward of homegrown asparagus is well worth the effort.
Choosing the Right Asparagus Variety
First things first, let’s talk asparagus varieties. Not all asparagus is created equal, especially when it comes to container gardening. You’ll want to choose a variety that’s known for its disease resistance and good yield. Here are a few of my favorites:
* ‘Jersey Knight’: This is a popular choice for a reason! It’s a male hybrid, which means it produces more spears and fewer seeds (less energy wasted on seed production!). It’s also known for its resistance to rust and fusarium.
* ‘Jersey Giant’: Similar to ‘Jersey Knight,’ but with even larger spears. If you’re looking for a substantial harvest, this is a great option.
* ‘Purple Passion’: Want to add a pop of color to your terrace garden? ‘Purple Passion’ asparagus is not only beautiful but also sweeter than green varieties. It turns green when cooked, though!
* ‘Mary Washington’: This is an older heirloom variety that’s still widely grown. It’s reliable and produces good yields, but it might be slightly more susceptible to disease than the Jersey hybrids.
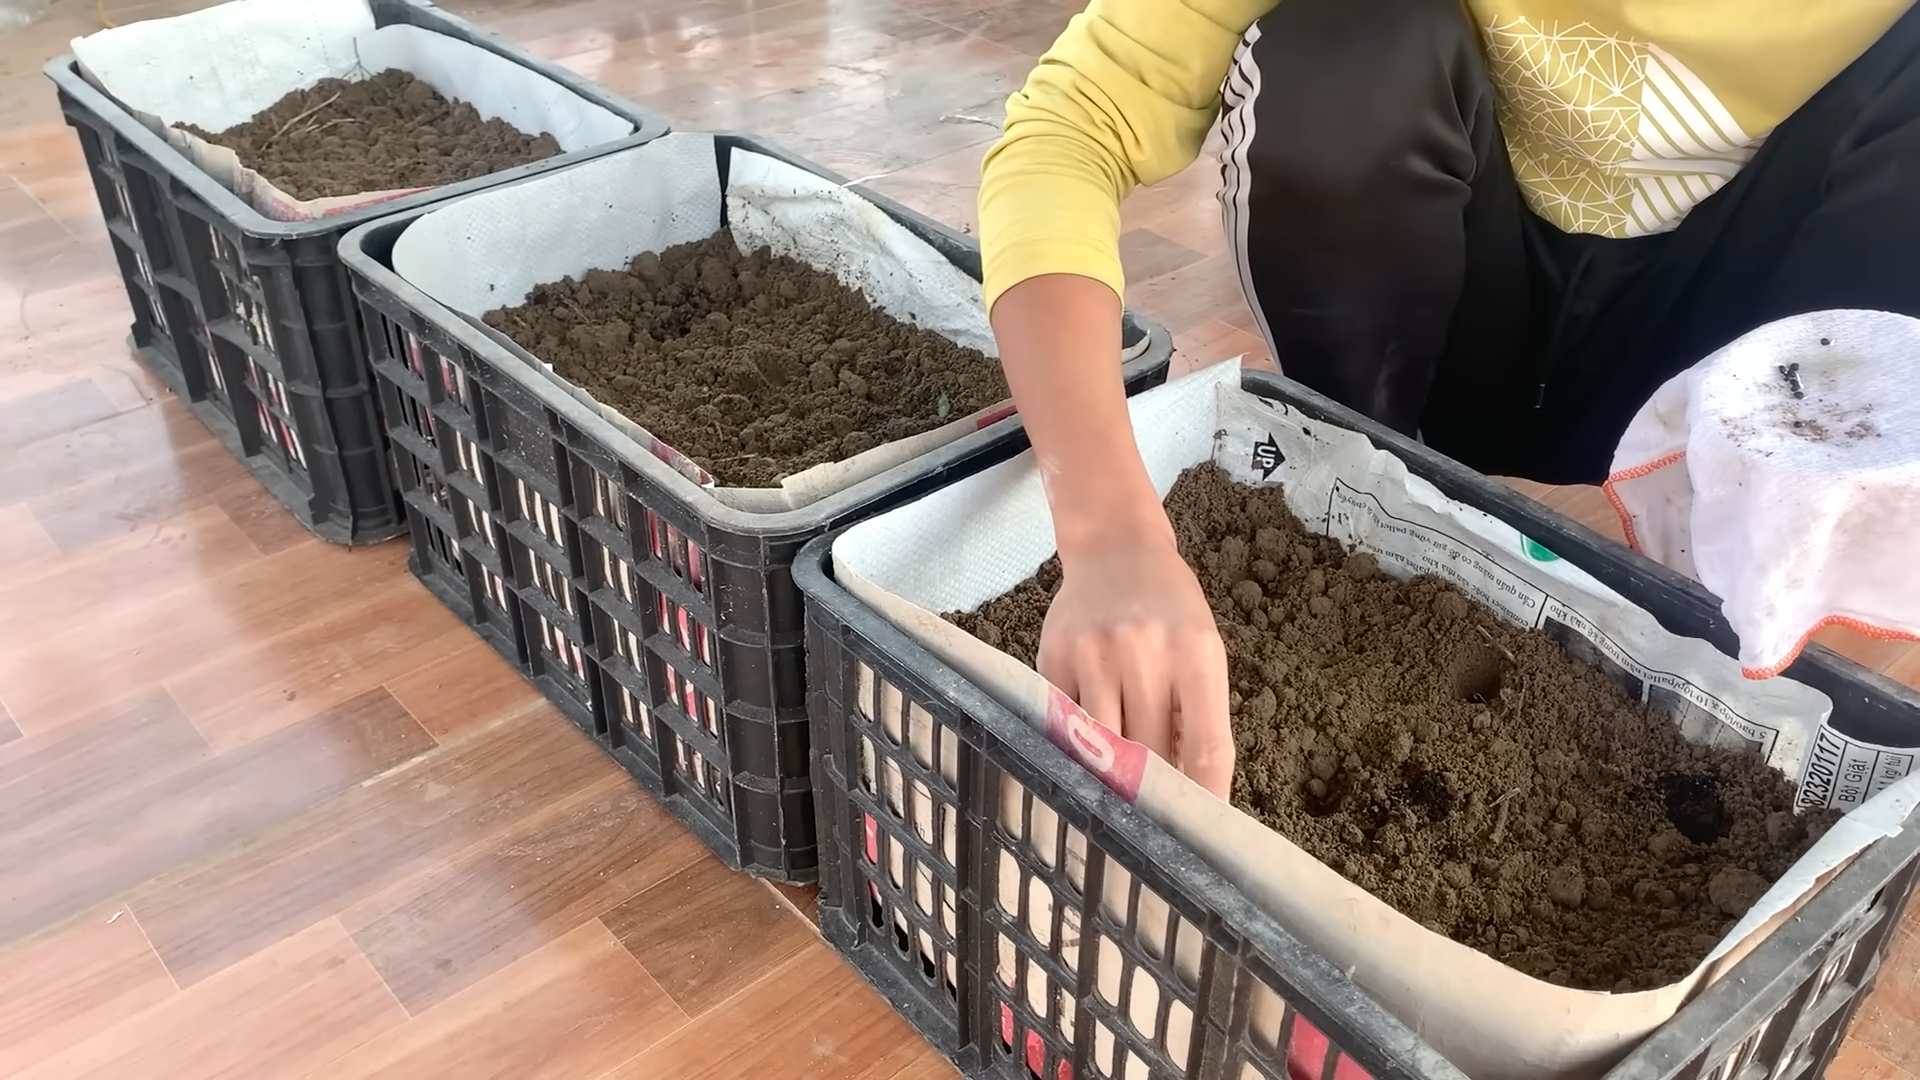
Preparing Your Asparagus Bed (Container!)
Asparagus needs a deep and well-draining container. Think big! A half-barrel planter or a large, sturdy pot (at least 24 inches in diameter and 24 inches deep) is ideal. Remember, asparagus is a perennial, meaning it will come back year after year, so you want to give it plenty of room to spread its roots.
Here’s what you’ll need:
* A large container (as mentioned above)
* Well-draining potting mix (a mix of compost, peat moss, and perlite is perfect)
* Asparagus crowns (one-year-old crowns are best)
* Bone meal or rock phosphate (for phosphorus, which promotes root growth)
* Slow-release fertilizer (optional, but recommended)
* Mulch (straw, wood chips, or shredded leaves)
Planting Your Asparagus Crowns
Okay, now for the fun part – planting! This is where your asparagus journey really begins.
1. Prepare the Container: Fill your container about halfway with your well-draining potting mix. Mix in a generous amount of bone meal or rock phosphate. This will provide essential phosphorus for strong root development.
2. Create a Mound: Form a small mound of soil in the center of the container. This is where you’ll place the asparagus crowns.
3. Position the Crowns: Gently place the asparagus crowns on top of the mound, spreading the roots out like a spider. Make sure the crown (the central bud) is facing upwards.
4. Cover the Roots: Carefully cover the roots with soil, leaving the crown exposed. You should have about 2-3 inches of soil covering the roots.
5. Water Thoroughly: Water the container thoroughly until water drains out of the bottom. This will help settle the soil and ensure good contact between the roots and the soil.
6. Add More Soil (Gradually): As the asparagus shoots emerge, gradually add more soil to the container until it’s filled to within a few inches of the top. This process is called “hilling” and it encourages the development of more spears.
7. Mulch: Add a layer of mulch around the asparagus plants to help retain moisture, suppress weeds, and regulate soil temperature.
Caring for Your Asparagus Plants
Asparagus is relatively low-maintenance once established, but there are a few key things to keep in mind to ensure a healthy and productive crop.
* Watering: Asparagus needs consistent moisture, especially during the growing season. Water deeply whenever the top inch of soil feels dry to the touch. Avoid overwatering, as this can lead to root rot.
* Fertilizing: Asparagus is a heavy feeder, so regular fertilization is important. In the spring, apply a slow-release fertilizer or side-dress with compost. You can also use a liquid fertilizer every few weeks during the growing season.
* Weeding: Keep the container free of weeds, as they can compete with the asparagus for nutrients and water. Hand-pull weeds carefully to avoid disturbing the asparagus roots.
* Sunlight: Asparagus needs at least 6-8 hours of sunlight per day to thrive. Choose a sunny spot on your terrace for your container.
* Support: As the asparagus ferns grow taller, they may need some support to prevent them from flopping over. You can use stakes or a small trellis to provide support.
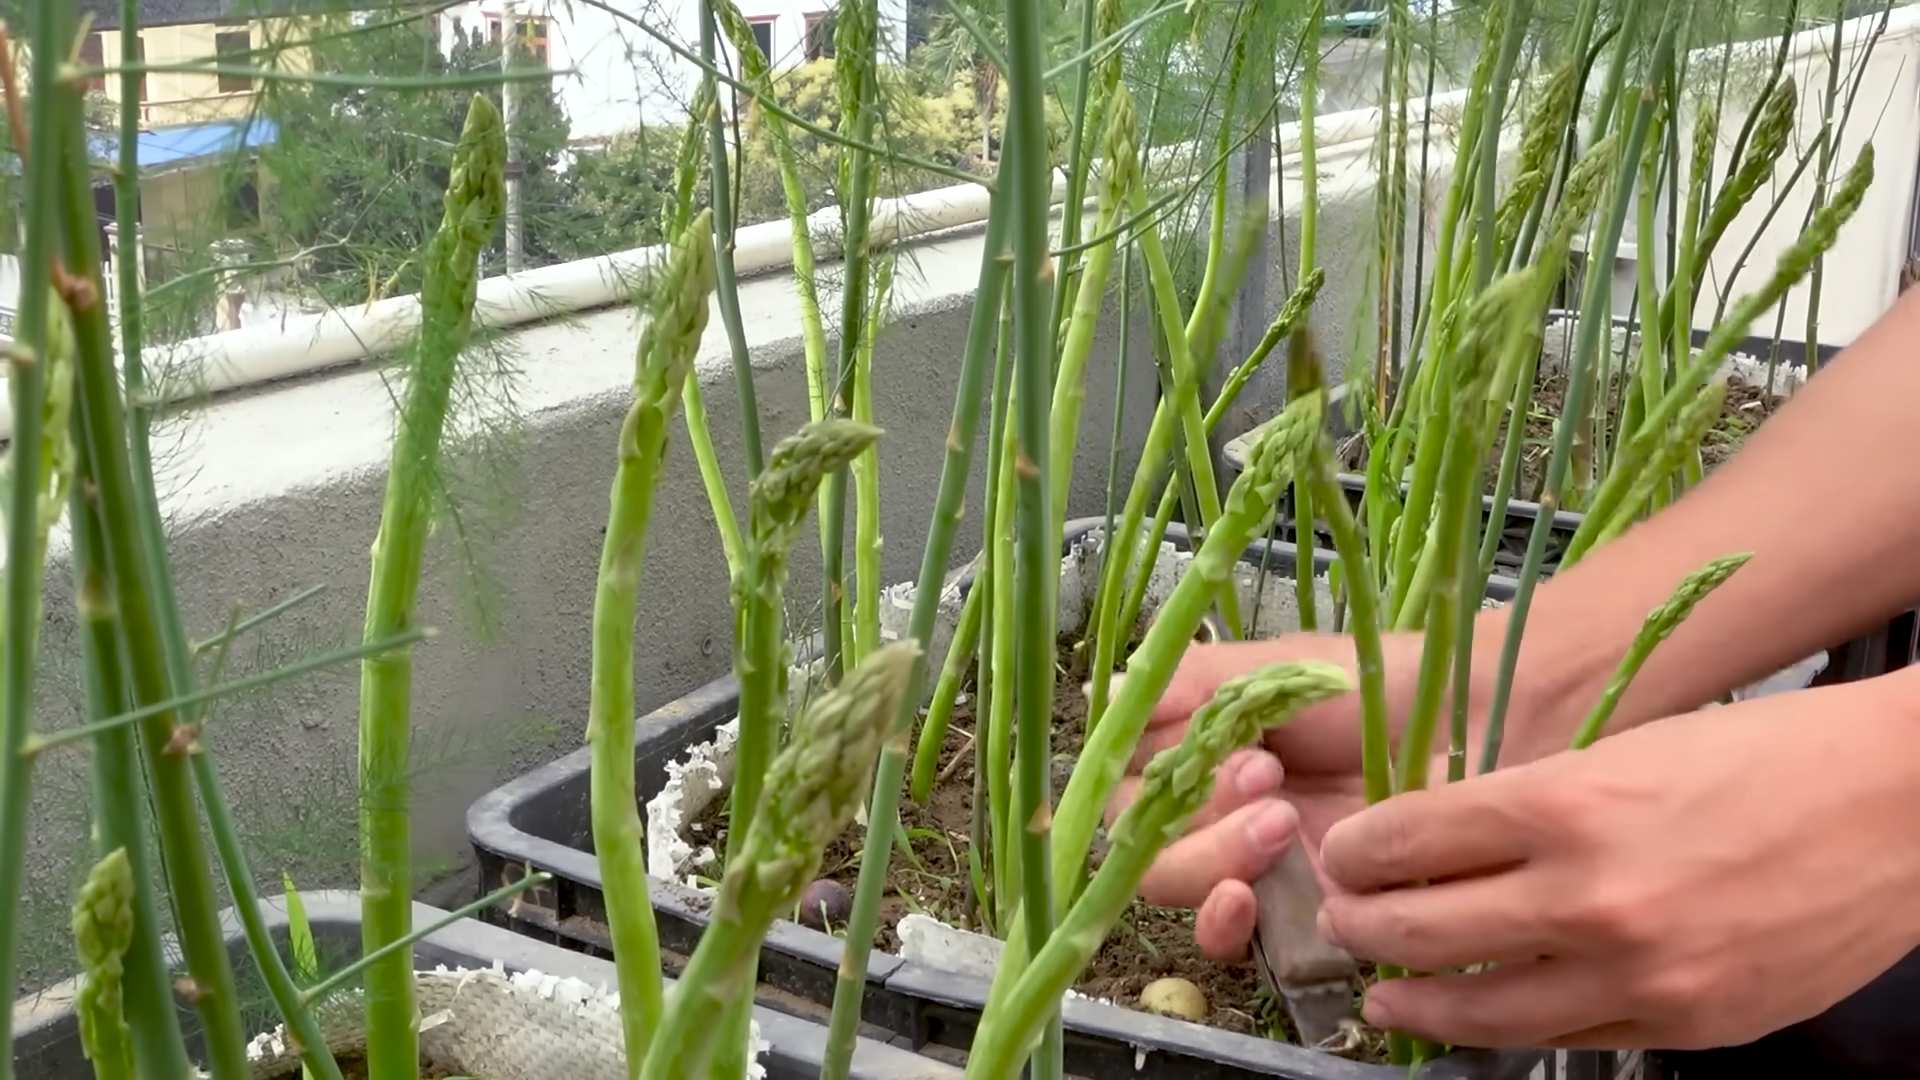
Harvesting Your Asparagus
Patience is key when it comes to harvesting asparagus. Don’t harvest any spears in the first year after planting. This allows the plants to establish a strong root system. In the second year, you can harvest lightly for a few weeks. In the third year and beyond, you can harvest more heavily for 6-8 weeks.
Here’s how to harvest asparagus:
1. Wait for the Spears: Look for spears that are about 6-8 inches tall and about as thick as your finger.
2. Cut or Snap: You can either cut the spears at ground level with a sharp knife or snap them off with your fingers. Snapping is often preferred, as it leaves the remaining spear intact and prevents disease from entering the plant.
3. Harvest Regularly: Harvest spears every day or two during the peak of the season. This will encourage the plants to produce more spears.
4. Stop Harvesting: Stop harvesting when the spears become thin and spindly. This indicates that the plants are starting to put their energy into producing ferns.
Overwintering Your Asparagus
Asparagus is a hardy perennial that can withstand cold temperatures, but it’s still important to protect your container plants during the winter.
1. Cut Back the Ferns: In the fall, after the ferns have turned brown, cut them back to about 2 inches above the ground.
2. Mulch: Add a thick layer of mulch around the base of the plants to insulate the roots and protect them from freezing temperatures.
3. Water Sparingly: Water sparingly during the winter, only when the soil is very dry.
4. Protect from Extreme Cold: If you live in an area with very cold winters, you may want to move the container to a sheltered location, such as a garage or shed.
Troubleshooting Common Asparagus Problems
Even with the best care, you might encounter a few problems along the way. Here are some common issues and how to deal with them:
* Asparagus Beetles: These small, colorful beetles can damage asparagus spears and ferns. Hand-pick them off the plants or use an insecticidal soap.
* Fusarium Wilt: This fungal disease can cause the plants to wilt and die. Choose disease-resistant varieties and avoid overwatering.
* Rust: This fungal disease causes orange or brown pustules on the ferns. Improve air circulation and use a fungicide if necessary.
* Poor Spear Production: This can be caused by a variety of factors, including lack of sunlight, poor soil, or insufficient fertilization. Make sure your plants are getting enough sunlight, water, and nutrients.
Enjoying Your Homegrown Asparagus
Congratulations! You’ve successfully grown asparagus on your terrace. Now it’s time to enjoy the fruits (or rather, vegetables) of your labor. Freshly harvested asparagus is incredibly delicious. You can steam it, grill it, roast it, or add it to salads and omelets. The possibilities are endless!
Remember, growing asparagus takes time and patience, but the reward of homegrown spears is well worth the effort. So, get out there, get your hands dirty, and start growing your own asparagus today! I promise, you won’t regret it. Happy gardening!
Conclusion
So, there you have it! Growing asparagus on your terrace isn’t just a whimsical dream; it’s a tangible reality within your reach. We’ve walked you through the process, from selecting the right crowns to nurturing them through their initial growth and beyond. The beauty of this DIY project lies not only in the fresh, delicious asparagus spears you’ll harvest year after year, but also in the satisfaction of cultivating your own food source in a limited space.
Why is this a must-try? Because it’s more than just growing vegetables; it’s about connecting with nature, understanding the rhythms of the seasons, and enjoying the unparalleled flavor of homegrown produce. Store-bought asparagus simply can’t compare to the crisp, tender spears you’ll pluck straight from your terrace garden. Plus, you’ll be reducing your carbon footprint by sourcing your food locally – literally!
But the journey doesn’t end here. Feel free to experiment with different varieties of asparagus. ‘Jersey Knight’ is a reliable choice for beginners, but ‘Purple Passion’ offers a unique color and slightly sweeter flavor. Consider companion planting to enhance your asparagus patch. Marigolds can deter asparagus beetles, while tomatoes and basil can improve growth and flavor. You can also try different container sizes and materials to see what works best for your terrace environment. Perhaps a raised bed would provide better drainage, or a self-watering container could simplify maintenance.
Don’t be afraid to get your hands dirty and embrace the learning process. Gardening is all about trial and error, and even experienced gardeners face challenges. The key is to be patient, observant, and willing to adapt your approach as needed.
We wholeheartedly encourage you to embark on this rewarding adventure of growing asparagus on your terrace. Imagine the pride you’ll feel when you serve a dish featuring asparagus you’ve grown yourself. Picture the vibrant green spears adding a touch of elegance to your meals. Think of the conversations you’ll spark with friends and family as you share your homegrown bounty.
And most importantly, we want to hear about your experience! Share your successes, your challenges, and your tips with us in the comments below. Post photos of your asparagus patch, tell us about the varieties you’re growing, and let us know what you’ve learned along the way. Your insights will not only inspire others to try this DIY trick, but also help us all become better terrace gardeners. Let’s create a community of asparagus enthusiasts and celebrate the joys of homegrown food! So, grab your gardening gloves, select your asparagus crowns, and get ready to transform your terrace into a thriving edible oasis. Happy gardening!
Frequently Asked Questions (FAQ)
1. What is the best time of year to plant asparagus crowns on my terrace?
The ideal time to plant asparagus crowns is in early spring, as soon as the soil can be worked. This typically falls between late March and early May, depending on your climate. Planting in spring allows the crowns to establish themselves before the heat of summer arrives. Alternatively, you can plant in the fall (September-October) in milder climates, giving the crowns a head start before winter dormancy. Avoid planting during the hottest months of summer or when the ground is frozen.
2. What size container is needed for growing asparagus on a terrace?
Asparagus needs plenty of room for its roots to spread. A minimum container size of 12 inches deep and 12 inches wide is recommended per crown. However, larger is always better. A half-barrel container or a raised bed on your terrace would be ideal for multiple crowns. Ensure the container has adequate drainage holes to prevent waterlogging, which can lead to root rot.
3. What type of soil is best for growing asparagus in containers?
Asparagus prefers well-draining, fertile soil with a slightly acidic to neutral pH (6.0-7.0). A good potting mix specifically formulated for vegetables is a great starting point. You can amend the soil with compost or well-rotted manure to improve drainage, fertility, and water retention. Avoid using heavy clay soil, as it can become waterlogged and hinder root growth. Adding perlite or vermiculite to the potting mix can also improve drainage.
4. How often should I water my asparagus plants on the terrace?
Asparagus needs consistent moisture, especially during its first year of growth. Water deeply whenever the top inch of soil feels dry to the touch. Avoid overwatering, as this can lead to root rot. During hot, dry weather, you may need to water more frequently. Mulching around the base of the plants can help retain moisture and suppress weeds. In the fall, reduce watering as the plants enter dormancy.
5. How much sunlight do asparagus plants need on a terrace?
Asparagus requires at least 6-8 hours of direct sunlight per day to thrive. Choose a sunny spot on your terrace where your plants will receive ample sunlight. If your terrace is partially shaded, try to position the containers where they will receive the most morning sun, as this is generally the strongest. Insufficient sunlight can result in weak growth and reduced spear production.
6. How long does it take to harvest asparagus after planting?
Patience is key when growing asparagus. Do not harvest any spears during the first year after planting. In the second year, you can harvest a few spears for a short period (about 2 weeks). In the third year and beyond, you can harvest for a longer period (6-8 weeks) in the spring. Allowing the ferns to grow and mature each year is crucial for building the plant’s energy reserves and ensuring a bountiful harvest in subsequent years.
7. How do I harvest asparagus spears?
Harvest asparagus spears when they are about 6-8 inches tall and the tips are still tightly closed. Use a sharp knife to cut the spear at or slightly below the soil surface. Avoid damaging the surrounding crowns or emerging spears. Harvest spears regularly during the harvest season to encourage continued production.
8. What are some common pests and diseases that affect asparagus, and how can I control them?
Asparagus beetles are a common pest that can damage the foliage and spears. Handpicking the beetles or using insecticidal soap can help control them. Asparagus rust is a fungal disease that can cause orange pustules on the ferns. Ensure good air circulation around the plants and avoid overhead watering to prevent rust. If rust occurs, remove and destroy infected foliage. Fusarium wilt is another fungal disease that can cause yellowing and wilting of the plants. Choose disease-resistant varieties and ensure good soil drainage to prevent Fusarium wilt.
9. How do I care for asparagus plants in the fall and winter?
In the fall, allow the asparagus ferns to turn yellow and brown naturally. Once they have completely died back, cut them down to the ground level. This allows the plant to redirect its energy to the roots for winter storage. Apply a layer of mulch around the base of the plants to protect them from freezing temperatures. In colder climates, you may need to move the containers to a sheltered location or wrap them with burlap to provide extra insulation.
10. Can I grow asparagus from seed instead of crowns?
Yes, you can grow asparagus from seed, but it takes much longer to establish a productive patch. It typically takes 2-3 years longer to harvest spears from seed-grown plants compared to crown-grown plants. If you choose to grow from seed, start the seeds indoors in early spring and transplant the seedlings to your terrace garden after the last frost. Be prepared to be patient, as it will take several years before you can enjoy a substantial harvest.


Leave a Comment