
Regrow enoki mushrooms at home? Absolutely! Imagine harvesting a fresh batch of these delicate, flavorful fungi right from your kitchen. It sounds like something out of a gourmet chef’s dream, but trust me, it’s easier than you think! For centuries, mushrooms have held a special place in various cultures, prized for their unique taste and medicinal properties. In East Asian cuisine, enoki mushrooms, with their long, slender stems and tiny caps, are a staple, adding a delightful crunch and subtle sweetness to soups, stir-fries, and hot pots.
But why should you bother with this DIY project? Well, for starters, store-bought enoki mushrooms can be quite expensive and often lack the freshness of homegrown varieties. Plus, there’s something incredibly satisfying about nurturing your own food, connecting with nature, and reducing your environmental impact. This simple trick allows you to regrow enoki mushrooms at home from the scraps you’d normally toss away, turning waste into a delicious and sustainable resource. I’m excited to share this easy-to-follow guide that will empower you to cultivate your own supply of these culinary gems. Let’s get started!
Regrow Your Own Enoki Mushrooms at Home: A Fun and Frugal Project!
Hey there, fellow mushroom enthusiasts! Ever find yourself tossing out the base of your enoki mushrooms after enjoying a delicious stir-fry or soup? Well, stop right there! I’m going to show you how to regrow those little guys right in your own home. It’s a surprisingly simple and rewarding process, and you’ll be amazed at how easy it is to get a second (or even third!) harvest.
What You’ll Need
Before we dive in, let’s gather our supplies. This is a pretty low-cost project, which is always a win in my book!
* Enoki Mushroom Stems: The star of the show! Save the base of your store-bought enoki mushrooms. Make sure they look healthy and aren’t slimy or moldy.
* Cardboard: Plain, unprinted cardboard is best. Cereal boxes, shipping boxes, or even toilet paper rolls (flattened) will work. Avoid anything with glossy coatings or heavy printing.
* Coffee Grounds: Used coffee grounds are a fantastic nutrient source for mushrooms. Ask your local coffee shop if they have some to spare – they often give them away for free!
* Spray Bottle: For misting and keeping things nice and humid.
* Container: A plastic container with a lid is ideal. A clean takeout container, a storage bin, or even a large ziplock bag will do the trick.
* Hydrogen Peroxide (3%): This is optional, but it can help prevent mold growth.
* Gloves: To keep things sanitary.
* Patience: Mushroom growing takes time, so be prepared to wait a few weeks.
Preparing the Substrate: Cardboard and Coffee Grounds
The substrate is the material that the mushrooms will grow on. In this case, we’re using a combination of cardboard and coffee grounds, which provides the perfect environment for enoki mushrooms to thrive.
1. Prepare the Cardboard:
* Tear the cardboard into small pieces, about 1-2 inches in size. The smaller the pieces, the easier it will be for the mushrooms to colonize.
* Soak the cardboard pieces in hot water for at least an hour, or even overnight. This will help to pasteurize the cardboard and make it easier for the mushrooms to break down.
* After soaking, drain the cardboard thoroughly. You want it to be damp, but not dripping wet. Squeeze out any excess water.
2. Prepare the Coffee Grounds:
* Make sure your coffee grounds are used and cooled. Fresh coffee grounds are too acidic for mushrooms.
* If you’re using a large amount of coffee grounds, you can pasteurize them by microwaving them for a few minutes or steaming them in a pot. This will help to kill any unwanted bacteria or mold.
* Let the coffee grounds cool down before mixing them with the cardboard.
3. Mix the Substrate:
* In a clean container, mix the soaked cardboard and coffee grounds together. A good ratio is about 2 parts cardboard to 1 part coffee grounds.
* Make sure the mixture is evenly distributed. You want the coffee grounds to be well-integrated with the cardboard.
* The substrate should be damp, but not soggy. If it’s too wet, add more cardboard. If it’s too dry, add a little bit of water.
Inoculating the Substrate: Introducing the Enoki Mushrooms
Now comes the fun part – introducing the enoki mushroom stems to the substrate! This is where the magic happens.
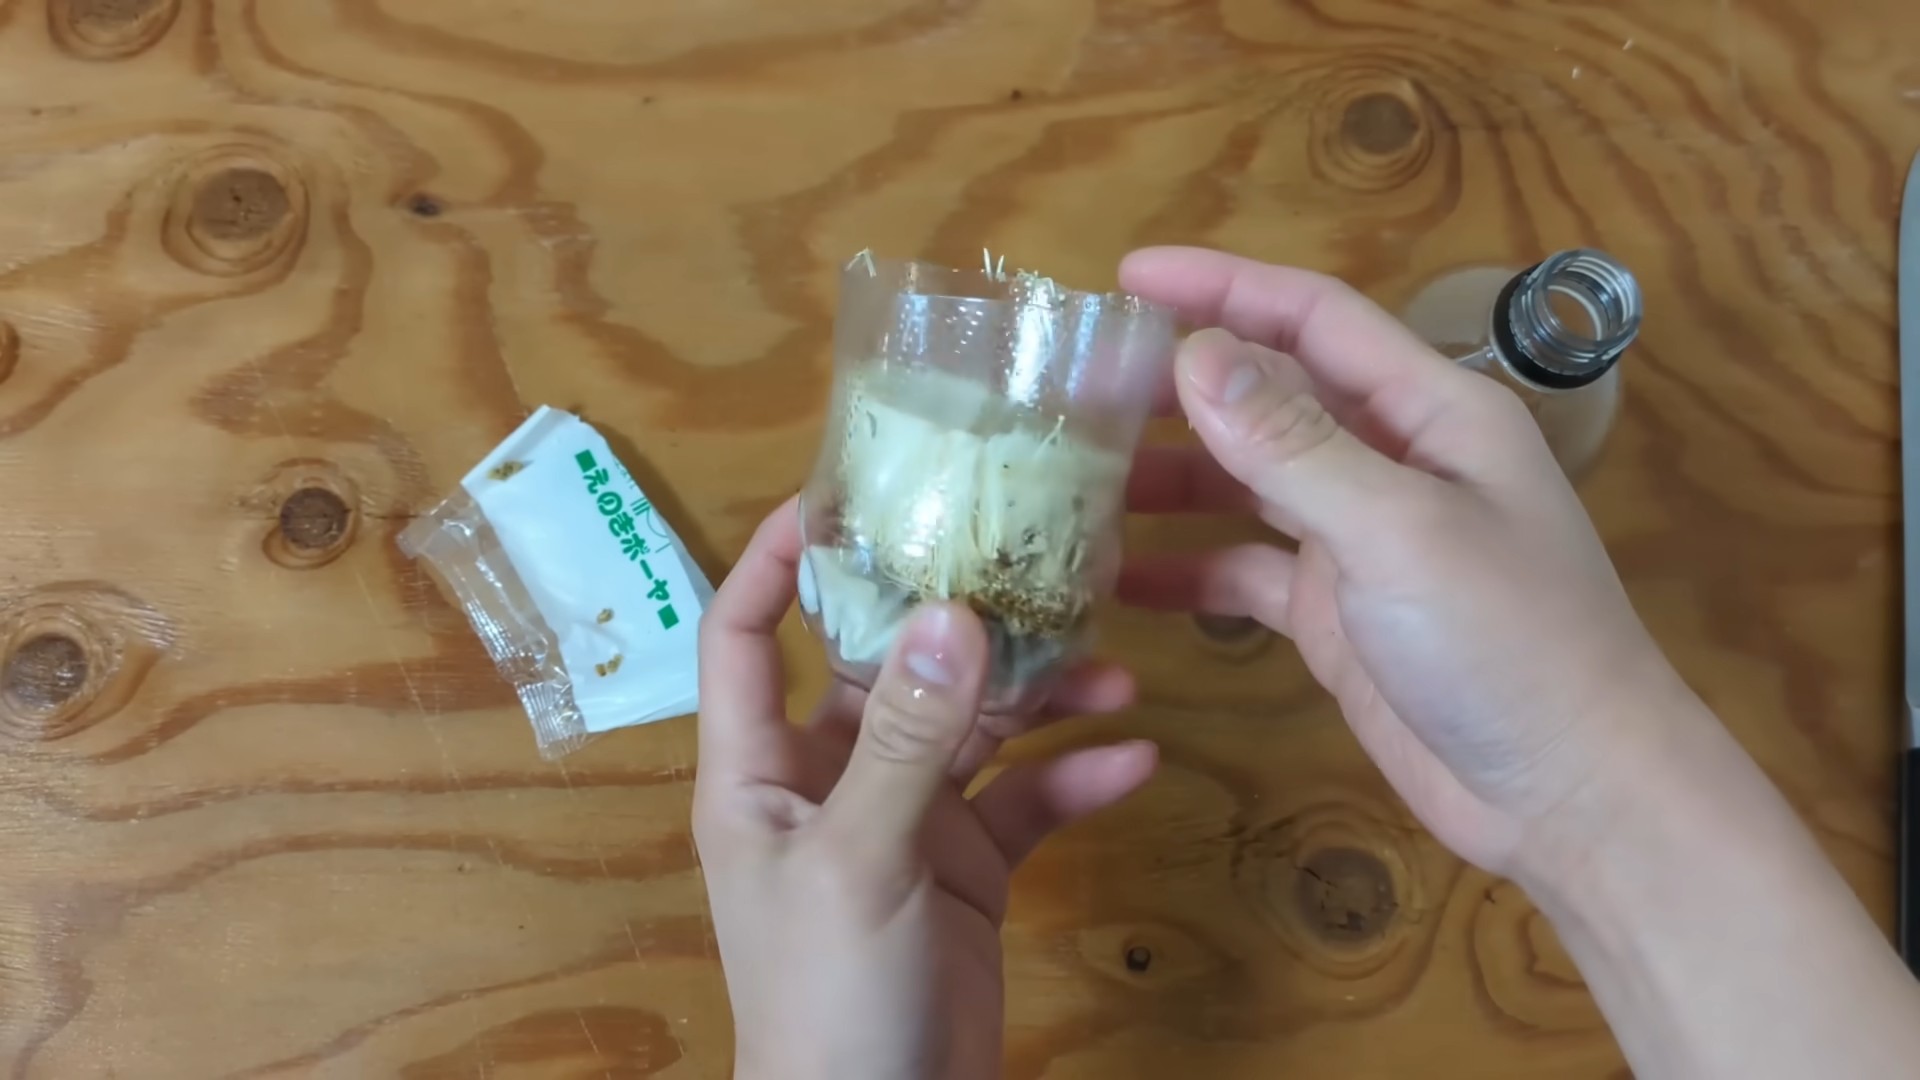
1. Prepare the Enoki Stems:
* Carefully separate the enoki mushroom stems from the base. Try to keep as much of the mycelium (the white, fuzzy stuff) intact as possible. This is where the new mushrooms will grow from.
* If you’re concerned about contamination, you can dip the stems in a diluted hydrogen peroxide solution (1 part hydrogen peroxide to 9 parts water) for a few seconds. This will help to kill any surface mold or bacteria.
2. Inoculate the Substrate:
* Spread the prepared substrate evenly in your container.
* Place the enoki mushroom stems on top of the substrate, spacing them out evenly.
* Gently press the stems into the substrate, ensuring that they are in good contact with the cardboard and coffee grounds.
* Cover the stems with a thin layer of the substrate. This will help to keep them moist and protect them from drying out.
3. Seal the Container:
* Cover the container with a lid or seal it in a ziplock bag. This will help to create a humid environment, which is essential for mushroom growth.
* If you’re using a container with a lid, make sure there are a few small air holes to allow for gas exchange. You can poke holes with a needle or a small nail.
Incubation: Letting the Mycelium Grow
This is the waiting game! The mycelium needs time to colonize the substrate before mushrooms will start to form.
1. Find a Suitable Location:
* Place the container in a dark, cool place. A basement, closet, or cupboard is ideal.
* The temperature should be between 60-70°F (15-21°C).
* Avoid direct sunlight, as this can dry out the substrate and inhibit mushroom growth.
2. Maintain Humidity:
* Check the substrate regularly to make sure it’s still damp. If it’s starting to dry out, mist it with water using a spray bottle.
* You want to keep the humidity level high, but avoid overwatering. The substrate should be damp, not soggy.
3. Monitor for Mold:
* Keep an eye out for any signs of mold growth. If you see any green, black, or blue mold, remove it immediately.
* You can use a diluted hydrogen peroxide solution to treat mold. Spray the affected area with the solution and let it air dry.
4. Be Patient:
* It can take several weeks for the mycelium to fully colonize the substrate. You’ll know it’s ready when the substrate is covered in a white, fuzzy growth.
Fruiting: Encouraging Mushroom Growth
Once the mycelium has colonized the substrate, it’s time to encourage mushroom growth. This involves changing the environmental conditions to stimulate fruiting.
1. Introduce Light:
* Move the container to a location with indirect light. A north-facing window is ideal.
* Enoki mushrooms need light to trigger fruiting.
2. Lower the Temperature:
* Lower the temperature to around 50-60°F (10-15°C). This will help to stimulate mushroom formation.
* You can achieve this by placing the container in a cooler location, such as a refrigerator or a cool basement.
3. Increase Airflow:
* Increase the airflow around the container. You can do this by opening the lid slightly or by fanning the container with a piece of cardboard.
* Enoki mushrooms need fresh air to grow properly.
4. Maintain Humidity:
* Continue to mist the substrate regularly to maintain a high humidity level.
* You can also place a tray of water near the container to increase humidity.
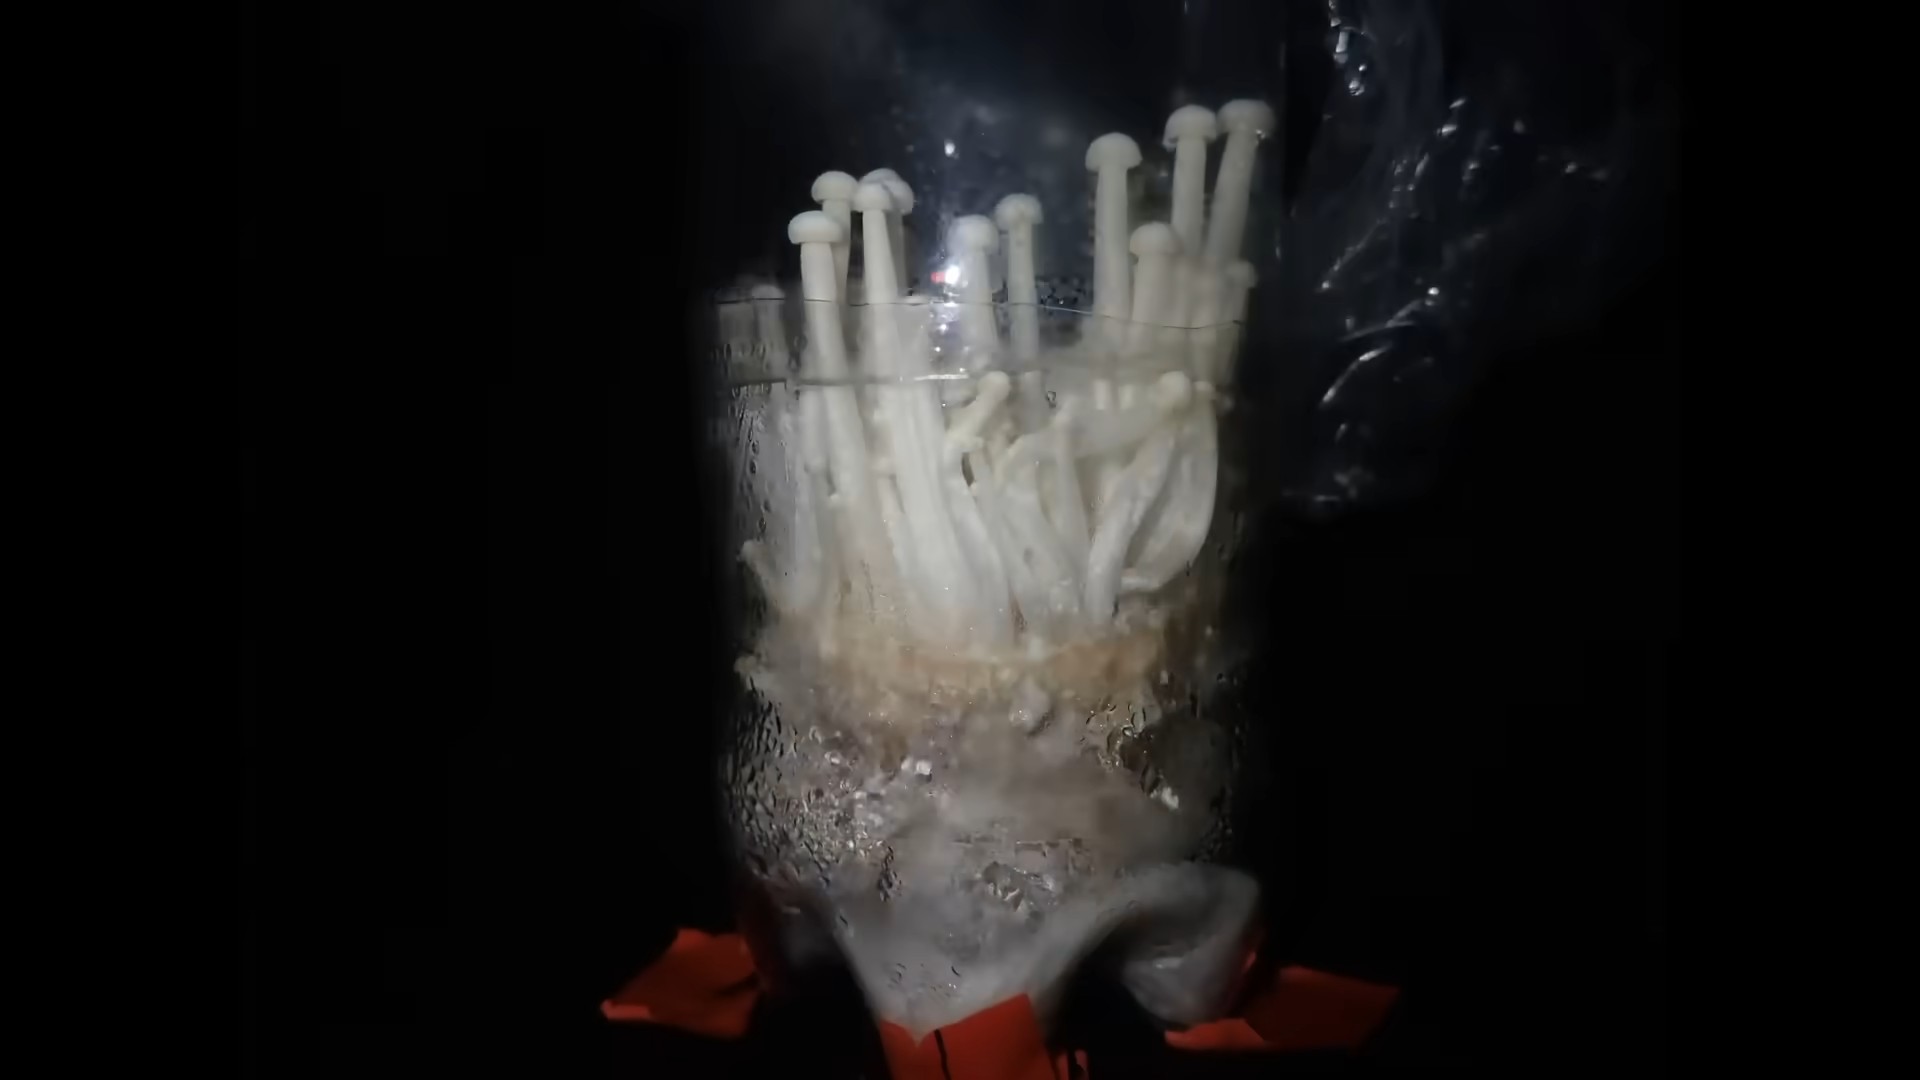
Harvesting: Enjoying Your Homegrown Enoki Mushrooms
After a week or two, you should start to see small enoki mushrooms forming. These will grow quickly, and you’ll be able to harvest them when they reach the desired size.
1. Harvesting:
* When the mushrooms are ready to harvest, gently twist them off the substrate.
* Avoid pulling the mushrooms, as this can damage the mycelium and prevent future harvests.
* Harvest all of the mushrooms at once, even if some are smaller than others.
2. Enjoy Your Harvest:
* Your homegrown enoki mushrooms are now ready to eat! They can be used in a variety of dishes, such as stir-fries, soups, and salads.
* Store the harvested mushrooms in the refrigerator for up to a week.
Second Flush: Getting Another Harvest
After harvesting your first flush of mushrooms, you can often get a second (or even third!) harvest by repeating the fruiting process.
1. Prepare for Second Flush:
* After harvesting, remove any remaining mushroom stems from the substrate.
* Mist the substrate thoroughly with water.
* Return the container to the dark, cool location for a week or two to allow the mycelium to recover.
2. Repeat Fruiting Process:
* After the recovery period, repeat the fruiting process by introducing light, lowering the temperature, and increasing airflow.
Conclusion
So, there you have it! Regrowing enoki mushrooms at home isn’t just a fun science experiment; it’s a sustainable way to enjoy these delicate and flavorful fungi. We’ve walked you through the simple steps, from sourcing your initial enoki to creating the ideal growing environment. The beauty of this DIY project lies in its accessibility – you don’t need a fancy lab or specialized equipment. Just a little patience, some readily available materials, and a dash of curiosity.
Why is this a must-try? Beyond the sheer satisfaction of cultivating your own food, regrowing enoki mushrooms offers several compelling advantages. First, it significantly reduces food waste. Instead of tossing those enoki stems into the compost bin, you’re giving them a second life, transforming them into a fresh batch of delicious mushrooms. Second, it’s an incredibly cost-effective way to enjoy enoki mushrooms. Store-bought enoki can be pricey, especially if you use them frequently in your cooking. Regrowing them at home allows you to bypass the grocery store markup and enjoy a continuous supply. Third, it’s an educational and engaging activity for the whole family. It’s a fantastic way to teach children about the life cycle of fungi, the importance of sustainability, and the rewards of growing your own food.
But the benefits don’t stop there. Regrowing enoki mushrooms at home also allows you to control the growing environment, ensuring that your mushrooms are free from pesticides and other harmful chemicals. You can tailor the growing conditions to your specific preferences, experimenting with different substrates and light levels to achieve the perfect texture and flavor.
Variations and Suggestions:
While the method we’ve outlined is a great starting point, don’t be afraid to experiment and adapt it to your own needs and preferences. Here are a few suggestions to get you started:
* Substrate Variations: While sawdust is a common and effective substrate, you can also try using other materials, such as coffee grounds, cardboard, or even shredded paper. Each substrate will impart a slightly different flavor and texture to the mushrooms.
* Light Levels: Enoki mushrooms typically grow in low-light conditions, but you can experiment with different light levels to see how it affects their growth and appearance. Higher light levels may result in darker, more robust mushrooms.
* Temperature Control: Maintaining a consistent temperature is crucial for successful enoki cultivation. Consider using a seedling heat mat or a temperature-controlled incubator to ensure optimal growing conditions.
* Flavor Infusions: Get creative with flavor infusions by adding herbs, spices, or even a small amount of wine to the substrate. This can impart subtle but delicious flavors to your homegrown enoki mushrooms.
* Vertical Growing: If you’re short on space, consider using a vertical growing system to maximize your yield. You can stack multiple containers on top of each other to create a compact and efficient growing setup.
We encourage you to embark on this exciting journey of regrowing enoki mushrooms at home. It’s a rewarding and sustainable way to enjoy these delicious fungi. Don’t be afraid to experiment, learn from your mistakes, and most importantly, have fun!
Once you’ve successfully regrown your own enoki mushrooms, we’d love to hear about your experience. Share your tips, tricks, and photos with us in the comments section below. Let’s build a community of enoki enthusiasts and inspire others to embrace the joys of home mushroom cultivation. Your insights could be invaluable to other aspiring mushroom growers. So, grab your enoki stems, gather your supplies, and get ready to witness the magic of mushroom regeneration! Happy growing!
Frequently Asked Questions (FAQ)
What exactly are enoki mushrooms, and why are they so popular?
Enoki mushrooms, also known as enokitake, are long, thin, white mushrooms with small caps. They have a mild, slightly sweet flavor and a crisp, crunchy texture. They are popular in Asian cuisine, particularly in soups, stir-fries, and salads. Their delicate flavor and unique texture make them a versatile ingredient that can add a touch of elegance to any dish. They are also relatively easy to grow, making them a popular choice for home cultivation.
How long does it take to regrow enoki mushrooms?
The time it takes to regrow enoki mushrooms can vary depending on several factors, including the temperature, humidity, and the quality of the initial enoki stems. Generally, you can expect to see new mushroom growth within 2-4 weeks. However, it may take longer in cooler temperatures or if the humidity is not optimal. Be patient and consistent with your care, and you’ll eventually be rewarded with a fresh batch of enoki mushrooms.
What is the best substrate to use for regrowing enoki mushrooms?
Sawdust is a commonly used and effective substrate for regrowing enoki mushrooms. It provides the necessary nutrients and moisture for the mushrooms to thrive. However, you can also experiment with other substrates, such as coffee grounds, cardboard, or shredded paper. Each substrate will impart a slightly different flavor and texture to the mushrooms. Coffee grounds, for example, can add a slightly earthy flavor, while cardboard can provide a more robust texture.
How often should I water my enoki mushrooms?
Maintaining adequate moisture is crucial for successful enoki cultivation. You should water your enoki mushrooms regularly, keeping the substrate consistently moist but not waterlogged. The frequency of watering will depend on the humidity of your environment. In drier climates, you may need to water more frequently. A good rule of thumb is to check the substrate daily and water when it feels dry to the touch. Use a spray bottle to mist the substrate gently, avoiding direct contact with the mushrooms themselves.
What is the ideal temperature for regrowing enoki mushrooms?
Enoki mushrooms prefer cool temperatures, ideally between 55-65°F (13-18°C). Maintaining a consistent temperature within this range is crucial for optimal growth. If the temperature is too high, the mushrooms may become leggy and thin. If the temperature is too low, growth may be slow or stunted. Consider using a seedling heat mat or a temperature-controlled incubator to ensure optimal growing conditions.
Can I use tap water to water my enoki mushrooms?
While tap water is generally safe to use, it’s best to use filtered or distilled water if possible. Tap water can contain chlorine and other chemicals that may inhibit mushroom growth. If you must use tap water, let it sit out for 24 hours to allow the chlorine to dissipate.
My enoki mushrooms are growing, but they are very thin and leggy. What am I doing wrong?
Thin and leggy enoki mushrooms are often a sign of insufficient light or excessive heat. Enoki mushrooms typically grow in low-light conditions, but they still need some light to develop properly. If your mushrooms are growing in complete darkness, try providing them with a small amount of indirect light. Also, ensure that the temperature is within the ideal range of 55-65°F (13-18°C).
Can I eat the regrown enoki mushrooms?
Yes, the regrown enoki mushrooms are perfectly safe to eat, as long as they are grown in a clean and controlled environment. Before consuming them, inspect them carefully for any signs of mold or contamination. If they look and smell healthy, they are ready to be enjoyed.
How do I harvest my regrown enoki mushrooms?
Once your enoki mushrooms have reached a desired size, you can harvest them by gently twisting and pulling them from the substrate. Avoid cutting them, as this can damage the remaining mycelium and prevent further growth. Harvest the mushrooms in clusters, leaving some behind to continue growing.
How can I prevent contamination when regrowing enoki mushrooms?
Contamination is a common challenge in mushroom cultivation. To minimize the risk of contamination, it’s essential to maintain a clean and sterile environment. Before starting, thoroughly clean all your equipment with soap and water, and then sanitize them with a diluted bleach solution. Use sterile substrate and avoid introducing any foreign materials into the growing container. Regularly inspect your mushrooms for any signs of mold or contamination, and remove any affected areas immediately.
What if my enoki stems start to mold?
Mold is a common issue when regrowing mushrooms. If you see mold, immediately remove the affected stems to prevent it from spreading. Ensure proper ventilation and avoid overwatering, as these can contribute to mold growth. You can also try spraying the substrate with a diluted hydrogen peroxide solution to kill the mold.
Can I regrow enoki mushrooms multiple times from the same stems?
While it’s possible to regrow enoki mushrooms multiple times from the same stems, the yield and quality of the mushrooms may decrease with each subsequent generation. After a few cycles, the stems may become depleted of nutrients, and the risk of contamination may increase. It’s generally best to start with fresh enoki stems for each batch.
Is regrowing enoki mushrooms a good way to save money?
Yes, regrowing enoki mushrooms can be a cost-effective way to enjoy these delicious fungi. Store-bought enoki can be pricey, especially if you use them frequently in your cooking. Regrowing them at home allows you to bypass the grocery store markup and enjoy a continuous supply at a fraction of the cost.

Leave a Comment