
Grow Sweet Cantaloupe right in your backyard! Imagine biting into a juicy, sun-ripened cantaloupe that you nurtured from seed to fruit. Forget those bland, store-bought melons – we’re talking about cantaloupe bursting with flavor, so sweet it’ll make your taste buds sing. For centuries, cantaloupe has been a symbol of summer abundance, enjoyed by cultures around the world. From ancient Egypt, where melons were cultivated for royalty, to modern-day picnics, this fruit has always been a refreshing treat.
But let’s be honest, growing cantaloupe can seem intimidating. Maybe you’ve tried before and ended up with small, tasteless fruits, or perhaps you’re worried about pests and diseases. That’s where these DIY tricks and hacks come in! I’m here to share my secrets for successfully grow sweet cantaloupe, even if you have limited space or gardening experience. We’ll cover everything from choosing the right varieties to optimizing your soil and protecting your precious melons from unwanted visitors. Get ready to transform your garden into a cantaloupe paradise!
Growing Sweet Cantaloupe at Home: A DIY Guide
Okay, so you want to grow your own sweet, juicy cantaloupe? Awesome! It’s totally doable, even if you don’t have a huge garden. I’m going to walk you through everything you need to know, from starting seeds to harvesting that perfect melon. Let’s get started!
Choosing the Right Cantaloupe Variety
First things first, let’s talk varieties. Not all cantaloupes are created equal! Some are better suited for certain climates or have different ripening times. Here are a few popular and reliable choices:
* ‘Athena’: This is a classic choice, known for its disease resistance and consistent sweetness. It’s a good all-around option.
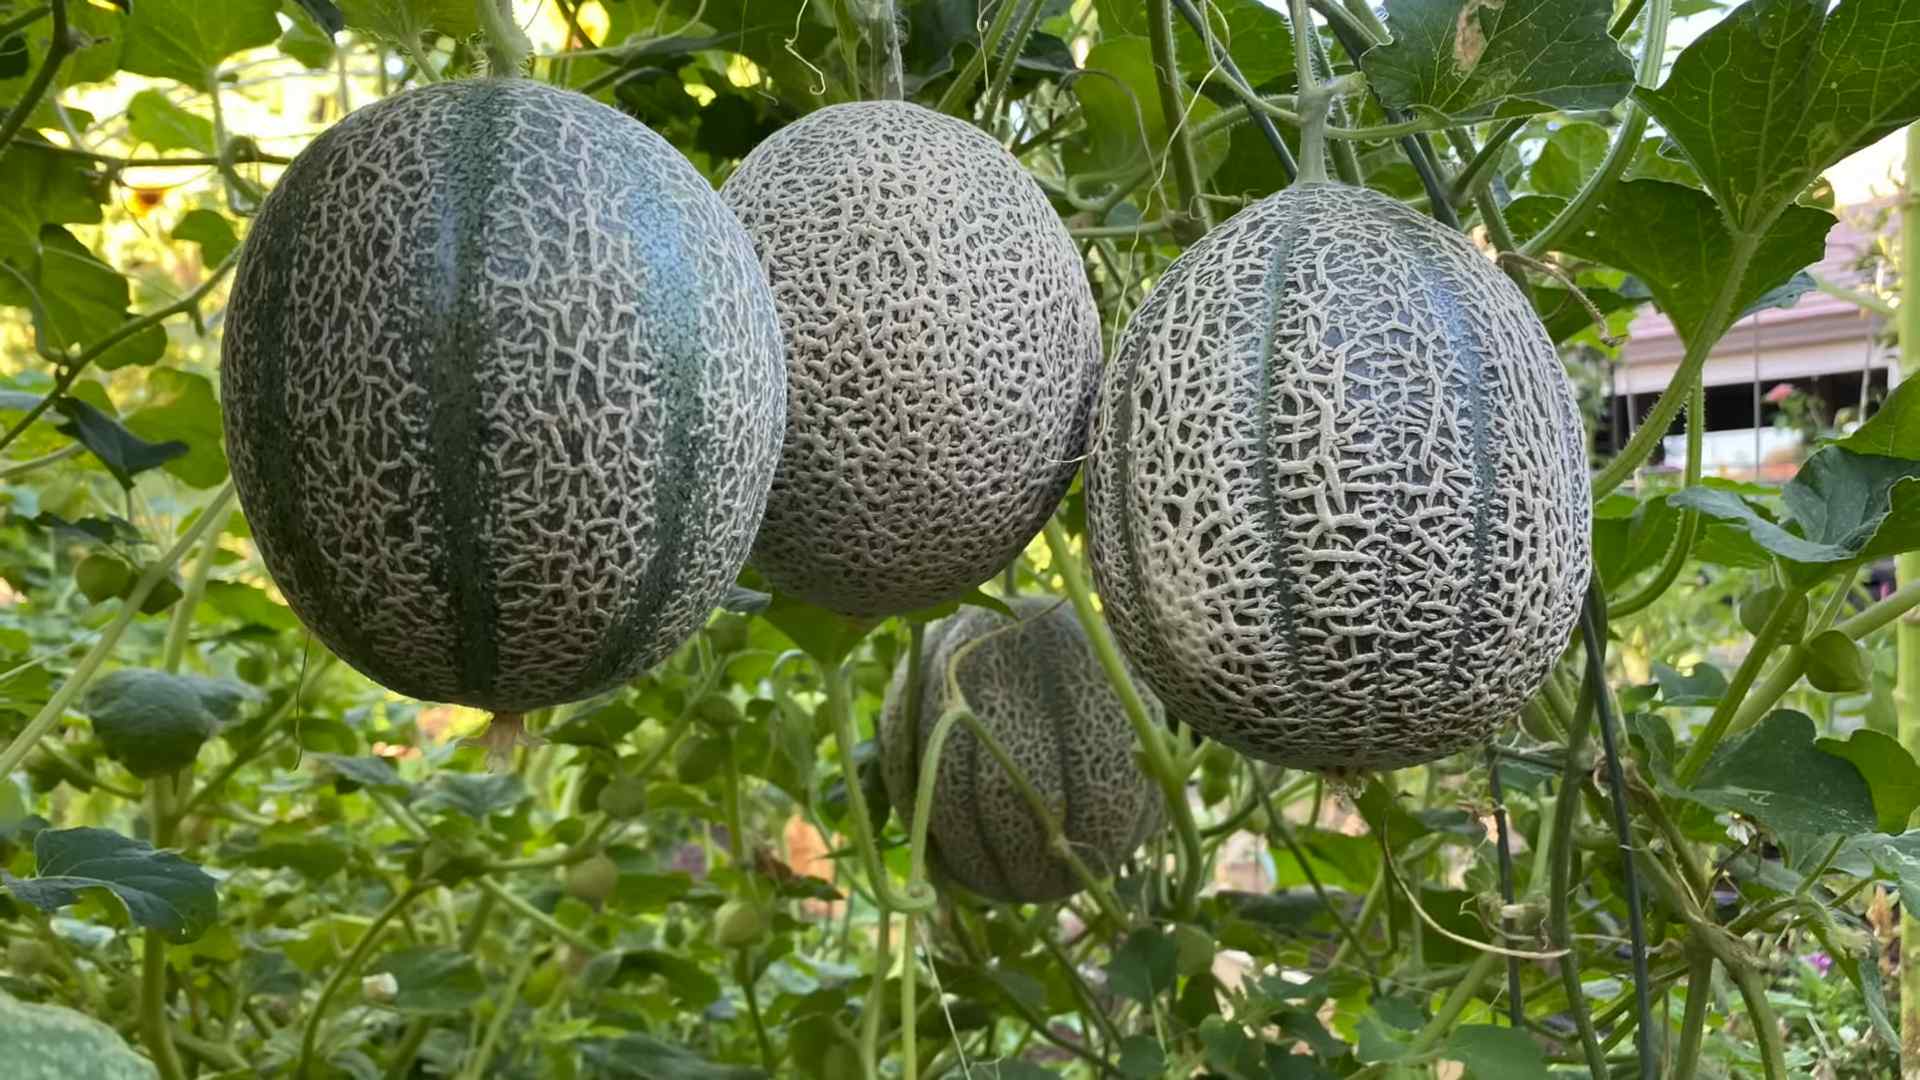
* ‘Hales Best Jumbo’: An heirloom variety with a deeply netted rind and incredibly flavorful flesh. It takes a bit longer to mature.
* ‘Ambrosia’: A hybrid variety that’s super sweet and aromatic. It’s also relatively early-maturing.
* ‘Sugar Cube’: If you’re short on space, this is a great option! It’s a smaller cantaloupe, perfect for containers or smaller gardens.
Consider your local climate and growing season when making your choice. Check seed packets for information on days to maturity and disease resistance.
Starting Your Cantaloupe Seeds
You can either direct sow your cantaloupe seeds or start them indoors. I usually prefer starting them indoors, especially if you have a shorter growing season. It gives them a head start!
When to Start Seeds:
* Indoors: About 3-4 weeks before the last expected frost.
* Direct Sowing: After the last frost, when the soil temperature is consistently above 65°F (18°C).
Materials You’ll Need:
* Cantaloupe seeds (obviously!)
* Seed starting trays or small pots
* Seed starting mix (a light, well-draining mix is best)
* Watering can or spray bottle
* Heat mat (optional, but helpful for germination)
* Grow lights (if starting indoors)
Step-by-Step Instructions for Starting Seeds Indoors:
1. Prepare Your Seed Starting Trays: Fill your seed starting trays or pots with seed starting mix. Gently tap the trays to settle the mix.
2. Sow the Seeds: Make a small indentation (about ½ inch deep) in the center of each cell or pot. Place 2-3 seeds in each indentation. This increases your chances of at least one seed germinating.
3. Cover the Seeds: Gently cover the seeds with seed starting mix.
4. Water Thoroughly: Water the trays or pots gently with a watering can or spray bottle. You want to moisten the soil without disturbing the seeds.
5. Provide Warmth: Place the trays on a heat mat (if using) and cover them with a humidity dome or plastic wrap. This will help to create a warm, humid environment that’s ideal for germination.
6. Provide Light: Once the seeds germinate (usually within 7-10 days), remove the humidity dome or plastic wrap and place the trays under grow lights. If you don’t have grow lights, place them in a sunny window, but be aware that they may not get enough light.
7. Water Regularly: Keep the soil consistently moist, but not soggy. Water when the top inch of soil feels dry to the touch.
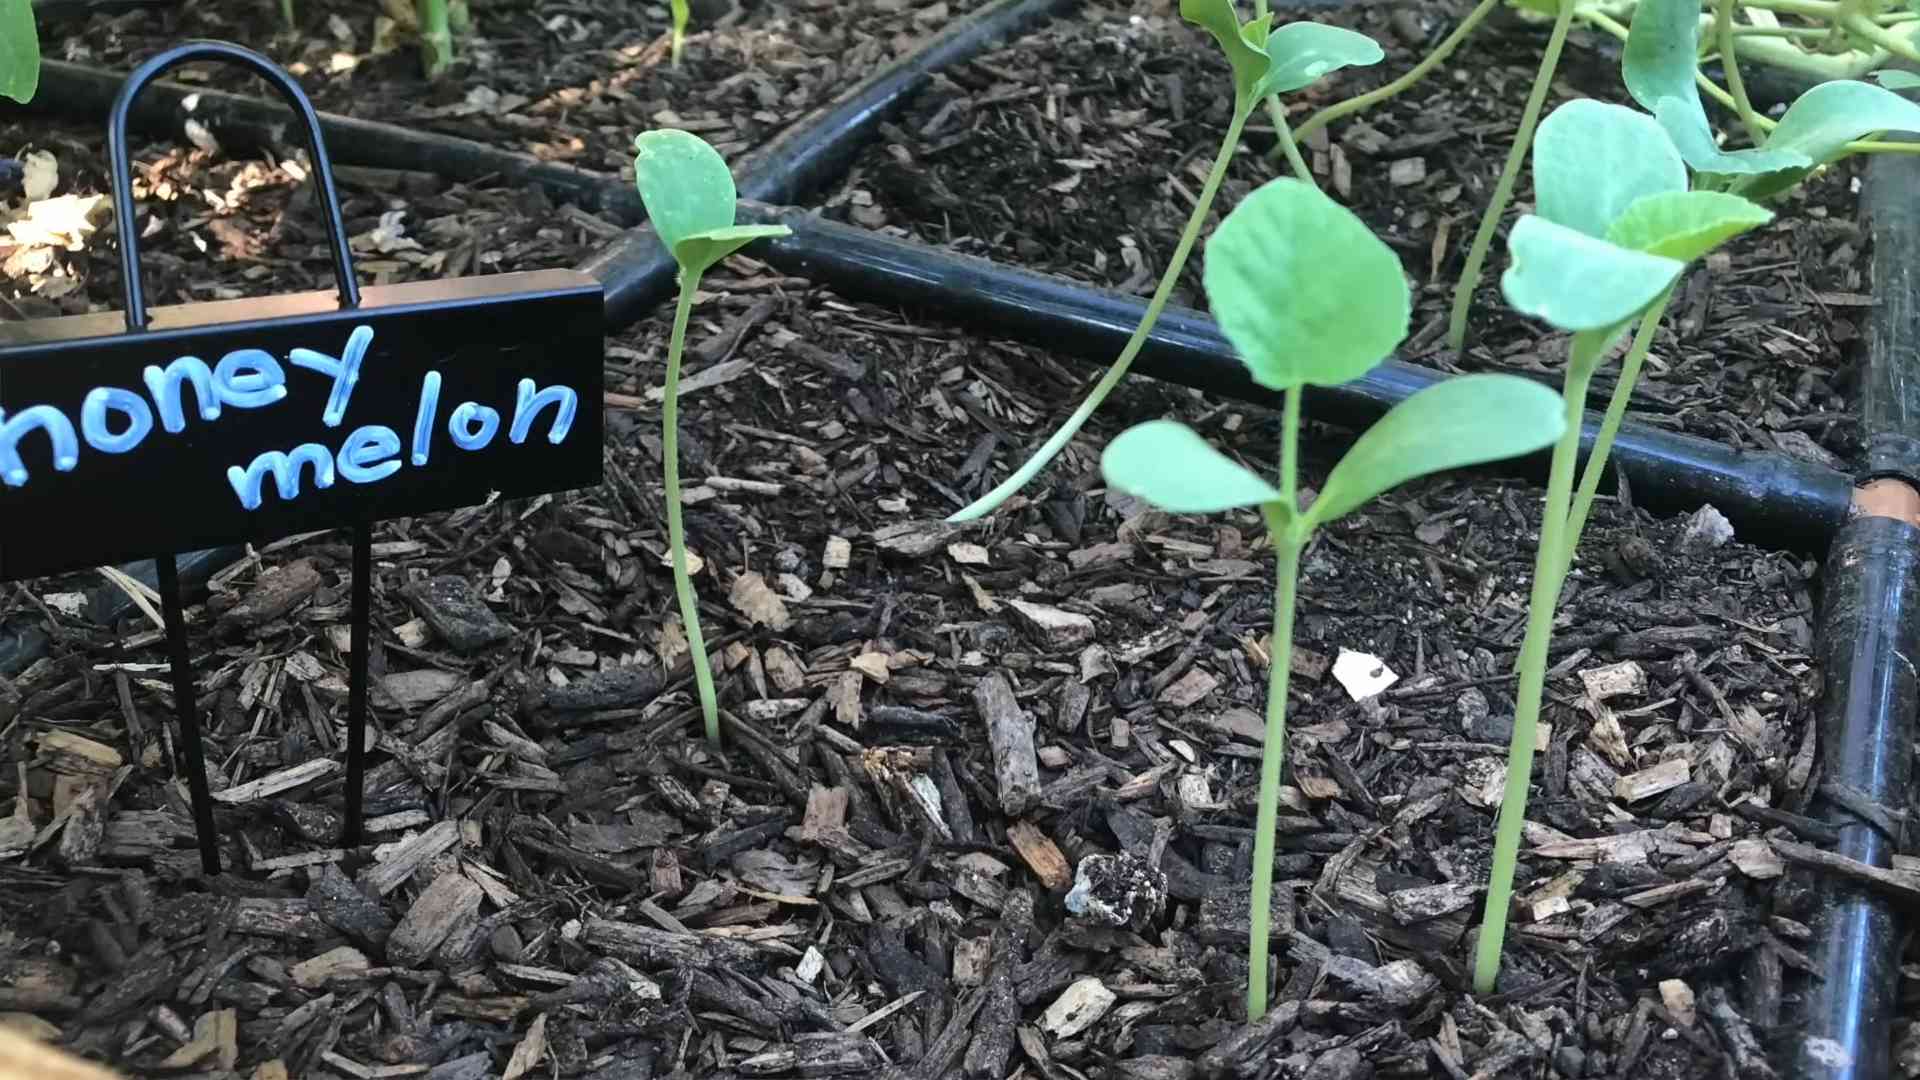
8. Thin Seedlings: Once the seedlings have their first true leaves (the leaves that look like miniature cantaloupe leaves), thin them to one seedling per cell or pot. Choose the strongest, healthiest-looking seedling and snip off the others at the soil line.
Preparing Your Garden Bed
Cantaloupes need plenty of sunshine and well-drained soil. Choose a location that gets at least 6-8 hours of direct sunlight per day.
Soil Preparation:
* Amend the Soil: Cantaloupes are heavy feeders, so it’s important to amend the soil with plenty of organic matter, such as compost or well-rotted manure. This will improve drainage, fertility, and water retention.
* Check the pH: Cantaloupes prefer a slightly acidic to neutral soil pH (between 6.0 and 6.8). You can test your soil pH with a soil testing kit. If your soil is too acidic, add lime. If it’s too alkaline, add sulfur.
* Create Mounds or Rows: Cantaloupes grow best on slightly raised mounds or rows. This helps with drainage and warms the soil more quickly.
Transplanting Your Cantaloupe Seedlings
Once the danger of frost has passed and the soil has warmed up, it’s time to transplant your cantaloupe seedlings into the garden.
Hardening Off:
Before transplanting, you’ll need to harden off your seedlings. This means gradually acclimating them to outdoor conditions. Start by placing them outside in a sheltered location for a few hours each day, gradually increasing the amount of time they spend outdoors over the course of a week.
Transplanting Instructions:
1. Dig Holes: Dig holes that are slightly larger than the root balls of your seedlings. Space the holes about 2-3 feet apart.
2. Remove Seedlings from Pots: Gently remove the seedlings from their pots, being careful not to damage the roots.
3. Plant Seedlings: Place the seedlings in the holes and backfill with soil. Gently firm the soil around the base of the plants.
4. Water Thoroughly: Water the seedlings thoroughly after transplanting.
5. Mulch: Apply a layer of mulch around the plants to help retain moisture, suppress weeds, and regulate soil temperature. Straw, hay, or wood chips are good choices.
Caring for Your Cantaloupe Plants
Cantaloupes need consistent care to thrive. Here’s what you need to do:
* Watering: Water deeply and regularly, especially during hot, dry weather. Aim to water at the base of the plants to avoid wetting the foliage, which can lead to fungal diseases.
* Fertilizing: Fertilize your cantaloupe plants every 2-3 weeks with a balanced fertilizer. You can also side-dress them with compost or well-rotted manure.
* Weeding: Keep the garden bed free of weeds, which can compete with your cantaloupe plants for nutrients and water.
* Pruning (Optional): Some gardeners prune their cantaloupe plants to encourage larger fruit. You can prune off some of the side shoots and leaves to improve air circulation and sunlight penetration.
* Pest and Disease Control: Keep an eye out for pests and diseases. Common cantaloupe pests include aphids, squash bugs, and cucumber beetles. Common diseases include powdery mildew and fusarium wilt. Use organic pest and disease control methods whenever possible.
Supporting the Vines
Cantaloupe vines can get quite long and heavy, especially when the fruits start to develop. You may need to provide some support to keep the vines off the ground.
Options for Supporting Vines:
* Trellis: A trellis is a great option for supporting cantaloupe vines, especially if you’re growing them in a small space.
* Stakes: You can use stakes to support individual vines.
* Cages: Tomato cages can also be used to support cantaloupe vines.
* Straw Mulch: A thick layer of straw mulch can help to keep the fruits off the ground and prevent them from rotting.
Pollination
Cantaloupes need to be pollinated in order to produce fruit. Bees are the primary pollinators, so it’s important to attract bees to your garden. You can do this by planting flowers that attract bees, such as lavender, sunflowers, and zinnias.
Hand-Pollination (If Necessary):
If you’re not seeing a lot of bees in your garden, you may need to hand-pollinate your cantaloupe flowers. Here’s how:
1. Identify Male and Female Flowers: Male flowers have a long, thin stem, while female flowers have a small, immature fruit at the base of the flower.
2. Collect Pollen: Use a small paintbrush or cotton swab to collect pollen from the male flower.
Okay, so you want to grow your own sweet, juicy cantaloupe? Awesome! It’s totally doable, even if you don’t have a huge garden. I’m going to walk you through everything you need to know, from starting seeds to harvesting that perfect melon. Let’s get started!
Choosing the Right Cantaloupe Variety
First things first, let’s talk varieties. Not all cantaloupes are created equal! Some are better suited for certain climates or have different ripening times. Here are a few popular and reliable choices:
* ‘Athena’: This is a classic choice, known for its disease resistance and consistent sweetness. It’s a good all-around option.
* ‘Hales Best Jumbo’: An heirloom variety with a deeply netted rind and incredibly flavorful flesh. It takes a bit longer to mature.
* ‘Ambrosia’: A hybrid variety that’s super sweet and aromatic. It’s also relatively early-maturing.
* ‘Sugar Cube’: If you’re short on space, this is a great option! It’s a smaller cantaloupe, perfect for containers or smaller gardens.
Consider your local climate and growing season when making your choice. Check seed packets for information on days to maturity and disease resistance.
Starting Your Cantaloupe Seeds
You can either direct sow your cantaloupe seeds or start them indoors. I usually prefer starting them indoors, especially if you have a shorter growing season. It gives them a head start!
When to Start Seeds:
* Indoors: About 3-4 weeks before the last expected frost.
* Direct Sowing: After the last frost, when the soil temperature is consistently above 65°F (18°C).
Materials You’ll Need:
* Cantaloupe seeds (obviously!)
* Seed starting trays or small pots
* Seed starting mix (a light, well-draining mix is best)
* Watering can or spray bottle
* Heat mat (optional, but helpful for germination)
* Grow lights (if starting indoors)
Step-by-Step Instructions for Starting Seeds Indoors:
1. Prepare Your Seed Starting Trays: Fill your seed starting trays or pots with seed starting mix. Gently tap the trays to settle the mix.
2. Sow the Seeds: Make a small indentation (about ½ inch deep) in the center of each cell or pot. Place 2-3 seeds in each indentation. This increases your chances of at least one seed germinating.
3. Cover the Seeds: Gently cover the seeds with seed starting mix.
4. Water Thoroughly: Water the trays or pots gently with a watering can or spray bottle. You want to moisten the soil without disturbing the seeds.
5. Provide Warmth: Place the trays on a heat mat (if using) and cover them with a humidity dome or plastic wrap. This will help to create a warm, humid environment that’s ideal for germination.
6. Provide Light: Once the seeds germinate (usually within 7-10 days), remove the humidity dome or plastic wrap and place the trays under grow lights. If you don’t have grow lights, place them in a sunny window, but be aware that they may not get enough light.
7. Water Regularly: Keep the soil consistently moist, but not soggy. Water when the top inch of soil feels dry to the touch.
8. Thin Seedlings: Once the seedlings have their first true leaves (the leaves that look like miniature cantaloupe leaves), thin them to one seedling per cell or pot. Choose the strongest, healthiest-looking seedling and snip off the others at the soil line.
Preparing Your Garden Bed
Cantaloupes need plenty of sunshine and well-drained soil. Choose a location that gets at least 6-8 hours of direct sunlight per day.
Soil Preparation:
* Amend the Soil: Cantaloupes are heavy feeders, so it’s important to amend the soil with plenty of organic matter, such as compost or well-rotted manure. This will improve drainage, fertility, and water retention.
* Check the pH: Cantaloupes prefer a slightly acidic to neutral soil pH (between 6.0 and 6.8). You can test your soil pH with a soil testing kit. If your soil is too acidic, add lime. If it’s too alkaline, add sulfur.
* Create Mounds or Rows: Cantaloupes grow best on slightly raised mounds or rows. This helps with drainage and warms the soil more quickly.
Transplanting Your Cantaloupe Seedlings
Once the danger of frost has passed and the soil has warmed up, it’s time to transplant your cantaloupe seedlings into the garden.
Hardening Off:
Before transplanting, you’ll need to harden off your seedlings. This means gradually acclimating them to outdoor conditions. Start by placing them outside in a sheltered location for a few hours each day, gradually increasing the amount of time they spend outdoors over the course of a week.
Transplanting Instructions:
1. Dig Holes: Dig holes that are slightly larger than the root balls of your seedlings. Space the holes about 2-3 feet apart.
2. Remove Seedlings from Pots: Gently remove the seedlings from their pots, being careful not to damage the roots.
3. Plant Seedlings: Place the seedlings in the holes and backfill with soil. Gently firm the soil around the base of the plants.
4. Water Thoroughly: Water the seedlings thoroughly after transplanting.
5. Mulch: Apply a layer of mulch around the plants to help retain moisture, suppress weeds, and regulate soil temperature. Straw, hay, or wood chips are good choices.
Caring for Your Cantaloupe Plants
Cantaloupes need consistent care to thrive. Here’s what you need to do:
* Watering: Water deeply and regularly, especially during hot, dry weather. Aim to water at the base of the plants to avoid wetting the foliage, which can lead to fungal diseases.
* Fertilizing: Fertilize your cantaloupe plants every 2-3 weeks with a balanced fertilizer. You can also side-dress them with compost or well-rotted manure.
* Weeding: Keep the garden bed free of weeds, which can compete with your cantaloupe plants for nutrients and water.
* Pruning (Optional): Some gardeners prune their cantaloupe plants to encourage larger fruit. You can prune off some of the side shoots and leaves to improve air circulation and sunlight penetration.
* Pest and Disease Control: Keep an eye out for pests and diseases. Common cantaloupe pests include aphids, squash bugs, and cucumber beetles. Common diseases include powdery mildew and fusarium wilt. Use organic pest and disease control methods whenever possible.
Supporting the Vines
Cantaloupe vines can get quite long and heavy, especially when the fruits start to develop. You may need to provide some support to keep the vines off the ground.
Options for Supporting Vines:
* Trellis: A trellis is a great option for supporting cantaloupe vines, especially if you’re growing them in a small space.
* Stakes: You can use stakes to support individual vines.
* Cages: Tomato cages can also be used to support cantaloupe vines.
* Straw Mulch: A thick layer of straw mulch can help to keep the fruits off the ground and prevent them from rotting.
Pollination
Cantaloupes need to be pollinated in order to produce fruit. Bees are the primary pollinators, so it’s important to attract bees to your garden. You can do this by planting flowers that attract bees, such as lavender, sunflowers, and zinnias.
Hand-Pollination (If Necessary):
If you’re not seeing a lot of bees in your garden, you may need to hand-pollinate your cantaloupe flowers. Here’s how:
1. Identify Male and Female Flowers: Male flowers have a long, thin stem, while female flowers have a small, immature fruit at the base of the flower.
2. Collect Pollen: Use a small paintbrush or cotton swab to collect pollen from the male flower.
3. Transfer Pollen: Gently transfer the pollen to the stigma (the sticky part) of the female flower.
4. Repeat: Repeat this process for several female flowers.
Harvesting Your Cantaloupe
This is the best part! Knowing when to harvest your cantaloupe is key to getting that perfect sweetness.
Signs of Ripeness:
* Color Change: The rind will change color from green to tan or yellow.
* Aroma: The cantaloupe will have a sweet, musky aroma.
* Stem Slip:
Conclusion
So, there you have it! Growing sweet cantaloupe at home, while it might seem daunting at first, is entirely achievable with a little know-how and the right approach. This DIY trick, focusing on [specific aspect of the trick detailed in the main article, e.g., “vertical gardening with trellises” or “hand-pollination techniques”], is a game-changer for anyone looking to maximize their yield and enjoy the unparalleled flavor of homegrown cantaloupe.
Why is this a must-try? Because store-bought cantaloupe simply can’t compare to the sweetness and aroma of a vine-ripened melon nurtured in your own garden. You control the growing conditions, ensuring optimal sunlight, water, and nutrients. Plus, you avoid the pesticides and preservatives often used in commercial farming. This DIY method allows even those with limited space, like balcony gardeners, to indulge in the joy of harvesting their own delicious cantaloupe.
But don’t stop there! Experiment with different cantaloupe varieties. Consider trying ‘Athena’ for its disease resistance, ‘Hales Best Jumbo’ for its classic flavor, or even a smaller, personal-sized variety like ‘Sugar Cube’ if you’re short on space. You can also adjust the soil composition based on your local climate. In hotter regions, adding more organic matter will help retain moisture. In cooler climates, ensure good drainage to prevent root rot.
Another variation to consider is companion planting. Marigolds can deter pests, while basil can improve the flavor of your cantaloupe. Experiment with different combinations to find what works best for your garden.
We’ve covered the essentials, but the real magic happens when you get your hands dirty. Don’t be afraid to tweak the process to suit your specific environment and preferences. The most important thing is to observe your plants, learn from your mistakes, and enjoy the journey.
We are confident that this DIY trick will significantly improve your cantaloupe growing experience. The satisfaction of biting into a perfectly ripe, homegrown cantaloupe is truly unmatched.
So, what are you waiting for? Grab your seeds, prepare your soil, and get ready to grow some amazing cantaloupe! We encourage you to try this DIY trick and share your experiences with us. Let us know what worked for you, what challenges you faced, and any tips you discovered along the way. Your feedback will help other gardeners succeed and contribute to a thriving community of cantaloupe enthusiasts. Share your photos and stories on our social media pages using #HomegrownCantaloupe and let’s celebrate the deliciousness of homegrown produce together! We can’t wait to see your cantaloupe creations!
FAQ
What is the best time to plant cantaloupe seeds?
Cantaloupe thrives in warm weather, so the best time to plant seeds is after the last frost when the soil temperature reaches at least 65°F (18°C). In most regions, this is typically late spring or early summer. You can start seeds indoors 3-4 weeks before the last frost to get a head start, but be sure to harden them off before transplanting them outdoors.
How much sunlight does cantaloupe need?
Cantaloupe requires at least 6-8 hours of direct sunlight per day to produce sweet, flavorful melons. Choose a sunny location in your garden where the plants will receive ample sunlight throughout the day. If you live in a particularly hot climate, some afternoon shade may be beneficial to prevent the plants from overheating.
What kind of soil is best for growing cantaloupe?
Cantaloupe prefers well-drained, fertile soil with a pH between 6.0 and 6.8. Amend your soil with compost or other organic matter to improve drainage and fertility. Avoid heavy clay soils, as they can retain too much moisture and lead to root rot. A slightly sandy loam is ideal.
How often should I water my cantaloupe plants?
Water your cantaloupe plants deeply and regularly, especially during hot, dry weather. Aim to keep the soil consistently moist but not waterlogged. Water at the base of the plants to avoid wetting the foliage, which can increase the risk of fungal diseases. As the fruits begin to ripen, reduce watering slightly to concentrate the sugars and enhance the flavor.
How do I know when my cantaloupe is ripe?
There are several indicators that your cantaloupe is ripe. The skin will change color from green to a tan or yellowish hue. The stem will begin to crack and separate easily from the vine (this is called “slipping”). The melon will also have a sweet, fragrant aroma. Gently press on the blossom end (opposite the stem end); it should feel slightly soft and yielding.
What are some common pests and diseases that affect cantaloupe?
Common pests that can affect cantaloupe include aphids, squash bugs, cucumber beetles, and vine borers. Diseases include powdery mildew, downy mildew, and fusarium wilt. Regularly inspect your plants for signs of pests or diseases and take appropriate action, such as using insecticidal soap, neem oil, or fungicide. Crop rotation and good sanitation practices can also help prevent problems.
Can I grow cantaloupe in containers?
Yes, you can grow cantaloupe in containers, but you’ll need a large container (at least 20 gallons) with good drainage. Choose a dwarf or bush variety of cantaloupe that is better suited for container growing. Provide a trellis or support for the vines to climb. Be sure to water and fertilize regularly, as container-grown plants tend to dry out and deplete nutrients more quickly.
How do I hand-pollinate cantaloupe flowers?
If you’re having trouble with pollination, you can hand-pollinate your cantaloupe flowers. Identify the male and female flowers. The male flowers have a long, thin stem, while the female flowers have a small, immature fruit at the base. Use a small paintbrush or cotton swab to collect pollen from the male flower and transfer it to the stigma of the female flower. Do this in the morning, when the flowers are open.
Why are my cantaloupe fruits splitting?
Fruit splitting can be caused by inconsistent watering, especially after a period of drought. To prevent splitting, water your plants regularly and deeply, especially during hot, dry weather. Mulching around the plants can also help retain moisture in the soil.
How can I make my cantaloupe sweeter?
To encourage sweeter cantaloupe, ensure your plants receive plenty of sunlight, water, and nutrients. Reduce watering slightly as the fruits begin to ripen to concentrate the sugars. You can also try adding Epsom salts to the soil, as magnesium can help improve fruit sweetness. Avoid over-fertilizing with nitrogen, as this can promote leafy growth at the expense of fruit production.
Leave a Comment