
Grow Queen Cabbage at Home? Absolutely! Imagine stepping into your backyard and harvesting a vibrant, healthy Queen Cabbage, ready to be transformed into a delicious meal. It’s not just a dream; it’s an achievable reality with a few simple DIY tricks and hacks. For centuries, cultivating your own food has been a cornerstone of self-sufficiency and a connection to nature. From ancient Roman kitchen gardens to the victory gardens of World War II, growing your own produce has always been a way to ensure fresh, healthy food and a sense of accomplishment.
But let’s be honest, sometimes gardening feels overwhelming, right? That’s where these DIY tips come in. Maybe you’re struggling with pests, or perhaps your soil isn’t quite right. Whatever the challenge, I’m here to share easy-to-follow solutions that will help you grow Queen Cabbage at Home like a pro, even if you’re a complete beginner. We’ll cover everything from seed starting to pest control, ensuring you have a thriving cabbage patch in no time. So, grab your gardening gloves, and let’s get started on this exciting journey to homegrown goodness!
Königskohl selbst anbauen: Dein DIY-Leitfaden für den Garten
Hey Gartenfreunde! Habt ihr schon mal von Königskohl gehört? Das ist nicht einfach nur Kohl, das ist eine imposante, leckere und super gesunde Pflanze, die eurem Garten einen Hauch von Exotik verleiht. Und das Beste: Ihr könnt ihn ganz einfach selbst anbauen! Ich zeige euch, wie es geht, Schritt für Schritt. Keine Angst, es ist einfacher als ihr denkt!
Was ist Königskohl überhaupt?
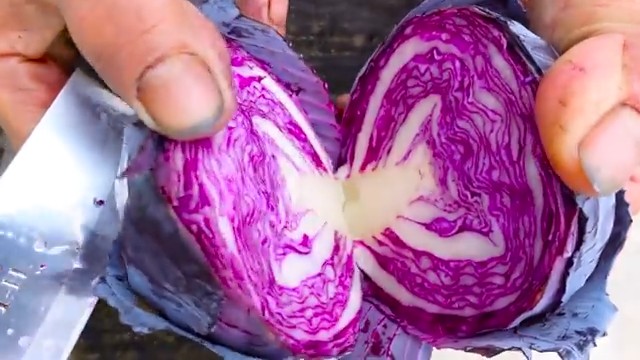
Königskohl, auch bekannt als Grünkohlbaum oder Baumkohl (Brassica oleracea var. ramosa), ist eine Grünkohlart, die bis zu zwei Meter hoch werden kann. Er bildet einen Stamm und verzweigte Äste, an denen die krausen Blätter wachsen. Diese Blätter sind nicht nur dekorativ, sondern auch super lecker und reich an Vitaminen und Mineralstoffen. Königskohl ist winterhart und kann über mehrere Jahre geerntet werden.
Warum Königskohl selbst anbauen?
* Frische und Geschmack: Selbst angebauter Königskohl schmeckt einfach besser! Er ist frischer, aromatischer und enthält mehr Nährstoffe als gekaufter Kohl.
* Nachhaltigkeit: Ihr wisst genau, was in eurem Garten passiert. Keine Pestizide, keine langen Transportwege.
* Dekoration: Königskohl ist ein echter Hingucker im Garten. Er sieht nicht nur gut aus, sondern bietet auch Schutz für andere Pflanzen.
* Gesundheit: Königskohl ist ein echtes Superfood! Er ist reich an Vitaminen (A, C, K), Mineralstoffen (Kalzium, Eisen, Kalium) und Antioxidantien.
* Langlebigkeit: Einmal gepflanzt, könnt ihr Königskohl über mehrere Jahre ernten.
Die Vorbereitung: Was ihr braucht
Bevor wir loslegen, solltet ihr sicherstellen, dass ihr alles Nötige zur Hand habt. Hier ist eine Liste:
* Königskohl-Samen oder Jungpflanzen: Samen sind günstiger, aber Jungpflanzen sparen Zeit.
* Anzuchterde: Für die Aussaat oder das Umpflanzen der Jungpflanzen.
* Töpfe oder Anzuchtschalen: Für die Voranzucht.
* Gartenerde: Für das Beet oder den Kübel.
* Kompost oder organischer Dünger: Für eine gute Nährstoffversorgung.
* Gießkanne oder Gartenschlauch: Zum Bewässern.
* Gartenwerkzeug: Spaten, Harke, Pflanzkelle.
* Pflanzstäbe (optional): Zur Unterstützung der Pflanzen, besonders bei starkem Wind.
* Schneckenkorn (optional): Zum Schutz vor Schnecken.
Aussaat oder Jungpflanzen?
Ihr habt die Wahl: Entweder ihr zieht euren Königskohl selbst aus Samen vor oder ihr kauft Jungpflanzen. Beide Varianten haben ihre Vor- und Nachteile.
* Aussaat:
* Vorteile: Günstiger, größere Auswahl an Sorten.
* Nachteile: Mehr Aufwand, längere Wartezeit bis zur Ernte.
* Jungpflanzen:
* Vorteile: Weniger Aufwand, schnellere Ernte.
* Nachteile: Teurer, begrenzte Auswahl an Sorten.
Ich persönlich ziehe es vor, Königskohl selbst auszusäen. Es macht einfach Spaß, die kleinen Pflänzchen wachsen zu sehen!
Aussaat von Königskohl (Schritt für Schritt)
Wenn ihr euch für die Aussaat entschieden habt, geht es jetzt los!
1. Aussaatzeitpunkt: Beginnt mit der Aussaat im Frühjahr (März/April) oder im Sommer (Juli/August). Für eine frühe Ernte könnt ihr die Samen auch schon im Februar im Haus vorziehen.
2. Vorbereitung der Anzuchtschalen: Füllt die Anzuchtschalen oder Töpfe mit Anzuchterde. Drückt die Erde leicht an.
3. Aussaat der Samen: Verteilt die Samen gleichmäßig auf der Erde. Bedeckt sie mit einer dünnen Schicht Erde (ca. 0,5 cm).
4. Bewässerung: Gießt die Erde vorsichtig an. Am besten verwendet ihr eine Sprühflasche, um die Samen nicht wegzuschwemmen.
5. Standort: Stellt die Anzuchtschalen an einen hellen und warmen Ort (ca. 18-20°C).
6. Feuchtigkeit: Haltet die Erde feucht, aber nicht nass.
7. Keimung: Die Samen keimen in der Regel innerhalb von 7-14 Tagen.
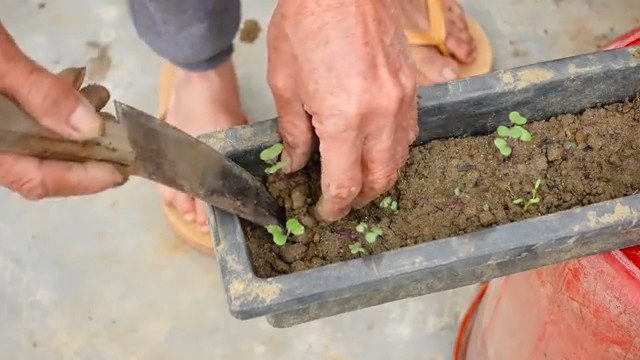
8. Pikieren: Sobald die Keimlinge ihre ersten richtigen Blätter gebildet haben, könnt ihr sie pikieren. Das bedeutet, dass ihr sie in größere Töpfe umpflanzt, damit sie mehr Platz zum Wachsen haben.
Pflanzung von Königskohl (Schritt für Schritt)
Egal ob ihr Jungpflanzen gekauft oder selbst vorgezogen habt, jetzt ist es Zeit, den Königskohl ins Beet oder in den Kübel zu pflanzen.
1. Standortwahl: Königskohl braucht einen sonnigen Standort mit einem nährstoffreichen Boden.
2. Bodenvorbereitung: Lockert den Boden gründlich auf und entfernt Unkraut. Mischt Kompost oder organischen Dünger unter die Erde.
3. Pflanzabstand: Pflanzt die Königskohlpflanzen im Abstand von ca. 60-80 cm zueinander.
4. Pflanzloch: Grabt ein Pflanzloch, das etwas größer ist als der Wurzelballen der Pflanze.
5. Einsetzen der Pflanze: Setzt die Pflanze in das Pflanzloch und füllt es mit Erde auf. Drückt die Erde leicht an.
6. Bewässerung: Gießt die Pflanze gründlich an.
7. Schutz vor Schnecken: Königskohl ist bei Schnecken sehr beliebt. Schützt die Pflanzen mit Schneckenkorn oder anderen Schneckenschutzmaßnahmen.
8. Stütze (optional): Bei starkem Wind kann es sinnvoll sein, die Pflanzen mit Pflanzstäben zu stützen.
Pflege von Königskohl
Königskohl ist relativ pflegeleicht, aber ein paar Dinge solltet ihr beachten, damit er gut gedeiht.
* Bewässerung: Gießt den Königskohl regelmäßig, besonders in trockenen Perioden. Die Erde sollte immer leicht feucht sein.
* Düngung: Düngt den Königskohl regelmäßig mit Kompost oder organischem Dünger.
* Unkrautbekämpfung: Entfernt regelmäßig Unkraut, damit der Königskohl nicht von Nährstoffen und Wasser konkurriert wird.
* Schutz vor Schädlingen: Kontrolliert die Pflanzen regelmäßig auf Schädlinge wie Kohlweißlinge oder Blattläuse. Bei Bedarf könnt ihr biologische Schädlingsbekämpfungsmittel einsetzen.
* Entfernen von gelben Blättern: Entfernt regelmäßig gelbe oder beschädigte Blätter, um die Pflanze gesund zu halten.
Ernte von Königskohl
Die Erntezeit für Königskohl beginnt im Herbst und dauert bis in den Winter hinein. Ihr könnt die Blätter nach Bedarf ernten.
1. Erntezeitpunkt: Die Blätter sind erntereif, wenn sie eine kräftige grüne Farbe haben und sich leicht vom Stamm lösen lassen.
2. Erntemethode: Brecht oder schneidet die Blätter von unten nach oben ab. Lasst die oberen Blätter stehen, damit die Pflanze weiterwachsen kann.
3. Lagerung: Königskohlblätter sind im Kühlschrank einige Tage haltbar. Am besten lagert ihr sie in einem feuchten Tuch.
Verwendung von Königskohl
Königskohl ist vielseitig verwendbar. Ihr könnt ihn roh in Salaten essen, kochen, dünsten, braten oder für Smoothies verwenden.
* Salate: Junge, zarte Blätter eignen sich gut für Salate.
* Gemüsebeilagen: Königskohl kann wie Grünkohl zubereitet werden.
* Suppen und Eintöpfe: Königskohl verleiht Suppen und Eintöpfen eine würzige Note.
* Smooth
Conclusion
So, there you have it! Growing your own Queen Cabbage at home isn’t just a gardening project; it’s an investment in fresh, flavorful, and nutritious food right at your fingertips. We’ve walked you through the essential steps, from selecting the right seeds to nurturing your cabbage through its growth cycle. But why is this DIY trick a must-try?
Firstly, the taste difference is undeniable. Store-bought cabbage, while convenient, often lacks the vibrant flavor and crisp texture of a homegrown Queen Cabbage. When you grow your own, you control the entire process, ensuring optimal growing conditions and harvesting at peak ripeness. This translates to a superior culinary experience, whether you’re using it in salads, slaws, stir-fries, or fermented dishes.
Secondly, it’s incredibly rewarding. There’s a unique satisfaction in watching a tiny seed transform into a beautiful, leafy head of cabbage. It connects you to the natural world and provides a sense of accomplishment that’s hard to replicate. Plus, it’s a fantastic way to reduce your carbon footprint by minimizing the transportation and packaging associated with commercially grown produce.
Thirdly, growing your own Queen Cabbage allows for customization. Want a sweeter cabbage? Adjust the soil pH. Prefer a smaller head? Space your plants closer together. The possibilities are endless!
Here are a few suggestions and variations to consider:
* Companion Planting: Plant your Queen Cabbage alongside herbs like rosemary, thyme, or sage to deter pests naturally. Marigolds are also excellent companions, adding a splash of color and further repelling unwanted insects.
* Succession Planting: Plant new seeds every few weeks to ensure a continuous harvest throughout the growing season. This is especially useful if you have a large family or enjoy cabbage frequently.
* Fermented Delights: Queen Cabbage is perfect for making sauerkraut or kimchi. Experiment with different spices and fermentation techniques to create your own unique flavor profiles.
* Colored Varieties: While the traditional Queen Cabbage is green, consider exploring purple or red varieties for added visual appeal and nutritional benefits. These colored cabbages are rich in anthocyanins, powerful antioxidants that contribute to overall health.
* Container Gardening: If you have limited space, you can successfully grow Queen Cabbage in large containers. Just ensure the containers have adequate drainage and are filled with a high-quality potting mix.
Ultimately, growing your own Queen Cabbage is a journey of discovery and a celebration of fresh, healthy food. We encourage you to give this DIY trick a try. Don’t be afraid to experiment, learn from your mistakes, and most importantly, have fun!
Once you’ve harvested your first Queen Cabbage, we’d love to hear about your experience. Share your photos, tips, and recipes in the comments below. Let’s build a community of cabbage-growing enthusiasts and inspire others to embrace the joys of homegrown produce! Your insights could be invaluable to fellow gardeners. Happy growing!
Frequently Asked Questions (FAQ)
1. What is Queen Cabbage and why should I grow it?
Queen Cabbage is a variety of cabbage known for its relatively large size, dense head, and sweet, mild flavor. It’s a great choice for home gardeners because it’s relatively easy to grow, produces a substantial yield, and offers a superior taste compared to many store-bought varieties. Growing your own allows you to control the growing conditions, ensuring a pesticide-free and nutrient-rich vegetable. Plus, the satisfaction of harvesting your own food is incredibly rewarding.
2. How long does it take to grow Queen Cabbage from seed?
From seed to harvest, Queen Cabbage typically takes between 70 and 100 days, depending on the variety and growing conditions. Starting seeds indoors 6-8 weeks before the last expected frost can give you a head start. Keep in mind that optimal temperatures and consistent watering are crucial for healthy growth.
3. What are the ideal growing conditions for Queen Cabbage?
Queen Cabbage thrives in cool weather, with temperatures between 60°F and 70°F (15°C and 21°C). It requires at least 6 hours of direct sunlight per day and well-drained soil that is rich in organic matter. The soil pH should be between 6.0 and 7.0. Regular watering is essential, especially during dry periods.
4. What kind of soil is best for growing Queen Cabbage?
The best soil for Queen Cabbage is a well-draining loam that is rich in organic matter. Amend your soil with compost or well-rotted manure before planting to improve its fertility and drainage. Avoid heavy clay soils, as they can become waterlogged and hinder root development. If you have clay soil, consider adding sand and organic matter to improve its structure.
5. How often should I water my Queen Cabbage plants?
Water your Queen Cabbage plants regularly, especially during dry periods. Aim to keep the soil consistently moist but not waterlogged. Water deeply at the base of the plants, avoiding wetting the leaves, which can encourage fungal diseases. A good rule of thumb is to water when the top inch of soil feels dry to the touch.
6. What are some common pests and diseases that affect Queen Cabbage?
Common pests that affect Queen Cabbage include cabbage worms, aphids, flea beetles, and cabbage root maggots. Common diseases include black rot, clubroot, and downy mildew. To prevent pests and diseases, practice crop rotation, use row covers, and inspect your plants regularly. Organic pest control methods, such as insecticidal soap or neem oil, can be effective in controlling infestations. Ensure good air circulation to minimize the risk of fungal diseases.
7. How do I prevent cabbage worms from eating my Queen Cabbage?
Cabbage worms are a common pest that can quickly decimate your Queen Cabbage crop. To prevent them, use row covers to protect your plants from egg-laying moths. Handpick any worms you find on your plants. Bacillus thuringiensis (Bt) is an effective organic insecticide that targets cabbage worms.
8. When and how do I harvest my Queen Cabbage?
Harvest your Queen Cabbage when the head is firm and dense. The size of the head will vary depending on the variety, but generally, a mature head will be about 6-12 inches in diameter. To harvest, use a sharp knife to cut the head from the stem, leaving a few outer leaves attached.
9. Can I grow Queen Cabbage in containers?
Yes, you can successfully grow Queen Cabbage in containers, provided they are large enough. Choose a container that is at least 12 inches in diameter and depth. Use a high-quality potting mix and ensure the container has adequate drainage. Water regularly and fertilize as needed. Container-grown cabbages may require more frequent watering and fertilization than those grown in the ground.
10. How do I store Queen Cabbage after harvesting?
Store your Queen Cabbage in a cool, humid place, such as a refrigerator or root cellar. Wrap the head in plastic wrap or a damp cloth to prevent it from drying out. Properly stored, Queen Cabbage can last for several weeks.
11. Can I save seeds from my Queen Cabbage to plant next year?
Saving seeds from Queen Cabbage can be challenging because cabbage is a biennial plant, meaning it typically flowers and produces seeds in its second year. This requires overwintering the plant, which can be difficult in colder climates. Additionally, cabbage is cross-pollinated, so the seeds may not produce true-to-type plants. For best results, purchase fresh seeds each year.
12. What are some good companion plants for Queen Cabbage?
Good companion plants for Queen Cabbage include herbs like rosemary, thyme, and sage, which deter pests. Marigolds also repel insects and add color to the garden. Other beneficial companions include dill, chamomile, and clover. Avoid planting Queen Cabbage near other members of the brassica family, such as broccoli, cauliflower, and kale, as they can attract the same pests and diseases.
13. How do I fertilize my Queen Cabbage plants?
Fertilize your Queen Cabbage plants with a balanced fertilizer, such as 10-10-10, at planting time. Side-dress with a nitrogen-rich fertilizer, such as ammonium nitrate or urea, every few weeks during the growing season. Alternatively, you can use organic fertilizers, such as compost tea or fish emulsion.
14. My Queen Cabbage is splitting. What should I do?
Cabbage heads can split when they receive too much water after a period of drought. To prevent splitting, water your plants consistently and avoid overwatering. If your cabbage head is already splitting, harvest it immediately to prevent further damage.
15. Is Queen Cabbage a good source of nutrients?
Yes, Queen Cabbage is a good source of vitamins C and K, as well as fiber and antioxidants. It’s a low-calorie and nutrient-dense vegetable that can contribute to a healthy diet.


Leave a Comment