
Growing Cabbage in Bottles might sound like something out of a science fiction movie, but trust me, it’s a real, space-saving, and surprisingly effective way to cultivate this leafy green right in your own backyard (or even balcony!). Have you ever dreamed of harvesting fresh, crisp cabbage without dedicating a huge chunk of your garden? Well, this DIY trick is about to make that dream a reality!
While container gardening itself has been around for centuries, with evidence suggesting its use in ancient civilizations like Rome and Egypt, the idea of specifically growing cabbage in bottles is a more modern innovation, born from the need for efficient urban gardening solutions. It’s a testament to human ingenuity, finding creative ways to maximize limited space and resources.
Why should you try this? Well, for starters, it’s perfect for those of us with small gardens, balconies, or even just a sunny windowsill. It’s also a fantastic way to recycle plastic bottles, turning waste into something beautiful and productive. Plus, it offers better control over soil conditions and can help protect your precious cabbage from pests and diseases. I’m excited to share this simple yet effective method with you, so let’s dive in and learn how to grow your own bottle-grown cabbage!

Kohl im Flaschengarten: Eine DIY-Anleitung für den urbanen Gärtner
Hallo liebe Gartenfreunde! Habt ihr wenig Platz, aber trotzdem Lust auf frischen, selbstgezogenen Kohl? Dann habe ich hier genau das Richtige für euch: Kohl im Flaschengarten! Klingt verrückt? Ist es vielleicht ein bisschen, aber es funktioniert und ist eine super Möglichkeit, auch auf dem kleinsten Balkon oder sogar drinnen, leckeren Kohl anzubauen. Ich zeige euch, wie es geht!
Was ihr für euren Flaschenkohlgarten braucht
Bevor wir loslegen, hier eine Liste mit allen Materialien, die ihr benötigt:
* Eine große Plastikflasche (mindestens 5 Liter): Am besten eine durchsichtige PET-Flasche, damit das Licht gut durchkommt.
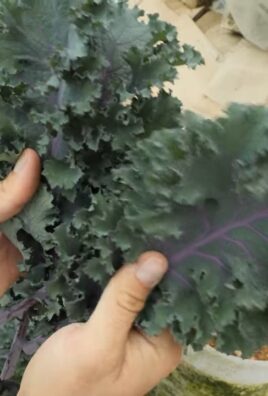
* Kohlsaat: Wählt eine Kohlsorte, die nicht zu groß wird, wie z.B. Mini-Kopfkohl, Pak Choi oder Grünkohl.
* Anzuchterde: Spezielle Erde für die Anzucht von Sämlingen.
* Blumenerde: Normale Blumenerde für das spätere Umpflanzen.
* Drainagematerial: Kies, Blähton oder Tonscherben.
* Ein scharfes Messer oder eine Schere: Zum Schneiden der Flasche.
* Sprühflasche: Zum Befeuchten der Erde.
* Gießkanne: Zum Gießen der Pflanzen.
* Optional: Flüssigdünger für Gemüse.
Die Vorbereitung der Flasche
Dieser Schritt ist wichtig, um die Grundlage für euren kleinen Kohl-Garten zu schaffen.
1. Flasche reinigen: Zuerst müsst ihr die Plastikflasche gründlich reinigen. Entfernt alle Etiketten und spült sie mit warmem Wasser und Spülmittel aus. Achtet darauf, dass keine Spülmittelreste zurückbleiben.
2. Flasche schneiden: Jetzt kommt der spannende Teil: das Schneiden der Flasche. Es gibt verschiedene Möglichkeiten, wie ihr das machen könnt. Ich bevorzuge es, die Flasche horizontal in zwei Teile zu schneiden, etwa 10-15 cm unterhalb des Flaschenhalses. So erhaltet ihr einen oberen Teil (mit dem Flaschenhals) und einen unteren Teil. Der obere Teil wird später umgedreht in den unteren Teil gesteckt und dient als eine Art Mini-Gewächshaus. Achtet darauf, dass die Schnittkanten sauber und nicht zu scharf sind. Ihr könnt sie eventuell mit Klebeband abkleben, um Verletzungen zu vermeiden.
3. Drainage legen: Bevor wir die Erde einfüllen, legen wir eine Drainageschicht an. Diese verhindert Staunässe, die für Kohlpflanzen schädlich sein kann. Füllt den unteren Teil der Flasche mit einer Schicht Kies, Blähton oder Tonscherben (ca. 3-5 cm hoch).
4. Erde einfüllen: Nun füllen wir den unteren Teil der Flasche mit Blumenerde. Lasst etwa 2-3 cm Platz bis zum Rand. Drückt die Erde leicht an.
Die Aussaat der Kohlsaat
Jetzt geht es ans Eingemachte: Wir säen die Kohlsaat aus!
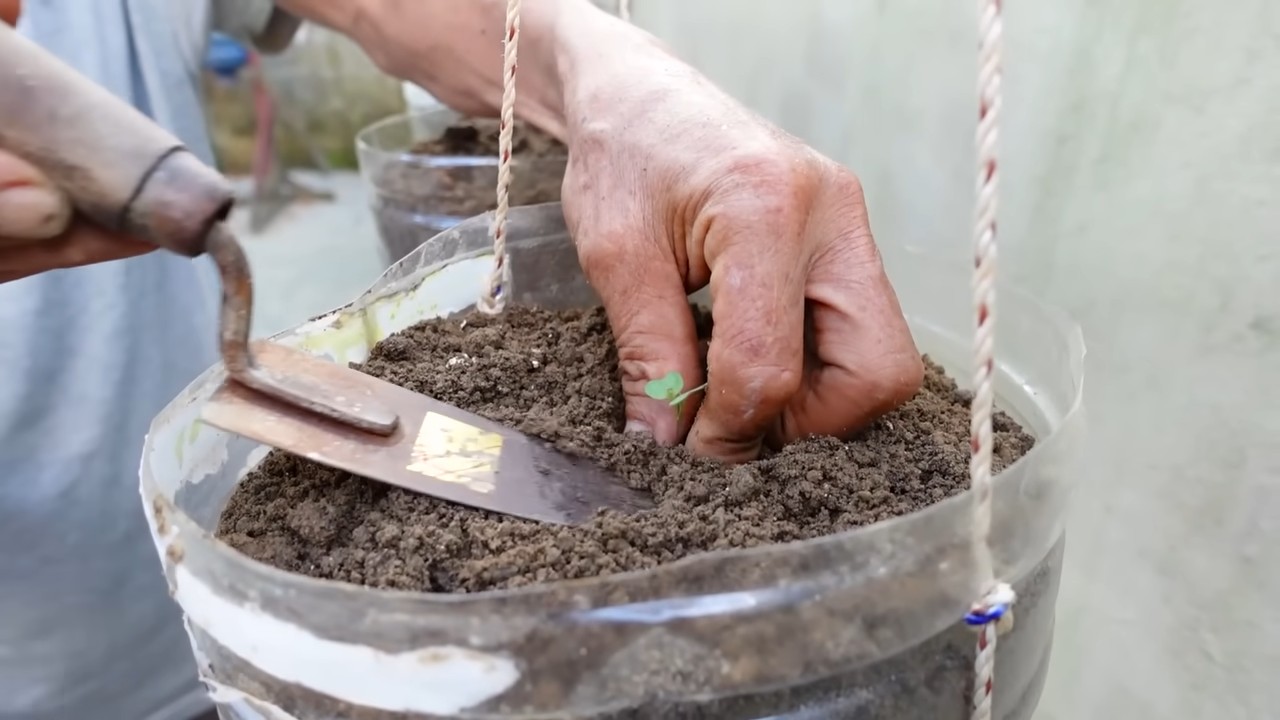
1. Anzuchterde vorbereiten: Füllt den oberen Teil der Flasche (den mit dem Flaschenhals) mit Anzuchterde. Befeuchtet die Erde mit der Sprühflasche, sodass sie feucht, aber nicht nass ist.
2. Samen aussäen: Verteilt die Kohlsaat gleichmäßig auf der Anzuchterde. Achtet darauf, dass die Samen nicht zu dicht beieinander liegen. Bedeckt die Samen leicht mit einer dünnen Schicht Anzuchterde.
3. Befeuchten: Befeuchtet die Erde erneut vorsichtig mit der Sprühflasche.
4. Mini-Gewächshaus: Steckt den oberen Teil der Flasche (mit dem Flaschenhals nach unten) in den unteren Teil der Flasche. So entsteht ein Mini-Gewächshaus, das für ein feuchtwarmes Klima sorgt, ideal für die Keimung der Samen.
5. Standort: Stellt den Flaschenkohlgarten an einen hellen, warmen Ort. Direkte Sonneneinstrahlung sollte vermieden werden, da die Erde sonst zu schnell austrocknet.
Die Pflege der Kohlpflanzen
Nach der Aussaat ist es wichtig, die Kohlpflanzen gut zu pflegen, damit sie kräftig wachsen.
1. Gießen: Achtet darauf, dass die Erde immer leicht feucht ist. Gießt regelmäßig, aber vermeidet Staunässe. Am besten gießt ihr mit einer Gießkanne direkt auf die Erde, nicht über die Blätter.
2. Lüften: Um Schimmelbildung zu vermeiden, solltet ihr den Flaschenkohlgarten regelmäßig lüften. Nehmt dazu den oberen Teil der Flasche für einige Stunden ab.
3. Umpflanzen: Sobald die Kohlpflanzen groß genug sind (ca. 5-7 cm hoch), müssen sie umgepflanzt werden. Nehmt die Pflanzen vorsichtig aus dem oberen Teil der Flasche und pflanzt sie in den unteren Teil der Flasche, in die vorbereitete Blumenerde. Achtet darauf, dass die Wurzeln nicht beschädigt werden.
4. Düngen: Um das Wachstum der Kohlpflanzen zu fördern, könnt ihr sie regelmäßig düngen. Verwendet dazu einen Flüssigdünger für Gemüse. Beachtet die Dosierungsanleitung auf der Verpackung.
5. Schädlinge: Achtet auf Schädlinge wie Blattläuse oder Kohlweißlingsraupen. Bei Befall könnt ihr die Schädlinge absammeln oder mit einem biologischen Schädlingsbekämpfungsmittel behandeln.
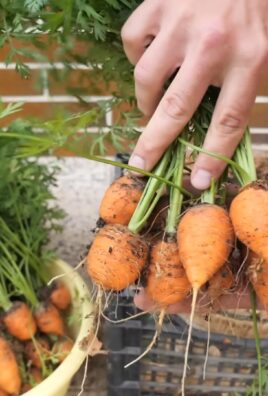
Erntezeit!
Je nach Kohlsorte und Standort könnt ihr euren Kohl nach einigen Wochen ernten. Mini-Kopfkohl und Pak Choi sind in der Regel schneller erntereif als Grünkohl. Erntet den Kohl, sobald er die gewünschte Größe erreicht hat.
Zusätzliche Tipps für den erfolgreichen Flaschenkohlgarten
* Die richtige Kohlsorte: Wählt eine Kohlsorte, die für den Anbau im Topf geeignet ist. Mini-Kopfkohl, Pak Choi und Grünkohl sind gute Optionen.
* Der richtige Standort: Kohlpflanzen brauchen viel Licht. Stellt den Flaschenkohlgarten an einen hellen Ort, aber vermeidet direkte Sonneneinstrahlung.
* Die richtige Erde: Verwendet hochwertige Blumenerde, die gut durchlässig ist.
* Regelmäßiges Gießen: Achtet darauf, dass die Erde immer leicht feucht ist.
* Regelmäßiges Düngen: Düngt die Kohlpflanzen regelmäßig, um das Wachstum zu fördern.
* Schädlingskontrolle: Achtet auf Schädlinge und bekämpft sie bei Bedarf.
* Kreativität: Gestaltet euren Flaschenkohlgarten nach euren eigenen Vorstellungen. Ihr könnt die Flasche bemalen oder mit anderen Pflanzen kombinieren.
Warum Kohl im Flaschengarten?
* Platzsparend: Ideal für kleine Balkone oder Wohnungen.
* Nachhaltig: Upcycling von Plastikflaschen.
* Lehrreich: Eine tolle Möglichkeit, Kindern die Natur näherzubringen.
* Frischer Kohl: Immer frischer, selbstgezogener Kohl zur Hand.
* Einzigartig: Ein echter Hingucker auf dem Balkon oder im Garten.
Ich hoffe, diese Anleitung hat euch gefallen und inspiriert, euren eigenen Flaschenkohlgarten anzulegen. Es ist wirklich einfacher als man denkt und macht unglaublich viel Spaß! Probiert es aus und lasst mich wissen, wie es läuft! Viel Erfolg und eine reiche Ernte!
Conclusion
So, there you have it! Growing cabbage in bottles might sound unconventional, but it’s a game-changer for urban gardeners, those with limited space, or anyone looking for a fun and rewarding gardening project. This method offers a surprising number of benefits, from protecting your young cabbage plants from pests and diseases to maximizing your yield in a small area. It’s also a fantastic way to recycle plastic bottles, contributing to a more sustainable lifestyle.
But why is this DIY trick a must-try?
First and foremost, it’s incredibly effective. The bottle acts as a mini-greenhouse, creating a warmer, more humid environment that encourages faster growth, especially in cooler climates. It also shields your delicate seedlings from harsh weather conditions like strong winds and heavy rain.
Second, it’s a natural pest deterrent. The bottle physically prevents many common cabbage pests, such as cabbage moths and slugs, from reaching your plants. This reduces the need for pesticides, allowing you to grow healthier, more organic cabbage.
Third, it’s space-saving. Whether you have a balcony, a patio, or just a sunny windowsill, you can grow cabbage in bottles. This method is perfect for apartment dwellers or anyone with limited garden space.
Fourth, it’s a fun and educational project. Growing cabbage in bottles is a great way to get kids involved in gardening and teach them about the life cycle of plants. It’s also a rewarding experience to see your cabbage plants thrive in their recycled containers.
Ready to take your cabbage growing to the next level? Here are a few suggestions and variations to try:
* Choose the right bottle: Experiment with different sizes and shapes of bottles to see what works best for your cabbage variety. Clear bottles are ideal for maximizing sunlight exposure, but you can also use colored bottles for a unique look.
* Consider companion planting: Plant herbs like rosemary or thyme around your cabbage bottles to further deter pests and attract beneficial insects.
* Try different cabbage varieties: This method works well for various cabbage types, including green cabbage, red cabbage, and savoy cabbage.
* Add drainage holes: Ensure your bottles have adequate drainage to prevent waterlogging, which can lead to root rot.
* Fertilize regularly: Cabbage is a heavy feeder, so be sure to fertilize your plants regularly with a balanced fertilizer.
Don’t be afraid to experiment and adapt this method to your specific needs and preferences. The key is to have fun and enjoy the process of growing your own fresh, delicious cabbage.
We encourage you to try this DIY trick and share your experience with us! Post photos of your cabbage bottles on social media using the hashtag #BottleCabbage and let us know how it worked for you. We’re excited to see your creative solutions and learn from your successes. Growing cabbage in bottles is not just a gardening technique; it’s a community project. Let’s grow together!
Frequently Asked Questions (FAQ)
What type of cabbage is best suited for growing in bottles?
While you can grow almost any type of cabbage in bottles, smaller varieties like ‘Golden Acre’ or ‘Dwarf Morden’ tend to be more manageable. These varieties don’t grow as large as some of the larger heading cabbages, making them ideal for the limited space inside a bottle. However, don’t let that stop you from experimenting! You can try growing larger varieties, but you might need to transplant them into larger containers as they mature. The key is to monitor your plants and provide them with the space they need to thrive.
How often should I water cabbage grown in bottles?
Watering frequency depends on several factors, including the size of the bottle, the type of soil, the weather conditions, and the size of the cabbage plant. Generally, you should water your cabbage plants whenever the top inch of soil feels dry to the touch. During hot, dry weather, you may need to water them daily, while during cooler, wetter weather, you may only need to water them every few days. Be careful not to overwater, as this can lead to root rot. Ensure the bottle has adequate drainage holes to allow excess water to escape. A good rule of thumb is to water thoroughly until water drains out of the bottom of the bottle.
What kind of soil should I use for growing cabbage in bottles?
A well-draining, nutrient-rich potting mix is ideal for growing cabbage in bottles. Avoid using garden soil, as it can be too heavy and compact, which can hinder drainage and root growth. Look for a potting mix that contains ingredients like peat moss, perlite, and vermiculite. You can also amend your potting mix with compost or other organic matter to provide additional nutrients. Cabbage plants are heavy feeders, so a nutrient-rich soil is essential for healthy growth.
How much sunlight do cabbage plants need when grown in bottles?
Cabbage plants need at least six hours of direct sunlight per day to thrive. Place your cabbage bottles in a sunny location where they will receive plenty of light. If you don’t have a sunny spot, you can supplement with artificial light, such as a grow light. Rotate the bottles regularly to ensure that all sides of the plants receive equal sunlight. Insufficient sunlight can lead to leggy growth and reduced yields.
How do I protect my cabbage plants from pests and diseases when growing them in bottles?
One of the main benefits of growing cabbage in bottles is that it provides a physical barrier against many common pests. However, it’s still important to monitor your plants regularly for signs of pests or diseases. If you notice any problems, take action immediately. You can use organic pest control methods, such as insecticidal soap or neem oil, to control pests. To prevent diseases, ensure good air circulation around your plants and avoid overwatering. Remove any infected leaves or plants immediately to prevent the spread of disease.
Can I reuse the plastic bottles for growing cabbage again?
Yes, you can definitely reuse the plastic bottles for growing cabbage again! Just make sure to clean them thoroughly before reusing them to remove any dirt, debris, or potential pathogens. Wash the bottles with soap and water, and then rinse them well. You can also disinfect them with a diluted bleach solution (1 part bleach to 9 parts water). After disinfecting, rinse the bottles thoroughly with clean water. Reusing plastic bottles is a great way to reduce waste and save money.
How do I transplant cabbage seedlings into bottles?
When your cabbage seedlings are large enough to handle (usually after they have developed a few sets of true leaves), you can transplant them into the bottles. First, prepare the bottles by cutting off the top and adding drainage holes to the bottom. Then, fill the bottles with your chosen potting mix. Gently remove the seedlings from their original containers and carefully place them into the bottles. Make sure the roots are covered with soil. Water the seedlings thoroughly after transplanting.
What are the signs that my cabbage plant is not doing well in the bottle?
Several signs can indicate that your cabbage plant is not thriving in the bottle. These include yellowing leaves, stunted growth, wilting, and the presence of pests or diseases. If you notice any of these signs, take action immediately to address the problem. Check the soil moisture, ensure the plant is receiving enough sunlight, and inspect for pests or diseases. You may need to adjust your watering schedule, relocate the plant to a sunnier location, or treat for pests or diseases.
How long does it take to grow cabbage in bottles?
The time it takes to grow cabbage in bottles depends on the variety of cabbage, the growing conditions, and the size of the bottle. Generally, it takes about 60 to 90 days from transplanting seedlings to harvest. Monitor your plants regularly and harvest them when the heads are firm and well-formed.
Can I grow other vegetables in bottles using this method?
Yes, you can grow other vegetables in bottles using this method! It works well for leafy greens like lettuce and spinach, as well as herbs like basil and parsley. Experiment with different vegetables and see what works best for you. The key is to choose vegetables that are well-suited for container gardening and provide them with the right growing conditions.

Leave a Comment