
Easy Housework Tips – who doesn’t crave them? Let’s be honest, spending hours scrubbing and tidying isn’t exactly anyone’s idea of a good time. For centuries, keeping a clean and organized home has been a cornerstone of well-being, from ancient rituals of purification to the Victorian obsession with spotless parlors. But in today’s fast-paced world, finding the time and energy for housework can feel like a monumental task.
That’s where these easy housework tips come in! I’m here to share some game-changing DIY tricks and hacks that will transform your cleaning routine from a dreaded chore into a manageable, even enjoyable, activity. Imagine having more free time to pursue your passions, spend quality time with loved ones, or simply relax and unwind in a sparkling clean space.
This isn’t just about surface-level cleaning; it’s about creating a healthier, happier home environment. A clean home reduces stress, improves air quality, and boosts your overall mood. So, ditch the overwhelming cleaning schedules and embrace these simple, effective strategies that will revolutionize the way you approach housework. Get ready to discover the secrets to a cleaner, more organized life, without sacrificing your precious time and energy!
Easy Housework Hacks to Reclaim Your Weekend!
Okay, let’s be honest, nobody *loves* housework. But it’s a necessary evil, right? So, instead of dreading it, let’s make it faster, easier, and maybe even a little bit…dare I say…fun? I’ve compiled some of my favorite housework hacks that have seriously changed my life. Get ready to reclaim your weekends!
Hack 1: The One-Minute Tidy
This is my absolute go-to when I’m feeling overwhelmed. The idea is simple: spend just one minute in each room tackling the most obvious clutter. You’d be surprised how much you can accomplish in 60 seconds!
How to do it:
* Set a timer: Grab your phone or a kitchen timer and set it for one minute.
* Choose a room: Start with the room that’s bothering you the most.
* Focus on the obvious: Don’t get bogged down in deep cleaning. Just grab the stray socks, toss the junk mail, fluff the pillows, and put away anything that’s clearly out of place.
* Move on: When the timer goes off, immediately move to the next room.
Why it works:
* It’s manageable: One minute is a commitment anyone can make.
* It prevents build-up: Regular one-minute tidies stop messes from snowballing.
* It’s a mood booster: Even a small amount of progress can make you feel more in control.
Hack 2: The Shower Cleaning Power Hour (or Less!)
Cleaning the shower is the bane of my existence. But I’ve found a way to make it less painful and more efficient.
What you’ll need:
* Spray bottle
* White vinegar
* Dish soap
* Scrub brush or sponge
* Squeegee (optional, but highly recommended!)
Step-by-step instructions:
1. Mix your cleaning solution: In your spray bottle, combine equal parts white vinegar and dish soap. I usually do about half a cup of each.
2. Spray it down: Generously spray the entire shower, including the walls, floor, and glass door (if you have one).
3. Let it sit: This is the magic part! Let the solution sit for at least 30 minutes, or even longer if your shower is particularly grimy. The vinegar and dish soap will work together to break down soap scum and hard water stains.
4. Scrub-a-dub-dub: After the solution has had time to work its magic, use your scrub brush or sponge to scrub away any remaining grime. Pay special attention to grout lines and areas with stubborn stains.
5. Rinse thoroughly: Rinse the entire shower with hot water until all traces of the cleaning solution are gone.
6. Squeegee (optional): If you have a squeegee, use it to remove excess water from the walls and glass door. This will help prevent water spots and keep your shower looking cleaner for longer.
Pro Tip: Keep a squeegee in your shower and use it after every shower to prevent water spots and soap scum build-up. It takes less than a minute and makes a huge difference!
Hack 3: The Laundry Basket System
Okay, this one might seem obvious, but it’s a game-changer. Having a dedicated laundry basket for each person in the household (or even for different types of clothing) can save you so much time and effort.
How to set it up:
* Assign baskets: Give each family member their own laundry basket.
* Label them: Clearly label each basket with the person’s name.
* Designate a laundry area: Choose a central location for the laundry baskets, such as a laundry room or a hallway closet.
* Train your family: Make sure everyone knows to put their dirty clothes in their assigned basket.
Why it works:
* No more sorting: When it’s time to do laundry, you can simply grab a basket and start washing. No more sorting through a mountain of clothes!
* Reduces clutter: Dirty clothes are contained in the baskets, preventing them from piling up on the floor or furniture.
* Encourages responsibility: Each person is responsible for their own laundry, which can help teach kids about responsibility.
Hack 4: The “Clean as You Go” Kitchen Rule
This is a simple but effective way to keep your kitchen clean and tidy. The idea is to clean up after yourself as you cook, rather than waiting until the end.
How to implement it:
* Wash dishes as you go: While you’re waiting for something to cook, wash any dishes you’ve already used.
* Wipe up spills immediately: Don’t let spills sit and harden. Wipe them up as soon as they happen.
* Put ingredients away: As soon as you’re finished using an ingredient, put it back in its place.
* Empty the dishwasher regularly: Don’t let the dishwasher fill up and become a dumping ground for dirty dishes. Empty it regularly so you always have a place to put dirty dishes.
Why it works:
* Prevents a huge mess: Cleaning as you go prevents a huge pile of dishes and a messy kitchen from accumulating.
* Saves time: It’s much easier to clean up small messes as they happen than to tackle a huge mess later.
* Makes cooking more enjoyable: A clean kitchen is a more pleasant place to cook.
Hack 5: The Decluttering Blitz
Sometimes, you just need to get rid of stuff. A decluttering blitz is a quick and intense decluttering session that can help you get rid of unwanted items and create more space.
How to do it:
1. Set a timer: Set a timer for 30 minutes (or longer, if you’re feeling ambitious).
2. Choose a target area: Pick a specific area to declutter, such as a drawer, a shelf, or a closet.
3. Grab three boxes: Label one box “Donate,” one box “Trash,” and one box “Relocate.”
4. Start sorting: Go through the items in your target area and decide what to do with each one.
* Donate: Items that are in good condition but you no longer need or use.
* Trash: Items that are broken, damaged, or no longer usable.
* Relocate: Items that belong somewhere else in your house.
5. Don’t overthink it: The goal is to make quick decisions. If you’re not sure whether to keep something, get rid of it.
6. When the timer goes off: Stop decluttering and immediately take the “Donate” box to a donation center and the “Trash” box to the trash. Put the “Relocate” items away in their proper places.
Why it works:
* It’s fast: The timer forces you to make quick decisions and prevents you from getting bogged down in indecision.
* It’s effective: You’ll be surprised how much you can declutter in just 30 minutes.
* It’s motivating: Seeing the results of your decluttering blitz can motivate you to declutter other areas of your home.
Hack 6: The Dusting Down Low Strategy
We often forget about the dust bunnies lurking under furniture and in corners. This hack focuses on getting those hard-to-reach areas.
What you’ll need:
* Duster with an extendable handle (or a broom with a microfiber cloth attached)
* Vacuum cleaner with a hose attachment
Step-by-step instructions:
1. Start high: Dust ceiling fans, light fixtures, and any other high surfaces first. This will prevent dust from falling onto already cleaned surfaces.
2. Work your way down: Dust shelves, furniture, and other surfaces.
3. Focus on the floor: Use your duster with an extendable handle (or a broom with a microfiber cloth attached) to dust under furniture, along baseboards, and in corners.
4. Vacuum: Use your vacuum cleaner with a hose attachment to vacuum up any dust and debris that you’ve dislodged.
Pro Tip: Use a dryer sheet on your duster to help repel dust and prevent it from clinging to surfaces.
Hack 7: The Make-Your-Bed-Every-Day Habit
This is a simple habit that can make a big difference in the overall appearance of your bedroom. Making your bed every day instantly makes the room look more put-together and tidy.
How to do it:
* Make it the first thing you
Conclusion
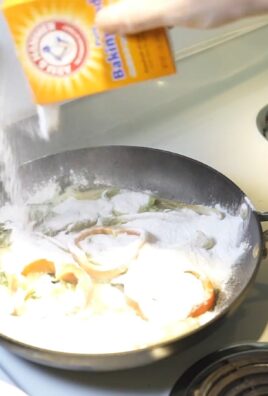
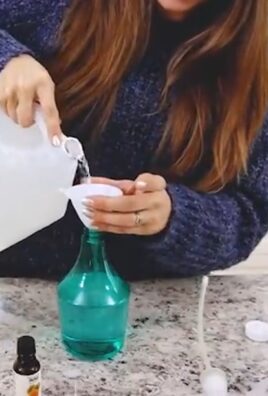
So, there you have it! This simple yet incredibly effective DIY trick for tackling everyday messes is a game-changer for anyone looking to streamline their cleaning routine and reclaim their precious time. We’ve shown you how to create a powerful, all-natural cleaning solution using ingredients you likely already have in your pantry. Forget spending a fortune on harsh chemicals and embrace a more sustainable and budget-friendly approach to keeping your home sparkling. This is one of the best easy housework tips you’ll find.
But why is this DIY trick a must-try? Because it’s not just about saving money; it’s about creating a healthier living environment for you and your family. By ditching the commercial cleaners laden with artificial fragrances and potentially harmful chemicals, you’re reducing your exposure to toxins and promoting better air quality in your home. Plus, the satisfaction of knowing you’re using a homemade solution that’s both effective and environmentally conscious is truly rewarding.
Beyond the basic recipe, there’s plenty of room for customization. Want to boost the cleaning power? Add a few drops of tea tree oil for its antibacterial properties. Prefer a different scent? Experiment with essential oils like lavender, lemon, or eucalyptus to create a fragrance that uplifts your mood while you clean. You can also adjust the ratios of ingredients to suit your specific cleaning needs. For tougher stains, try increasing the concentration of vinegar or baking soda. For delicate surfaces, dilute the solution further with water.
Consider these variations to tailor the DIY cleaner to different areas of your home:
* **For the Kitchen:** Add a squeeze of lemon juice to cut through grease and leave a fresh, citrusy scent.
* **For the Bathroom:** Incorporate a few drops of tea tree oil or eucalyptus oil for their antibacterial and antifungal properties.
* **For Floors:** Dilute the solution with warm water and use a microfiber mop for streak-free cleaning.
* **For Windows:** Use a spray bottle and a clean cloth to achieve sparkling, streak-free results.
The possibilities are endless! The key is to experiment and find what works best for you and your home.
We’re confident that once you try this DIY cleaning trick, you’ll wonder how you ever lived without it. It’s a simple, effective, and eco-friendly way to tackle everyday messes and keep your home looking its best. So, what are you waiting for? Gather your ingredients, mix up a batch, and experience the difference for yourself.
We’d love to hear about your experience! Share your results, variations, and any tips you discover in the comments below. Let’s build a community of DIY cleaning enthusiasts and help each other create healthier, happier homes. Don’t forget to share this article with your friends and family who are looking for easy housework tips!
Frequently Asked Questions
What exactly are the benefits of using a DIY cleaner compared to store-bought options?
DIY cleaners offer a multitude of benefits. Firstly, they are significantly more cost-effective. The ingredients used are typically inexpensive and readily available, saving you money in the long run. Secondly, they are environmentally friendly. By using natural ingredients, you reduce your reliance on harsh chemicals that can pollute waterways and harm the environment. Thirdly, they are safer for your health. Commercial cleaners often contain volatile organic compounds (VOCs) and other harmful chemicals that can cause respiratory problems, skin irritation, and other health issues. DIY cleaners, on the other hand, are made with natural ingredients that are less likely to cause adverse reactions. Finally, you have complete control over the ingredients, allowing you to customize the cleaner to your specific needs and preferences.
Is this DIY cleaner safe to use on all surfaces?
While this DIY cleaner is generally safe for most surfaces, it’s always a good idea to test it in an inconspicuous area first, especially on delicate or sensitive materials like marble, granite, or wood. The acidity of vinegar can potentially damage certain surfaces over time. For these surfaces, consider using a diluted solution or opting for a baking soda-based cleaner instead. Always read the manufacturer’s instructions for your specific surfaces before using any cleaning product, whether it’s store-bought or homemade.
How long does this DIY cleaner last?
This DIY cleaner typically lasts for several weeks when stored in an airtight container in a cool, dark place. However, it’s best to use it within a month or two to ensure its effectiveness. Over time, the ingredients may start to separate or lose their potency. If you notice any changes in color, odor, or consistency, it’s best to discard the cleaner and make a fresh batch.
Can I use different essential oils in this recipe?
Absolutely! Essential oils not only add a pleasant fragrance but also offer various cleaning and disinfecting properties. Lavender oil is known for its calming and antibacterial effects, lemon oil is a powerful degreaser and disinfectant, and tea tree oil is a potent antifungal and antiviral agent. Experiment with different essential oils to find your favorite combinations and tailor the cleaner to your specific needs. Just be sure to use pure, therapeutic-grade essential oils for the best results.
What if I don’t have vinegar? Can I substitute it with something else?
While vinegar is a key ingredient in this recipe due to its acidity and cleaning power, you can substitute it with lemon juice in a pinch. Lemon juice also contains citric acid, which helps to cut through grease and grime. However, vinegar is generally more effective and less expensive than lemon juice. If you’re looking for a non-acidic alternative, you can try using a baking soda paste or a mild dish soap solution instead.
How do I deal with stubborn stains using this DIY cleaner?
For stubborn stains, you may need to pre-treat the area before using the DIY cleaner. For grease stains, try sprinkling baking soda on the stain and letting it sit for a few minutes before wiping it away. For water stains, try using a mixture of vinegar and water. For mold and mildew, try using a solution of hydrogen peroxide and water. Always test any cleaning solution in an inconspicuous area first to ensure it doesn’t damage the surface.
Is this DIY cleaner safe to use around pets and children?
While this DIY cleaner is generally safer than commercial cleaners, it’s still important to exercise caution when using it around pets and children. Keep the cleaner out of their reach and avoid spraying it directly on them. If your pet or child accidentally ingests the cleaner, contact a veterinarian or poison control center immediately. As with any cleaning product, it’s always best to err on the side of caution and take necessary precautions to ensure their safety.
Can I use this DIY cleaner in a steam mop?
It’s generally not recommended to use this DIY cleaner in a steam mop, as the vinegar can potentially damage the internal components of the machine. Steam mops are designed to be used with water only. If you want to add a cleaning solution to your steam mop, check the manufacturer’s instructions for recommended products. You may be able to find steam mop-safe cleaning solutions that are specifically designed for use in these machines.
How can I make this DIY cleaner even more eco-friendly?
To make this DIY cleaner even more eco-friendly, consider using organic ingredients whenever possible. You can also reuse old spray bottles and containers to reduce waste. When disposing of the cleaner, be sure to dilute it with plenty of water before pouring it down the drain. You can also compost the ingredients if you’re using organic materials. By making small changes to your cleaning routine, you can significantly reduce your environmental impact. Remember, even small steps towards sustainability can make a big difference.
Leave a Comment