
Bell pepper plastic bottle trick – sounds intriguing, right? I know, it might seem a little odd at first, but trust me, this simple DIY hack can seriously boost your bell pepper harvest! For centuries, gardeners have been experimenting with ways to coax the most out of their plants, from ancient Egyptians using irrigation techniques to modern-day innovations in hydroponics. We’re all searching for that little edge, that secret weapon to help our gardens thrive.
And that’s where this clever trick comes in. Have you ever felt frustrated when your bell pepper plants produce beautiful foliage but disappointingly few peppers? Or maybe the peppers you do get are small and stunted? I’ve been there! That’s why I was so excited when I discovered the bell pepper plastic bottle trick. It’s a super easy and inexpensive way to create a mini-greenhouse effect around your plants, protecting them from harsh weather, retaining moisture, and even deterring some pests.
In this article, I’m going to walk you through exactly how to use this simple method to get bigger, healthier, and more abundant bell peppers. Get ready to transform those empty plastic bottles into garden gold!
Grow More Bell Peppers: The Upside-Down Bottle Trick!
Hey there, fellow gardening enthusiasts! Are you ready to supercharge your bell pepper harvest? I’m going to share a simple, yet incredibly effective DIY trick that will help you get more peppers from your plants using something you probably already have lying around: plastic bottles! This method focuses on creating a mini-greenhouse effect and providing consistent watering and feeding directly to the roots. Let’s dive in!
What You’ll Need
Before we get started, let’s gather our supplies. This is a pretty low-cost project, which is always a win in my book!
* Plastic Bottles: You’ll need empty plastic bottles, ideally 2-liter soda bottles or similar. Clear or slightly translucent bottles work best. The number of bottles depends on how many bell pepper plants you want to treat.
* Scissors or Utility Knife: For cutting the plastic bottles. Be careful!
* Drill or Nail and Hammer: To create drainage holes in the bottle caps.
* Potting Soil: Good quality potting soil to fill the bottles.
* Water: For watering your bell pepper plants.
* Fertilizer (Optional): Liquid fertilizer to add to the water for extra nutrients. I like using a balanced fertilizer specifically formulated for vegetables.
* Gloves (Optional): To protect your hands.
* Measuring cup or watering can: To measure and pour water.
Preparing the Plastic Bottles
This is where we transform those empty bottles into mini-greenhouses and watering systems.
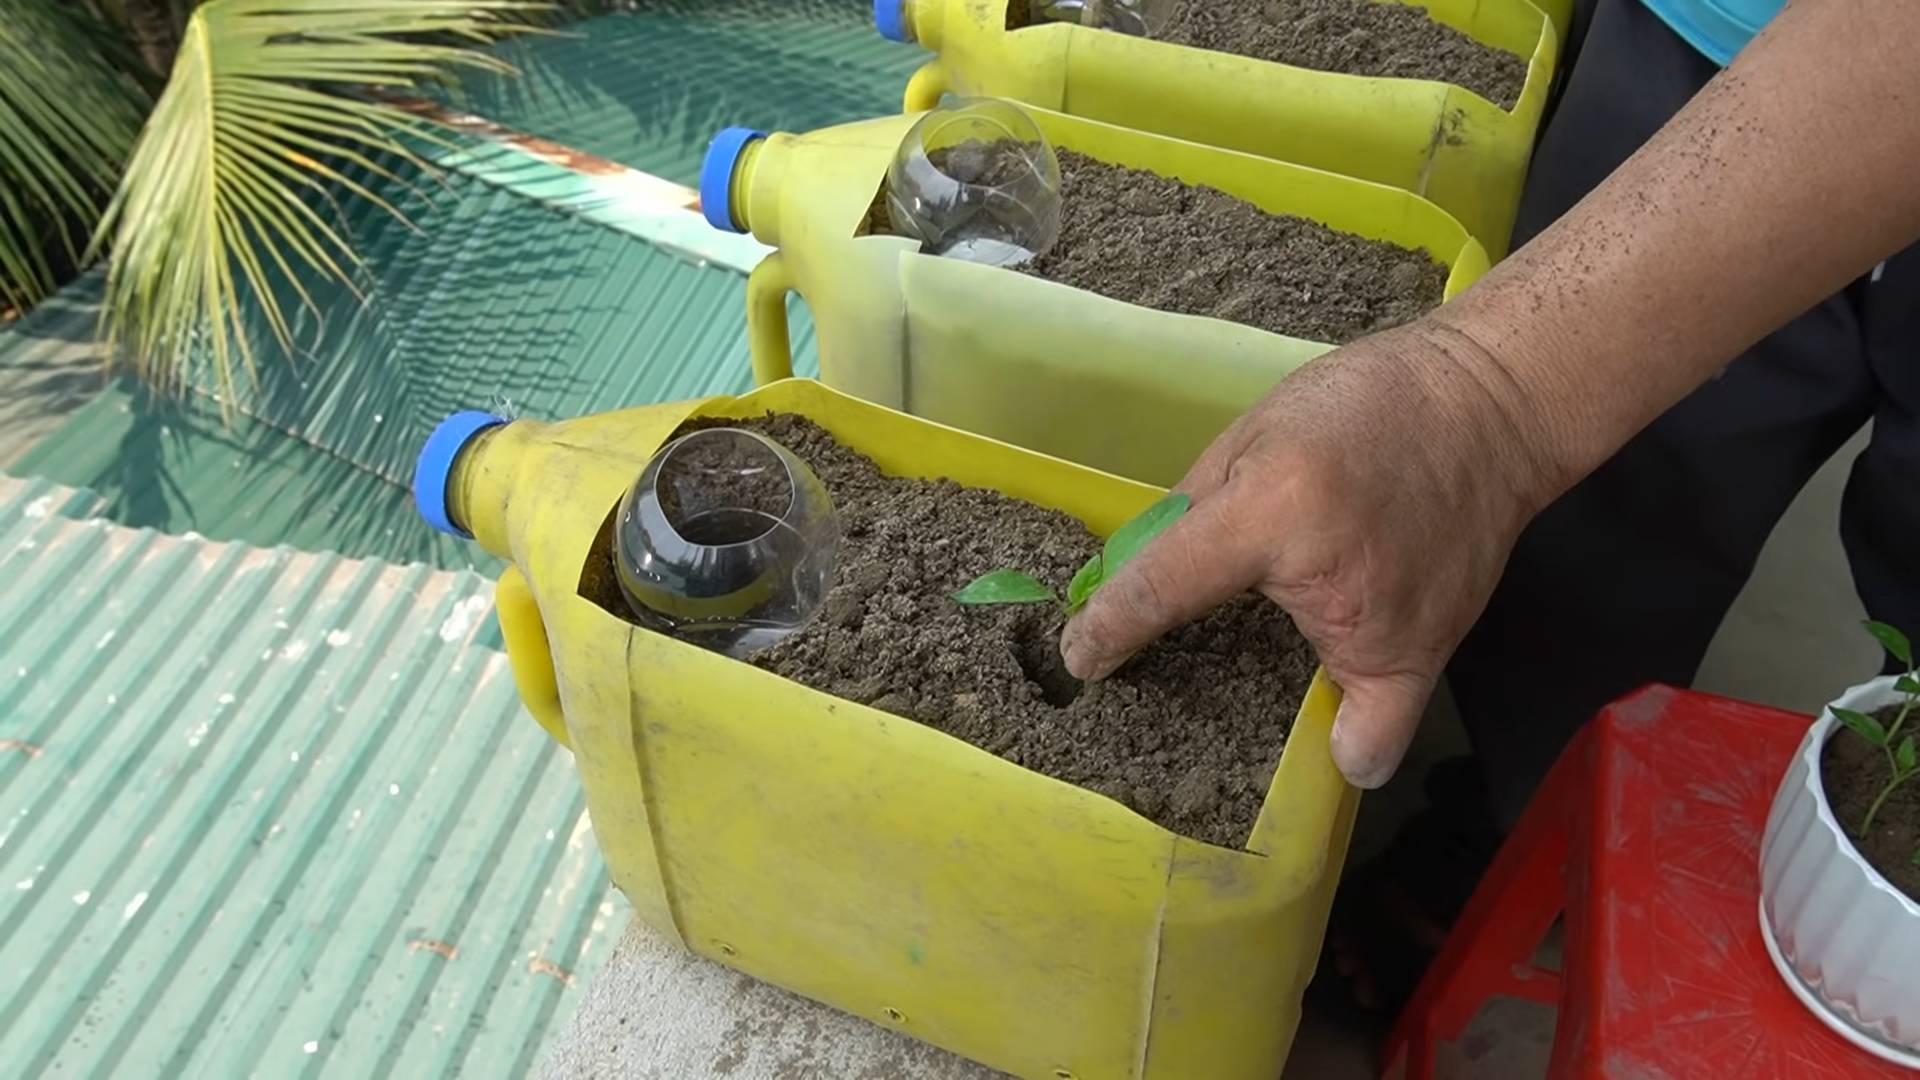
1. Clean the Bottles: First things first, thoroughly clean the plastic bottles. Remove any labels and residue. You want to make sure there’s nothing that could contaminate the soil or harm your plants. I usually wash them with soapy water and rinse them well.
2. Cut the Bottoms Off: Using your scissors or utility knife, carefully cut off the bottom of each plastic bottle. You want to remove the entire bottom so that the bottle is open at both ends. Be extra cautious when using a knife! I find it easier to score the plastic first and then cut along the score line.
3. Drill Drainage Holes: Now, take the bottle caps and drill or poke several small drainage holes in each one. This is crucial for preventing the soil from becoming waterlogged. If you’re using a nail and hammer, place the cap on a piece of wood to protect your work surface. I usually aim for about 4-5 holes per cap.
4. Reattach the Caps: Screw the caps back onto the bottles. Make sure they’re on tight!
Installing the Bottle System
Now comes the fun part: setting up the bottle system around your bell pepper plants.
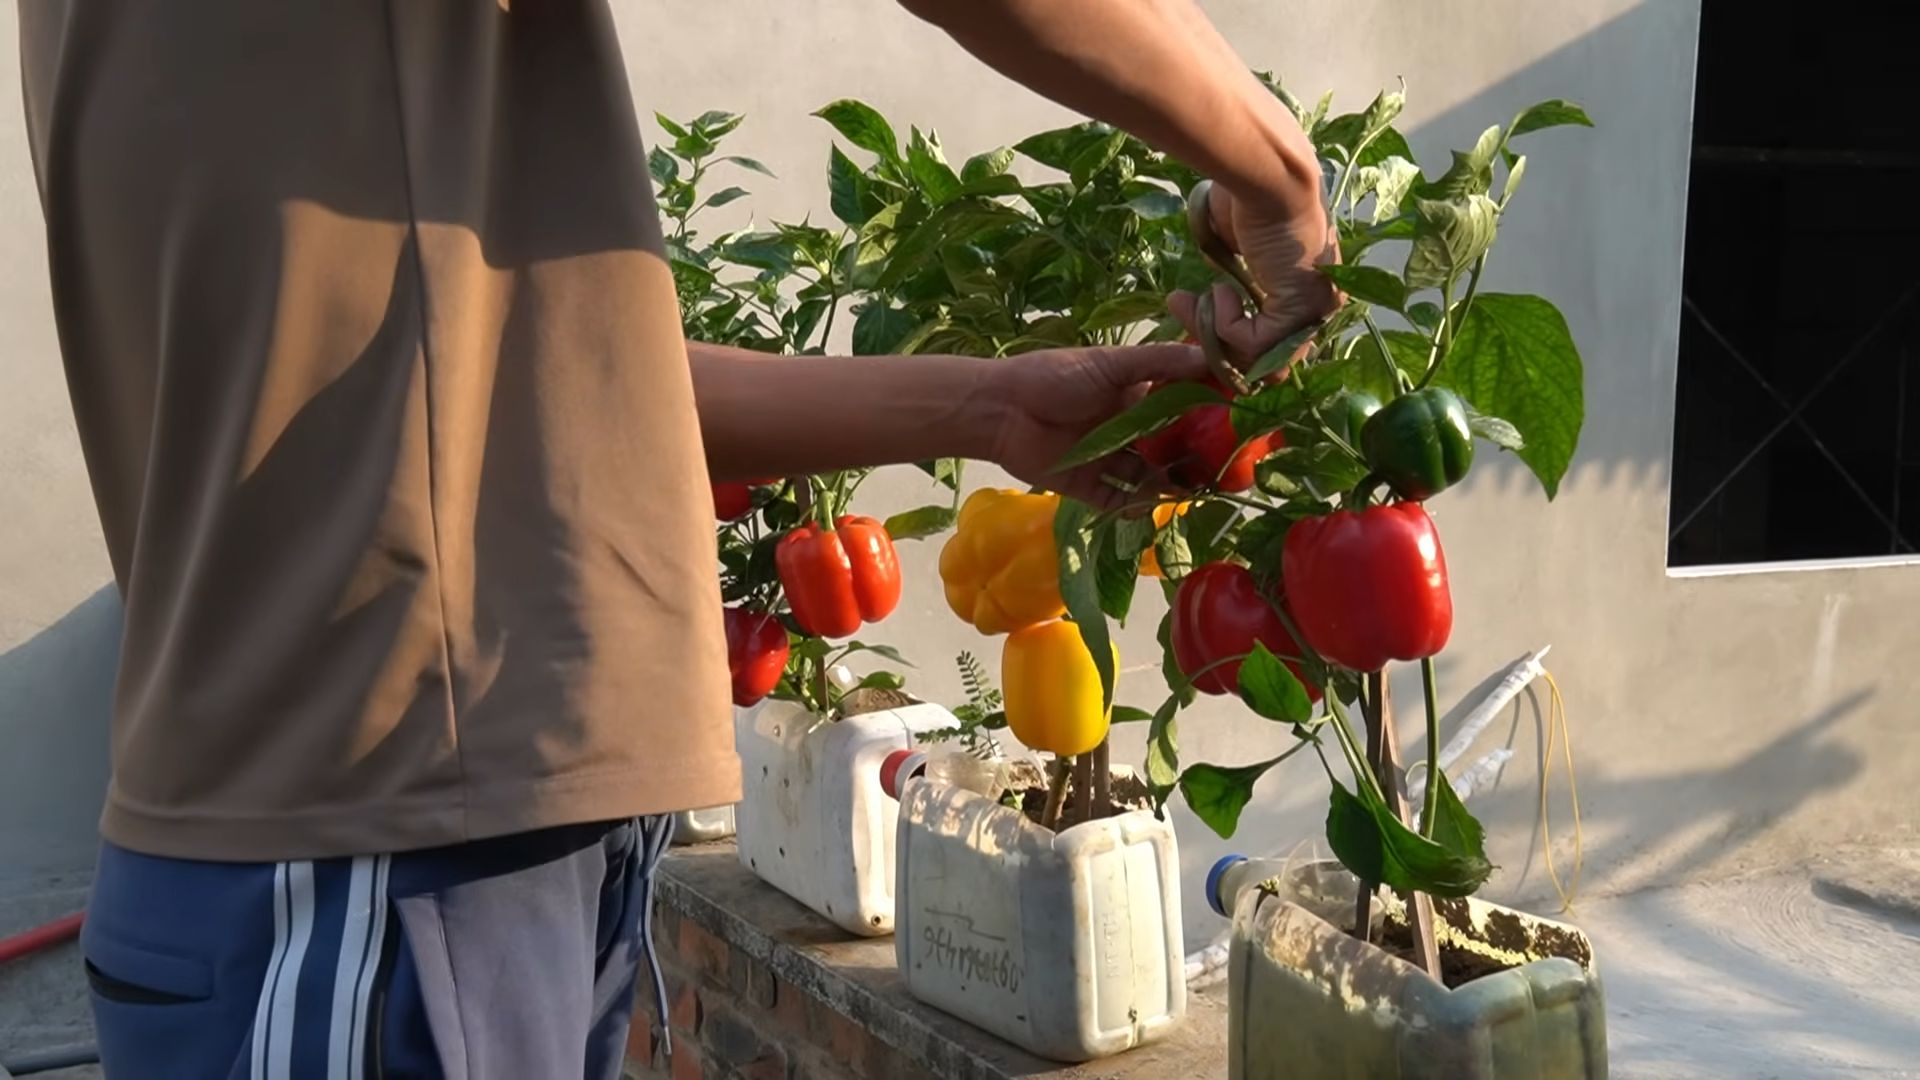
1. Dig a Small Hole: Near the base of each bell pepper plant, dig a small hole, about 2-3 inches deep. The hole should be wide enough to accommodate the neck of the plastic bottle.
2. Insert the Bottle (Upside Down): Carefully insert the neck of the plastic bottle into the hole, with the cut-off bottom facing upwards. Push the bottle in firmly so that it’s stable. The bottle should be positioned close to the main stem of the plant, but not touching it.
3. Fill with Potting Soil: Now, fill the plastic bottle with potting soil. Pack the soil down gently to ensure good contact with the surrounding soil. You want the soil level inside the bottle to be roughly the same as the soil level around the plant.
4. Water Thoroughly: Once the bottle is filled with soil, water it thoroughly. This will help settle the soil and ensure that the roots of the bell pepper plant have access to moisture.
5. Repeat for All Plants: Repeat steps 1-4 for all of your bell pepper plants that you want to treat with this method.
Maintaining Your Bell Pepper Plants with the Bottle System
The beauty of this system is that it provides consistent watering and feeding directly to the roots, minimizing water waste and maximizing nutrient uptake.
1. Watering: Water your bell pepper plants by pouring water directly into the plastic bottles. The soil inside the bottle will act as a reservoir, slowly releasing water to the roots. Check the soil moisture level regularly by sticking your finger into the soil inside the bottle. Water when the soil feels dry to the touch. I usually water every 2-3 days, depending on the weather.
2. Fertilizing (Optional): If you’re using fertilizer, add it to the water before pouring it into the bottles. Follow the instructions on the fertilizer package for the correct dosage. I like to fertilize my bell pepper plants every 2-3 weeks.
3. Monitor for Pests and Diseases: Keep an eye on your bell pepper plants for any signs of pests or diseases. The bottle system can create a humid environment, which can sometimes attract pests. If you notice any problems, take action immediately to prevent them from spreading.
4. Adjust as Needed: As your bell pepper plants grow, you may need to adjust the bottle system. For example, if the plants become too large and start to shade the bottles, you may need to move the bottles to a sunnier location.
5. Clean the Bottles Periodically: Over time, the plastic bottles may become dirty or clogged with debris. Clean them periodically to ensure that they continue to function properly. I usually clean them every few weeks by rinsing them out with water.
Benefits of Using the Upside-Down Bottle Trick
I’ve found so many advantages to using this simple method. Here are just a few:
* Water Conservation: This method helps conserve water by delivering it directly to the roots, minimizing evaporation and runoff.
* Targeted Feeding: You can easily add fertilizer to the water and deliver it directly to the roots, ensuring that your plants get the nutrients they need.
* Mini-Greenhouse Effect: The plastic bottles create a mini-greenhouse effect, which can help warm the soil and protect the plants from cold temperatures.
* Reduced Weed Growth: The bottles can help suppress weed growth around the base of the plants.
* Increased Yield: By providing consistent watering and feeding, this method can help increase the yield of your bell pepper plants.
* Recycling: You’re giving those plastic bottles a new life!
Troubleshooting
Even with the best planning, sometimes things don’t go exactly as expected. Here are a few common issues and how to address them:
* Waterlogging: If the soil inside the bottles is constantly wet, it could be a sign of waterlogging. Make sure the drainage holes in the bottle caps are clear and that the soil is well-draining. You may also need to water less frequently.
* Pest Infestations: The humid environment inside the bottles can sometimes attract pests. Monitor your plants regularly and take action immediately if you notice any problems. You can use organic pest control methods, such as insecticidal soap or neem oil.
* Bottle Instability: If the bottles are unstable and keep falling over, try burying them deeper in the soil or using stakes to support them.
* Root Rot: If you notice that the leaves of your bell pepper plants are turning yellow or brown, it could be a sign of root rot. This is usually caused by overwatering. Make sure the soil is well-draining and that you’re not watering too frequently.
Alternative Bottle Uses
While this guide focuses on bell peppers, the same principle can be applied to other plants in your garden!
* Tomatoes: Tomatoes benefit greatly from consistent watering and feeding, making this bottle trick perfect for them.
* Cucumbers: Similar to tomatoes, cucumbers thrive with consistent moisture.
* Eggplants: Eggplants also appreciate the targeted watering and feeding this method provides.
* Herbs: Many herbs, like basil and oregano, can also benefit from this system.
Final Thoughts
I’ve been using this upside-down bottle trick for years, and I’m always amazed at how well it works. It’s a simple, inexpensive, and effective way to boost your bell pepper harvest and conserve water. Give it a try, and I’m confident you’ll see a difference! Happy gardening!
Conclusion
So, there you have it! The bell pepper plastic bottle trick – a simple yet remarkably effective way to keep your bell peppers fresher for longer. We’ve all been there, haven’t we? Buying a vibrant array of bell peppers, only to find them softening and wrinkling in the crisper drawer just days later. This DIY method offers a practical solution, minimizing food waste and saving you money in the long run. It’s not just about preserving bell peppers; it’s about embracing a more sustainable approach to food storage.
This method is a must-try because it’s incredibly easy, requires minimal effort, and utilizes readily available materials. You don’t need any fancy equipment or specialized knowledge. A simple plastic bottle, a pair of scissors, and a few seconds of your time are all it takes to significantly extend the shelf life of your bell peppers. Think of the possibilities! You can buy bell peppers in bulk when they’re on sale, knowing they’ll stay crisp and delicious for weeks. You can prepare ingredients in advance for your favorite recipes, saving valuable time during busy weeknights.
But the benefits extend beyond mere convenience. By preventing spoilage, you’re actively reducing food waste, a critical step in minimizing your environmental impact. Food waste contributes significantly to landfill waste and greenhouse gas emissions. By adopting this simple trick, you’re making a conscious choice to be more environmentally responsible.
Variations and Suggestions:
While the basic method remains the same, there are a few variations you can explore to optimize the results.
* Bottle Size: Experiment with different bottle sizes to find the perfect fit for your bell peppers. Larger bottles can accommodate multiple peppers or larger varieties.
* Ventilation: If you live in a particularly humid climate, consider adding a few small ventilation holes to the bottle to prevent moisture buildup.
* Paper Towel: For extra moisture absorption, you can place a small piece of paper towel at the bottom of the bottle. Replace the paper towel if it becomes damp.
* Color Coordination: Use different colored bottles to organize your bell peppers by color. This can be helpful if you’re using them for specific recipes.
* Beyond Bell Peppers: While this trick is particularly effective for bell peppers, you can also try it with other vegetables, such as cucumbers or zucchini.
We firmly believe that this bell pepper plastic bottle trick is a game-changer for anyone who loves to cook with fresh produce. It’s a simple, effective, and sustainable way to keep your bell peppers fresher for longer, reduce food waste, and save money.
Now, it’s your turn! We encourage you to try this DIY trick and see the results for yourself. Don’t just take our word for it – experience the difference firsthand. Once you’ve tried it, we’d love to hear about your experience. Share your tips, variations, and success stories in the comments below. Let’s build a community of resourceful cooks who are committed to reducing food waste and maximizing the freshness of their ingredients. Let us know how this **bell pepper plastic bottle trick** worked for you!
Frequently Asked Questions (FAQ)
1. What type of plastic bottle is best for this trick?
The best type of plastic bottle to use is a clear, food-grade plastic bottle. Bottles that have previously contained water, soda, or juice are all suitable options. Make sure the bottle is clean and dry before using it. Avoid using bottles that have contained harsh chemicals or cleaning products. The size of the bottle will depend on the size and number of bell peppers you want to store. A standard 2-liter bottle is usually a good starting point.
2. How long will bell peppers last using this method?
Using the bell pepper plastic bottle trick, you can expect your bell peppers to last significantly longer than if stored without any protection. Typically, bell peppers stored in this way can last for 2-3 weeks, sometimes even longer, in the refrigerator. The exact duration will depend on the initial freshness of the peppers and the temperature of your refrigerator. Regularly check the peppers for any signs of spoilage, such as softening or discoloration.
3. Does this trick work for all types of bell peppers?
Yes, this trick works for all types of bell peppers, including green, red, yellow, and orange varieties. The color of the bell pepper does not affect the effectiveness of the storage method. However, it’s important to note that bell peppers with blemishes or soft spots may not last as long, regardless of the storage method.
4. Is it necessary to wash the bell peppers before storing them in the bottle?
It’s generally not recommended to wash bell peppers before storing them, as excess moisture can promote spoilage. If the peppers are visibly dirty, gently wipe them clean with a dry cloth. If you do wash them, make sure they are completely dry before placing them in the bottle.
5. Can I reuse the plastic bottle for multiple batches of bell peppers?
Yes, you can reuse the plastic bottle for multiple batches of bell peppers. However, it’s important to thoroughly clean and dry the bottle between uses to prevent the buildup of bacteria or mold. Wash the bottle with warm, soapy water and rinse it well. Allow it to air dry completely before storing another batch of bell peppers.
6. What if I don’t have a plastic bottle? Are there any alternative storage methods?
If you don’t have a plastic bottle, there are other storage methods you can try. One option is to wrap each bell pepper individually in a paper towel and store them in a plastic bag in the refrigerator. The paper towel will help absorb excess moisture. Another option is to store the bell peppers in a crisper drawer with a slightly damp cloth. However, these methods may not be as effective as the plastic bottle trick in extending the shelf life of the peppers.
7. Will this trick work for cut bell peppers?
This trick is most effective for whole, uncut bell peppers. Once a bell pepper is cut, it’s more susceptible to spoilage. If you have cut bell peppers, store them in an airtight container in the refrigerator and use them within a few days. You can also try wrapping the cut edges in plastic wrap to help prevent them from drying out.
8. How does the plastic bottle help keep the bell peppers fresh?
The plastic bottle creates a protective barrier around the bell peppers, preventing them from drying out and slowing down the ripening process. The bottle also helps to maintain a consistent level of humidity, which is ideal for preserving the freshness of the peppers. By minimizing exposure to air and moisture, the plastic bottle helps to extend the shelf life of the bell peppers.
9. Can I store other vegetables in the same bottle as the bell peppers?
It’s generally not recommended to store different types of vegetables together in the same bottle, as they may have different storage requirements and ethylene production rates. Ethylene is a natural gas produced by some fruits and vegetables that can accelerate the ripening process of other produce. Storing bell peppers with ethylene-producing fruits or vegetables, such as bananas or tomatoes, may cause them to spoil more quickly.
10. What are the signs that a bell pepper has gone bad?
Signs that a bell pepper has gone bad include softening, wrinkling, discoloration, and the presence of mold. If the pepper feels mushy or has a foul odor, it should be discarded. It’s also important to check for any signs of mold or decay on the stem end of the pepper. If you notice any of these signs, it’s best to err on the side of caution and discard the pepper.
Leave a Comment