
Grow Mustard Greens at Home – and unlock a world of peppery flavor right outside your door! Have you ever dreamt of snipping fresh, vibrant greens just moments before adding them to your favorite dish? Well, dream no more! This DIY guide is your passport to cultivating your own thriving mustard green patch, no matter the size of your space.
Mustard greens have a rich history, stretching back centuries and gracing tables across cultures. From ancient medicinal uses to being a staple in Southern cuisine, these leafy wonders have proven their versatility and nutritional power. But beyond their historical significance, why should you learn to grow mustard greens at home?
In today’s world, knowing where your food comes from is more important than ever. Growing your own mustard greens allows you to control what goes into your food – no harmful pesticides or mystery ingredients! Plus, it’s incredibly rewarding to nurture a plant from seed to harvest. I’m going to show you some simple, effective tricks and hacks that will make growing mustard greens at home easier than you ever thought possible. Get ready to enjoy fresh, flavorful greens and impress your friends and family with your newfound gardening skills!
Grow Your Own Mustard Greens: A Beginner’s Guide
Hey there, fellow gardening enthusiasts! I’m so excited to share my experience with growing mustard greens at home. It’s surprisingly easy, incredibly rewarding, and gives you access to fresh, peppery greens whenever you want them. Plus, it’s a fantastic way to add a little zing to your salads, stir-fries, and side dishes. Let’s dive in!
What You’ll Need
Before we get started, let’s gather all the necessary supplies. Trust me, having everything ready beforehand will make the process much smoother.
* Mustard Green Seeds: Choose your favorite variety! There are tons of options, from mild to super spicy. I personally love ‘Florida Broadleaf’ for its classic flavor and ‘Red Giant’ for its beautiful color and slightly milder taste.
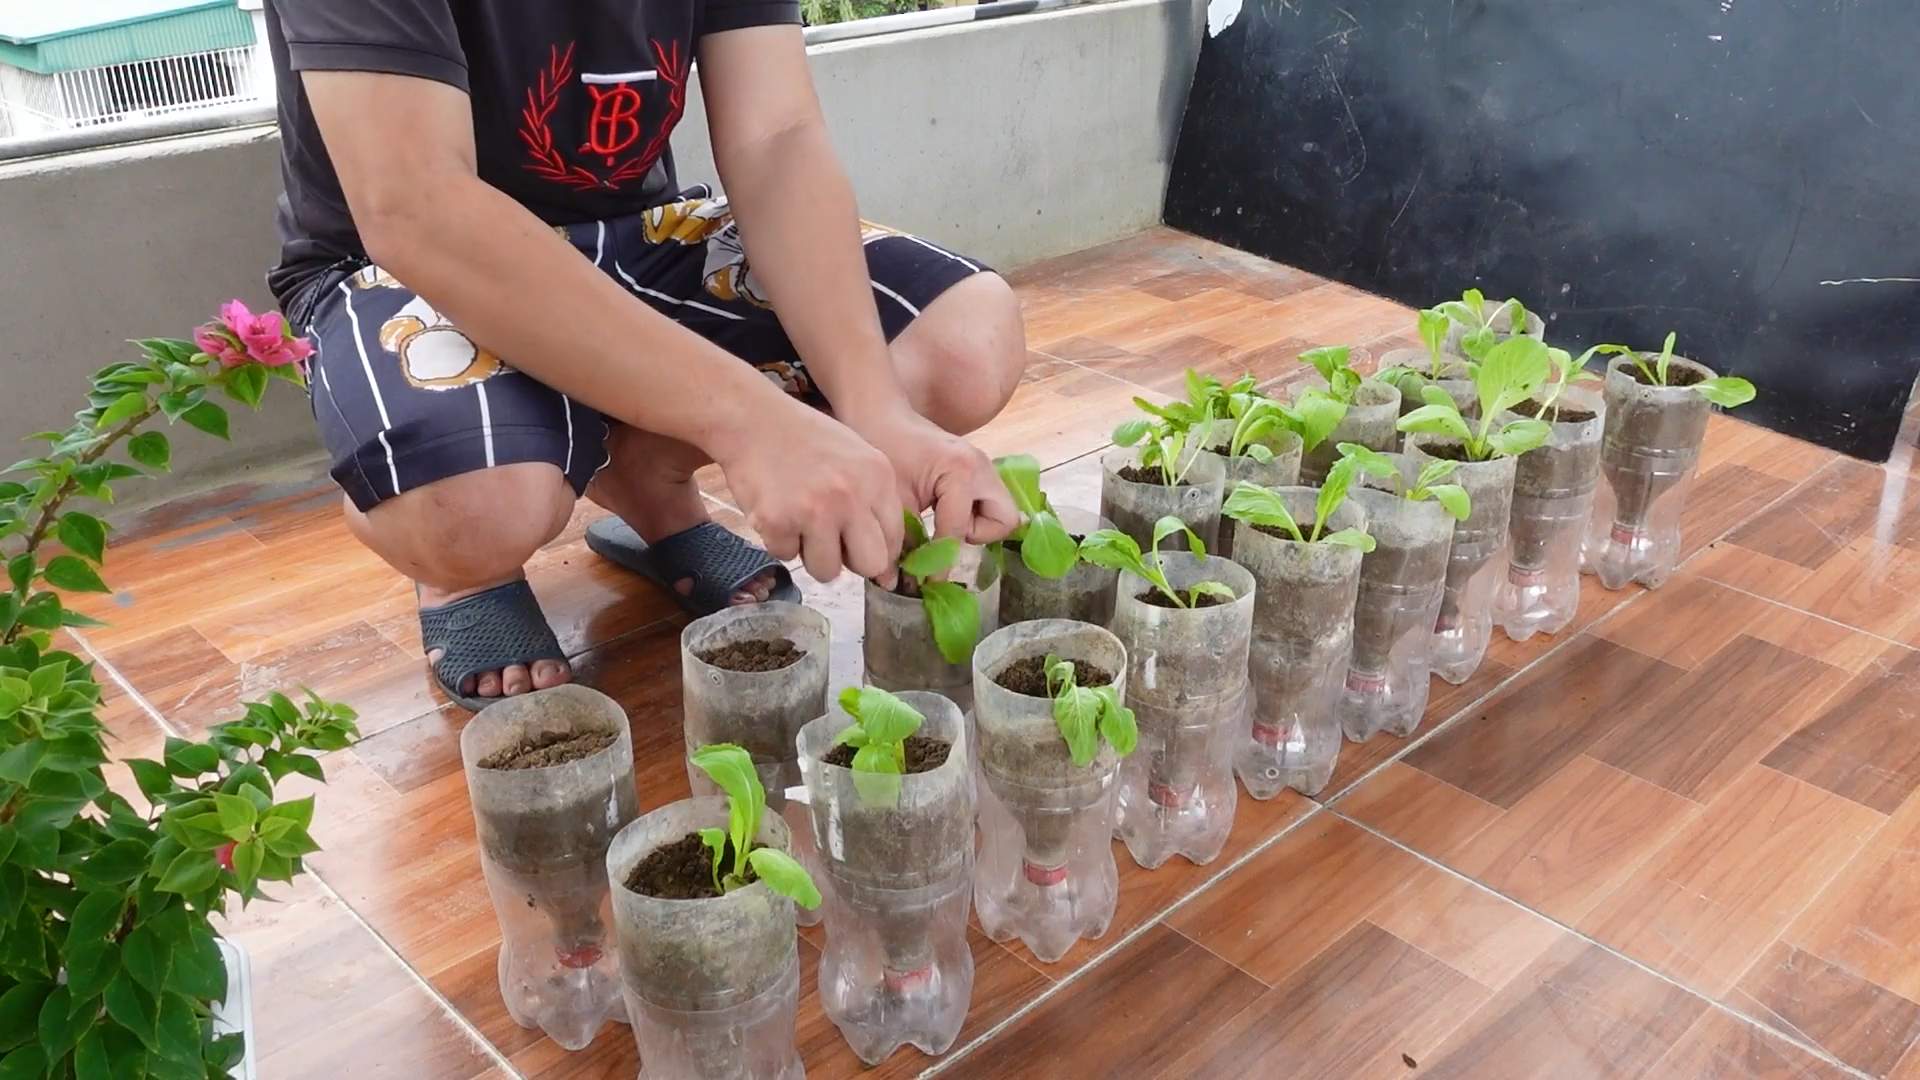
* Containers: You can use anything from small pots to large containers, depending on how much space you have and how many greens you want to grow. Make sure your container has drainage holes!
* Potting Mix: Use a high-quality potting mix that drains well. Avoid using garden soil, as it can compact and hinder drainage in containers.
* Watering Can or Hose: Gentle watering is key, especially when the seedlings are young.
* Optional: Fertilizer: A balanced liquid fertilizer can give your mustard greens a boost, but it’s not strictly necessary.
* Sunny Location: Mustard greens need at least 4-6 hours of sunlight per day.
* Gardening Gloves (Optional): To keep your hands clean.
Getting Started: Planting Your Mustard Green Seeds
Okay, now for the fun part! Planting the seeds is super easy.
1. Prepare Your Container: Fill your container with potting mix, leaving about an inch of space at the top. Gently pat down the soil to create a level surface.
2. Sow the Seeds: Sprinkle the mustard green seeds evenly over the surface of the soil. You don’t need to bury them too deep; about ¼ inch is perfect. I like to use my finger to make shallow furrows and then sprinkle the seeds in.
3. Cover the Seeds: Lightly cover the seeds with more potting mix.
4. Water Gently: Use a watering can or hose with a gentle spray nozzle to thoroughly moisten the soil. Be careful not to wash away the seeds.
5. Find a Sunny Spot: Place your container in a location that receives at least 4-6 hours of sunlight per day. A south-facing window or a sunny balcony is ideal.
6. Keep the Soil Moist: The soil should be consistently moist but not soggy. Check the soil moisture daily and water as needed.
Caring for Your Mustard Greens: From Seedling to Harvest
Now that your seeds are planted, it’s time to nurture them into delicious mustard greens.
1. Germination: Mustard green seeds typically germinate within 5-7 days. Keep an eye out for tiny sprouts emerging from the soil.
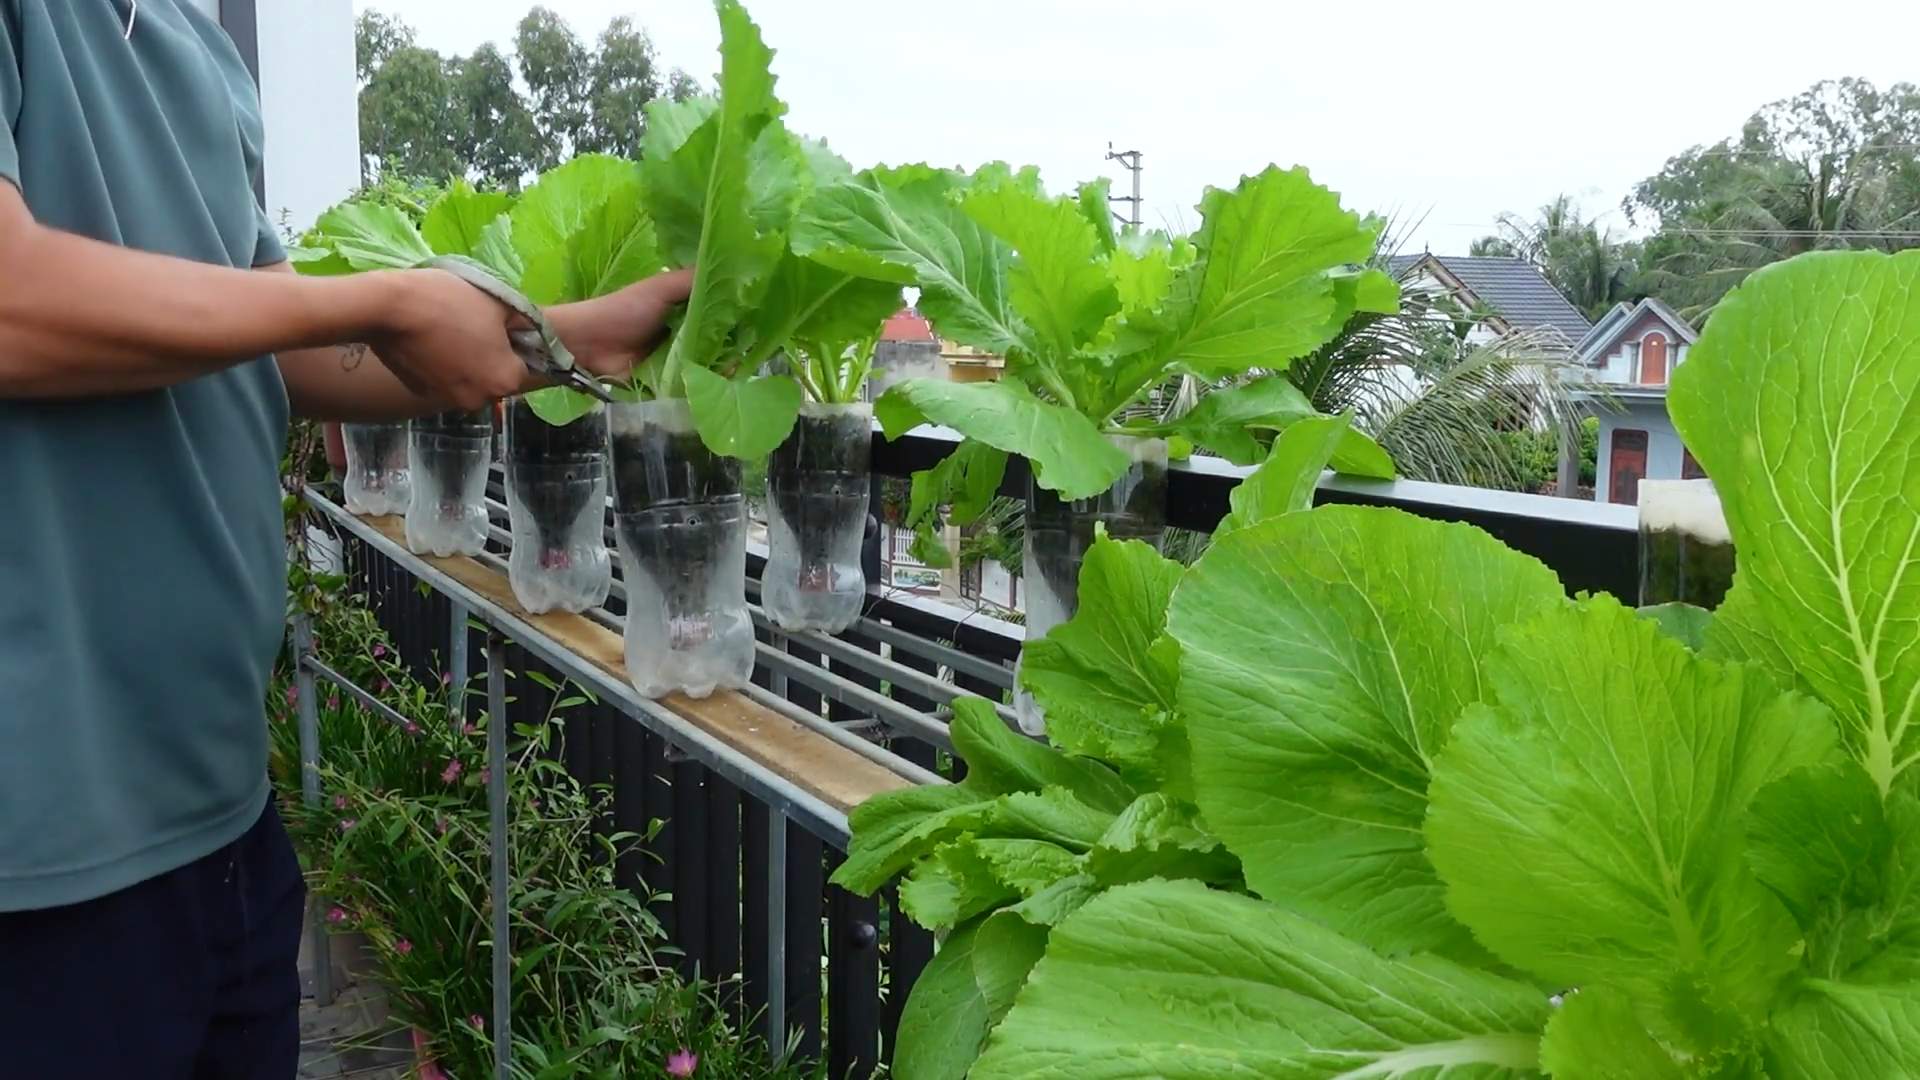
2. Thinning (Optional): Once the seedlings have a few true leaves (the second set of leaves that appear after the initial seed leaves), you can thin them out if they’re too crowded. This will give the remaining plants more room to grow. I usually aim for about 2-3 inches between plants. You can carefully snip off the extra seedlings at the soil line with scissors.
3. Watering: Continue to water your mustard greens regularly, keeping the soil consistently moist. Avoid overwatering, as this can lead to root rot. I usually water deeply when the top inch of soil feels dry to the touch.
4. Fertilizing (Optional): If you want to give your mustard greens a boost, you can fertilize them every 2-3 weeks with a balanced liquid fertilizer. Follow the instructions on the fertilizer label.
5. Pest Control: Mustard greens are generally pest-resistant, but they can occasionally be bothered by aphids or flea beetles. If you notice any pests, you can try spraying them with insecticidal soap or neem oil. I prefer to use organic methods whenever possible.
6. Weed Control: Keep an eye out for weeds and remove them promptly. Weeds can compete with your mustard greens for nutrients and water.
Harvesting Your Mustard Greens: Enjoying the Fruits (or Greens!) of Your Labor
This is the moment we’ve been waiting for! Harvesting your mustard greens is super satisfying.
1. When to Harvest: You can start harvesting your mustard greens when the leaves are about 4-6 inches long. This usually takes about 30-40 days after planting.
2. How to Harvest: You can harvest the entire plant at once by cutting it off at the base, or you can harvest individual leaves as needed. I prefer to harvest individual leaves, as this allows the plant to continue producing more greens.
3. Cut Outer Leaves: When harvesting individual leaves, start with the outer leaves, as these are the oldest and largest. Use scissors or a sharp knife to cut the leaves off near the base of the plant.
4. Wash and Enjoy: Wash your harvested mustard greens thoroughly before eating them. You can use them in salads, stir-fries, soups, or as a side dish.
Troubleshooting: Common Issues and Solutions
Even with the best care, you might encounter a few challenges along the way. Here are some common issues and how to address them:
* Yellowing Leaves: This could be a sign of overwatering, underwatering, or nutrient deficiency. Check the soil moisture and adjust your watering accordingly. If the soil is consistently moist, you may be overwatering. If the soil is dry, you may need to water more frequently. You can also try fertilizing your mustard greens with a balanced liquid fertilizer.
* Leggy Seedlings: This means your seedlings are stretching towards the light because they’re not getting enough. Make sure they’re in a sunny location or consider using a grow light.
* Pests: As mentioned earlier, aphids and flea beetles can sometimes be a problem. Spraying with insecticidal soap or neem oil can help control these pests.
* Bolting: Bolting is when the plant starts to produce flowers and seeds, which can make the leaves taste bitter. This is usually caused by hot weather. To prevent bolting, try to plant your mustard greens in early spring or late summer, when the temperatures are cooler. You can also provide shade during the hottest part of the day.
Tips for Success: Making the Most of Your Mustard Green Garden
Here are a few extra tips to help you grow the best mustard greens possible:
* Succession Planting: To ensure a continuous harvest, plant new seeds every 2-3 weeks. This is called succession planting.
* Choose the Right Variety: Different varieties of mustard greens have different flavors and textures. Experiment with different varieties to find your favorites.
* Provide Adequate Sunlight: Mustard greens need at least 4-6 hours of sunlight per day. If you don’t have a sunny location, consider using a grow light.
* Water Regularly: Keep the soil consistently moist but not soggy.
* Fertilize as Needed: A balanced liquid fertilizer can give your mustard greens a boost.
* Harvest Regularly: Harvesting regularly will encourage the plant to produce more leaves.
* Enjoy Your Harvest: Don’t forget to enjoy the delicious and nutritious mustard greens you’ve grown!
Mustard Green Varieties: Explore Your Options
There are so many different types of mustard greens to choose from! Here are a few popular varieties:
* Florida Broadleaf: A classic variety with a mild, slightly peppery flavor.
* Red Giant: A beautiful variety with reddish-purple leaves and a slightly milder taste than Florida Broadleaf.
* Southern Giant Curled: A variety with large, curly leaves and a strong, pungent flavor.
* Tendergreen: A mild and tender variety that’s great for salads.
* Mizuna: A Japanese mustard green with a mild, slightly peppery flavor and feathery leaves.
Mustard Greens in Different Climates: Adjusting Your Approach
Growing mustard greens is possible in a variety of climates, but you may need to adjust your approach depending on your location.
* Cool Climates: Mustard greens thrive in cool weather. Plant them in early spring or late summer for the best results. You may be able to grow them throughout the winter in mild climates.
* Warm Climates: Mustard greens can bolt (go to seed) in hot weather, which can make the leaves taste bitter. To prevent bolting, plant them in early spring or late summer, and provide shade during the hottest part of the day. You can also choose heat-tolerant varieties.
* Cold Climates: You can grow mustard greens indoors under grow lights during the winter.
Mustard Greens and Companion Planting: Growing Together
Companion planting is the practice of planting different crops together to
Conclusion
So, there you have it! Growing your own mustard greens at home is not just a fun project; it’s a gateway to fresher, more flavorful meals and a deeper connection with the food you eat. We’ve walked through the simple steps, from selecting the right seeds to harvesting your vibrant, peppery greens. The beauty of this DIY trick lies in its accessibility – even if you’re a complete beginner, you can successfully cultivate a thriving patch of mustard greens with minimal effort and resources.
Why is this a must-try? Because store-bought mustard greens simply can’t compare to the taste and nutritional value of homegrown ones. You control the growing environment, ensuring they’re free from harmful pesticides and herbicides. Plus, the satisfaction of harvesting something you’ve nurtured from seed is incredibly rewarding. Imagine adding a handful of freshly picked mustard greens to your morning smoothie, stir-fry, or salad – the burst of flavor and nutrients will elevate your dishes to a whole new level.
But the fun doesn’t stop there! Feel free to experiment with different varieties of mustard greens. Some are milder, while others pack a serious punch of spice. You can also try growing them in different containers, from raised beds to window boxes, to see what works best for your space. Consider companion planting – mustard greens are known to deter certain pests, making them a valuable addition to your garden.
And if you’re feeling adventurous, why not try pickling your mustard greens? This is a fantastic way to preserve your harvest and enjoy their unique flavor throughout the year. Or, you could even experiment with making your own mustard condiment using your homegrown greens – the possibilities are endless!
Don’t be intimidated by the idea of gardening. Growing mustard greens at home is a forgiving and rewarding experience. It’s a chance to connect with nature, learn new skills, and enjoy the fruits (or rather, the greens!) of your labor. We encourage you to give it a try. Start small, be patient, and don’t be afraid to experiment.
We’re confident that you’ll be amazed by how easy and enjoyable it is to grow your own mustard greens. And once you’ve tasted the difference between homegrown and store-bought, you’ll never go back!
So, grab some seeds, get your hands dirty, and embark on this exciting gardening adventure. And most importantly, don’t forget to share your experience with us! We’d love to hear about your successes, challenges, and creative ways you’re using your homegrown mustard greens. Share your photos and stories in the comments below – let’s inspire each other to grow more of our own food and embrace the joy of gardening. Let us know if you have any questions about how to **grow mustard greens at home**!
Frequently Asked Questions (FAQ)
What is the best time of year to plant mustard greens?
Mustard greens are a cool-season crop, meaning they thrive in cooler temperatures. The best time to plant them is in early spring or late summer/early fall. In spring, aim to plant them a few weeks before the last expected frost. For a fall harvest, plant them about 6-8 weeks before the first expected frost. Avoid planting during the hottest months of summer, as the heat can cause them to bolt (go to seed) and become bitter.
How much sunlight do mustard greens need?
Mustard greens need at least 4-6 hours of sunlight per day. While they can tolerate some shade, especially during the hottest part of the day, they will grow best in a sunny location. If you’re growing them indoors, make sure to provide them with adequate light, either through a sunny window or with grow lights.
What kind of soil is best for growing mustard greens?
Mustard greens prefer well-drained soil that is rich in organic matter. The ideal soil pH is between 6.0 and 7.5. Before planting, amend your soil with compost or other organic matter to improve its fertility and drainage. If your soil is heavy clay, consider adding sand or perlite to improve drainage.
How often should I water my mustard greens?
Mustard greens need consistent moisture to thrive. Water them regularly, especially during dry periods. Aim to keep the soil consistently moist but not waterlogged. Check the soil moisture by sticking your finger about an inch into the soil. If it feels dry, it’s time to water. Avoid overhead watering, as this can increase the risk of fungal diseases. Instead, water at the base of the plants.
How long does it take for mustard greens to mature?
Mustard greens are a fast-growing crop. They typically mature in about 4-6 weeks from planting. You can start harvesting the outer leaves as soon as they are large enough to eat, or you can wait until the entire plant is mature.
How do I harvest mustard greens?
You can harvest mustard greens by either cutting off the outer leaves as needed or by cutting the entire plant at the base. If you cut off the outer leaves, the plant will continue to produce new leaves for several weeks. If you cut the entire plant, you can either harvest it all at once or cut it into smaller pieces.
What are some common pests and diseases that affect mustard greens?
Some common pests that affect mustard greens include aphids, flea beetles, a
So, there you have it! Growing your own mustard greens at home is not just a fun project; it’s a gateway to fresher, more flavorful meals and a deeper connection with the food you eat. We’ve walked through the simple steps, from selecting the right seeds to harvesting your vibrant, peppery greens. The beauty of this DIY trick lies in its accessibility – even if you’re a complete beginner, you can successfully cultivate a thriving patch of mustard greens with minimal effort and resources.
Why is this a must-try? Because store-bought mustard greens simply can’t compare to the taste and nutritional value of homegrown ones. You control the growing environment, ensuring they’re free from harmful pesticides and herbicides. Plus, the satisfaction of harvesting something you’ve nurtured from seed is incredibly rewarding. Imagine adding a handful of freshly picked mustard greens to your morning smoothie, stir-fry, or salad – the burst of flavor and nutrients will elevate your dishes to a whole new level.
But the fun doesn’t stop there! Feel free to experiment with different varieties of mustard greens. Some are milder, while others pack a serious punch of spice. You can also try growing them in different containers, from raised beds to window boxes, to see what works best for your space. Consider companion planting – mustard greens are known to deter certain pests, making them a valuable addition to your garden.
And if you’re feeling adventurous, why not try pickling your mustard greens? This is a fantastic way to preserve your harvest and enjoy their unique flavor throughout the year. Or, you could even experiment with making your own mustard condiment using your homegrown greens – the possibilities are endless!
Don’t be intimidated by the idea of gardening. Growing mustard greens at home is a forgiving and rewarding experience. It’s a chance to connect with nature, learn new skills, and enjoy the fruits (or rather, the greens!) of your labor. We encourage you to give it a try. Start small, be patient, and don’t be afraid to experiment.
We’re confident that you’ll be amazed by how easy and enjoyable it is to grow your own mustard greens. And once you’ve tasted the difference between homegrown and store-bought, you’ll never go back!
So, grab some seeds, get your hands dirty, and embark on this exciting gardening adventure. And most importantly, don’t forget to share your experience with us! We’d love to hear about your successes, challenges, and creative ways you’re using your homegrown mustard greens. Share your photos and stories in the comments below – let’s inspire each other to grow more of our own food and embrace the joy of gardening. Let us know if you have any questions about how to **grow mustard greens at home**!
Frequently Asked Questions (FAQ)
What is the best time of year to plant mustard greens?
Mustard greens are a cool-season crop, meaning they thrive in cooler temperatures. The best time to plant them is in early spring or late summer/early fall. In spring, aim to plant them a few weeks before the last expected frost. For a fall harvest, plant them about 6-8 weeks before the first expected frost. Avoid planting during the hottest months of summer, as the heat can cause them to bolt (go to seed) and become bitter.
How much sunlight do mustard greens need?
Mustard greens need at least 4-6 hours of sunlight per day. While they can tolerate some shade, especially during the hottest part of the day, they will grow best in a sunny location. If you’re growing them indoors, make sure to provide them with adequate light, either through a sunny window or with grow lights.
What kind of soil is best for growing mustard greens?
Mustard greens prefer well-drained soil that is rich in organic matter. The ideal soil pH is between 6.0 and 7.5. Before planting, amend your soil with compost or other organic matter to improve its fertility and drainage. If your soil is heavy clay, consider adding sand or perlite to improve drainage.
How often should I water my mustard greens?
Mustard greens need consistent moisture to thrive. Water them regularly, especially during dry periods. Aim to keep the soil consistently moist but not waterlogged. Check the soil moisture by sticking your finger about an inch into the soil. If it feels dry, it’s time to water. Avoid overhead watering, as this can increase the risk of fungal diseases. Instead, water at the base of the plants.
How long does it take for mustard greens to mature?
Mustard greens are a fast-growing crop. They typically mature in about 4-6 weeks from planting. You can start harvesting the outer leaves as soon as they are large enough to eat, or you can wait until the entire plant is mature.
How do I harvest mustard greens?
You can harvest mustard greens by either cutting off the outer leaves as needed or by cutting the entire plant at the base. If you cut off the outer leaves, the plant will continue to produce new leaves for several weeks. If you cut the entire plant, you can either harvest it all at once or cut it into smaller pieces.
What are some common pests and diseases that affect mustard greens?
Some common pests that affect mustard greens include aphids, flea beetles, and cabbage worms. To control these pests, you can use insecticidal soap, neem oil, or row covers. Common diseases that affect mustard greens include downy mildew and white rust. To prevent these diseases, make sure to provide good air circulation and avoid overhead watering.
Can I grow mustard greens in containers?
Yes, mustard greens are well-suited for container gardening. Choose a container that is at least 6 inches deep and has drainage holes. Fill the container with a good-quality potting mix and plant the seeds according to the instructions on the seed packet. Water regularly and fertilize every few weeks with a balanced fertilizer.
How do I store mustard greens after harvesting?
After harvesting, wash the mustard greens thoroughly and dry them with a salad spinner or paper towels. Store them in a plastic bag in the refrigerator for up to a week. For longer storage, you can blanch and freeze them.
Are there any health benefits to eating mustard greens?
Yes, mustard greens are packed with nutrients. They are a good source of vitamins A, C, and K, as well as folate, calcium, and fiber. They also contain antioxidants that can help protect against chronic diseases. Eating mustard greens can help boost your immune system, improve your bone health, and promote healthy digestion.
Can I eat the mustard green stems?
Yes, the stems of mustard greens are edible, but they can be a bit tougher than the leaves. You can chop them up and add them to stir-fries, soups, or stews. You can also pickle them for a tangy and crunchy snack.
What are some different ways to use mustard greens in cooking?
Mustard greens are incredibly versatile and can be used in a variety of dishes. They can be eaten raw in salads, sautéed with garlic and olive oil, added to soups and stews, or used as a side dish. They pair well with other vegetables, meats, and grains. Some popular recipes include braised mustard greens, mustard green stir-fry, and mustard green and sausage soup.
How do I prevent mustard greens from becoming too bitter?
The bitterness of mustard greens can vary depending on the variety and growing conditions. To reduce bitterness, harvest the leaves when they are young and tender. You can also blanch the leaves in boiling water for a few minutes before cooking them. Adding an acid, such as vinegar or lemon juice, to the dish can also help to balance the bitterness.
Can I save seeds from my mustard greens to plant next year?
Yes, you can save seeds from your mustard greens, but it’s important to note that they may not come true to type, especially if you’re growing multiple varieties. To save seeds, allow a few plants to bolt and produce seed pods. Once the seed pods are dry and brown, harvest them and extract the seeds. Store the seeds in a cool, dry place until next year.

Leave a Comment