
Water saving tomato growing is easier than you think, and I’m here to show you how! Are you tired of watching your precious tomato plants wither under the summer sun, despite your best watering efforts? Or perhaps you’re concerned about the rising cost of water and want to find a more sustainable way to cultivate your garden? You’re not alone! For centuries, gardeners have sought innovative methods to conserve water while maximizing their yields, and the quest continues today.
From ancient irrigation systems in arid climates to modern-day drought-resistant varieties, the history of gardening is intertwined with the need for water conservation. Now, more than ever, it’s crucial to adopt practices that are both environmentally friendly and effective. That’s why I’ve compiled a list of simple yet powerful DIY tricks and hacks that will revolutionize your water saving tomato growing efforts.
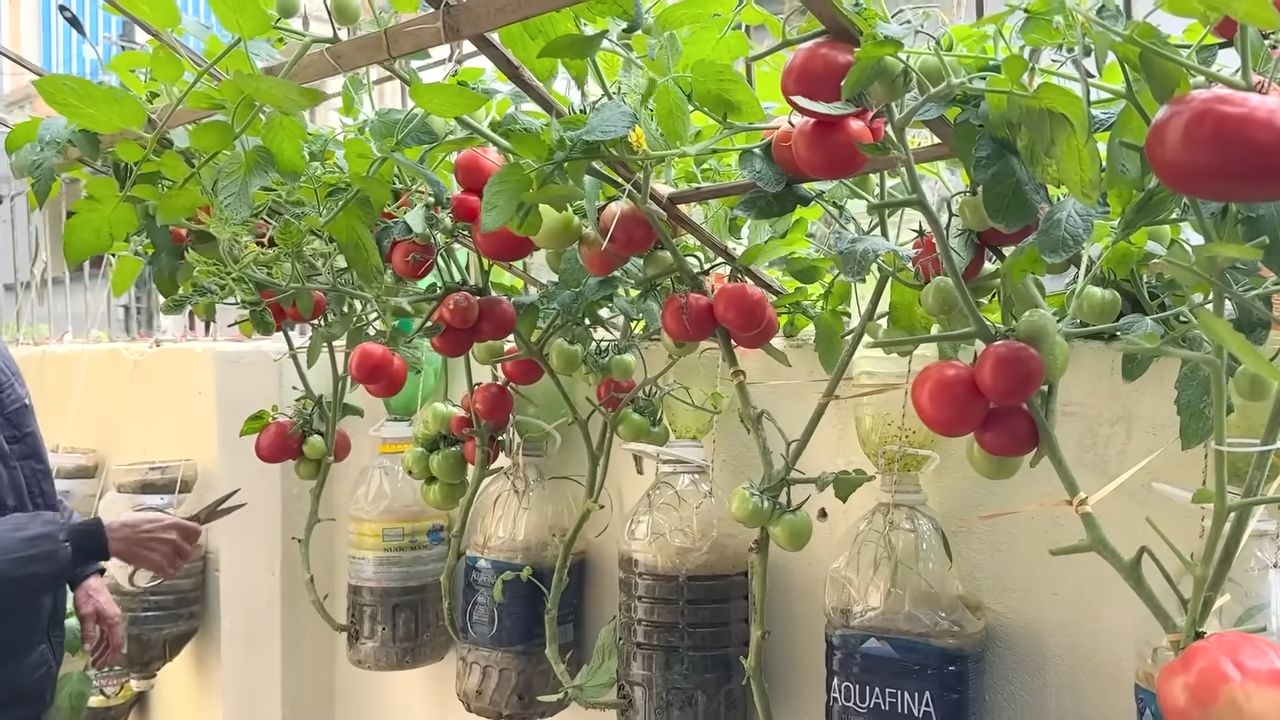
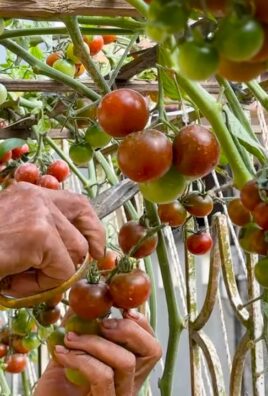
Imagine plump, juicy tomatoes bursting with flavor, all while using significantly less water. These techniques are not only good for the planet but also for your wallet. Plus, they’re surprisingly easy to implement, even if you’re a beginner gardener. So, grab your gardening gloves, and let’s dive into the world of water-wise tomato cultivation!
Wasser sparen beim Tomatenanbau: Ein DIY-Bewässerungssystem für üppige Ernten
Hallo liebe Gartenfreunde! Ich bin total begeistert, euch heute einen genialen Trick zu zeigen, wie ihr beim Tomatenanbau Wasser sparen und gleichzeitig eure Pflanzen optimal versorgen könnt. Wir bauen ein einfaches, aber effektives DIY-Bewässerungssystem, das direkt an den Wurzeln der Tomaten arbeitet. Das bedeutet: Weniger Wasserverbrauch, weniger Unkrautwachstum und glücklichere, ertragreichere Tomatenpflanzen!
Warum dieses Bewässerungssystem so toll ist
* Wassersparend: Das Wasser gelangt direkt zu den Wurzeln, wodurch Verdunstung minimiert wird.
* Effizient: Die Pflanzen erhalten genau die Wassermenge, die sie benötigen.
* Unkrautreduzierend: Die Oberfläche des Bodens bleibt trockener, was das Unkrautwachstum hemmt.
* Einfach und kostengünstig: Die Materialien sind leicht zu beschaffen und der Aufbau ist kinderleicht.
* Nachhaltig: Wir nutzen recycelte Materialien und schonen die Umwelt.
Was du brauchst: Die Materialliste
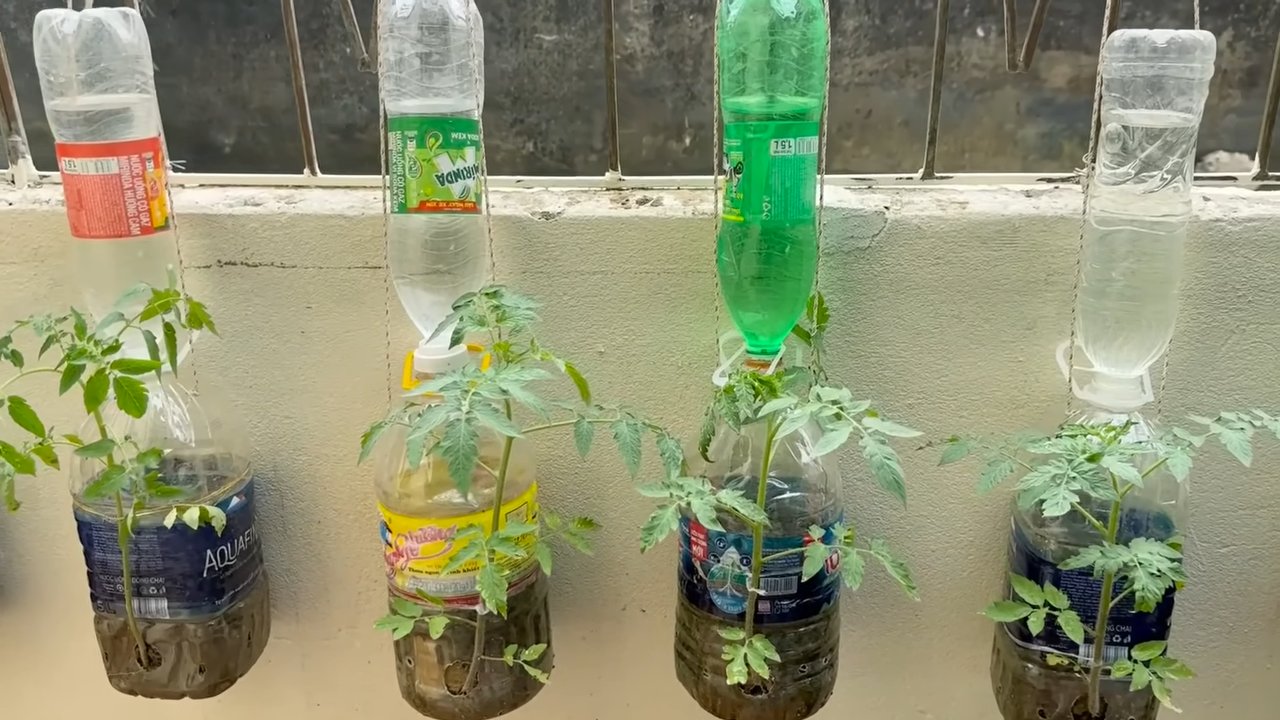
* Leere Plastikflaschen (PET): Am besten 1,5-Liter- oder 2-Liter-Flaschen. Je mehr Tomatenpflanzen, desto mehr Flaschen. Ich empfehle mindestens eine Flasche pro Pflanze.
* Bohrmaschine oder Schraubenzieher: Zum Bohren von Löchern in die Flaschen.
* Messer oder Schere: Zum Zuschneiden der Flaschen.
* Grobkörniger Sand oder Kies: Für die Drainage in den Flaschen.
* Gartenerde: Zum Auffüllen der Flaschen.
* Mulchmaterial (z.B. Stroh, Holzhackschnitzel): Um den Boden um die Pflanzen herum zu bedecken.
* Optional: Ein alter Stofflappen oder ein Stück Vlies, um das Loch im Flaschenhals abzudecken.
Schritt-für-Schritt-Anleitung: So baust du dein Bewässerungssystem
Phase 1: Die Vorbereitung der Flaschen
1. Flaschen reinigen: Zuerst müssen die Plastikflaschen gründlich gereinigt werden. Entferne alle Etiketten und spüle sie mit Wasser und Spülmittel aus. Achte darauf, dass keine Spülmittelreste zurückbleiben.
2. Löcher bohren: Jetzt kommt der wichtigste Teil: das Bohren der Löcher. Nimm deine Bohrmaschine oder deinen Schraubenzieher und bohre mehrere kleine Löcher (ca. 3-5 mm Durchmesser) in den unteren Teil der Flasche. Die Löcher sollten sich über die gesamte untere Hälfte verteilen. Ich empfehle, zuerst ein paar Löcher zu bohren und dann zu testen, ob das Wasser gut abfließt. Wenn nicht, kannst du immer noch weitere Löcher hinzufügen.
3. Flaschenhals abschneiden: Schneide den Flaschenhals mit einem Messer oder einer Schere ab. Der Schnitt sollte etwa 5-10 cm unterhalb des Flaschenhalses erfolgen. Der abgeschnittene Flaschenhals wird später als Trichter dienen.
Phase 2: Die Installation im Garten
1. Löcher graben: Grabe für jede Tomatenpflanze ein Loch in der Nähe der Wurzeln. Das Loch sollte so tief sein, dass die Plastikflasche bis zum abgeschnittenen Hals darin versenkt werden kann. Achte darauf, dass die Flasche stabil steht und nicht umkippt.
2. Drainage einfüllen: Fülle den Boden der Flasche mit einer Schicht grobkörnigem Sand oder Kies. Diese Schicht dient als Drainage und verhindert, dass die Erde die Löcher verstopft. Eine Schicht von etwa 5-7 cm ist ideal.
3. Erde einfüllen: Fülle den Rest der Flasche mit Gartenerde auf. Drücke die Erde leicht an, damit sie sich setzt.
4. Flaschenhals einsetzen: Setze den abgeschnittenen Flaschenhals umgedreht in die Flasche ein. Er dient als Trichter, um das Wasser leichter einzufüllen.
5. Optional: Stofflappen oder Vlies: Wenn du verhindern möchtest, dass Erde in den Flaschenhals gelangt, kannst du ein Stück Stofflappen oder Vlies über das Loch legen, bevor du den Flaschenhals einsetzt.
6. Tomatenpflanze einsetzen: Setze die Tomatenpflanze vorsichtig in das Loch neben der Flasche. Achte darauf, die Wurzeln nicht zu beschädigen.
7. Boden auffüllen: Fülle das Loch um die Tomatenpflanze herum mit Erde auf und drücke sie leicht an.
8. Mulchen: Bedecke den Boden um die Tomatenpflanze und die Flasche herum mit Mulchmaterial. Das Mulchmaterial hilft, die Feuchtigkeit im Boden zu halten und das Unkrautwachstum zu reduzieren.
Phase 3: Die Bewässerung
1. Wasser einfüllen: Fülle die Plastikflasche über den Flaschenhals-Trichter mit Wasser. Das Wasser sickert langsam durch die Löcher in den Boden und versorgt die Wurzeln der Tomatenpflanze direkt.
2. Regelmäßig kontrollieren: Kontrolliere regelmäßig den Wasserstand in den Flaschen und fülle sie bei Bedarf nach. Die Häufigkeit der Bewässerung hängt von verschiedenen Faktoren ab, wie z.B. der Wetterlage, der Bodenbeschaffenheit und dem Entwicklungsstadium der Tomatenpflanzen. Ich gieße meine Tomaten in der Regel alle 2-3 Tage, wenn es nicht regnet.
3. Düngen: Du kannst auch Flüssigdünger in das Wasser geben, um die Tomatenpflanzen zusätzlich zu versorgen. Achte dabei auf die Dosierungsanleitung des Düngers.
Zusätzliche Tipps für eine erfolgreiche Tomatenernte
* Standort: Tomaten lieben die Sonne! Wähle einen sonnigen Standort für deine Tomatenpflanzen.
* Boden: Der Boden sollte locker, humusreich und gut durchlässig sein.
* Stützen: Tomatenpflanzen brauchen Unterstützung, besonders wenn sie viele Früchte tragen. Verwende Tomatenstäbe oder ein Tomatennetz, um die Pflanzen zu stützen.
* Ausgeizen: Entferne regelmäßig die Seitentriebe (Geiztriebe) der Tomatenpflanzen, um die Bildung von Früchten zu fördern.
* Schutz vor Krankheiten: Achte auf Anzeichen von Krankheiten und Schädlingen und ergreife gegebenenfalls Maßnahmen.
Variationen und Erweiterungen
* Mehrere Flaschen pro Pflanze: Bei sehr durstigen Tomatensorten oder in sehr trockenen Regionen kannst du auch mehrere Flaschen pro Pflanze verwenden.
* Verbindung mehrerer Flaschen: Du kannst mehrere Flaschen mit einem Schlauch verbinden, um ein größeres Bewässerungssystem zu schaffen.
* Automatische Bewässerung: Mit einem kleinen Bewässerungscomputer und einem Tropfschlauch kannst du das System sogar automatisieren.
Ich hoffe, diese Anleitung hilft dir dabei, beim Tomatenanbau Wasser zu sparen und gleichzeitig eine reiche Ernte zu erzielen. Viel Spaß beim Gärtnern! Und denk daran: Jede kleine Maßnahme zählt, um unsere Umwelt zu schonen. Lass es mich wissen, wenn du Fragen hast oder deine Erfahrungen teilen möchtest!
Conclusion
So, there you have it! This simple, yet incredibly effective, water-saving tomato growing trick is a game-changer for any gardener, regardless of experience level. We’ve walked you through the process, highlighting the benefits of reduced water consumption, healthier plants, and a more bountiful harvest. It’s not just about saving water; it’s about optimizing your gardening efforts and creating a sustainable system that benefits both your plants and the environment.
This method, focusing on deep watering directly to the roots, minimizes water loss through evaporation and runoff. This means more water reaches your tomato plants where they need it most, leading to stronger root systems and more vigorous growth. Imagine the satisfaction of watching your tomato plants thrive, knowing you’re using less water and contributing to a more eco-friendly gardening practice.
But the beauty of this water-saving tomato growing technique lies in its adaptability. Feel free to experiment with different materials for your watering containers. Plastic bottles work great, but you could also use terracotta pots buried in the soil for a more aesthetically pleasing and naturally porous option. Consider adding a layer of mulch around your tomato plants to further reduce evaporation and suppress weeds. Straw, wood chips, or even shredded leaves can work wonders.
For those in particularly hot and dry climates, you might want to consider using larger containers or even multiple containers per plant to ensure adequate water delivery. Conversely, if you live in an area with frequent rainfall, you might need to adjust the frequency of watering to avoid overwatering. The key is to observe your plants and adjust your watering schedule accordingly.
Don’t be afraid to get creative and tailor this method to your specific needs and preferences. Perhaps you want to incorporate a slow-release fertilizer into the watering container to provide your plants with a continuous supply of nutrients. Or maybe you want to add a layer of gravel at the bottom of the container to improve drainage. The possibilities are endless!
We wholeheartedly encourage you to try this water-saving tomato growing trick in your own garden. It’s a simple, cost-effective, and environmentally friendly way to grow healthier, more productive tomato plants. And most importantly, we want to hear about your experiences! Share your photos, tips, and variations in the comments below. Let’s create a community of gardeners who are passionate about sustainable gardening practices and delicious, homegrown tomatoes. Together, we can make a difference, one tomato plant at a time. Let us know what worked for you, what challenges you faced, and any innovative solutions you came up with. Your feedback will help other gardeners learn and improve their own water-saving tomato growing techniques. So, get out there, get your hands dirty, and start growing! We can’t wait to see what you create.
Frequently Asked Questions (FAQ)
What type of container is best for this water-saving method?
The best type of container is one that is durable, readily available, and allows for easy water flow. Plastic bottles (with the bottom cut off and holes drilled) are a popular and cost-effective choice. However, you can also use terracotta pots, PVC pipes, or even repurposed containers. The key is to ensure the container is buried deep enough to reach the root zone and that it has adequate drainage holes to prevent waterlogging. Consider the size of your tomato plant when choosing a container; larger plants will require larger containers to provide sufficient water.
How often should I water my tomato plants using this method?
The frequency of watering depends on several factors, including the climate, soil type, and the size of your tomato plants. As a general rule, check the soil moisture around the base of the plant regularly. If the soil feels dry to the touch, it’s time to water. In hot, dry climates, you may need to water daily or every other day. In cooler, more humid climates, you may only need to water once or twice a week. The best way to determine the right watering schedule is to observe your plants and adjust accordingly. Look for signs of overwatering (yellowing leaves, wilting) or underwatering (drooping leaves, dry soil).
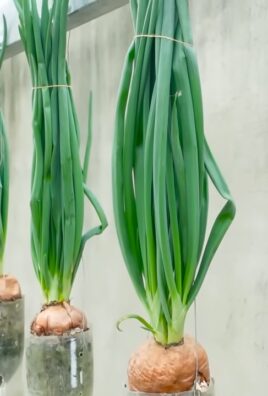
Can I use this method for other plants besides tomatoes?
Yes, this water-saving method can be used for a variety of other plants, especially those that benefit from deep watering, such as peppers, eggplants, and squash. The principle remains the same: deliver water directly to the root zone to minimize evaporation and runoff. You may need to adjust the size of the container and the frequency of watering depending on the specific needs of the plant. For example, plants with shallow root systems may not benefit as much from this method as plants with deep root systems.
What type of soil is best for this water-saving tomato growing technique?
Well-draining soil is essential for this method to prevent waterlogging and root rot. A loamy soil, which is a mixture of sand, silt, and clay, is ideal. You can also amend your soil with compost or other organic matter to improve drainage and fertility. Avoid using heavy clay soils, as they tend to retain too much water. If you have clay soil, you can amend it with sand and organic matter to improve drainage.
How deep should I bury the watering container?
The watering container should be buried deep enough to reach the root zone of your tomato plants. As a general rule, bury the container so that the top is a few inches below the soil surface. This will allow the water to seep directly into the roots without evaporating. The depth will also depend on the size of your tomato plant and the depth of its root system.
What are the benefits of using this water-saving method?
The benefits of this water-saving method are numerous. It reduces water consumption, promotes healthier plant growth, minimizes weed growth, and saves you time and effort. By delivering water directly to the roots, you’re ensuring that your plants receive the moisture they need without wasting water through evaporation or runoff. This method also helps to prevent fungal diseases by keeping the foliage dry.
Can I add fertilizer to the watering container?
Yes, you can add fertilizer to the watering container to provide your plants with a continuous supply of nutrients. Use a slow-release fertilizer or a liquid fertilizer diluted according to the manufacturer’s instructions. Be careful not to over-fertilize, as this can damage your plants. It’s always best to err on the side of caution and start with a lower concentration of fertilizer.
What if I live in an area with heavy rainfall?
If you live in an area with heavy rainfall, you may need to adjust the frequency of watering or even remove the watering containers during periods of heavy rain to prevent overwatering. Monitor the soil moisture closely and adjust your watering schedule accordingly. You can also add drainage holes to the bottom of the containers to allow excess water to escape.
How does this method help prevent weeds?
By delivering water directly to the roots of your tomato plants, you’re minimizing the amount of water available to weeds on the surface of the soil. This helps to suppress weed growth and reduces the need for weeding. Additionally, the mulch that you add around your tomato plants will further help to prevent weeds from germinating.
Is this method suitable for container gardening?
Yes, this method is suitable for container gardening. In fact, it can be particularly beneficial for container gardening, as it helps to conserve water and prevent the soil from drying out quickly. Just make sure to choose a container that is large enough to accommodate the watering container and the root system of your tomato plant.
Leave a Comment