
Grow Asparagus at Home? Absolutely! Imagine stepping into your backyard and harvesting fresh, tender asparagus spears, ready to be steamed, grilled, or tossed into a vibrant spring salad. It’s not just a dream; it’s an achievable reality with a little know-how and some simple DIY techniques. For centuries, asparagus has been prized for its delicate flavor and nutritional benefits, gracing the tables of royalty and commoners alike. The ancient Romans even cultivated it, recognizing its value as both a culinary delight and a medicinal herb.
But why should you bother to grow asparagus at home? Well, store-bought asparagus can be expensive and often lacks the freshness and flavor of homegrown varieties. Plus, there’s something incredibly satisfying about nurturing a plant from the ground up and enjoying the fruits (or rather, spears!) of your labor. In this article, I’m going to share some easy-to-follow DIY tricks and hacks that will empower you to cultivate your own thriving asparagus patch, even if you’re a complete beginner. Get ready to transform your garden and your plate with this delicious and rewarding vegetable!
Growing Asparagus at Home: A Beginner’s Guide
Asparagus, that delicious and slightly grassy spring vegetable, is surprisingly easy to grow at home! While it takes a little patience upfront, the rewards are years of fresh, homegrown asparagus spears. I’m going to walk you through everything you need to know to successfully cultivate your own asparagus patch, from choosing the right location to harvesting your first crop.
Choosing the Right Location and Preparing the Soil
Asparagus is a perennial, meaning it will come back year after year. So, choosing the right location is crucial. You want a spot where it can thrive undisturbed for potentially 15-20 years!
* Sunlight: Asparagus needs at least 6-8 hours of direct sunlight per day. The more sun, the better the spear production.
* Soil: Well-drained soil is essential. Asparagus crowns will rot in soggy conditions. Sandy loam is ideal, but you can amend heavier clay soils.
* Space: Give your asparagus plants plenty of room. Each plant needs about 18 inches of space, and rows should be spaced 4-5 feet apart. This allows for good air circulation and prevents overcrowding.
* Avoid Shady Areas: Don’t plant near trees or large shrubs that will compete for sunlight and nutrients.
Now, let’s talk about soil preparation. This is arguably the most important step, as asparagus is a heavy feeder.
1. Soil Testing: Before you do anything, get your soil tested. This will tell you the pH level and nutrient content. Asparagus prefers a soil pH between 6.5 and 7.5. You can usually get a soil test done through your local agricultural extension office.
2. Amending the Soil: Based on your soil test results, amend the soil accordingly.
* For acidic soil (pH below 6.5): Add lime to raise the pH. Follow the instructions on the lime package for the correct amount.
* For alkaline soil (pH above 7.5): Add sulfur to lower the pH. Again, follow package instructions.
* For poor soil: Incorporate plenty of organic matter, such as compost, well-rotted manure, or peat moss. This will improve drainage, aeration, and nutrient content. I usually add a generous layer (4-6 inches) of compost and work it into the top 12 inches of soil.
3. Tilling or Digging: Thoroughly till or dig the soil to a depth of at least 12 inches. This will loosen the soil and make it easier for the asparagus roots to establish. Remove any rocks, weeds, or debris.
4. Creating Trenches: Dig trenches that are 6-8 inches deep and about 12 inches wide. These trenches will be where you plant your asparagus crowns.
Choosing and Planting Asparagus Crowns
You have two options for starting asparagus: seeds or crowns. While you can grow asparagus from seed, it takes much longer (about 3 years) to harvest. Crowns, which are one-year-old plants, are the faster and more common option.
* Choosing Crowns: Look for healthy, plump crowns with plenty of roots. Avoid crowns that are dry, shriveled, or moldy. Jersey Knight, Jersey Giant, and Millennium are popular and productive varieties. I personally like Jersey Knight for its disease resistance.
* Soaking Crowns: Before planting, soak the crowns in water for about an hour. This will rehydrate them and give them a good start.
Now, let’s get those crowns in the ground!
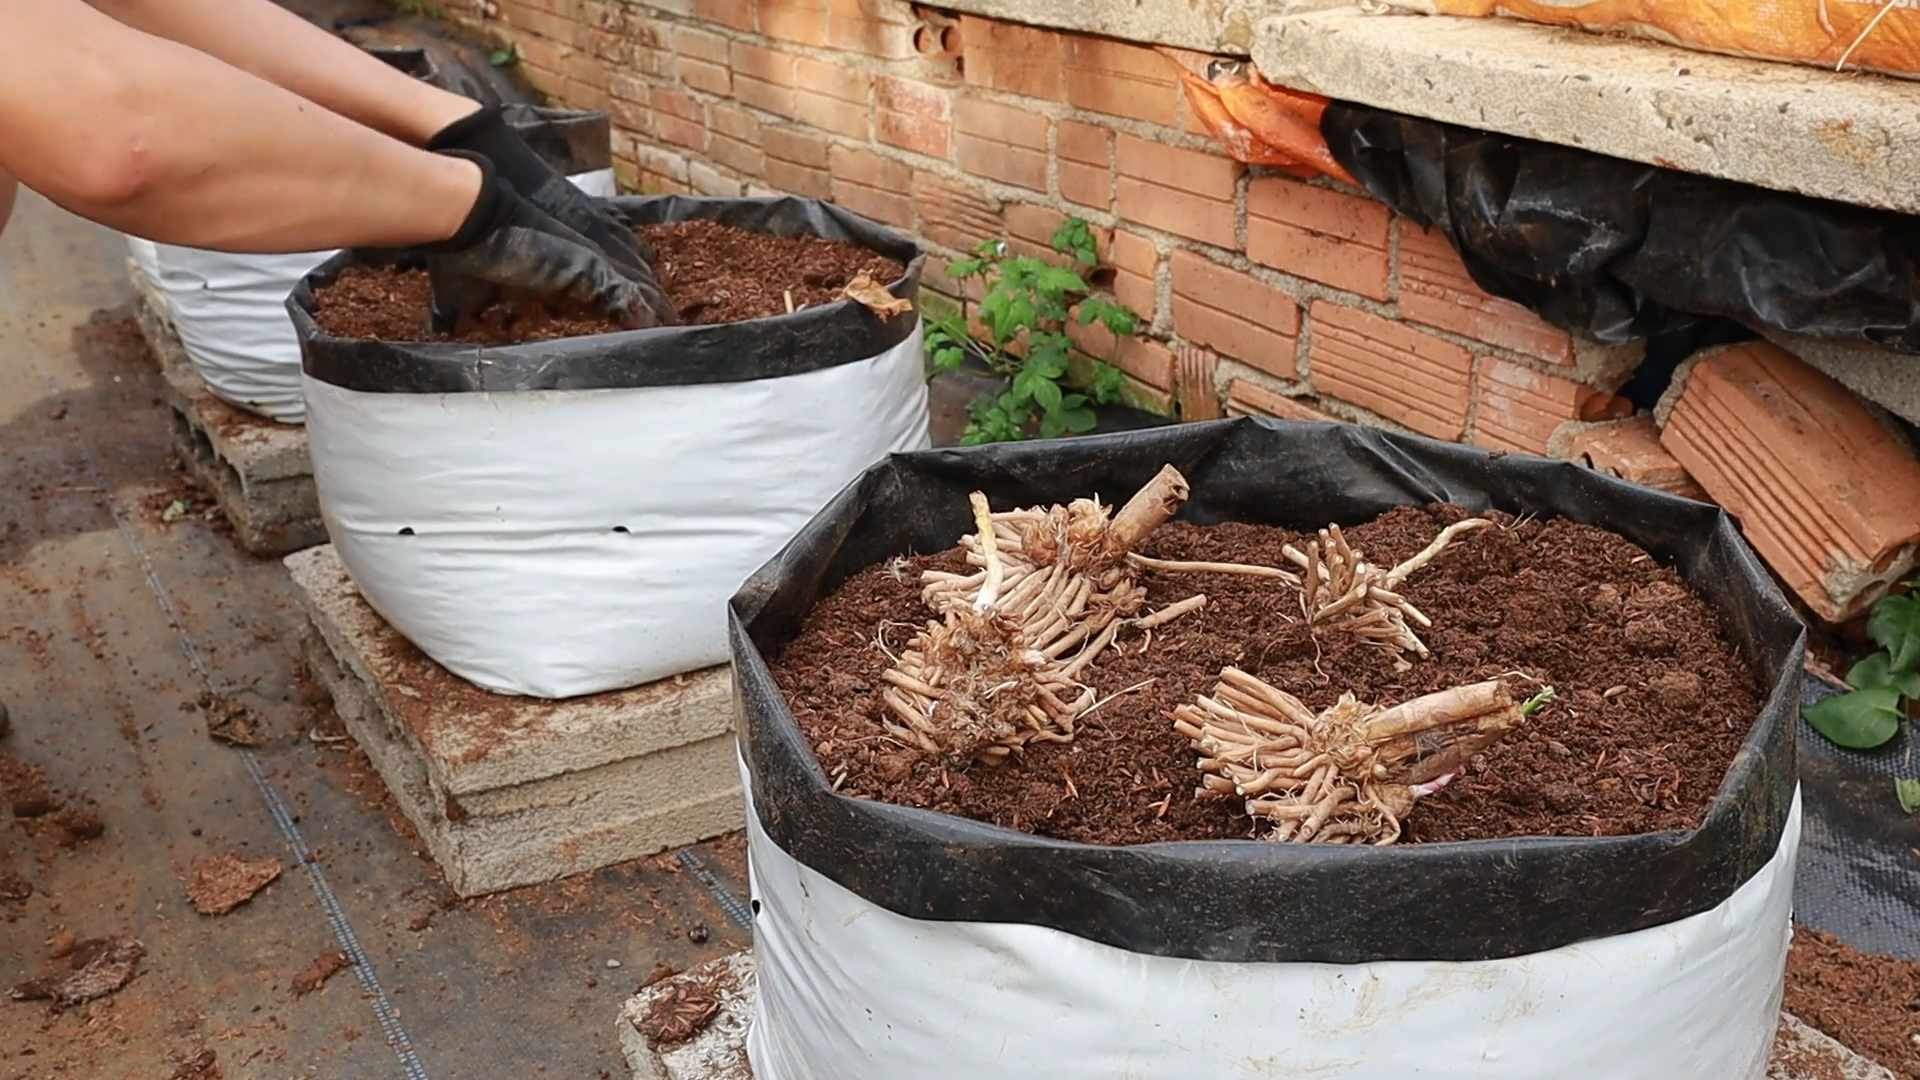
1. Mounding Soil: In the bottom of each trench, create a small mound of soil. This mound will support the crown and allow the roots to spread out.
2. Placing the Crowns: Place the asparagus crown on top of the mound, with the roots spread out around it like an octopus.
3. Covering the Crowns: Gently cover the crown with about 2 inches of soil. Don’t bury it too deep!
4. Watering: Water the newly planted crowns thoroughly.
5. Gradually Filling the Trench: As the asparagus spears emerge, gradually fill in the trench with soil. This will encourage the plant to develop a strong root system. Continue filling the trench until it is level with the surrounding ground.
Caring for Your Asparagus Patch
Asparagus requires regular care to thrive. Here’s what you need to do:
* Watering: Water deeply and regularly, especially during dry periods. Asparagus needs consistent moisture, but avoid overwatering, which can lead to root rot. Aim for about 1 inch of water per week.
* Weeding: Keep the asparagus patch free of weeds. Weeds compete with asparagus for nutrients and water. Hand-pull weeds regularly or use a hoe to cultivate the soil. Be careful not to damage the asparagus spears or roots.
* Fertilizing: Fertilize your asparagus patch in early spring and again after the harvest season. Use a balanced fertilizer, such as 10-10-10, or a fertilizer specifically formulated for vegetables. Follow the instructions on the fertilizer package for the correct amount. I also like to side-dress with compost throughout the growing season.
* Mulching: Apply a layer of mulch around the asparagus plants. Mulch helps to retain moisture, suppress weeds, and regulate soil temperature. Organic mulches, such as straw, wood chips, or shredded leaves, are ideal.
* Pest and Disease Control: Asparagus is relatively pest and disease-resistant, but keep an eye out for common problems, such as asparagus beetles and crown rot.
* Asparagus Beetles: These beetles can damage the spears and foliage. Hand-pick them off the plants or use an insecticidal soap.
* Crown Rot: This fungal disease can cause the crowns to rot. Prevent crown rot by ensuring good drainage and avoiding overwatering. If you suspect crown rot, remove the affected plants and dispose of them properly.
Harvesting Asparagus
Patience is key when it comes to harvesting asparagus. You shouldn’t harvest any spears during the first two years after planting. This allows the plants to establish a strong root system.
* Year 1 & 2: No Harvesting! Let the spears grow into ferns. This is crucial for building the plant’s energy reserves.
* Year 3: Light Harvest. In the third year, you can harvest spears for a short period (about 2-3 weeks).
* Year 4 and Beyond: Full Harvest. From the fourth year on, you can harvest spears for a longer period (about 6-8 weeks).
Here’s how to harvest asparagus:
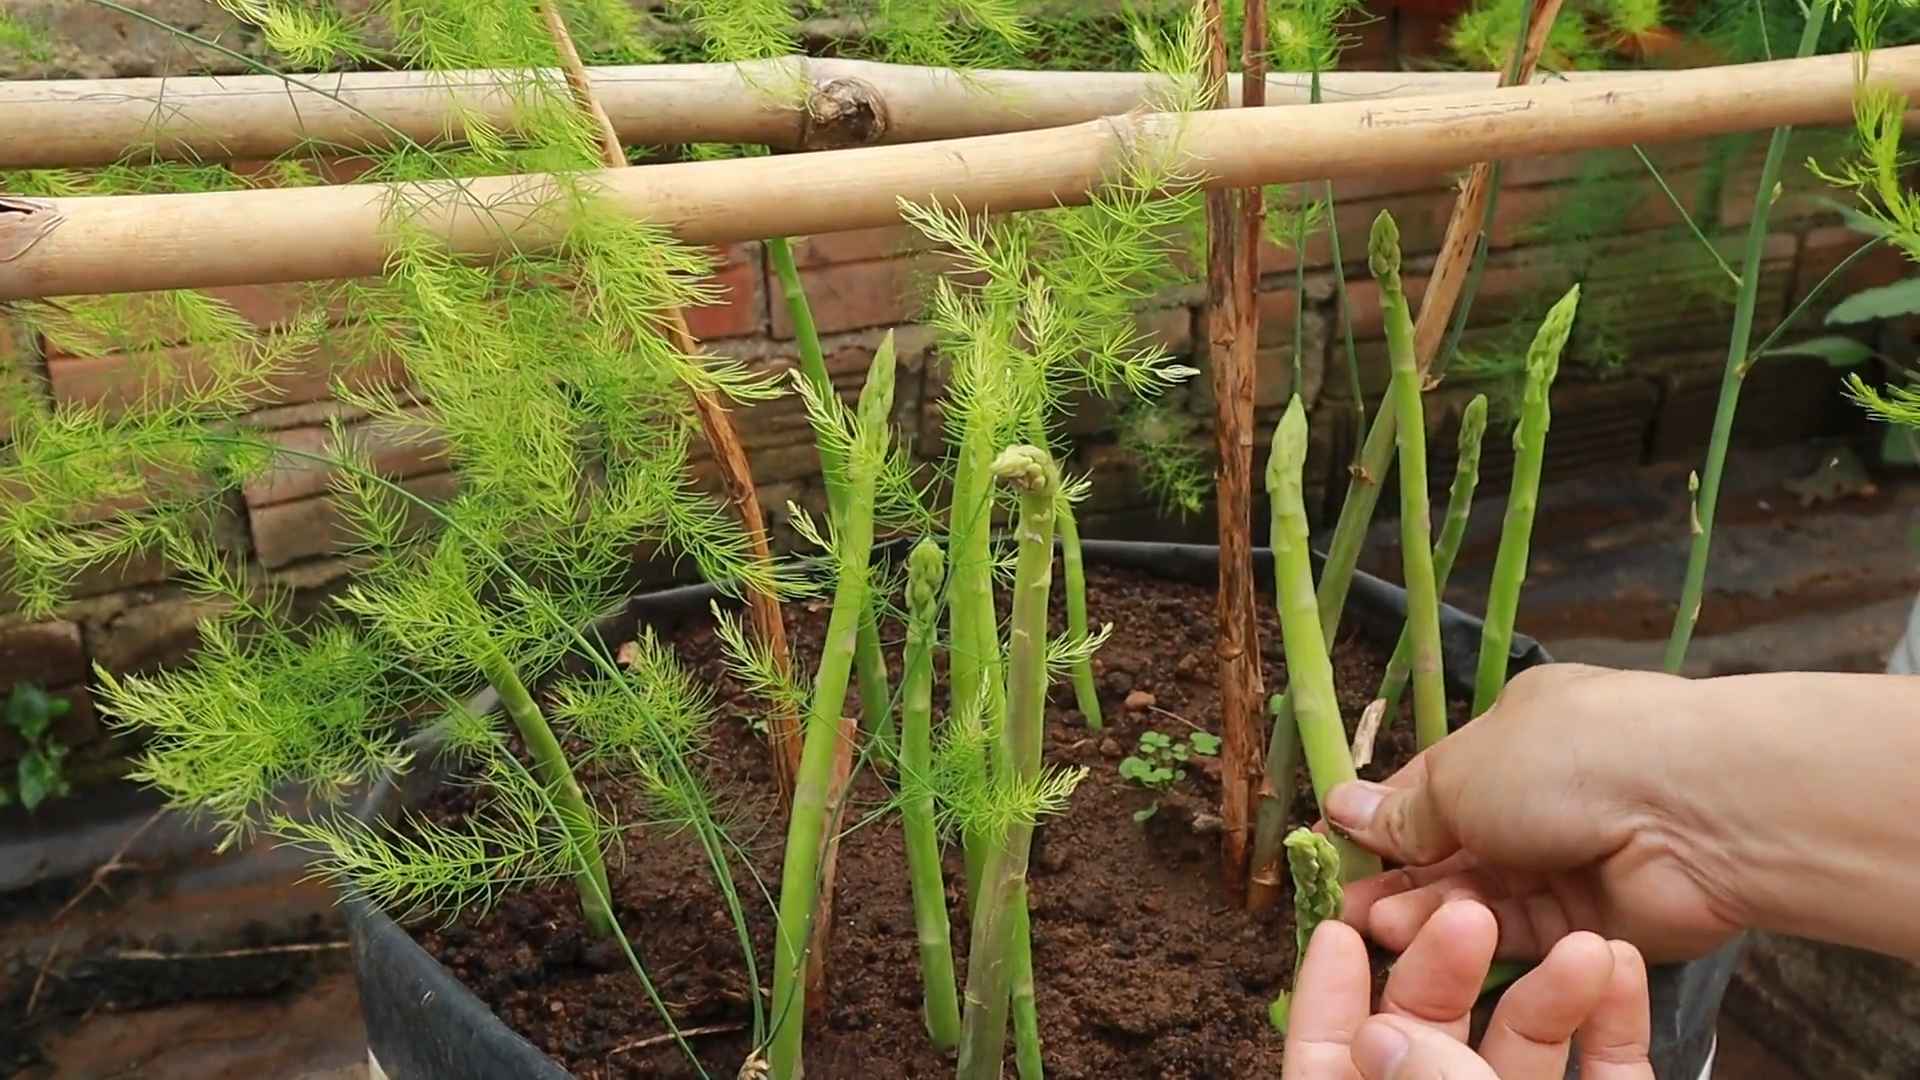
1. Harvesting Time: Harvest asparagus spears when they are about 6-8 inches tall and the tips are still tightly closed.
2. Cutting or Snapping: You can either cut or snap the spears off at ground level. I prefer to snap them off, as this is less likely to damage the crown.
3. Harvesting Frequency: Harvest spears every day or every other day during the peak harvest season.
4. Stop Harvesting: Stop harvesting when the spears become thin and spindly. This indicates that the plant is starting to exhaust its energy reserves.
Post-Harvest Care
After the harvest season, let the asparagus ferns grow and mature. These ferns will photosynthesize and store energy for the next year’s crop.
1. Fertilizing: Fertilize the asparagus patch after the harvest season to replenish nutrients.
2. Watering: Continue to water the asparagus patch regularly, especially during dry periods.
3. Cutting Back Ferns: In late fall or early winter, after the ferns have turned brown and died back, cut them back to ground level. This will help to prevent disease and pests from overwintering in the asparagus patch.
4. Mulching: Apply a fresh layer of mulch to protect the crowns from the cold winter weather.
Troubleshooting
Even with the best care, you may encounter some problems with your asparagus patch. Here are some common issues and how to address them:
* Thin Spears: Thin spears can be caused by a number of factors, including poor soil, lack of nutrients, or overharvesting. Amend the soil with compost, fertilize regularly, and avoid overharvesting.
* Yellowing Ferns: Yellowing ferns can be caused by a lack of water, nutrients, or disease. Water deeply and regularly, fertilize as needed, and check for signs of disease.
* Asparagus Beetles: Hand-pick asparagus beetles off the plants or use an insecticidal soap.
* Crown Rot: Ensure good drainage and avoid overwatering to prevent crown rot. If you suspect crown rot, remove the affected plants and dispose of them properly.
Enjoying Your Homegrown Asparagus
Now that you’ve successfully grown your own asparagus, it
Conclusion
So, there you have it! Growing asparagus at home isn’t just a gardening project; it’s an investment in years of delicious, healthy harvests. Forget those limp, expensive spears from the grocery store. Imagine stepping into your backyard and snipping fresh, vibrant asparagus, bursting with flavor and nutrients. This DIY trick transforms your garden into a source of culinary delight, offering a taste experience you simply can’t replicate with store-bought produce.
Why is this a must-try? Because it’s more than just growing a vegetable. It’s about connecting with your food, understanding its journey from seed (or crown) to plate, and enjoying the unparalleled satisfaction of nurturing something from the earth. It’s about having access to the freshest possible asparagus, picked at its peak ripeness, whenever you desire. And let’s be honest, it’s also about saving money in the long run!
But the benefits extend beyond the purely practical. Asparagus is a perennial plant, meaning it will return year after year with minimal effort once established. Think of it as a gift that keeps on giving, a sustainable source of food that enhances your garden’s biodiversity and beauty. Plus, the feathery foliage of mature asparagus plants adds an elegant touch to any landscape.
Ready to take your asparagus growing to the next level? Consider these variations:
* Container Gardening: If you’re short on space, don’t despair! Asparagus can be successfully grown in large containers. Just ensure they have excellent drainage and are filled with a rich, well-draining potting mix. Choose a dwarf variety for best results.
* Companion Planting: Asparagus thrives when planted alongside certain companion plants. Tomatoes, parsley, and basil are excellent choices, as they help deter pests and improve the overall health of your asparagus bed.
* Different Varieties: Explore the world of asparagus varieties! ‘Jersey Knight’ is a popular choice for its high yields and disease resistance, while ‘Purple Passion’ offers a unique color and sweeter flavor. Experiment to find your favorite!
* Succession Planting: To extend your harvest season, consider succession planting. Plant new asparagus crowns every few weeks to ensure a continuous supply of fresh spears throughout the spring.
Don’t be intimidated by the initial setup. Growing asparagus at home is a rewarding experience that will bring you years of enjoyment. The key is patience and proper preparation. Remember to choose a sunny location, prepare the soil thoroughly, and provide adequate water and nutrients.
We’re confident that you’ll be amazed by the results. So, grab your gardening gloves, order some asparagus crowns, and get ready to embark on this exciting culinary adventure. We encourage you to try this DIY trick and experience the joy of harvesting your own fresh asparagus.
And most importantly, we want to hear about your experience! Share your tips, tricks, and triumphs in the comments below. Let’s build a community of asparagus enthusiasts and learn from each other. What variety did you choose? What challenges did you face? What delicious dishes did you create with your homegrown asparagus? Your insights will help others succeed and inspire them to give this rewarding project a try. Happy gardening!
Frequently Asked Questions (FAQ)
How long does it take to harvest asparagus after planting?
Patience is key when growing asparagus. While it might be tempting to harvest those first few spears that emerge, it’s crucial to allow the plants to establish themselves properly. Generally, you should wait at least two years after planting crowns before harvesting any spears. This allows the plants to develop a strong root system and build up energy reserves for future harvests. In the third year, you can begin harvesting lightly, picking spears for about 4-6 weeks. By the fourth year and beyond, you can enjoy a full harvest season, typically lasting 8-10 weeks. Remember, over-harvesting young plants can weaken them and reduce their long-term productivity.
What is the best time of year to plant asparagus?
The best time to plant asparagus depends on your climate. In colder regions with harsh winters, spring planting is generally recommended. This allows the plants to establish themselves before the onset of winter. In milder climates, fall planting may be preferable, as it gives the crowns a head start before the spring growing season. Regardless of when you plant, ensure the soil is well-drained and amended with plenty of organic matter.
How deep should I plant asparagus crowns?
Planting depth is crucial for asparagus success. Dig a trench that is approximately 12-18 inches wide and 6-8 inches deep. Create a small mound of soil in the center of the trench and place the asparagus crown on top of the mound, spreading the roots out evenly. Cover the crown with about 2 inches of soil. As the asparagus spears begin to grow, gradually fill in the trench with soil until it is level with the surrounding ground. This method encourages the development of a strong root system.
What kind of soil is best for growing asparagus?
Asparagus thrives in well-drained, sandy loam soil with a pH between 6.5 and 7.5. Avoid heavy clay soils, as they can become waterlogged and lead to root rot. Before planting, amend the soil with plenty of organic matter, such as compost or well-rotted manure, to improve drainage and fertility. Asparagus is a heavy feeder, so regular fertilization is essential.
How often should I water asparagus?
Asparagus needs consistent moisture, especially during the growing season. Water deeply and regularly, ensuring the soil remains moist but not waterlogged. Avoid overhead watering, as this can promote fungal diseases. A good rule of thumb is to water when the top inch of soil feels dry to the touch. During dry spells, you may need to water more frequently.
How do I fertilize asparagus?
Asparagus benefits from regular fertilization. In early spring, before the spears emerge, apply a balanced fertilizer, such as 10-10-10, according to the package directions. You can also side-dress the plants with compost or well-rotted manure. After the harvest season, fertilize again to help the plants replenish their energy reserves for the following year. Avoid over-fertilizing, as this can lead to excessive foliage growth at the expense of spear production.
What are some common asparagus pests and diseases?
Asparagus beetles are a common pest that can damage the spears and foliage. Handpicking the beetles or using insecticidal soap can help control infestations. Asparagus rust is a fungal disease that can cause orange pustules on the spears and foliage. Ensure good air circulation and avoid overhead watering to prevent rust. Fusarium wilt is another fungal disease that can cause yellowing and wilting of the plants. Choose disease-resistant varieties and practice crop rotation to minimize the risk of Fusarium wilt.
How do I harvest asparagus?
Harvest asparagus spears when they are about 6-8 inches tall and the tips are still tightly closed. Use a sharp knife to cut the spears at ground level. Avoid pulling the spears, as this can damage the crown. Harvest spears every day or two during the peak of the harvest season. As the harvest season comes to an end, allow some spears to grow into ferns to replenish the plant’s energy reserves.
Can I grow asparagus in containers?
Yes, asparagus can be successfully grown in containers, but you’ll need a large container (at least 18 inches in diameter and depth) with good drainage. Use a high-quality potting mix and choose a dwarf variety of asparagus. Container-grown asparagus will need more frequent watering and fertilization than asparagus grown in the ground.
How do I overwinter asparagus?
In colder climates, cut back the asparagus ferns to ground level in late fall or early winter after they have turned brown. Apply a layer of mulch, such as straw or leaves, to protect the crowns from freezing temperatures. In milder climates, you may not need to mulch the plants. In spring, remove the mulch and fertilize the plants to encourage new growth.
Leave a Comment