
Harvest bean sprouts like a pro and unlock a world of fresh, crunchy goodness right in your own kitchen! Forget those bland, store-bought sprouts – I’m going to show you how to cultivate your own vibrant, flavorful sprouts with just a few simple steps.
Sprouting has a rich history, dating back thousands of years to ancient China, where it was recognized not only as a food source but also for its medicinal properties. Today, with a growing emphasis on healthy eating and sustainable living, sprouting is making a huge comeback. And for good reason! It’s an incredibly easy and rewarding way to add nutrient-packed greens to your diet, even if you don’t have a garden.
Why should you learn this DIY trick? Well, for starters, store-bought sprouts can be expensive and sometimes lack that fresh, vibrant flavor. Plus, there’s always the concern about potential contamination. By learning how to harvest bean sprouts yourself, you’re in complete control of the process, ensuring you get the freshest, safest, and most delicious sprouts possible. I’ll guide you through everything you need to know, from choosing the right beans to the perfect harvesting techniques. Get ready to enjoy a constant supply of crunchy, healthy sprouts for salads, sandwiches, stir-fries, and more!
Sprossen selber ziehen: Eine einfache Anleitung für zu Hause
Hallo liebe DIY-Freunde! Ich liebe frische Sprossen. Sie sind knackig, gesund und peppen jedes Gericht auf. Und das Beste: Man kann sie super einfach selbst ziehen! Keine komplizierten Geräte, keine teuren Zutaten. Nur ein bisschen Geduld und schon hat man eine eigene kleine Sprossenfarm in der Küche. In diesem Artikel zeige ich euch, wie ihr das ganz einfach hinbekommt. Los geht’s!
Was du brauchst:
* Sprossengläser oder ein Keimgerät: Ich persönlich mag Sprossengläser am liebsten. Sie sind günstig, leicht zu reinigen und man kann den Keimprozess gut beobachten. Ein Keimgerät ist natürlich auch super, besonders wenn du regelmäßig Sprossen ziehst.
* Sprossensamen: Achte darauf, dass du spezielle Sprossensamen kaufst. Diese sind unbehandelt und für den Verzehr geeignet. Im Supermarkt oder Bioladen gibt es eine große Auswahl: Alfalfa, Radieschen, Brokkoli, Mungbohnen, Linsen, Kichererbsen und viele mehr.
* Sauberes Wasser: Am besten gefiltertes Wasser oder abgekochtes, abgekühltes Wasser verwenden.
* Ein Sieb oder ein Tuch: Zum Abspülen der Sprossen.
* Ein dunkler Ort: Am Anfang brauchen die Sprossen Dunkelheit zum Keimen.
* Ein heller Ort (ohne direkte Sonneneinstrahlung): Sobald die Sprossen gekeimt sind, brauchen sie Licht zum Wachsen.
Die Vorbereitung:
Bevor wir loslegen, ist es wichtig, dass alles sauber ist. So vermeiden wir, dass sich Schimmel bildet.
1. Reinige dein Sprossenglas oder Keimgerät gründlich: Am besten mit heißem Wasser und Spülmittel. Spüle es danach gut aus.
2. Wähle deine Sprossensamen aus: Überlege dir, welche Sprossen du gerne essen möchtest.
3. Weiche die Samen ein: Gib die Samen in eine Schüssel und bedecke sie mit reichlich Wasser. Die Einweichzeit variiert je nach Sorte. Hier eine kleine Übersicht:
* Alfalfa: 4-6 Stunden
* Radieschen: 4-8 Stunden
* Brokkoli: 6-8 Stunden
* Mungbohnen: 8-12 Stunden
* Linsen: 8-12 Stunden
* Kichererbsen: 12-24 Stunden
Ich lasse die Samen meistens über Nacht einweichen, dann bin ich auf der sicheren Seite.
Der Keimprozess: Schritt für Schritt
Jetzt geht es ans Eingemachte! Hier zeige ich dir, wie du deine Sprossen im Sprossenglas ziehst.
1. Gieße das Einweichwasser ab: Spüle die Samen gründlich mit frischem Wasser ab.
2. Fülle die Samen in das Sprossenglas: Achte darauf, dass die Samen nicht zu dicht liegen. Sie brauchen Platz zum Keimen.
3. Bedecke das Glas mit einem Tuch oder einem Sieb: Befestige es mit einem Gummiband. So können die Sprossen atmen und es kommen keine Insekten hinein.
4. Stelle das Glas an einen dunklen Ort: Zum Beispiel in einen Schrank oder eine Schublade.
5. Spüle die Sprossen 2-3 Mal täglich: Das ist wichtig, damit sie nicht austrocknen und sich kein Schimmel bildet. Gieße dazu Wasser in das Glas, schwenke es vorsichtig und gieße das Wasser wieder ab.
6. Nach 2-3 Tagen: sollten die ersten Keimlinge sichtbar sein. Jetzt kannst du das Glas an einen hellen Ort stellen, aber vermeide direkte Sonneneinstrahlung.
7. Spüle die Sprossen weiterhin 2-3 Mal täglich: bis sie die gewünschte Größe erreicht haben. Das dauert je nach Sorte 3-7 Tage.
Spezielle Tipps für verschiedene Sprossensorten
Jede Sprossensorte hat ihre Eigenheiten. Hier ein paar Tipps, die dir helfen, das beste Ergebnis zu erzielen:
* Mungbohnen: Mungbohnen sind sehr beliebt, weil sie schnell keimen und einen milden Geschmack haben. Achte darauf, dass du sie gut spülst, da sie sonst leicht schleimig werden können.
* Radieschen: Radieschensprossen haben einen würzigen Geschmack. Sie brauchen viel Licht, um ihre rote Farbe zu entwickeln.
* Alfalfa: Alfalfa-Sprossen sind sehr fein und zart. Sie brauchen viel Feuchtigkeit, aber dürfen nicht im Wasser stehen.
* Brokkoli: Brokkolisprossen sind reich an Sulforaphan, einem wertvollen Inhaltsstoff. Sie brauchen etwas länger zum Keimen als andere Sorten.
* Linsen und Kichererbsen: Diese Hülsenfrüchte brauchen eine längere Einweichzeit und keimen etwas langsamer. Sie sind aber sehr nahrhaft und sättigend.
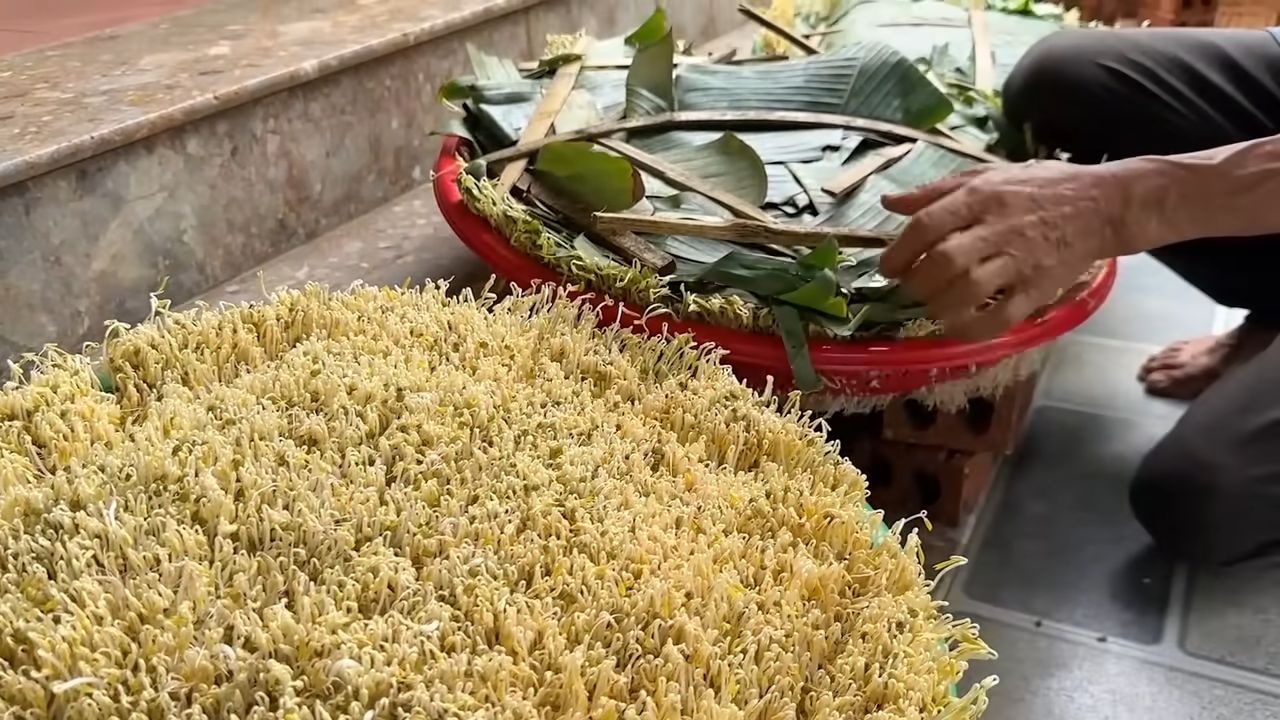
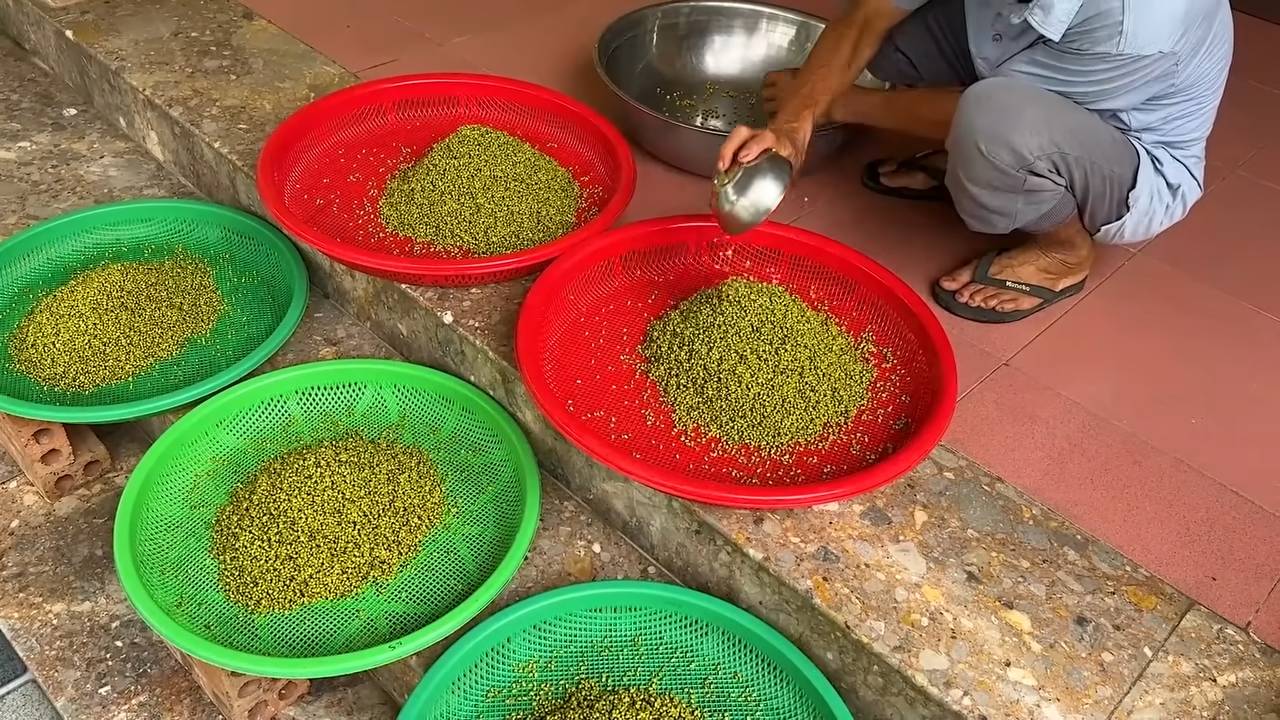
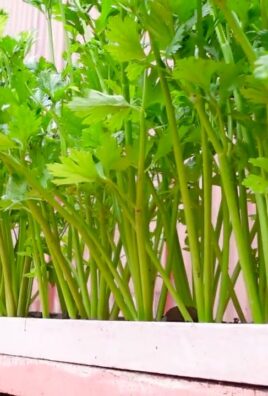
Die Ernte und Lagerung:
Wenn die Sprossen die gewünschte Größe erreicht haben, ist es Zeit für die Ernte!
1. Spüle die Sprossen gründlich ab: Entferne dabei eventuelle Samenhülsen.
2. Lasse die Sprossen gut abtropfen: Am besten in einem Sieb.
3. Bewahre die Sprossen im Kühlschrank auf: In einem luftdichten Behälter halten sie sich 2-3 Tage.
Wie du deine Sprossen verwendest:
Sprossen sind unglaublich vielseitig! Du kannst sie roh essen oder kurz mitkochen. Hier ein paar Ideen:
* Im Salat: Sprossen peppen jeden Salat auf und machen ihn knackiger.
* Auf dem Brot: Als Belag auf Brot oder Brötchen sind Sprossen eine gesunde und leckere Alternative zu Wurst und Käse.
* In Suppen und Eintöpfen: Kurz vor dem Servieren über die Suppe oder den Eintopf geben.
* Im Smoothie: Für einen extra Nährstoffkick.
* Im Wok: Kurz mitgebraten im Wok-Gericht.
* Als Garnitur: Zum Dekorieren von Gerichten.
Häufige Probleme und Lösungen:
Manchmal läuft nicht alles glatt. Hier ein paar häufige Probleme und wie du sie lösen kannst:
* Schimmelbildung: Schimmel entsteht meistens durch mangelnde Hygiene oder zu wenig Belüftung. Reinige dein Sprossenglas gründlich und spüle die Sprossen regelmäßig. Sorge für eine gute Belüftung.
* Die Sprossen keimen nicht: Das kann an alten Samen liegen oder an einer zu niedrigen Temperatur. Kaufe frische Samen und achte darauf, dass die Temperatur nicht unter 18 Grad Celsius liegt.
* Die Sprossen werden schleimig: Das passiert oft bei Mungbohnen. Spüle die Sprossen gründlich und achte darauf, dass sie nicht zu dicht liegen.
* Die Sprossen schmecken bitter: Das kann an zu viel Licht liegen. Stelle das Glas an einen etwas dunkleren Ort.
Zusätzliche Tipps und Tricks:
* Verwende nur hochwertige Sprossensamen: So stellst du sicher, dass sie keimfähig sind und keine Schadstoffe enthalten.
* Experimentiere mit verschiedenen Sorten: Finde heraus, welche Sprossen dir am besten schmecken.
* Achte auf die Hygiene: Saubere Hände und saubere Geräte sind das A und O.
* Sei geduldig: Sprossen ziehen braucht Zeit. Lass dich nicht entmutigen, wenn es nicht gleich beim ersten Mal klappt.
* Beobachte deine Sprossen: So lernst du, wie sie sich entwickeln und was sie brauchen.
Ich hoffe, diese Anleitung hilft dir dabei, deine eigenen Sprossen zu ziehen. Es ist wirklich kinderleicht und macht Spaß! Viel Erfolg und guten Appetit!
Conclusion
So, there you have it! Harvesting bean sprouts at home is not only incredibly easy and cost-effective, but it also provides you with the freshest, most flavorful sprouts imaginable. Forget those limp, pre-packaged sprouts from the grocery store – once you taste the difference of homegrown, you’ll never go back. This simple DIY trick empowers you to control the entire process, ensuring that your sprouts are free from unwanted additives and grown exactly to your liking.
The beauty of this method lies in its adaptability. Experiment with different types of beans – mung beans are the classic choice, but lentils, adzuki beans, and even chickpeas can be sprouted with fantastic results. Each variety offers a unique flavor profile and texture, allowing you to tailor your sprouts to complement a wide range of dishes. Consider adding a touch of seaweed extract to the sprouting water for an extra boost of nutrients and a subtle umami flavor. You can also adjust the sprouting time to achieve your preferred sprout length and crispness. Some prefer short, tender sprouts, while others enjoy the crunch of longer, more developed ones.
This is more than just a recipe; it’s a gateway to a healthier, more sustainable way of eating. By embracing this simple technique, you’re reducing your reliance on commercially produced sprouts, minimizing food waste, and connecting with the natural world in a meaningful way. Plus, it’s a fun and rewarding project that the whole family can enjoy!
We wholeheartedly encourage you to give this DIY trick a try. It’s a small investment of time that yields a significant return in terms of flavor, nutrition, and satisfaction. Don’t be intimidated – the process is surprisingly forgiving, and even if your first batch isn’t perfect, you’ll learn valuable lessons that will improve your results next time.
Once you’ve experienced the joy of harvesting bean sprouts from your own kitchen, we’d love to hear about it! Share your experiences, tips, and variations in the comments below. Let’s build a community of sprout enthusiasts and inspire others to discover the magic of homegrown goodness. What beans did you use? What dishes did you add them to? Did you encounter any challenges, and how did you overcome them? Your insights will be invaluable to other aspiring sprout growers. So go ahead, get sprouting, and let’s celebrate the deliciousness of fresh, homemade bean sprouts together!
Frequently Asked Questions (FAQ)
What types of beans are best for sprouting?
Mung beans are the most commonly used and widely recommended bean for sprouting, especially for beginners. They sprout reliably and have a mild, slightly sweet flavor that complements many dishes. However, you can also experiment with other types of beans, such as lentils, adzuki beans, chickpeas, and even some types of peas. Keep in mind that different beans may require slightly different sprouting times and conditions. Always ensure that the beans you choose are specifically intended for sprouting and are free from any chemical treatments. Avoid using dried beans from the grocery store that are intended for cooking, as they may not sprout properly.
How long does it take to harvest bean sprouts?
The sprouting process typically takes between 3 to 5 days, depending on the type of bean, the temperature, and the humidity. Mung beans usually sprout within 3 to 4 days. You’ll know your sprouts are ready to harvest when they have reached your desired length and have developed small roots and leaves. Keep in mind that over-sprouting can result in bitter-tasting sprouts, so it’s important to monitor them closely and harvest them at the peak of freshness.
What is the best way to store harvested bean sprouts?
Once you’ve harvested your bean sprouts, rinse them thoroughly under cold water and drain them well. To store them, place them in a clean, airtight container lined with a paper towel. The paper towel will help absorb excess moisture and prevent the sprouts from becoming soggy. Store the container in the refrigerator for up to a week. Check the sprouts daily and discard any that show signs of spoilage.
How do I prevent mold growth during the sprouting process?
Mold growth is a common concern when sprouting beans, but it can be easily prevented with proper hygiene and ventilation. Always start with clean beans and a clean sprouting container. Rinse the beans thoroughly at least twice a day with fresh, cool water. Ensure that the sprouting container is well-ventilated to allow for air circulation. Avoid overcrowding the container with too many beans, as this can create a humid environment that promotes mold growth. If you notice any signs of mold, discard the entire batch of sprouts immediately.
Can I eat the bean sprout roots?
Yes, the roots of bean sprouts are perfectly edible and nutritious. They have a slightly nutty flavor and add a pleasant crunch to dishes. However, some people prefer to remove the roots for aesthetic reasons. It’s entirely up to your personal preference.
Are there any health benefits to eating bean sprouts?
Yes, bean sprouts are a nutritional powerhouse! They are a good source of vitamins, minerals, and enzymes. They are also low in calories and high in fiber, making them a healthy addition to any diet. Bean sprouts are particularly rich in vitamin C, vitamin K, and folate. They also contain antioxidants that can help protect your body against damage from free radicals.
What are some ways to use harvested bean sprouts?
Bean sprouts are incredibly versatile and can be used in a wide variety of dishes. They are commonly used in Asian cuisine, such as stir-fries, spring rolls, and soups. They can also be added to salads, sandwiches, and wraps for a boost of flavor and nutrition. Try adding them to your next omelet or frittata for a healthy and delicious breakfast. The possibilities are endless!
Can I sprout beans in a jar?
Yes, sprouting beans in a jar is a popular and easy method. You’ll need a wide-mouth jar, a sprouting lid or cheesecloth secured with a rubber band, and a dark place to store the jar. Follow the same rinsing and draining instructions as with other sprouting methods.
What if my bean sprouts don’t sprout?
If your bean sprouts aren’t sprouting, there could be several reasons. First, make sure your beans are specifically intended for sprouting and are not too old. Old beans may have a lower germination rate. Second, ensure that the beans are being kept consistently moist but not waterlogged. Third, check the temperature. Beans sprout best in a warm environment, ideally between 70-75°F (21-24°C). If the temperature is too cold, the sprouting process may be slowed down or even halted. Finally, make sure the beans are being rinsed and drained properly to prevent mold growth.
Is it safe to eat raw bean sprouts?
While bean sprouts are often eaten raw, there is a small risk of foodborne illness associated with consuming raw sprouts. This is because sprouts are grown in warm, humid conditions that can promote the growth of bacteria. To minimize the risk, purchase sprouts from a reputable source and wash them thoroughly before eating. If you are pregnant, elderly, or have a weakened immune system, it is recommended to cook bean sprouts thoroughly before consuming them.
Leave a Comment