
Grow Sweet Potatoes Beginners, and unlock a world of homegrown goodness! Have you ever dreamt of harvesting your own vibrant, nutrient-packed sweet potatoes right from your backyard? It’s easier than you think, and this DIY guide is your passport to a bountiful harvest. For centuries, sweet potatoes have been a staple in diets across the globe, from the Americas to Asia, symbolizing prosperity and nourishment. Their versatility in the kitchen is legendary, lending themselves to everything from savory stews to delectable desserts.
But why should you, as a beginner, embark on this sweet potato adventure? Well, store-bought sweet potatoes can sometimes lack the freshness and flavor of homegrown varieties. Plus, knowing exactly where your food comes from and how it’s grown is incredibly rewarding. This DIY article will provide you with simple, step-by-step instructions, ensuring even the most novice gardener can successfully grow sweet potatoes beginners can be proud of. We’ll cover everything from choosing the right variety to harvesting your delicious crop. Get ready to dig in and experience the joy of homegrown sweet potatoes!
Süßkartoffeln selbst anbauen: Einsteiger-Guide für eine reiche Ernte
Hey Gartenfreunde! Süßkartoffeln sind nicht nur super lecker und gesund, sondern auch überraschend einfach selbst anzubauen. Ich zeige euch, wie ihr auch ohne grünen Daumen eine reiche Ernte einfahren könnt. Keine Angst, es ist wirklich einfacher als ihr denkt!
Was ihr für den Süßkartoffelanbau braucht:
* Süßkartoffeln: Am besten Bio-Süßkartoffeln, da diese nicht mit Keimhemmern behandelt wurden.
* Wasserglas oder Gefäß: Zum Anziehen der “Slips” (Triebe).
* Zahnstocher: Um die Süßkartoffel im Wasserglas zu stabilisieren.
* Anzuchterde: Für das Vorziehen der Slips in Töpfen.
* Gartenboden: Gut durchlässig und nährstoffreich.
* Kompost oder organischer Dünger: Zur Bodenverbesserung.
* Gießkanne: Zum regelmäßigen Gießen.
* Mulchmaterial (Stroh, Heu, Rasenschnitt): Um die Feuchtigkeit im Boden zu halten und Unkraut zu unterdrücken.
* Geduld: Süßkartoffeln brauchen etwas Zeit zum Wachsen.
Phase 1: Slips ziehen – Der Start in die Süßkartoffel-Saison
Die “Slips” sind die Triebe, die aus der Süßkartoffel wachsen und die wir später einpflanzen werden. Dieser Schritt ist entscheidend für eine erfolgreiche Ernte.
1. Süßkartoffel vorbereiten: Nehmt eure Süßkartoffel und wascht sie gründlich ab. Achtet darauf, dass ihr sie nicht beschädigt.
2. Zahnstocher anbringen: Steckt vier Zahnstocher etwa in der Mitte der Süßkartoffel ein, so dass sie sich gegenseitig gegenüberliegen. Diese dienen dazu, die Süßkartoffel im Wasserglas zu stabilisieren.
3. Ins Wasserglas setzen: Füllt ein Glas oder Gefäß mit Wasser. Die Süßkartoffel sollte etwa zur Hälfte im Wasser stehen. Die Zahnstocher verhindern, dass die Süßkartoffel komplett untertaucht.
4. Warm und hell platzieren: Stellt das Glas an einen warmen und hellen Ort, aber nicht in die pralle Sonne. Ein Fensterbrett ist ideal.
5. Wasserstand kontrollieren: Achtet darauf, dass der Wasserstand immer gleich bleibt und die Süßkartoffel weiterhin Kontakt zum Wasser hat.
6. Geduld haben: Nach einigen Wochen (ca. 4-8 Wochen) sollten sich an der Süßkartoffel Triebe (Slips) bilden. Diese können unterschiedlich schnell wachsen.
7. Slips ernten: Sobald die Slips etwa 15-20 cm lang sind, könnt ihr sie vorsichtig von der Süßkartoffel abdrehen oder abschneiden. Achtet darauf, dass ihr die Süßkartoffel nicht beschädigt.
Phase 2: Slips bewurzeln – Bereit für den Garten
Bevor wir die Slips in den Garten pflanzen können, müssen sie erst Wurzeln bilden.
1. Slips ins Wasser stellen: Füllt ein Glas mit Wasser und stellt die Slips hinein. Achtet darauf, dass die Blätter nicht im Wasser sind, da sie sonst faulen können.
2. Warm und hell platzieren: Stellt das Glas mit den Slips an einen warmen und hellen Ort, aber nicht in die pralle Sonne.
3. Wurzelbildung abwarten: Nach einigen Tagen (ca. 1-2 Wochen) sollten sich an den Slips Wurzeln bilden.
4. In Töpfe pflanzen: Sobald die Wurzeln etwa 2-3 cm lang sind, könnt ihr die Slips in kleine Töpfe mit Anzuchterde pflanzen.
5. Angießen: Gießt die Slips nach dem Einpflanzen vorsichtig an.
6. Weiter pflegen: Stellt die Töpfe an einen hellen Ort und haltet die Erde feucht, aber nicht nass.
Phase 3: Vorbereitung des Gartenbodens – Die Basis für eine gute Ernte
Süßkartoffeln lieben einen lockeren, gut durchlässigen und nährstoffreichen Boden.
1. Boden lockern: Lockert den Boden gründlich auf, am besten mit einer Grabegabel oder einem Spaten.
2. Kompost einarbeiten: Arbeitet reichlich Kompost oder organischen Dünger in den Boden ein. Das verbessert die Bodenstruktur und versorgt die Süßkartoffeln mit wichtigen Nährstoffen.
3. Beete vorbereiten: Süßkartoffeln wachsen am besten auf Dämmen oder Hügeln. Das sorgt für eine bessere Drainage und erwärmt den Boden schneller. Formt also kleine Dämme oder Hügel im Beet.
Phase 4: Süßkartoffeln pflanzen – Endlich in die Erde!
Jetzt kommt der spannende Teil: Das Einpflanzen der vorgezogenen Slips in den Garten.
1. Wetterlage beachten: Süßkartoffeln sind frostempfindlich. Pflanzt sie erst nach den letzten Frösten, wenn die Bodentemperatur mindestens 15°C beträgt. Das ist meistens ab Mitte Mai oder Anfang Juni der Fall.
2. Pflanzabstand: Pflanzt die Slips in einem Abstand von etwa 30-40 cm zueinander und die Reihen etwa 70-90 cm auseinander.
3. Pflanzlöcher graben: Grabt kleine Pflanzlöcher in die vorbereiteten Dämme oder Hügel.
4. Slips einsetzen: Setzt die Slips vorsichtig in die Pflanzlöcher und bedeckt die Wurzeln mit Erde. Achtet darauf, dass die Blätter nicht mit Erde bedeckt werden.
5. Angießen: Gießt die frisch gepflanzten Süßkartoffeln gründlich an.
Phase 5: Pflege der Süßkartoffeln – Gießen, Düngen, Mulchen
Süßkartoffeln sind relativ pflegeleicht, aber ein paar Dinge solltet ihr beachten.
1. Gießen: Gießt die Süßkartoffeln regelmäßig, besonders in trockenen Perioden. Achtet darauf, dass der Boden nicht austrocknet, aber auch nicht zu nass ist.
2. Düngen: Düngt die Süßkartoffeln während der Wachstumsphase ein- bis zweimal mit einem organischen Dünger.
3. Mulchen: Mulcht den Boden um die Süßkartoffeln herum mit Stroh, Heu oder Rasenschnitt. Das hält die Feuchtigkeit im Boden, unterdrückt Unkraut und schützt die Süßkartoffeln vor direktem Kontakt mit dem Boden.
4. Unkraut jäten: Entfernt regelmäßig Unkraut, damit die Süßkartoffeln genügend Licht und Nährstoffe bekommen.
5. Ranken leiten: Süßkartoffeln bilden lange Ranken. Ihr könnt diese entweder auf dem Boden liegen lassen oder an einem Rankgitter oder Zaun hochleiten.
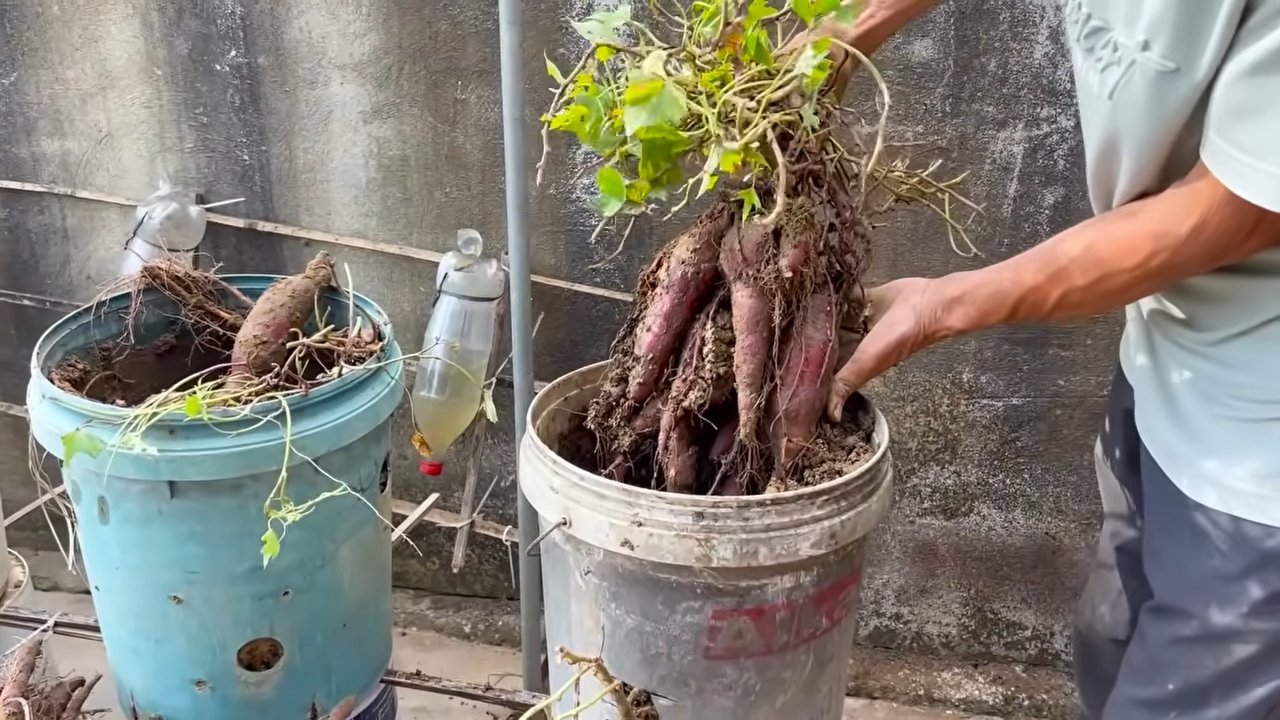
Phase 6: Ernte der Süßkartoffeln – Der Lohn der Mühe
Nach etwa 4-5 Monaten sind die Süßkartoffeln reif für die Ernte.
1. Erntezeitpunkt: Der beste Zeitpunkt für die Ernte ist kurz vor dem ersten Frost. Die Blätter der Süßkartoffeln beginnen dann, gelb zu werden.
2. Vorsichtig ausgraben: Grabt die Süßkartoffeln vorsichtig mit einer Grabegabel oder einem Spaten aus. Achtet darauf, die Knollen nicht zu beschädigen.
3. Trocknen lassen: Lasst die Süßkartoffeln nach der Ernte einige Tage an einem trockenen und luftigen Ort trocknen. Das härtet die Schale und macht sie haltbarer.
4. Lagern: Lagert die Süßkartoffeln an einem kühlen (10-15°C), trockenen und dunklen Ort. So halten sie sich mehrere Monate.
Zusätzliche Tipps für eine erfolgreiche Süßkartoffelernte:
* Sortenwahl: Es gibt verschiedene Süßkartoffelsorten mit unterschiedlichen Farben und Geschmacksrichtungen. Informiert euch vor dem Anbau über die verschiedenen Sorten und wählt die aus, die euch am besten gefallen.
* Schädlinge und Krankheiten: Süßkartoffeln sind relativ robust, können aber von einigen Schäd
Conclusion
So, there you have it! Growing sweet potatoes, even for beginners, doesn’t have to be an intimidating endeavor. This DIY trick, starting with slips and nurturing them into thriving plants, opens up a world of possibilities, bringing the joy of homegrown goodness right to your table. It’s more than just a gardening project; it’s an investment in fresh, delicious, and nutritious food.
Why is this a must-try? Because it empowers you to control the quality of your food, reduce your reliance on store-bought produce, and connect with nature in a tangible way. Imagine the satisfaction of harvesting your own sweet potatoes, knowing exactly where they came from and how they were grown. Plus, the taste of a freshly dug, homegrown sweet potato is simply unparalleled – sweeter, richer, and more flavorful than anything you’ll find at the supermarket.
But the fun doesn’t stop there! Feel free to experiment with different varieties of sweet potatoes. From the classic orange Beauregard to the purple-fleshed Okinawan, each variety offers a unique flavor profile and texture. You can also explore different growing methods, such as container gardening for those with limited space or raised beds for improved drainage. Consider companion planting with herbs like rosemary or thyme to deter pests and enhance the flavor of your sweet potatoes.
Don’t be afraid to get your hands dirty and embrace the learning process. Gardening is all about trial and error, and even if you encounter a few bumps along the way, the rewards are well worth the effort. Remember to document your progress, take pictures, and share your experiences with fellow gardeners.
We wholeheartedly encourage you to try this DIY trick for growing sweet potatoes. It’s a rewarding and fulfilling experience that will not only provide you with delicious food but also connect you with the natural world. Once you’ve harvested your bounty, get creative in the kitchen! Sweet potato fries, pies, casseroles, and even sweet potato bread are just a few of the many delectable dishes you can create.
And most importantly, we want to hear about your journey! Share your tips, tricks, and triumphs in the comments below. Let’s build a community of sweet potato enthusiasts and inspire others to embark on this rewarding gardening adventure. Let us know what challenges you faced and how you overcame them. Did you try a unique variety? Did you discover a secret to maximizing your yield? Your insights could be invaluable to other beginners.
So, grab your slips, prepare your soil, and get ready to experience the joy of growing your own sweet potatoes. Happy gardening!
Frequently Asked Questions (FAQ)
What exactly are sweet potato slips, and where can I get them?
Sweet potato slips are sprouts that grow from a mature sweet potato. They are essentially baby sweet potato plants ready to be transplanted. You can purchase slips from nurseries, garden centers, or online retailers specializing in vegetable starts. Alternatively, you can easily grow your own slips by suspending a sweet potato in water or burying it in moist soil. Within a few weeks, sprouts will emerge, which you can then carefully detach and plant.
How much sunlight do sweet potatoes need?
Sweet potatoes are sun-loving plants and require at least 6-8 hours of direct sunlight per day to thrive. Choose a planting location that receives ample sunlight throughout the day. If you’re growing them in containers, make sure to place them in a sunny spot. Insufficient sunlight can lead to stunted growth and reduced yields.
What kind of soil is best for growing sweet potatoes?
Sweet potatoes prefer well-drained, sandy loam soil that is rich in organic matter. Avoid heavy clay soils, as they can become waterlogged and hinder root development. Before planting, amend your soil with compost or other organic materials to improve drainage and fertility. A slightly acidic soil pH of 6.0 to 6.5 is ideal.
How often should I water my sweet potato plants?
Water your sweet potato plants regularly, especially during dry periods. Keep the soil consistently moist but not waterlogged. Water deeply at the base of the plants, avoiding wetting the foliage, which can increase the risk of fungal diseases. As the plants mature and the tubers begin to form, you can reduce watering slightly.
When is the best time to harvest sweet potatoes?
Sweet potatoes are typically ready to harvest about 90-120 days after planting. The exact timing will depend on the variety and growing conditions. A good indicator is when the foliage starts to turn yellow and die back. Harvest before the first frost, as frost can damage the tubers. Carefully dig up the sweet potatoes, being careful not to bruise or cut them.
How do I cure sweet potatoes after harvesting?
Curing is an essential step in the sweet potato growing process. It helps to heal any wounds on the tubers and improves their flavor and storage life. To cure sweet potatoes, place them in a warm, humid environment (80-85°F and 85-90% humidity) for about 7-10 days. A well-ventilated shed or garage works well. After curing, store the sweet potatoes in a cool, dry place (55-60°F) for several months.
What are some common pests and diseases that affect sweet potatoes?
Sweet potatoes can be susceptible to various pests and diseases, including sweet potato weevils, wireworms, flea beetles, and fungal diseases like stem rot and black rot. Regularly inspect your plants for signs of infestation or disease. Use organic pest control methods, such as insecticidal soap or neem oil, to control pests. Practice crop rotation and choose disease-resistant varieties to prevent diseases.
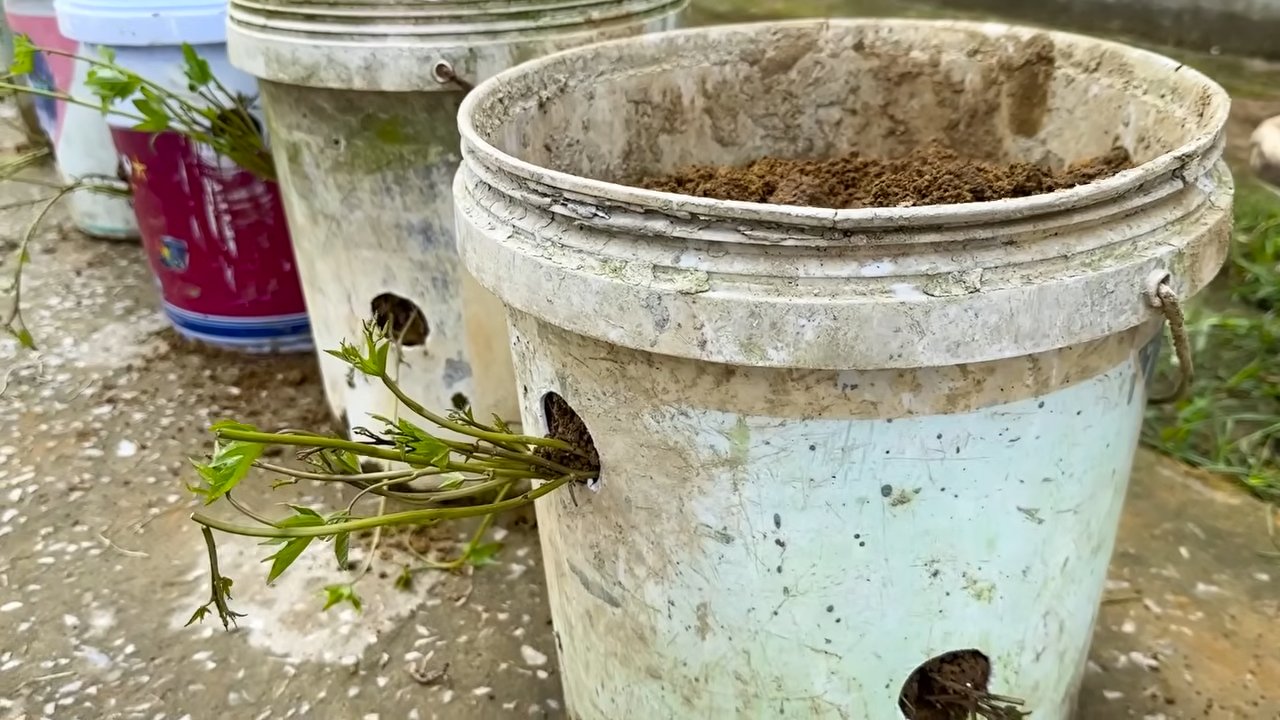
Can I grow sweet potatoes in containers?
Yes, you can successfully grow sweet potatoes in containers, especially if you have limited space. Choose a large container (at least 20 gallons) with good drainage holes. Fill the container with well-draining potting mix and plant your sweet potato slips. Provide adequate sunlight and water, and fertilize regularly. Container-grown sweet potatoes may not produce as many tubers as those grown in the ground, but you can still enjoy a decent harvest.
What are some good companion plants for sweet potatoes?
Companion planting can help to deter pests, attract beneficial insects, and improve the overall health of your sweet potato plants. Some good companion plants for sweet potatoes include:
* **Rosemary:** Deters sweet potato weevils.
* **Thyme:** Repels cabbage moths and other pests.
* **Marigolds:** Repel nematodes and other soil pests.
* **Nasturtiums:** Attract aphids away from sweet potatoes.
* **Beans:** Fix nitrogen in the soil, benefiting sweet potato growth.
How can I improve the yield of my sweet potato plants?
To maximize your sweet potato yield, consider the following tips:
* Choose a sunny location with well-drained soil.
* Amend the soil with compost or other organic matter.
* Provide adequate water and fertilizer.
* Control pests and diseases.
* Hill the soil around the plants to encourage tuber development.
* Harvest at the right time.
* Cure the sweet potatoes properly after harvesting.
By following these tips, you can increase your chances of a bountiful sweet potato harvest.

Leave a Comment