
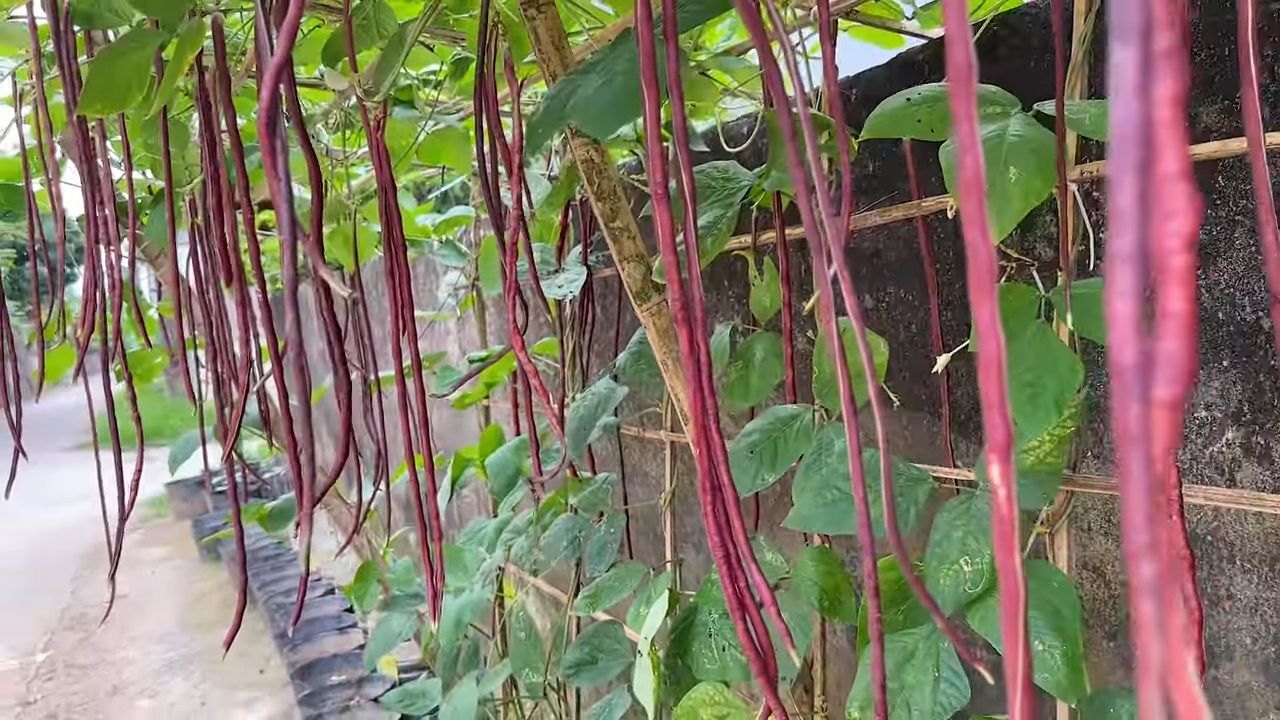
Grow more yardlong beans than you ever thought possible! Imagine harvesting armfuls of these incredibly versatile and delicious beans from your very own backyard. Forget those measly grocery store portions – with a few clever tricks and DIY hacks, you can transform your garden into a yardlong bean bonanza.
Yardlong beans, also known as asparagus beans or Chinese long beans, have a rich history rooted in Southeast Asia. For centuries, they’ve been a staple in Asian cuisine, prized for their unique texture and subtly sweet flavor. Beyond their culinary appeal, these beans represent a connection to tradition and sustainable food practices.
But why should you bother with these DIY tricks? Well, let’s face it: gardening can be tricky! Sometimes, even with the best intentions, our plants just don’t thrive as we’d hoped. Maybe your yardlong beans are producing sparsely, or perhaps they’re struggling to climb. That’s where these simple, yet effective, DIY solutions come in. I’m going to share some of my favorite tips and tricks that have helped me grow more yardlong beans than I know what to do with! From optimizing your soil to creating the perfect support system, these hacks will empower you to maximize your harvest and enjoy the satisfaction of growing your own food.
Mehr Schlangenbohnen Ernten: Mein DIY-Leitfaden für eine üppige Ernte
Hallo liebe Gartenfreunde! Ich liebe Schlangenbohnen (auch bekannt als Spargelbohnen oder Meterbohnen) – ihr einzigartiger Geschmack und ihre beeindruckende Länge machen sie zu einer fantastischen Ergänzung für jeden Gemüsegarten. Aber manchmal ist es frustrierend, wenn die Ernte nicht so üppig ausfällt, wie man es sich wünscht. Deshalb habe ich im Laufe der Jahre einige DIY-Tricks und Kniffe entwickelt, um die Ernte meiner Schlangenbohnen zu maximieren. Und heute teile ich mein Wissen mit euch!
Die Grundlagen: Was Schlangenbohnen lieben
Bevor wir uns in die DIY-Hacks stürzen, ist es wichtig, die Grundlagen zu verstehen. Schlangenbohnen sind wärmeliebende Pflanzen, die viel Sonne, gut durchlässigen Boden und eine stabile Rankhilfe benötigen.
* Sonne: Mindestens 6-8 Stunden direkte Sonneneinstrahlung pro Tag sind ideal.
* Boden: Der Boden sollte locker, fruchtbar und gut durchlässig sein. Staunässe ist der Feind!
* Rankhilfe: Schlangenbohnen sind Kletterpflanzen und brauchen eine stabile Rankhilfe, an der sie emporwachsen können.
* Wasser: Regelmäßige Bewässerung ist wichtig, besonders während der Blütezeit und Fruchtbildung.
* Düngung: Eine ausgewogene Düngung fördert das Wachstum und die Ernte.
DIY-Hack 1: Die perfekte Rankhilfe selber bauen
Eine stabile und gut durchdachte Rankhilfe ist das A und O für eine reiche Schlangenbohnenernte. Hier zeige ich euch, wie ihr eine einfache, aber effektive Rankhilfe selber bauen könnt.
Materialien, die du brauchst:
* 4 Holzpfosten (ca. 2 Meter lang)
* Draht oder starkes Seil
* Drahtspanner (optional, aber sehr hilfreich)
* Hammer oder Pfahlramme
* Drahtschneider
* Handschuhe (zum Schutz deiner Hände)
Schritt-für-Schritt-Anleitung:
1. Pfosten einschlagen: Schlage die vier Holzpfosten in einem Quadrat oder Rechteck in den Boden. Der Abstand zwischen den Pfosten sollte etwa 1,5 bis 2 Meter betragen. Achte darauf, dass die Pfosten tief genug im Boden verankert sind, um stabil zu stehen.
2. Draht spannen: Befestige den Draht oder das Seil an einem der Pfosten. Wickle den Draht mehrmals um den Pfosten und sichere ihn gut.
3. Drahtführung: Führe den Draht von Pfosten zu Pfosten, sodass ein Rahmen entsteht. Du kannst den Draht entweder horizontal oder vertikal spannen, je nachdem, was dir besser gefällt. Ich bevorzuge eine Kombination aus beidem.
4. Drahtspanner verwenden (optional): Wenn du Drahtspanner verwendest, befestige sie an den Drahtenden und spanne den Draht, bis er straff ist. Das sorgt für zusätzliche Stabilität.
5. Zusätzliche Unterstützung: Du kannst zusätzliche Drähte oder Seile zwischen den horizontalen und vertikalen Drähten spannen, um den Schlangenbohnen noch mehr Halt zu geben.
6. Testen: Überprüfe die Stabilität der Rankhilfe, indem du daran rüttelst. Sie sollte fest und stabil stehen.
DIY-Hack 2: Bodenverbesserung mit Komposttee
Ein gesunder Boden ist die Grundlage für gesunde Pflanzen. Komposttee ist ein fantastisches Mittel, um den Boden mit Nährstoffen zu versorgen und das Bodenleben zu fördern.
Was ist Komposttee?
Komposttee ist im Grunde genommen ein Auszug aus Kompost, der mit Wasser verdünnt wird. Er enthält eine Vielzahl von Mikroorganismen, Nährstoffen und Enzymen, die das Pflanzenwachstum fördern.
Materialien, die du brauchst:
* Eimer (ca. 20 Liter)
* Kompost (hochwertig, am besten selbstgemacht)
* Wasser (möglichst chlorfrei, z.B. Regenwasser)
* Luftpumpe für Aquarien (optional, aber empfehlenswert)
* Sprühflasche oder Gießkanne
Schritt-für-Schritt-Anleitung:
1. Kompost vorbereiten: Fülle den Eimer mit etwa 5 Litern Kompost.
2. Wasser hinzufügen: Fülle den Eimer mit Wasser, sodass der Kompost vollständig bedeckt ist. Lasse oben noch etwas Platz.
3. Belüften (optional): Wenn du eine Luftpumpe hast, tauche den Schlauch in den Eimer ein und schalte die Pumpe ein. Die Belüftung fördert das Wachstum der Mikroorganismen.
4. Ziehen lassen: Lasse den Komposttee 24-48 Stunden ziehen. Rühre ihn gelegentlich um.
5. Filtern: Filtere den Komposttee durch ein Sieb oder ein Tuch, um grobe Partikel zu entfernen.
6. Verdünnen: Verdünne den Komposttee mit Wasser im Verhältnis 1:10 (1 Teil Komposttee auf 10 Teile Wasser).
7. Anwenden: Gieße den verdünnten Komposttee direkt auf den Boden um die Schlangenbohnen herum. Du kannst ihn auch mit einer Sprühflasche auf die Blätter sprühen.
DIY-Hack 3: Mulchen für Feuchtigkeit und weniger Unkraut
Mulchen ist eine einfache, aber effektive Methode, um den Boden feucht zu halten, Unkraut zu unterdrücken und den Boden mit organischem Material anzureichern.
Welches Mulchmaterial ist am besten?
Es gibt viele verschiedene Mulchmaterialien, die du verwenden kannst. Ich bevorzuge organische Materialien wie Stroh, Heu, Grasschnitt oder Holzhackschnitzel.
Schritt-für-Schritt-Anleitung:
1. Unkraut entfernen: Entferne zuerst das Unkraut um die Schlangenbohnen herum.
2. Mulch auftragen: Verteile das Mulchmaterial gleichmäßig um die Pflanzen herum. Achte darauf, dass der Mulch nicht direkt an den Stängeln der Pflanzen anliegt, um Fäulnis zu vermeiden.
3. Dicke der Mulchschicht: Die Mulchschicht sollte etwa 5-10 cm dick sein.
4. Regelmäßig überprüfen: Überprüfe die Mulchschicht regelmäßig und fülle sie bei Bedarf nach.
DIY-Hack 4: Gezielte Bewässerung mit selbstgebauten Bewässerungssystemen
Eine gleichmäßige Bewässerung ist entscheidend für eine gute Ernte. Hier zeige ich dir, wie du einfache Bewässerungssysteme selber bauen kannst.
Option 1: Tropfbewässerung mit PET-Flaschen
Diese Methode ist einfach, kostengünstig und sehr effektiv.
Materialien, die du brauchst:
* PET-Flaschen (1,5 oder 2 Liter)
* Nagel oder Bohrer
* Messer oder Schere
Schritt-für-Schritt-Anleitung:
1. Löcher bohren: Bohre oder steche mit dem Nagel oder Bohrer kleine Löcher in den Deckel der PET-Flasche.
2. Flasche eingraben: Grabe die PET-Flasche mit dem Deckel nach unten in den Boden neben den Schlangenbohnen ein. Lasse den Flaschenboden etwas aus dem Boden herausschauen.
3. Flasche befüllen: Befülle die Flasche mit Wasser. Das Wasser sickert langsam durch die Löcher in den Boden und versorgt die Pflanzen mit Feuchtigkeit.
4. Regelmäßig nachfüllen: Fülle die Flasche regelmäßig nach, je nach Bedarf.
Option 2: Bewässerung mit Tonkrügen (Ollas)
Diese Methode ist etwas aufwendiger, aber sehr effektiv und wassersparend.
Materialien, die du brauchst:
* Tonkrüge (unglasiert)
* Deckel oder Steine
* Schaufel
Schritt-für-Schritt-Anleitung:
1. Krug eingraben: Grabe ein Loch in den Boden und setze den Tonkrug hinein. Lasse den oberen Rand des Kruges etwas aus dem Boden herausschauen.
2. Krug befüllen
Conclusion
So, there you have it! Mastering the art of growing more yardlong beans doesn’t require a green thumb blessed by the gardening gods. It’s about understanding the plant’s needs and employing a few clever, DIY techniques to maximize your yield. We’ve explored simple yet effective methods, from crafting your own bean towers for optimal vertical growth to creating nutrient-rich soil amendments using readily available kitchen scraps.
Why is this a must-try? Because fresh, homegrown yardlong beans are simply incomparable to anything you can buy at the store. The vibrant flavor, the satisfying crunch, and the sheer pride of harvesting your own bounty are rewards well worth the effort. Plus, you’re in complete control of what goes into your garden, ensuring a healthy and organic harvest for you and your family.
But the journey doesn’t end here! Feel free to experiment with variations on these techniques. Perhaps you’ll discover a unique trellis design that works even better in your specific garden space. Maybe you’ll find that adding a particular type of compost tea gives your yardlong beans an extra boost. The possibilities are endless!
Consider companion planting to further enhance your yardlong bean growth. Marigolds can deter nematodes, while basil can repel bean beetles. These natural pairings can create a thriving ecosystem in your garden, reducing the need for chemical interventions.
Don’t be afraid to get creative with your support structures. While we discussed bean towers, you could also use sturdy bamboo poles arranged in a teepee shape, or even repurpose old ladders or fencing. The key is to provide ample vertical space for the vines to climb and spread.
And remember, consistent watering and proper fertilization are crucial for success. Monitor your plants regularly for signs of pests or diseases, and take action promptly to prevent problems from escalating.
We are confident that by implementing these DIY strategies, you’ll be well on your way to enjoying a bumper crop of delicious yardlong beans. Now, it’s your turn to get your hands dirty! We encourage you to try these techniques in your own garden and share your experiences with us. What worked best for you? What challenges did you encounter? What innovative solutions did you come up with?
Share your photos, tips, and stories in the comments section below. Let’s create a community of passionate gardeners who are dedicated to growing more yardlong beans and sharing their knowledge with others. Together, we can unlock the full potential of this amazing vegetable and enjoy the fruits (or rather, the beans!) of our labor. So, grab your gardening gloves, gather your supplies, and get ready to embark on a rewarding journey of homegrown goodness. Happy gardening!
Frequently Asked Questions (FAQ)
What are the ideal growing conditions for yardlong beans?
Yardlong beans thrive in warm climates with plenty of sunshine. They require at least 6-8 hours of direct sunlight per day. The ideal soil temperature for germination is between 70°F and 85°F (21°C and 29°C). They prefer well-drained soil that is rich in organic matter. Amend your soil with compost or aged manure before planting to improve its fertility and drainage. Consistent moisture is also essential, especially during flowering and pod development. Avoid overwatering, which can lead to root rot.
How often should I water my yardlong beans?
Water your yardlong beans deeply and regularly, especially during hot, dry weather. Aim to keep the soil consistently moist but not waterlogged. A good rule of thumb is to water when the top inch of soil feels dry to the touch. Mulching around the base of the plants can help retain moisture and suppress weeds. Consider using a soaker hose or drip irrigation system to deliver water directly to the roots, minimizing water loss through evaporation.
What kind of fertilizer should I use for yardlong beans?
Yardlong beans benefit from a balanced fertilizer with a slightly higher phosphorus content to promote flowering and pod development. A fertilizer with an NPK ratio of 5-10-5 or 10-20-10 is a good choice. Avoid over-fertilizing with nitrogen, as this can lead to excessive foliage growth at the expense of pod production. You can also supplement with organic fertilizers such as compost tea or fish emulsion. Apply fertilizer according to the package instructions, and be sure to water thoroughly after application.
How do I prevent pests and diseases from affecting my yardlong beans?
Regularly inspect your plants for signs of pests or diseases. Common pests that affect yardlong beans include aphids, bean beetles, and spider mites. You can control these pests with insecticidal soap, neem oil, or by handpicking them off the plants. Diseases such as powdery mildew and fungal leaf spots can be prevented by ensuring good air circulation around the plants and avoiding overhead watering. If diseases do occur, treat them with a fungicide according to the package instructions. Companion planting with marigolds and basil can also help deter pests and diseases.
When is the best time to harvest yardlong beans?
Yardlong beans are typically ready to harvest about 60-80 days after planting. Harvest the pods when they are young, tender, and about 12-18 inches long. The pods should be firm and snap easily when bent. Avoid letting the pods become too mature, as they will become tough and stringy. Harvest regularly to encourage continued pod production. Use scissors or pruning shears to cut the pods from the vine, being careful not to damage the plant.
Can I grow yardlong beans in containers?
Yes, yardlong beans can be successfully grown in containers, provided that you choose a large enough container and provide adequate support for the vines. A container that is at least 12 inches in diameter and 12 inches deep is recommended. Use a well-draining potting mix and provide a trellis or other support structure for the vines to climb. Water and fertilize regularly, and be sure to place the container in a sunny location. Container-grown yardlong beans may require more frequent watering and fertilization than those grown in the ground.
How do I save seeds from my yardlong beans?
To save seeds from your yardlong beans, allow a few pods to mature completely on the vine. The pods will become dry and brittle, and the seeds inside will be hard and dry. Harvest the pods and remove the seeds. Spread the seeds out on a tray to dry completely for a few days. Store the dried seeds in an airtight container in a cool, dark, and dry place. Properly stored seeds can remain viable for several years. Be aware that if you are growing multiple varieties of beans, cross-pollination may occur, resulting in seeds that are not true to type.
What are some creative ways to use yardlong beans in cooking?
Yardlong beans are incredibly versatile in the kitchen. They can be stir-fried, steamed, boiled, grilled, or added to soups and stews. They are a popular ingredient in Asian cuisine, particularly in stir-fries and curries. You can also use them in salads, pasta dishes, and even as a side dish. Try stir-frying them with garlic, ginger, and soy sauce, or adding them to a coconut milk curry with vegetables and tofu. They can also be blanched and added to a salad with a vinaigrette dressing. The possibilities are endless!


Leave a Comment