
Grow bigger gourds than you ever thought possible! Have you ever dreamed of having prize-winning gourds that are the envy of all your neighbors? I know I have! This isn’t just about bragging rights, though. For centuries, gourds have held a special place in cultures around the world, used for everything from practical containers and musical instruments to stunning works of art. Think of the intricate carvings of gourd bowls in South America or the vibrant painted gourd masks of Africa – these aren’t just plants; they’re a connection to our shared human history.
But let’s be honest, sometimes getting those impressive, jumbo-sized gourds can feel like a real challenge. That’s where these DIY tricks and hacks come in! I’m going to share some simple, yet incredibly effective, techniques that will help you grow bigger gourds and maximize your harvest. Whether you’re a seasoned gardener or just starting out, these tips will give you the edge you need to cultivate truly remarkable gourds. Get ready to roll up your sleeves and unlock the secrets to gourd-growing success!
So züchtest du riesige Kürbisse: Mein ultimativer DIY-Leitfaden
Hallo Kürbisfreunde! Träumst du auch davon, den größten und beeindruckendsten Kürbis in der Nachbarschaft zu züchten? Ich auch! Und über die Jahre habe ich einige Tricks und Kniffe gelernt, die ich gerne mit dir teilen möchte. Dieser Leitfaden ist vollgepackt mit Informationen, die dir helfen werden, deine Kürbisziele zu erreichen. Lass uns loslegen!
Die Grundlagen: Vorbereitung ist alles
Bevor wir uns in die Details stürzen, ist es wichtig, die Grundlagen zu verstehen. Ein riesiger Kürbis braucht mehr als nur Glück; er braucht die richtige Genetik, den richtigen Boden, die richtige Pflege und natürlich viel Geduld.
* Die richtige Sorte wählen: Nicht alle Kürbisse sind gleich. Für riesige Kürbisse solltest du dich für Sorten wie ‘Atlantic Giant’ entscheiden. Diese Sorte ist speziell dafür gezüchtet, riesig zu werden. Kaufe dein Saatgut von einem seriösen Anbieter, der sich auf Riesenkürbisse spezialisiert hat.
* Boden vorbereiten: Kürbisse sind Starkzehrer, das heißt, sie brauchen einen nährstoffreichen Boden. Beginne im Herbst vor dem Anbau mit der Vorbereitung des Bodens. Grabe reichlich Kompost, gut verrotteten Mist und organische Stoffe ein. Der Boden sollte gut durchlässig sein, aber dennoch Feuchtigkeit speichern können. Ein pH-Wert zwischen 6,0 und 6,8 ist ideal.
* Der richtige Standort: Wähle einen sonnigen Standort, der mindestens 6-8 Stunden direkte Sonneneinstrahlung pro Tag erhält. Kürbisse brauchen viel Sonne, um zu wachsen. Achte auch darauf, dass der Standort vor starkem Wind geschützt ist.
* Keimung: Ich starte meine Kürbissamen immer drinnen, etwa 3-4 Wochen vor dem letzten Frost. Das gibt den Pflanzen einen Vorsprung.
1. Weiche die Samen 24 Stunden in warmem Wasser ein. Das hilft, die harte Schale aufzuweichen und die Keimung zu beschleunigen.
2. Pflanze die Samen in kleine Töpfe mit Anzuchterde.
3. Halte die Erde feucht, aber nicht nass.
4. Stelle die Töpfe an einen warmen Ort, idealerweise mit einer Heizmatte.
5. Sobald die Sämlinge gekeimt sind, stelle sie an einen hellen Ort, z. B. unter eine Pflanzenlampe.
Die Wachstumsphase: Pflege und Aufmerksamkeit
Sobald deine Kürbispflanzen im Freien sind, beginnt die eigentliche Arbeit. Jetzt geht es darum, die Pflanzen optimal zu versorgen, damit sie ihr volles Potenzial entfalten können.
* Umpflanzen: Sobald die Gefahr von Frost vorüber ist und die Bodentemperatur mindestens 15°C beträgt, kannst du die Kürbispflanzen ins Freie umpflanzen. Achte darauf, dass du ihnen genügend Platz gibst. Ich empfehle, mindestens 3-4 Meter Platz zwischen den Pflanzen zu lassen.
* Bewässerung: Kürbisse brauchen viel Wasser, besonders während der Wachstumsphase. Gieße tief und regelmäßig, am besten am Morgen. Vermeide es, die Blätter zu benetzen, da dies Pilzkrankheiten fördern kann. Eine Tröpfchenbewässerung ist ideal.
* Düngung: Dünge deine Kürbisse regelmäßig mit einem ausgewogenen Dünger. Ich verwende gerne einen organischen Dünger, der reich an Stickstoff, Phosphor und Kalium ist. Während der Blütezeit wechsle ich zu einem Dünger mit höherem Phosphoranteil, um die Fruchtbildung zu fördern.
* Bestäubung: Kürbisse haben männliche und weibliche Blüten. Die weiblichen Blüten erkennst du an dem kleinen Kürbisansatz direkt unter der Blüte. Wenn die Bestäubung nicht von selbst erfolgt, kannst du sie manuell durchführen.
1. Pflücke eine männliche Blüte ab.
2. Entferne die Blütenblätter, um den Staubbeutel freizulegen.
3. Reibe den Staubbeutel vorsichtig auf die Narbe der weiblichen Blüte.
4. Mache das am besten am frühen Morgen, wenn die Blüten geöffnet sind.
* Rankenmanagement: Kürbispflanzen wachsen sehr schnell und bilden lange Ranken. Um die Energie der Pflanze auf den Kürbis zu konzentrieren, solltest du die Ranken regelmäßig beschneiden. Entferne alle Seitentriebe und Blüten, die nicht zur Kürbisbildung beitragen. Leite die Hauptranke in die gewünschte Richtung.
* Kürbis auswählen: Sobald sich mehrere Kürbisse gebildet haben, wähle den vielversprechendsten aus und entferne alle anderen. Die Pflanze kann ihre ganze Energie in diesen einen Kürbis stecken.
* Schutz vor Schädlingen und Krankheiten: Kürbisse sind anfällig für verschiedene Schädlinge und Krankheiten. Kontrolliere deine Pflanzen regelmäßig und ergreife bei Bedarf Maßnahmen.
* Kürbisfliegen: Diese Schädlinge legen ihre Eier in die Stängel der Kürbispflanzen. Entferne befallene Stängel und verwende Insektizide, falls erforderlich.
* Echter Mehltau: Diese Pilzkrankheit verursacht einen weißen, pudrigen Belag auf den Blättern. Sprühe die Blätter mit einer Lösung aus Backpulver und Wasser ein.
* Blattläuse: Diese kleinen Schädlinge saugen den Saft aus den Blättern. Sprühe die Blätter mit Wasser ab oder verwende Insektizidseife.
Die Endphase: Den Kürbis pflegen und schützen
Jetzt, wo dein Kürbis wächst, ist es wichtig, ihn vor Beschädigungen zu schützen und ihm die bestmöglichen Bedingungen zu bieten.
* Unterlage: Lege eine dicke Schicht Stroh oder eine Holzplatte unter den Kürbis, um ihn vor Feuchtigkeit und Fäulnis zu schützen.
* Sonnenschutz: Wenn der Kürbis zu starker Sonneneinstrahlung ausgesetzt ist, kann er verbrennen. Schütze ihn mit einem Sonnenschirm oder einem Tuch.
* Bewegung vermeiden: Versuche, den Kürbis so wenig wie möglich zu bewegen, da dies zu Rissen führen kann.
* Regelmäßige Kontrolle: Überprüfe den Kürbis regelmäßig auf Anzeichen von Krankheiten oder Schäden.
Spezielle Techniken für riesige Kürbisse
Hier sind einige fortgeschrittene Techniken, die ich im Laufe der Jahre gelernt habe und die wirklich einen Unterschied machen können:
* Blattbeschneidung: Entferne einige der größeren Blätter, um die Luftzirkulation zu verbessern und die Sonneneinstrahlung auf den Kürbis zu erhöhen. Aber übertreibe es nicht, da die Blätter für die Photosynthese wichtig sind.
* Bodenheizung: Eine Bodenheizung kann das Wachstum des Kürbisses beschleunigen, besonders in kühleren Klimazonen.
* Spezielle Dünger: Es gibt spezielle Dünger, die für Riesenkürbisse entwickelt wurden. Diese enthalten eine ausgewogene Mischung aus Nährstoffen, die das Wachstum fördern.
* Wachstumstagebuch: Führe ein Wachstumstagebuch, in dem du die täglichen Fortschritte des Kürbisses dokumentierst. Das hilft dir, Trends zu erkennen und deine Pflege entsprechend anzupassen.
Ernte und Lagerung
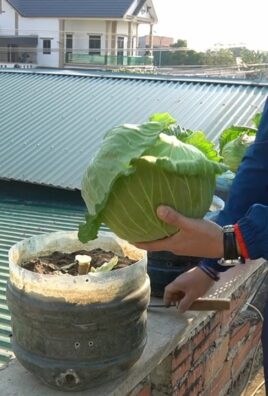
Der Zeitpunkt der Ernte ist entscheidend. Ein reifer Kürbis hat eine harte Schale und einen hohlen Klang, wenn man darauf klopft.
* Ernte: Schneide den Kürbis vorsichtig vom Stiel ab und lasse dabei einen langen Stielansatz stehen.
* Lagerung: Lagere den Kürbis an einem kühlen, trockenen Ort. Vermeide es, ihn zu stapeln, da dies zu Druckstellen führen kann.
Häufige Fehler und wie man sie vermeidet
* Überwässerung: Zu viel Wasser kann zu Wurzelfäule führen. Achte darauf, dass der Boden gut durchlässig ist.
* Unterdüngung: Kürbisse brauchen viele Nährstoffe. Dünge sie regelmäßig mit einem ausgewogenen Dünger.
* Vernachlässigung: Kürbisse brauchen regelmäßige Pflege und Aufmerksamkeit. Kontrolliere sie regelmäßig auf Schädlinge und Krankheiten.
* Zu frühe Ernte: Warte, bis der Kürbis vollständig reif ist, bevor du ihn erntest.
Fazit
Die Zucht ries
Conclusion
So, there you have it! This simple yet effective DIY trick for growing bigger gourds is more than just a gardening hack; it’s a pathway to unlocking the full potential of your gourd patch. We’ve explored the science behind it, the straightforward steps involved, and the potential rewards – larger, healthier, and more impressive gourds than you ever thought possible.
Why is this a must-try? Because it’s accessible to everyone, regardless of their gardening experience. It doesn’t require expensive equipment or specialized knowledge. It’s a low-cost, high-impact method that can significantly improve your gourd yield. Imagine the satisfaction of harvesting gourds that are the envy of your neighborhood, perfect for crafting, decorating, or even winning prizes at your local fair.
But the benefits extend beyond just size. This technique also promotes healthier growth, leading to gourds that are more resistant to pests and diseases. By providing the developing gourds with the support they need, you’re preventing them from sitting directly on the damp ground, which can lead to rot and other problems.
Ready to take your gourd growing to the next level?
Don’t be afraid to experiment! Consider these variations to tailor the technique to your specific needs and preferences:
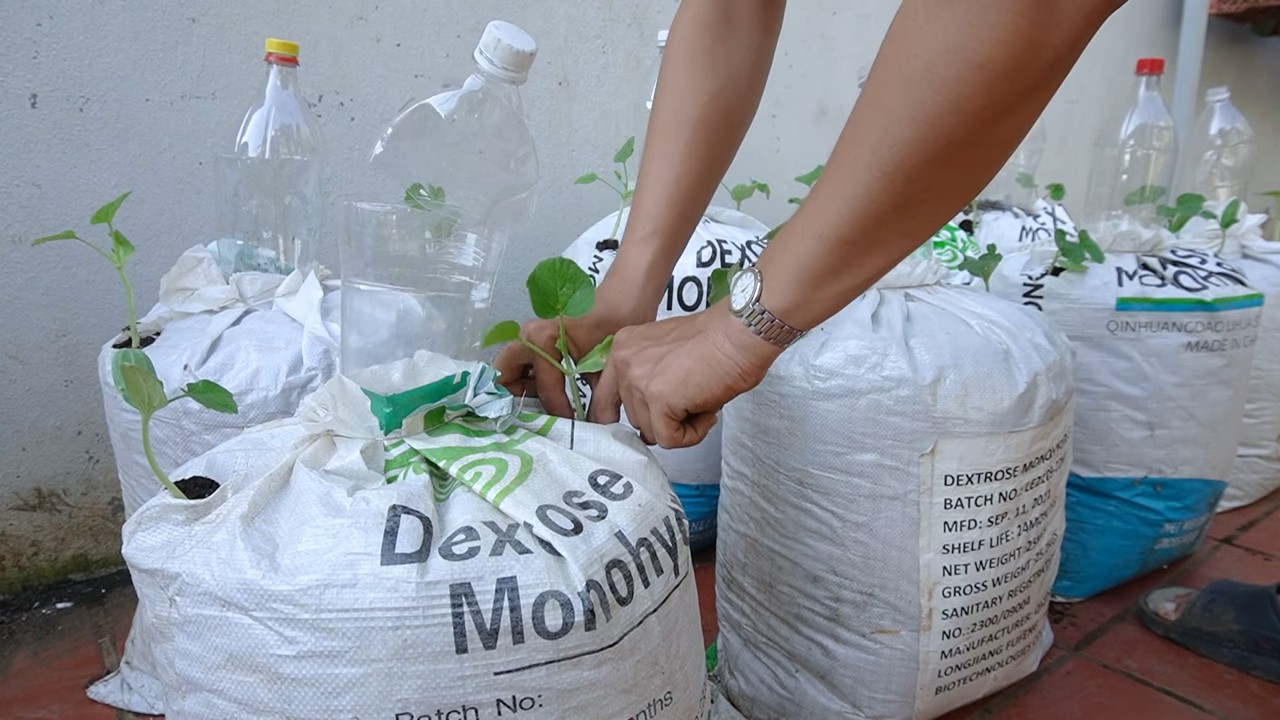
* Material Variations: While we’ve focused on using repurposed materials like old t-shirts and plastic containers, feel free to get creative. Burlap sacks, old towels, or even specially designed gourd slings can work just as well. Just ensure the material is breathable and provides adequate support.
* Support Structure Adjustments: Depending on the size and shape of your gourds, you might need to adjust the support structure. For larger gourds, consider using a more robust frame or multiple supports to distribute the weight evenly.
* Timing Tweaks: Monitor your gourds closely and adjust the timing of the support installation based on their growth rate. Some varieties may benefit from earlier support, while others may not need it until they’re larger.
This DIY trick is not a one-size-fits-all solution, but rather a foundation upon which you can build your own gourd-growing success story. The key is to observe your plants, experiment with different approaches, and learn from your experiences.
We are confident that by implementing this simple technique, you’ll see a noticeable difference in the size and quality of your gourds. So, grab your supplies, head out to your garden, and get ready to witness the magic of this DIY trick firsthand.
We encourage you to try this method and share your results with us! Post pictures of your impressive gourds on social media using #GrowBiggerGourds and tag us in your posts. We’d love to see your creations and hear about your experiences. Let’s build a community of passionate gourd growers who are dedicated to pushing the boundaries of what’s possible. Happy gardening!
Frequently Asked Questions (FAQ)
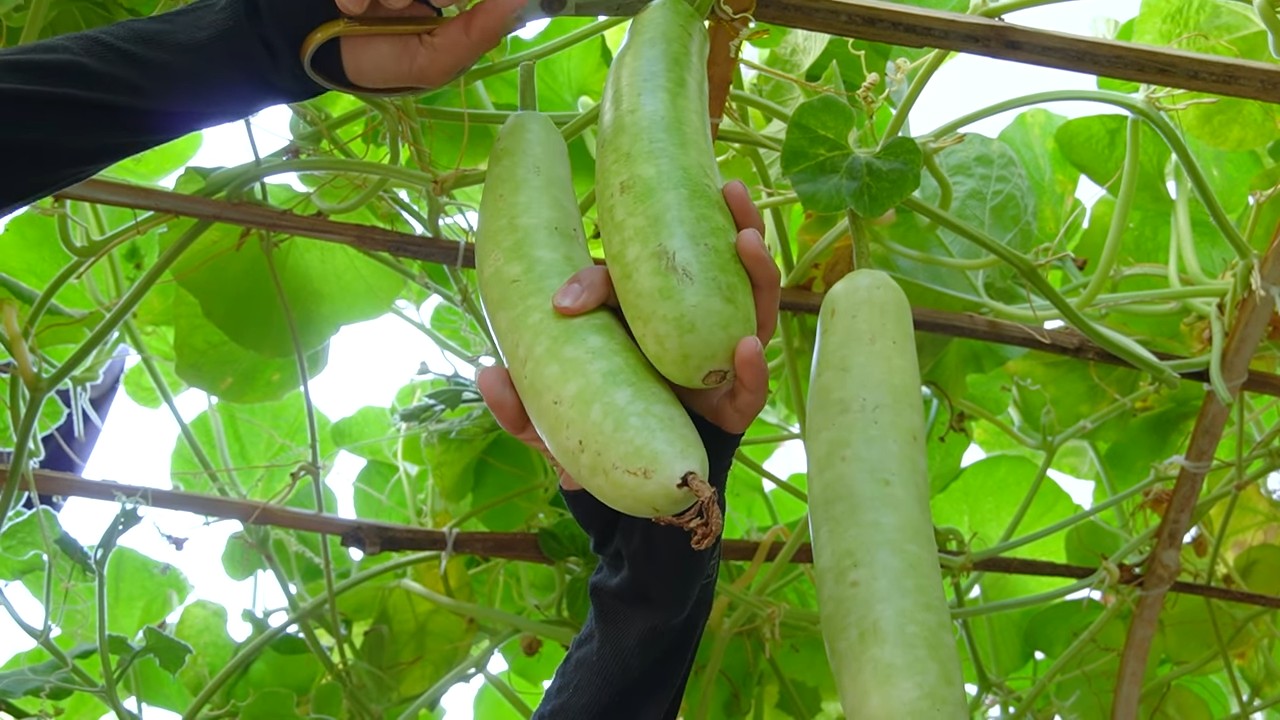
What types of gourds does this DIY trick work best for?
This technique is beneficial for most gourd varieties, especially those known for growing large, such as bottle gourds, bushel gourds, and dipper gourds. However, even smaller ornamental gourds can benefit from the added support and protection from ground contact. The key is to assess the weight and growth habit of your specific gourd variety and adjust the support accordingly.
When is the best time to implement this DIY trick?
The ideal time to implement this trick is when the gourds are still relatively small, about the size of a softball or slightly larger. This allows you to provide support before the gourds become too heavy and potentially damage the vine. Monitor your plants closely and look for signs that the gourds are starting to weigh down the vine. Early intervention is key to preventing problems.
How do I choose the right materials for the support structure?
The most important factors to consider when choosing materials are durability, breathability, and weight capacity. Repurposed materials like old t-shirts, burlap sacks, and plastic containers are excellent options because they are readily available and environmentally friendly. Avoid using materials that are non-breathable, as they can trap moisture and promote rot. Ensure that the support structure is strong enough to hold the weight of the mature gourd.
What if my gourds are already quite large? Can I still use this trick?
Yes, you can still use this trick even if your gourds are already quite large, but you’ll need to be extra careful when lifting and supporting them. Enlist the help of a friend or family member to avoid straining yourself or damaging the vine. Use a sturdy support structure that can handle the weight of the mature gourd. It’s also a good idea to gently lift the gourd a little bit each day to get it used to the support.
How often should I check the support structure?
It’s important to check the support structure regularly, especially as the gourds continue to grow. Inspect the materials for signs of wear and tear, and make sure the support is still securely in place. Adjust the support as needed to accommodate the growing size and weight of the gourds. A weekly check-up is generally sufficient, but more frequent inspections may be necessary during periods of rapid growth.
Can this trick help prevent gourd rot?
Yes, one of the major benefits of this DIY trick is that it helps prevent gourd rot by keeping the gourds off the damp ground. Ground contact can lead to moisture buildup and fungal growth, which can cause the gourds to rot. By providing a support structure, you’re creating airflow around the gourds and reducing the risk of rot.
Will this trick work in all climates?
This trick can be beneficial in most climates, but it’s particularly helpful in areas with high humidity or frequent rainfall. In these conditions, the risk of gourd rot is higher, making the support structure even more important. In drier climates, the support structure can still help protect the gourds from sunburn and provide stability during windy conditions.
What other tips can I use to grow bigger gourds?
In addition to this DIY trick, there are several other things you can do to promote larger gourd growth. These include:
* Proper Soil Preparation: Ensure your soil is rich in organic matter and well-draining.
* Adequate Watering: Water your gourd plants deeply and regularly, especially during dry periods.
* Fertilization: Fertilize your plants with a balanced fertilizer throughout the growing season.
* Pest and Disease Control: Monitor your plants for pests and diseases and take appropriate action to prevent problems.
* Pruning: Prune your gourd vines to encourage the development of larger fruits.
My gourds are growing, but they are not getting very big. What could be the problem?
There could be several reasons why your gourds are not growing as large as you’d like. These include:
* Insufficient Sunlight: Gourds need at least 6-8 hours of sunlight per day.
* Poor Soil Quality: Gourds need nutrient-rich soil to thrive.
* Inadequate Watering: Gourds need consistent moisture, especially during fruit development.
* Pest or Disease Infestation: Pests and diseases can stunt growth and reduce fruit size.
* Lack of Pollination: Ensure your gourds are properly pollinated. You may need to hand-pollinate if there are not enough pollinators in your area.
Is there a risk of the support structure damaging the vine?
Yes, there is a potential risk of the support structure damaging the vine if it’s not properly installed or maintained. To minimize this risk, use soft, flexible materials for the support, and avoid putting too much pressure on the vine. Check the support structure regularly and adjust it as needed to accommodate the growing size and weight of the gourds. If you notice any signs of damage to the vine, such as bruising or breakage, take immediate action to correct the problem.
Leave a Comment