
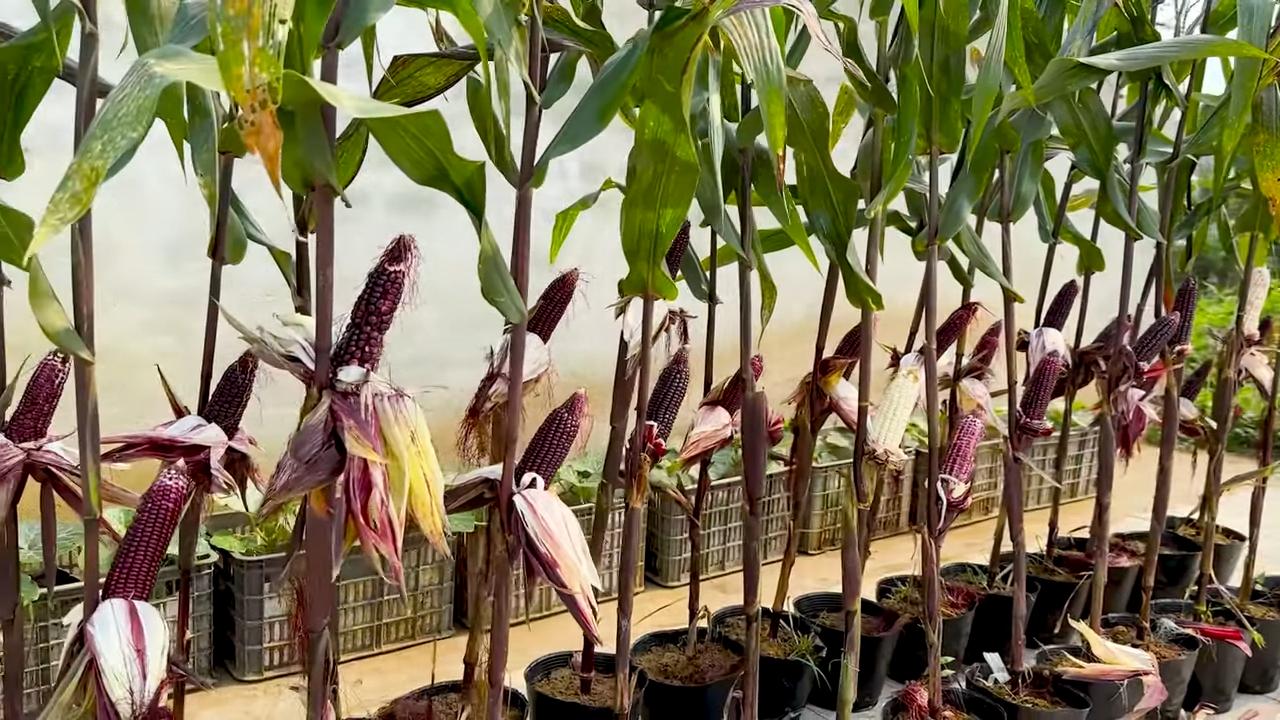
Rooftop Corn Growing Easy: Imagine stepping onto your rooftop and harvesting fresh, sweet corn – a taste of summer right in the heart of the city! Sounds like a dream, right? Well, it doesn’t have to be! This DIY guide is your ticket to transforming your urban space into a thriving cornfield, no sprawling acres required.
Corn, a staple in diets across the globe, boasts a rich history dating back thousands of years to its origins in Mesoamerica. It’s been a symbol of sustenance and community for countless cultures. While traditionally grown in vast fields, the beauty of modern gardening is its adaptability. We’re taking this ancient grain and giving it a modern, urban twist!
Why should you try rooftop corn growing easy? Because fresh, homegrown corn is simply unbeatable! Store-bought corn often lacks the sweetness and flavor of freshly picked ears. Plus, growing your own food is incredibly rewarding, connecting you to nature and providing a sustainable source of deliciousness. This DIY project is perfect for apartment dwellers, city residents, or anyone with limited garden space who wants to experience the joy of growing their own food. I’m going to show you how to make it surprisingly simple and successful, even if you’ve never grown corn before. Get ready to impress your friends and family with your urban farming skills!
“`html
Dachgarten-Maisanbau: Dein einfacher Leitfaden für eine reiche Ernte
Hey Leute! Habt ihr jemals davon geträumt, euren eigenen Mais auf dem Dach anzubauen? Klingt verrückt, oder? Aber glaubt mir, es ist einfacher als ihr denkt und super befriedigend! Ich zeige euch, wie ihr mit ein paar einfachen Schritten und etwas Geduld euren eigenen kleinen Maisacker hoch über den Dächern der Stadt erschaffen könnt. Los geht’s!
Was du brauchst: Die Vorbereitung
Bevor wir loslegen, müssen wir sicherstellen, dass wir alles haben, was wir brauchen. Hier ist eine Liste der wichtigsten Dinge:
* Geeignete Behälter: Große, stabile Behälter sind entscheidend. Denkt an große Pflanzkübel, Mörtelwannen oder sogar recycelte Fässer. Sie sollten mindestens 60 cm tief und breit sein, damit die Maiswurzeln genügend Platz haben.
* Hochwertige Erde: Mais ist ein Vielfraß! Eine gut durchlässige, nährstoffreiche Erde ist das A und O. Ich empfehle eine Mischung aus Gartenerde, Kompost und etwas Sand oder Perlit.
* Mais-Saatgut: Wählt eine Maissorte, die für den Anbau in Behältern geeignet ist. Zwergmaissorten oder frühe Sorten sind ideal. Achtet darauf, dass das Saatgut frisch ist.
* Dünger: Mais braucht viel Nahrung, besonders während des Wachstums. Ein ausgewogener Dünger (z.B. 10-10-10) oder ein organischer Dünger wie Komposttee ist perfekt.
* Wasser: Eine zuverlässige Wasserquelle ist unerlässlich. Ein Gartenschlauch oder eine Gießkanne sind ausreichend.
* Sonnenlicht: Mais liebt die Sonne! Stellt sicher, dass euer Dach mindestens 6-8 Stunden direkte Sonneneinstrahlung pro Tag bekommt.
* Stützmaterial: Maispflanzen können hoch werden und bei Wind umknicken. Bambusstäbe oder andere Stützen helfen, sie aufrecht zu halten.
* Werkzeug: Eine Schaufel, eine Harke, eine Gießkanne und eventuell eine kleine Hacke.
Schritt-für-Schritt-Anleitung: Der Anbau
Jetzt, wo wir alles vorbereitet haben, können wir mit dem eigentlichen Anbau beginnen.
1. Behälter vorbereiten:
* Stellt sicher, dass eure Behälter Abzugslöcher haben, damit überschüssiges Wasser ablaufen kann.
* Füllt die Behälter mit eurer vorbereiteten Erde. Lasst etwa 5-10 cm Platz bis zum Rand.
* Befeuchtet die Erde gründlich, bevor ihr die Samen pflanzt.
2. Aussaat:
* Pflanzt die Maiskörner etwa 2-3 cm tief in die Erde.
* Achtet darauf, dass ihr die Körner nicht zu dicht beieinander pflanzt. Ein Abstand von etwa 20-25 cm zwischen den Pflanzen ist ideal.
* Ich empfehle, 3-4 Körner pro Pflanzstelle zu säen, um sicherzustellen, dass mindestens eine Pflanze aufgeht.
* Bedeckt die Samen mit Erde und drückt sie leicht an.
* Gießt die Erde vorsichtig, um sie feucht zu halten.
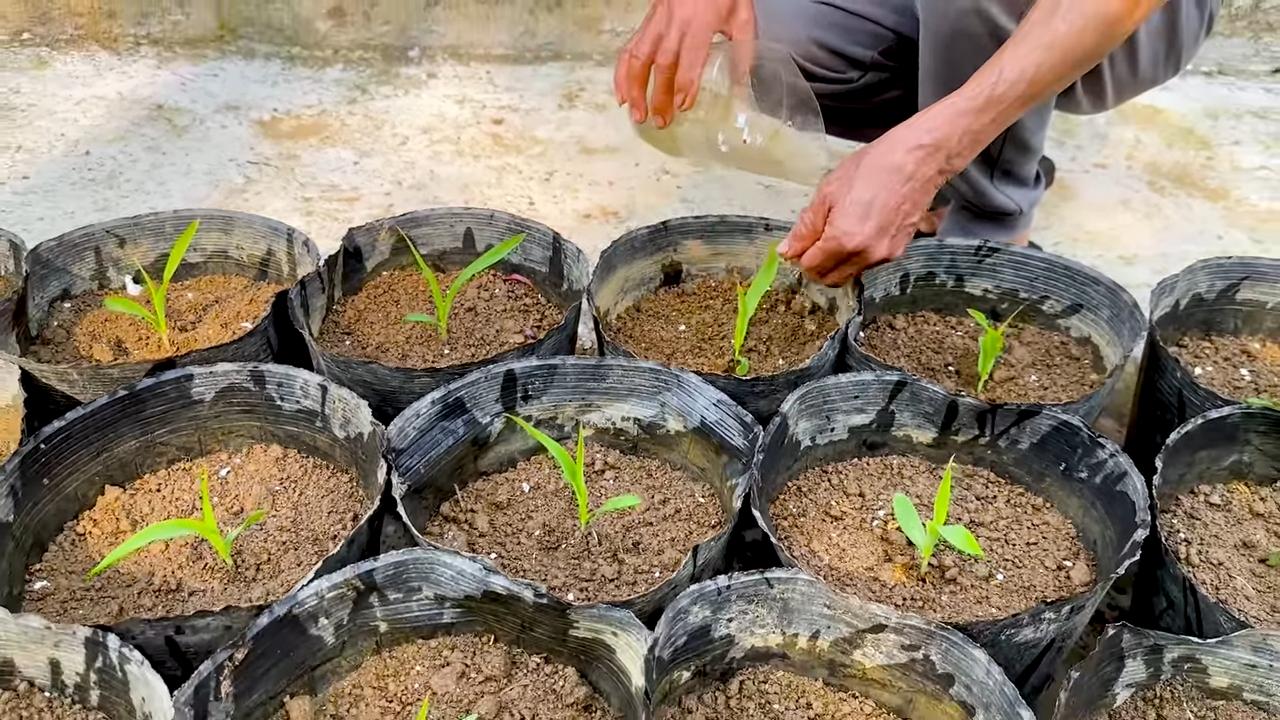
3. Keimung:
* Die Keimung dauert in der Regel 7-14 Tage, abhängig von der Temperatur und der Feuchtigkeit.
* Haltet die Erde während dieser Zeit feucht, aber nicht nass.
* Sobald die Sämlinge aufgegangen sind, könnt ihr die schwächsten entfernen, so dass nur die stärkste Pflanze pro Pflanzstelle übrig bleibt.
4. Pflege:
* Gießen: Mais braucht viel Wasser, besonders während der Blütezeit und der Kolbenbildung. Gießt regelmäßig, besonders an heißen Tagen. Achtet darauf, dass die Erde nicht austrocknet.
* Düngen: Düngt eure Maispflanzen alle 2-3 Wochen mit einem ausgewogenen Dünger. Ich verwende gerne Komposttee, da er die Pflanzen mit wichtigen Nährstoffen versorgt und gleichzeitig den Boden verbessert.
* Unkraut jäten: Entfernt regelmäßig Unkraut, das um Nährstoffe und Wasser konkurriert.
* Stützen: Sobald die Pflanzen etwa 50-60 cm hoch sind, solltet ihr sie mit Bambusstäben oder anderen Stützen stabilisieren. Bindet die Pflanzen locker an die Stützen, um sie vor Windbruch zu schützen.
Die Bestäubung: Ein wichtiger Schritt
Mais ist windbestäubt, was bedeutet, dass der Pollen von den männlichen Blüten (den Fahnen oben an der Pflanze) zu den weiblichen Blüten (den Seidenfäden an den Kolben) transportiert werden muss. In einem kleinen Dachgarten kann es schwierig sein, eine ausreichende Bestäubung zu gewährleisten. Hier sind ein paar Tipps, um die Bestäubung zu verbessern:
* Pflanzt Mais in Blöcken: Anstatt die Pflanzen in einer Reihe zu pflanzen, pflanzt sie in einem Quadrat oder Rechteck. Dies erhöht die Wahrscheinlichkeit, dass der Pollen die weiblichen Blüten erreicht.
* Manuelle Bestäubung: Wenn ihr merkt, dass die Bestäubung nicht gut funktioniert, könnt ihr sie manuell unterstützen. Schüttelt die Pflanzen vorsichtig, wenn der Pollen reif ist (er sollte gelb und staubig sein). Ihr könnt auch den Pollen mit einem kleinen Pinsel von den männlichen Blüten auf die weiblichen Blüten übertragen.
* Windschutz: Wenn euer Dach sehr windig ist, kann es hilfreich sein, einen Windschutz zu installieren, um den Pollen nicht wegzublasen.
Die Ernte: Der Lohn der Arbeit
Die Erntezeit hängt von der Maissorte ab, die ihr angebaut habt. In der Regel dauert es etwa 60-100 Tage von der Aussaat bis zur Ernte. Hier sind ein paar Anzeichen dafür, dass euer Mais reif ist:
* Die Seidenfäden sind braun und trocken: Die Seidenfäden, die aus den Kolben herausragen, sollten braun und trocken sein.
* Die Kolben fühlen sich voll an: Die Kolben sollten sich voll und prall anfühlen.
* Die Körner sind milchig: Stecht mit dem Fingernagel in ein Korn. Wenn eine milchige Flüssigkeit austritt, ist der Mais reif.
Um den Mais zu ernten, dreht ihr den Kolben vorsichtig ab. Entfernt die äußeren Blätter und die Seidenfäden. Jetzt könnt ihr euren selbst angebauten Mais genießen!
Häufige Probleme und Lösungen
Auch beim Maisanbau auf dem Dach können Probleme auftreten. Hier sind ein paar häufige Probleme und wie ihr sie lösen könnt:
* Schädlinge: Blattläuse, Maiszünsler und andere Schädlinge können eure Pflanzen befallen. Kontrolliert eure Pflanzen regelmäßig und entfernt Schädlinge von Hand oder mit einem biologischen Insektizid.
* Krankheiten: Pilzkrankheiten wie Maisbeulen können auftreten, besonders bei feuchtem Wetter. Sorgt für eine gute Belüftung und entfernt befallene Blätter.
* Nährstoffmangel: Gelbe Blätter oder langsames Wachstum können auf einen Nährstoffmangel hindeuten. Düngt eure Pflanzen regelmäßig mit einem ausgewogenen Dünger.
* Schlechte Bestäubung: Wie bereits erwähnt, kann eine schlechte Bestäubung zu leeren oder schlecht gefüllten Kolben führen. Befolgt die oben genannten Tipps zur Verbesserung der Bestäubung.
Zusätzliche Tipps für den Erfolg
* Wählt den richtigen Standort: Stellt sicher, dass euer Dach genügend Sonnenlicht bekommt und vor starkem Wind geschützt ist.
* Verwendet hochwertige Erde: Eine gute Erde ist das A und O für gesunde Pflanzen.
* Gießt regelmäßig: Mais braucht viel Wasser, besonders während der Blütezeit und der Kolbenbildung.
* Düngt regelmäßig: Mais ist ein Vielfraß und braucht viel Nahrung.
* Kontrolliert eure Pflanzen regelmäßig: Achtet auf Schädlinge, Krankheiten und Nährstoffmangel.
* Seid geduldig: Der Maisanbau braucht Zeit und Geduld. Lasst euch nicht entmutigen, wenn es nicht sofort klappt.
Ich hoffe, dieser Leitfaden hat euch geholfen, euren eigenen Dachgarten-Maisanbau zu starten
Conclusion
So, there you have it! Transforming your rooftop into a thriving cornfield might sound like a whimsical dream, but with a little planning and effort, it’s entirely achievable. This DIY rooftop corn growing method isn’t just about fresh, homegrown corn; it’s about embracing sustainable practices, maximizing urban spaces, and connecting with nature in a unique and rewarding way. Forget those bland, store-bought ears – imagine sinking your teeth into sweet, juicy corn that you nurtured from seed to table, all while enjoying the panoramic views from your very own rooftop oasis.
Why is this a must-try? Beyond the unparalleled flavor of homegrown corn, this project offers a multitude of benefits. It’s an excellent way to reduce your carbon footprint by minimizing transportation needs. It provides a natural cooling effect for your building, reducing energy consumption during hot summer months. And, perhaps most importantly, it’s an incredibly fulfilling and educational experience, especially for families with children. Watching those tiny seeds sprout and grow into towering stalks of corn is a truly magical process.
But don’t stop there! Feel free to experiment with different varieties of corn to find your favorites. Try planting companion herbs like basil or beans to enhance growth and deter pests naturally. Consider adding a small composting system to recycle kitchen scraps and enrich your soil. You could even explore vertical gardening techniques to maximize space and create a stunning green wall of corn.
Ready to embark on your rooftop corn growing adventure? We encourage you to give this DIY trick a try. It’s easier than you might think, and the rewards are immeasurable. Remember to start small, be patient, and don’t be afraid to learn from your mistakes. Gardening is a journey, not a destination.
And most importantly, we want to hear about your experiences! Share your photos, tips, and challenges in the comments below. Let’s create a community of rooftop corn growers and inspire others to transform their urban spaces into thriving food sources. Together, we can make our cities greener, healthier, and more sustainable, one ear of corn at a time. So, grab your seeds, get your hands dirty, and let the rooftop corn growing revolution begin!
Frequently Asked Questions (FAQ)
What kind of corn is best for rooftop growing?
Choosing the right corn variety is crucial for success. Look for shorter, more compact varieties that are well-suited for container gardening. Sweet corn varieties like ‘Golden Bantam’ or ‘Early Sunglow’ are popular choices. Dent corn, used for cornmeal and animal feed, can also be grown, but it typically requires more space and a longer growing season. Consider your local climate and growing conditions when making your selection. Heirloom varieties often offer unique flavors and resilience, but may require more research and care.
How much sunlight does rooftop corn need?
Corn is a sun-loving plant and requires at least 6-8 hours of direct sunlight per day to thrive. Choose a location on your rooftop that receives ample sunlight throughout the growing season. If your rooftop is partially shaded, consider using reflective materials to bounce sunlight onto your corn plants. You can also supplement with grow lights if necessary, especially during the early stages of growth. Insufficient sunlight can lead to stunted growth, reduced yields, and poor-quality corn.
What size containers should I use for rooftop corn growing?
Corn plants have extensive root systems, so they require large containers to support their growth. A minimum of 15-20 gallons per plant is recommended. Larger containers are always better, as they provide more room for root development and help retain moisture. Choose containers made from durable materials that can withstand the elements, such as plastic, wood, or metal. Ensure that the containers have adequate drainage holes to prevent waterlogging, which can lead to root rot.
What type of soil is best for rooftop corn growing?
Corn prefers well-draining, fertile soil that is rich in organic matter. A good potting mix specifically designed for vegetables is a great option. You can also create your own soil mix by combining equal parts of compost, peat moss, and perlite or vermiculite. Compost provides essential nutrients and improves soil structure, while peat moss helps retain moisture and perlite or vermiculite improves drainage. Avoid using heavy clay soils, as they can become waterlogged and inhibit root growth.
How often should I water my rooftop corn plants?
Corn plants require consistent watering, especially during hot and dry weather. Water deeply and regularly, ensuring that the soil is evenly moist but not waterlogged. Check the soil moisture level daily by sticking your finger into the soil. If the top inch feels dry, it’s time to water. Avoid watering the foliage, as this can promote fungal diseases. Consider using a drip irrigation system or soaker hoses to deliver water directly to the roots.
How do I pollinate my rooftop corn plants?
Corn is wind-pollinated, so you may need to assist with pollination, especially if your rooftop is sheltered from the wind. When the tassels (male flowers) appear at the top of the plant, gently shake the stalks to release pollen. You can also collect pollen from the tassels and dust it onto the silks (female flowers) that emerge from the developing ears of corn. Repeat this process every day for several days to ensure adequate pollination. Poor pollination can result in underdeveloped or missing kernels.
What are some common pests and diseases that affect rooftop corn?
Common pests that can affect rooftop corn include aphids, corn earworms, and spider mites. Aphids can be controlled with insecticidal soap or neem oil. Corn earworms can be handpicked or treated with Bacillus thuringiensis (Bt). Spider mites can be controlled with a strong spray of water or horticultural oil. Common diseases include corn smut and leaf blight. Choose disease-resistant varieties and practice good sanitation to prevent these problems. Remove infected plants promptly to prevent the spread of disease.
How do I know when my rooftop corn is ready to harvest?
Corn is typically ready to harvest about 20-25 days after the silks emerge. The silks will turn brown and dry, and the ears will feel plump and full. To check for ripeness, peel back a portion of the husk and puncture a kernel with your fingernail. If the liquid is milky, the corn is ready to harvest. If the liquid is clear, the corn needs more time to mature. If the liquid is doughy, the corn is overripe. Harvest the corn by twisting the ear downward and pulling it away from the stalk.
Can I grow other vegetables alongside my rooftop corn?
Yes, companion planting can be beneficial for rooftop corn. Good companion plants include beans, squash, and cucumbers. Beans fix nitrogen in the soil, which benefits corn. Squash provides ground cover, which helps retain moisture and suppress weeds. Cucumbers can climb up the corn stalks, providing support and maximizing space. Avoid planting tomatoes or brassicas (cabbage, broccoli, cauliflower) near corn, as they can compete for nutrients and attract pests.
How can I improve the yield of my rooftop corn?
To maximize the yield of your rooftop corn, ensure that you provide adequate sunlight, water, and nutrients. Fertilize regularly with a balanced fertilizer or compost tea. Practice good pollination techniques. Control pests and diseases promptly. Consider planting multiple rows of corn to improve pollination and increase yields. And most importantly, choose the right corn variety for your climate and growing conditions. With a little care and attention, you can enjoy a bountiful harvest of fresh, homegrown corn from your very own rooftop garden.

Leave a Comment