
Grow peanuts indoors? Absolutely! Forget the sprawling fields and sunny southern climates you might associate with this beloved snack. I’m here to tell you that cultivating your own peanut bounty is entirely possible, even within the cozy confines of your home.
For centuries, peanuts have been a staple food, tracing their origins back to South America. Evidence suggests that peanuts were cultivated as early as 7,600 years ago in Peru! From ancient civilizations to modern-day snack enthusiasts, the peanut has held a special place in our hearts (and stomachs!). But who says you need a farm to enjoy the satisfaction of harvesting your own?
In today’s world, where access to fresh, homegrown produce is becoming increasingly important, learning to grow peanuts indoors offers a fantastic solution. Imagine the joy of plucking fresh peanuts straight from the plant, knowing exactly where they came from and how they were grown. Plus, it’s a fantastic conversation starter and a fun project for the whole family! This DIY guide will walk you through every step, from selecting the right seeds to harvesting your very own peanut crop. Say goodbye to store-bought peanuts and hello to fresh, homegrown goodness!
Erdnüsse im Haus anbauen: Dein umfassender DIY-Leitfaden
Hallo liebe Pflanzenfreunde! Habt ihr jemals darüber nachgedacht, Erdnüsse im Haus anzubauen? Es mag ungewöhnlich klingen, aber es ist tatsächlich ein faszinierendes und lohnendes Projekt. Ich zeige euch, wie ihr eure eigenen Erdnüsse in den eigenen vier Wänden ziehen könnt – ganz ohne Garten!
Was du brauchst: Die richtige Ausrüstung
Bevor wir loslegen, stelle sicher, dass du alles Notwendige zur Hand hast. Hier ist eine Liste der Dinge, die du brauchst:
* Erdnüsse: Rohe, ungesalzene Erdnüsse (am besten aus dem Bioladen oder Reformhaus). Achte darauf, dass sie nicht geröstet sind, da sie sonst nicht keimen.
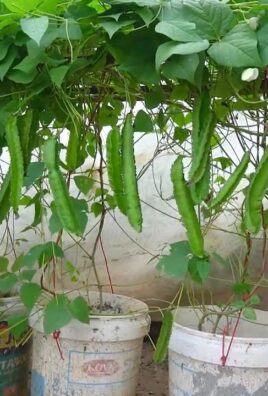
* Töpfe: Große Töpfe (mindestens 30 cm Durchmesser und Tiefe) mit guter Drainage. Erdnusspflanzen brauchen Platz für ihre Wurzeln und die Erdnüsse, die unter der Erde wachsen.
* Erde: Gut durchlässige Blumenerde oder eine Mischung aus Blumenerde, Kompost und Sand.
* Wasser: Sauberes Wasser zum Gießen.
* Sonnenlicht: Ein sonniger Standort, idealerweise ein Südfenster. Erdnusspflanzen brauchen viel Licht.
* Pflanzensprüher: Zum Befeuchten der Blätter.
* Optional: Pflanzenlampe, falls du nicht genügend Sonnenlicht hast.
* Optional: Flüssigdünger für Erdnusspflanzen.
Schritt-für-Schritt-Anleitung: So ziehst du deine eigenen Erdnüsse
Jetzt geht’s ans Eingemachte! Folge diesen Schritten, um deine eigenen Erdnüsse im Haus anzubauen:
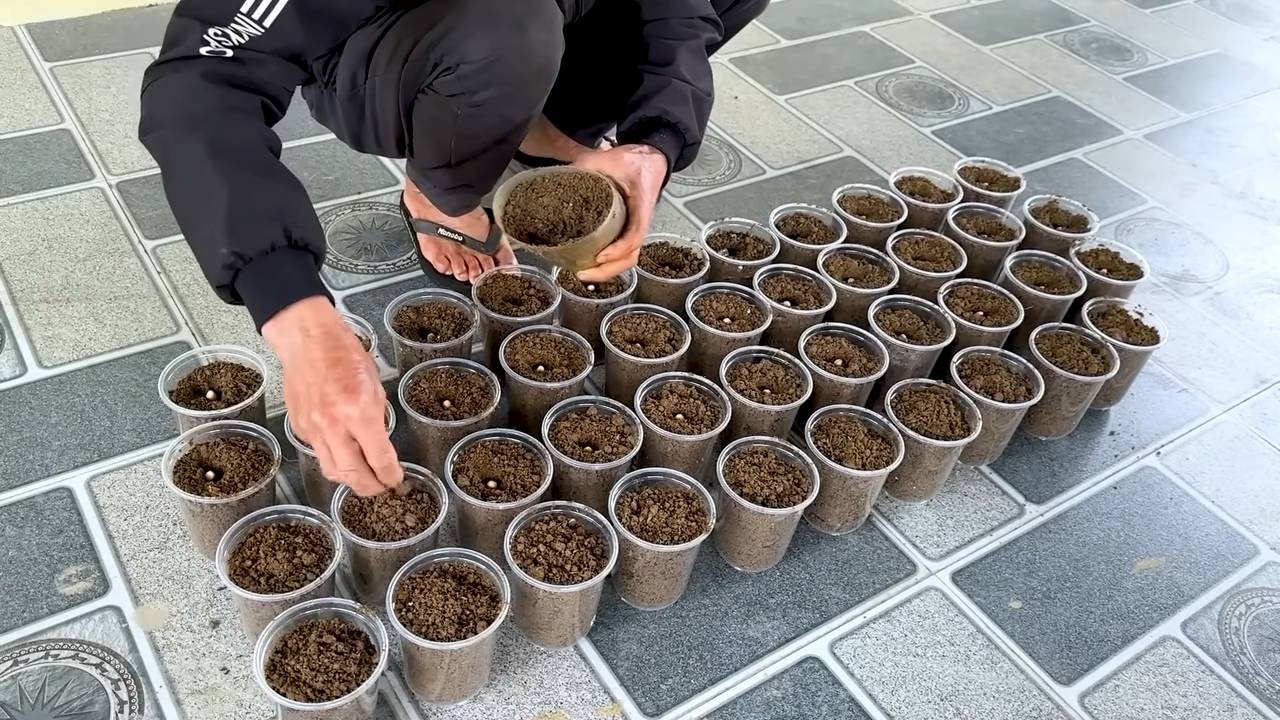
1. Die Erdnüsse vorbereiten: Keimung starten
1. Erdnüsse auswählen: Wähle die größten und gesündesten Erdnüsse aus. Vermeide Erdnüsse, die beschädigt oder verfärbt sind.
2. Einweichen: Lege die Erdnüsse für 24 Stunden in lauwarmes Wasser. Das hilft, die Schale aufzuweichen und die Keimung zu beschleunigen.
3. Keimung starten (optional): Du kannst die Erdnüsse direkt in die Erde pflanzen, aber ich empfehle, sie vorher keimen zu lassen. Wickle die eingeweichten Erdnüsse in ein feuchtes Papiertuch und lege sie in einen Plastikbeutel. Verschließe den Beutel und stelle ihn an einen warmen Ort.
4. Beobachten: Überprüfe die Erdnüsse täglich. Nach ein paar Tagen sollten kleine Wurzeln austreten. Sobald die Wurzeln etwa 1 cm lang sind, kannst du die Erdnüsse einpflanzen.
2. Die Erdnüsse einpflanzen: Der Grundstein für deine Ernte
1. Töpfe vorbereiten: Fülle die Töpfe mit der Blumenerde. Lasse etwa 5 cm Platz bis zum Rand.
2. Erdnüsse pflanzen: Mache kleine Löcher in die Erde (etwa 2-3 cm tief). Lege in jedes Loch eine gekeimte Erdnuss mit der Wurzel nach unten. Wenn du die Erdnüsse nicht vorgekeimt hast, lege einfach eine Erdnuss in jedes Loch.
3. Zudecken: Bedecke die Erdnüsse mit Erde und drücke sie leicht an.
4. Gießen: Gieße die Erde vorsichtig, bis sie feucht, aber nicht nass ist.
3. Pflege und Wachstum: Geduld ist gefragt
1. Standort: Stelle die Töpfe an einen sonnigen Standort. Erdnusspflanzen brauchen mindestens 6 Stunden Sonnenlicht pro Tag.
2. Gießen: Gieße die Pflanzen regelmäßig, aber vermeide Staunässe. Die Erde sollte immer leicht feucht sein. Überprüfe die Erde regelmäßig mit dem Finger.
3. Düngen (optional): Dünge die Pflanzen alle zwei Wochen mit einem Flüssigdünger für Erdnusspflanzen. Befolge die Anweisungen auf der Verpackung.
4. Blätter besprühen: Besprühe die Blätter regelmäßig mit Wasser, um die Luftfeuchtigkeit zu erhöhen.
5. Beobachten: Beobachte die Pflanzen aufmerksam. Achte auf Schädlinge oder Krankheiten.
4. Die Blütezeit: Kleine gelbe Blüten
1. Blüten: Nach etwa einem Monat sollten die Erdnusspflanzen kleine gelbe Blüten bilden. Diese Blüten sind selbstbestäubend.
2. Befruchtung: Nach der Befruchtung welken die Blüten und bilden sogenannte “Pflöcke”. Diese Pflöcke wachsen in die Erde und bilden dort die Erdnüsse.
5. Die Ernte: Der Lohn deiner Mühe
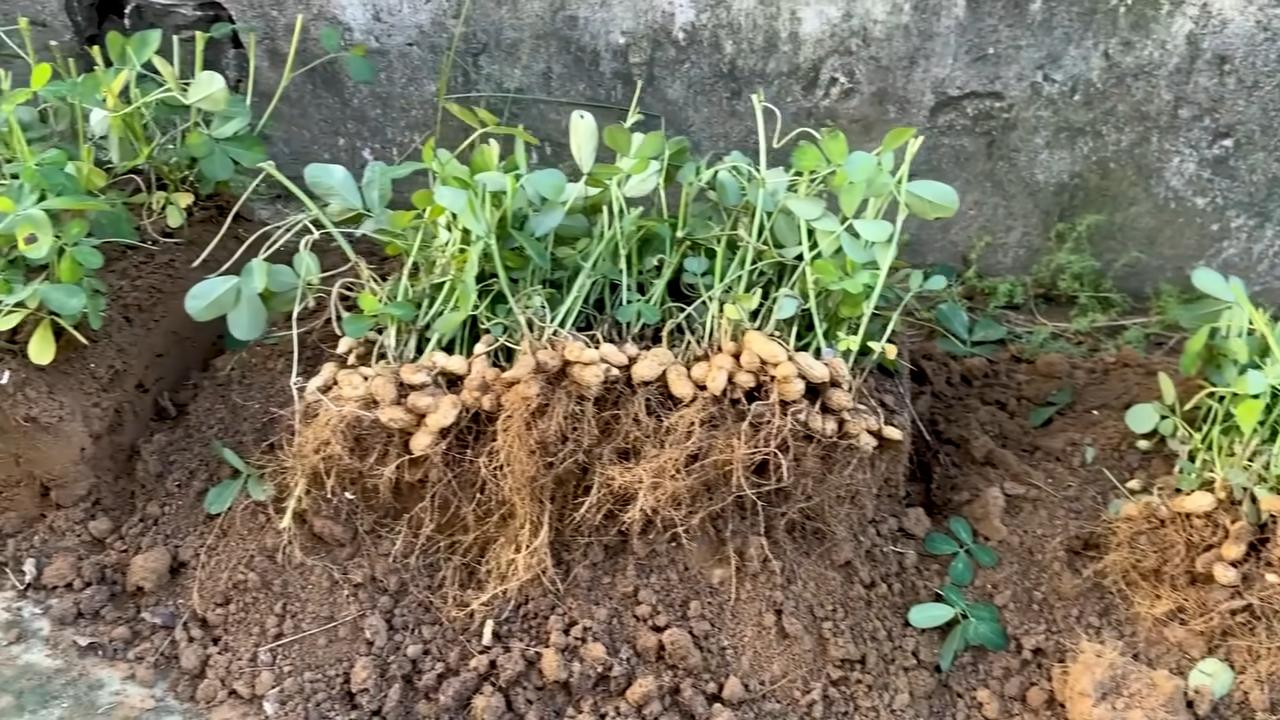
1. Reifezeit: Die Erdnüsse sind reif, wenn die Blätter gelb werden und absterben. Das dauert in der Regel etwa 4-5 Monate.
2. Ernte: Ziehe die Pflanzen vorsichtig aus der Erde. Schüttle die Erde ab und sammle die Erdnüsse ein.
3. Trocknen: Lasse die Erdnüsse an einem trockenen und luftigen Ort für etwa 1-2 Wochen trocknen.
4. Lagern: Lagere die getrockneten Erdnüsse in einem luftdichten Behälter an einem kühlen und trockenen Ort.
Häufige Probleme und Lösungen: Was tun, wenn etwas schief geht?
Auch beim Anbau von Erdnüssen im Haus können Probleme auftreten. Hier sind einige häufige Probleme und wie du sie lösen kannst:
* Gelbe Blätter: Gelbe Blätter können ein Zeichen für Überwässerung, Nährstoffmangel oder Schädlingsbefall sein. Überprüfe die Erde und passe die Bewässerung an. Dünge die Pflanzen bei Bedarf. Untersuche die Blätter auf Schädlinge.
* Schädlinge: Erdnusspflanzen können von Blattläusen, Spinnmilben oder Weißen Fliegen befallen werden. Sprühe die Pflanzen mit einem Insektizid oder einer Lösung aus Wasser und Spülmittel ein.
* Keine Blüten: Wenn die Pflanzen keine Blüten bilden, kann das an zu wenig Sonnenlicht oder Nährstoffmangel liegen. Stelle die Pflanzen an einen sonnigeren Standort und dünge sie.
* Keine Erdnüsse: Wenn die Pflanzen blühen, aber keine Erdnüsse bilden, kann das an einer schlechten Befruchtung oder an zu wenig Platz im Topf liegen. Stelle sicher, dass die Pflanzen genügend Platz haben und dass die Erde gut durchlässig ist.
Zusätzliche Tipps und Tricks: So machst du es noch besser
* Sortenwahl: Es gibt verschiedene Erdnusssorten. Einige Sorten sind besser für den Anbau im Haus geeignet als andere. Informiere dich vor dem Kauf über die verschiedenen Sorten.
* Umpflanzen: Wenn die Pflanzen zu groß für ihre Töpfe werden, kannst du sie in größere Töpfe umpflanzen.
* Beschneiden: Du kannst die Pflanzen beschneiden, um das Wachstum zu fördern.
* Klima: Erdnusspflanzen bevorzugen warme Temperaturen. Stelle sicher, dass die Temperatur im Raum nicht unter 18 Grad Celsius fällt.
* Geduld: Der Anbau von Erdnüssen braucht Zeit und Geduld. Gib nicht auf, wenn es nicht sofort klappt.
Warum Erdnüsse im Haus anbauen? Die Vorteile
Es gibt viele gute Gründe, Erdnüsse im Haus anzubauen:
* Frische Erdnüsse: Du hast immer frische Erdnüsse zur Hand.
* Nachhaltigkeit: Du kannst deine eigenen Lebensmittel anbauen und somit einen Beitrag zur Nachhaltigkeit leisten.
* Hobby: Der Anbau von Erdnüssen ist ein faszinierendes und lohnendes Hobby.
* Dekoration: Erdnusspflanzen sind eine schöne Dekoration für dein Zuhause.
* Lerneffekt: Du lernst viel über Pflanzen und den Anbau von Lebensmitteln.
Ich hoffe, dieser Leitfaden hat dir geholfen, deine eigenen Erdnüsse im Haus anzubauen. Viel Erfolg und viel Spaß dabei! Lass mich wissen, wie es läuft!
Conclusion
So, there you have it! Growing peanuts indoors is not only possible, but it’s also a surprisingly rewarding experience. Forget the store-bought, often bland, peanuts. Imagine the satisfaction of harvesting your own homegrown, flavorful peanuts right from your living room. This DIY project is a must-try for several reasons. First, it offers a unique and engaging gardening experience, especially during colder months when outdoor gardening is limited. Second, it provides a sustainable source of fresh, healthy snacks. And third, it’s a fantastic educational opportunity, particularly for children, to learn about the life cycle of plants and the origins of their food.
But the benefits don’t stop there. Growing peanuts indoors allows you to control the growing environment, minimizing the risk of pests and diseases that can plague outdoor crops. You can tailor the soil composition, watering schedule, and lighting to create the perfect conditions for optimal peanut production. Plus, it’s a conversation starter! Imagine the looks of surprise and admiration when you tell your friends and family that you’re growing peanuts indoors.
Don’t be afraid to experiment with different varieties of peanuts. Virginia peanuts, with their large kernels, are a popular choice, but Spanish peanuts, known for their smaller size and reddish skins, can also thrive indoors. Consider trying Valencia peanuts, which typically produce multiple peanuts per plant, for a potentially higher yield.
For a fun variation, try roasting your freshly harvested peanuts with different seasonings. A sprinkle of sea salt, a dash of chili powder, or a coating of honey and cinnamon can transform your homegrown peanuts into a gourmet treat. You can also use your peanuts to make homemade peanut butter, peanut brittle, or even add them to stir-fries and salads for a crunchy, nutty flavor.
We strongly encourage you to give this DIY trick a try. It’s a fun, educational, and rewarding project that will bring a touch of the outdoors inside. And most importantly, it will provide you with a delicious and sustainable source of fresh peanuts.
Once you’ve embarked on your indoor peanut-growing adventure, we’d love to hear about your experience. Share your tips, tricks, and photos in the comments below. Let’s create a community of indoor peanut growers and learn from each other’s successes and challenges. What kind of soil did you use? What lighting setup worked best for you? Did you encounter any unexpected problems? Your insights could be invaluable to other aspiring indoor peanut farmers. So, grab your seeds, prepare your pots, and get ready to experience the joy of growing peanuts indoors! We can’t wait to see what you create.
FAQ
Frequently Asked Questions About Growing Peanuts Indoors
Q: What kind of peanuts should I use to grow indoors?
A: You can use raw, unsalted peanuts that are specifically labeled for planting. Avoid roasted or salted peanuts, as they will not germinate. Virginia peanuts are a popular choice due to their large size, but Spanish and Valencia peanuts can also be grown successfully indoors. Look for peanut seeds at your local garden center or online seed supplier. Ensure the seeds are fresh and viable for the best results.
Q: What kind of soil is best for growing peanuts indoors?
A: Peanuts thrive in well-draining, sandy loam soil. Avoid heavy clay soils, as they can become waterlogged and inhibit peanut development. You can create your own potting mix by combining equal parts of potting soil, sand, and compost. The sand will improve drainage, while the compost will provide essential nutrients. Ensure the soil pH is between 6.0 and 6.5 for optimal growth.
Q: How much sunlight do peanuts need when grown indoors?
A: Peanuts require at least 6-8 hours of direct sunlight per day. If you don’t have a sunny window, you can supplement with artificial grow lights. Fluorescent or LED grow lights are a good option. Position the lights about 6-12 inches above the plants and adjust as they grow. Consistent light is crucial for healthy growth and peanut production.
Q: How often should I water my peanut plants?
A: Water your peanut plants regularly, keeping the soil consistently moist but not waterlogged. Allow the top inch of soil to dry out between waterings. Overwatering can lead to root rot, while underwatering can stunt growth. Check the soil moisture daily and adjust your watering schedule as needed. During hot, dry periods, you may need to water more frequently.
Q: How long does it take to grow peanuts indoors?
A: It typically takes about 120-150 days from planting to harvest. The exact time will depend on the variety of peanut, the growing conditions, and your climate. Be patient and monitor your plants closely. You’ll know the peanuts are ready to harvest when the leaves start to turn yellow and the pods begin to mature.
Q: How do I harvest peanuts grown indoors?
A: To harvest your peanuts, carefully dig up the entire plant, being careful not to damage the pods. Gently shake off any excess soil and allow the plants to dry in a warm, well-ventilated area for several days. Once the plants are dry, you can remove the peanuts from the vines.
Q: Are there any common pests or diseases that affect indoor peanut plants?
A: While indoor peanut plants are generally less susceptible to pests and diseases than outdoor plants, they can still be affected by aphids, spider mites, and fungal diseases. Inspect your plants regularly for signs of infestation or disease. If you notice any problems, treat them promptly with an appropriate insecticide or fungicide. Good air circulation and proper watering can help prevent many common problems.
Q: Can I grow peanuts in containers? What size container is best?
A: Yes, peanuts can be successfully grown in containers. Choose a container that is at least 12 inches deep and 12 inches wide to allow ample room for root development and peanut formation. Ensure the container has drainage holes to prevent waterlogging. You can grow multiple peanut plants in a larger container, but be sure to space them adequately to allow for proper growth.
Q: Do I need to fertilize my peanut plants?
A: Yes, fertilizing your peanut plants can help promote healthy growth and peanut production. Use a balanced fertilizer with equal amounts of nitrogen, phosphorus, and potassium. Apply the fertilizer according to the package directions, typically every 2-3 weeks during the growing season. Avoid over-fertilizing, as this can lead to excessive foliage growth and reduced peanut production.
Q: What do I do with the peanut plants after harvesting the peanuts?
A: After harvesting the peanuts, you can compost the remaining plant material. Peanut plants are a good source of organic matter and can help improve the soil structure and fertility of your compost pile. Alternatively, you can discard the plants in your yard waste bin.
Leave a Comment