
Growing Celery with Rocks might sound a little unconventional, right? But trust me, this simple DIY trick can revolutionize your home garden and give you the crispest, most flavorful celery you’ve ever tasted! For centuries, gardeners have experimented with different techniques to improve their yields, and while the exact origin of using rocks for celery cultivation is a bit murky, the underlying principle is rooted in understanding the plant’s needs.
Celery, with its refreshing crunch, has been enjoyed since ancient times, with evidence suggesting its cultivation dating back to the Mediterranean region. Historically, it was valued for its medicinal properties before becoming a culinary staple. Now, you might be wondering, “Why rocks? What’s the big deal?” Well, the secret lies in moisture retention and temperature regulation. Celery thrives in consistently moist soil, and strategically placed rocks around your plants can help retain moisture, reducing the need for frequent watering. This is especially crucial during hot summer months.
Plus, the rocks can help moderate soil temperature, preventing extreme fluctuations that can stress your celery plants. This DIY hack is a game-changer for anyone struggling with dry soil, inconsistent watering schedules, or simply wanting to boost their celery production. I’m excited to share this simple yet effective method with you, so you can enjoy a bountiful harvest of delicious, homegrown celery! Let’s dive into the details of growing celery with rocks and unlock the secrets to a thriving garden.
Sellerie aus Strunk ziehen: Ein DIY-Gartenprojekt für Anfänger
Hey Gartenfreunde! Habt ihr euch jemals gefragt, ob ihr euren Gemüsegarten auf eine super einfache und nachhaltige Weise erweitern könnt? Ich zeige euch heute, wie ihr aus einem einfachen Selleriestrunk, den ihr normalerweise wegwerfen würdet, frischen Sellerie ziehen könnt – und das Ganze mit nur ein paar Steinen! Klingt verrückt? Ist es aber nicht! Es ist ein tolles Projekt für Kinder, Anfänger und alle, die einen grünen Daumen entwickeln wollen.
Was ihr braucht:
* Ein Selleriestrunk (am besten mit einem intakten Boden)
* Ein flaches Gefäß (z.B. eine Schale, ein Teller oder eine Auflaufform)
* Kleine Steine (Kieselsteine, Ziersteine, etc.)
* Wasser
* Ein sonniger Platz (Fensterbank ist ideal)
* Geduld (aber keine Sorge, es geht relativ schnell!)
* Optional: Pflanzerde und ein Topf (für die spätere Umpflanzung)
Warum Sellerie aus Strunk ziehen?
* Nachhaltigkeit: Ihr reduziert Lebensmittelverschwendung und gebt einem vermeintlichen Abfallprodukt ein neues Leben.
* Einfachheit: Es ist ein super einfaches Projekt, das fast keine Vorkenntnisse erfordert.
* Beobachtung: Ihr könnt den Wachstumsprozess hautnah miterleben und lernen, wie Pflanzen funktionieren.
* Kostenersparnis: Ihr spart Geld, da ihr keinen neuen Sellerie kaufen müsst.
* Spaß: Es macht einfach Spaß, zu sehen, wie aus einem Strunk neue Blätter sprießen!
Schritt-für-Schritt-Anleitung: Sellerie-Regeneration
1. Den Selleriestrunk vorbereiten:
* Nachdem ihr den Sellerie für eure Mahlzeit verwendet habt, schneidet ihr den Strunk etwa 5-7 cm vom unteren Ende ab. Achtet darauf, dass der Strunk fest und gesund aussieht. Er sollte keine braunen oder faulen Stellen haben.
* Entfernt die äußeren, welken oder beschädigten Blätter. Die inneren, kleinen Blätter könnt ihr dran lassen.
* Wichtig: Schneidet den Strunk nicht zu kurz ab, da er die Basis für das neue Wachstum bildet.
2. Das Gefäß vorbereiten:
* Wählt ein flaches Gefäß, das etwas größer ist als der Durchmesser des Selleriestrunks. Eine Schale, ein tiefer Teller oder eine kleine Auflaufform eignen sich gut.
* Reinigt das Gefäß gründlich, um die Bildung von Bakterien oder Schimmel zu vermeiden.
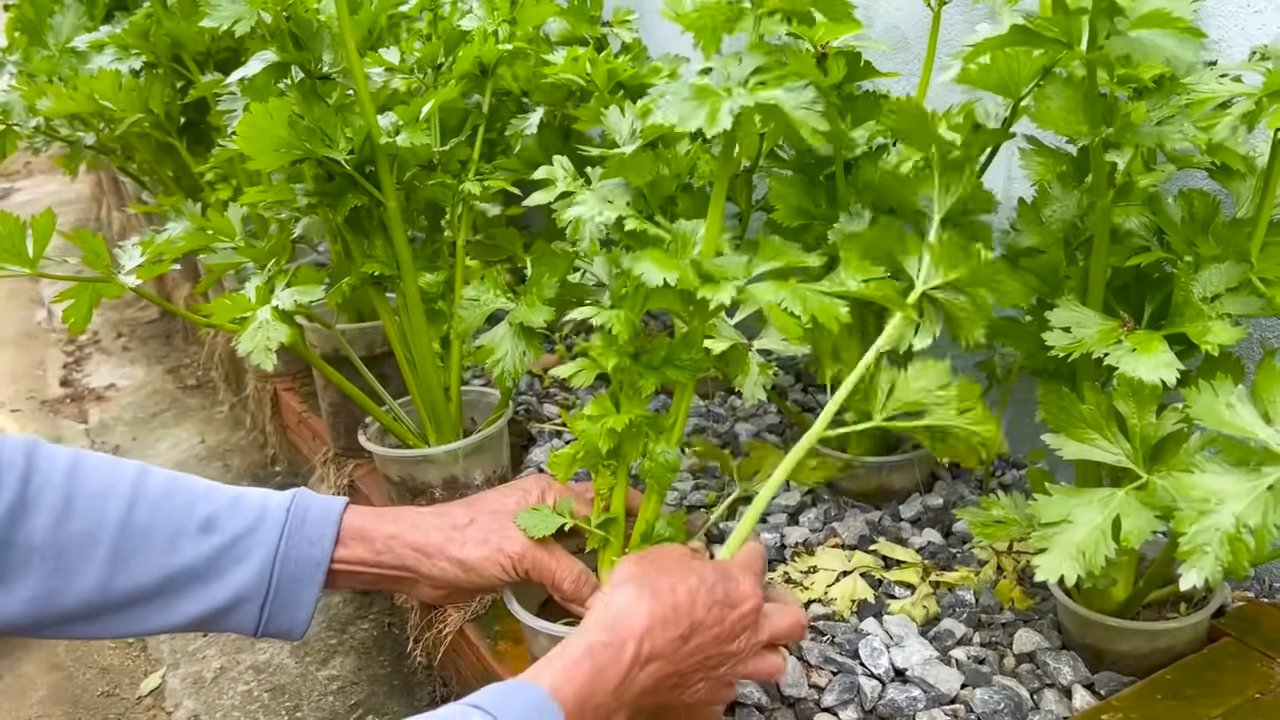
3. Die Steine platzieren:
* Verteilt die kleinen Steine gleichmäßig im Gefäß. Die Steine dienen dazu, den Selleriestrunk zu stabilisieren und ihn gleichzeitig vor dem direkten Kontakt mit dem Wasser zu schützen. Das verhindert Fäulnis.
* Die Steine sollten etwa 2-3 cm hoch im Gefäß liegen.
4. Den Selleriestrunk platzieren:
* Setzt den Selleriestrunk vorsichtig auf die Steine. Achtet darauf, dass der Strunk stabil steht und nicht umkippt.
* Die Unterseite des Strunks sollte die Steine berühren, aber nicht vollständig im Wasser stehen.
5. Wasser hinzufügen:
* Gießt vorsichtig Wasser in das Gefäß, bis der Wasserstand etwa 1 cm unterhalb der Schnittfläche des Selleriestrunks liegt. Die Steine sollten teilweise im Wasser stehen, aber der Strunk selbst sollte nicht komplett untergetaucht sein.
* Achtung: Zu viel Wasser kann dazu führen, dass der Strunk fault.
6. Den richtigen Standort wählen:
* Stellt das Gefäß mit dem Selleriestrunk an einen hellen, sonnigen Platz. Eine Fensterbank ist ideal, da der Sellerie viel Licht benötigt, um zu wachsen.
* Direkte Sonneneinstrahlung ist gut, aber vermeidet extreme Hitze, da dies den Strunk austrocknen kann.
7. Die Pflege:
* Wechselt das Wasser alle 1-2 Tage, um die Bildung von Bakterien zu verhindern und dem Sellerie frisches Wasser zuzuführen.
* Achtet darauf, dass der Wasserstand immer gleich bleibt. Füllt bei Bedarf Wasser nach.
* Beobachtet den Selleriestrunk genau. Nach einigen Tagen solltet ihr erste Anzeichen von Wachstum sehen: kleine, grüne Blätter, die aus der Mitte des Strunks sprießen.
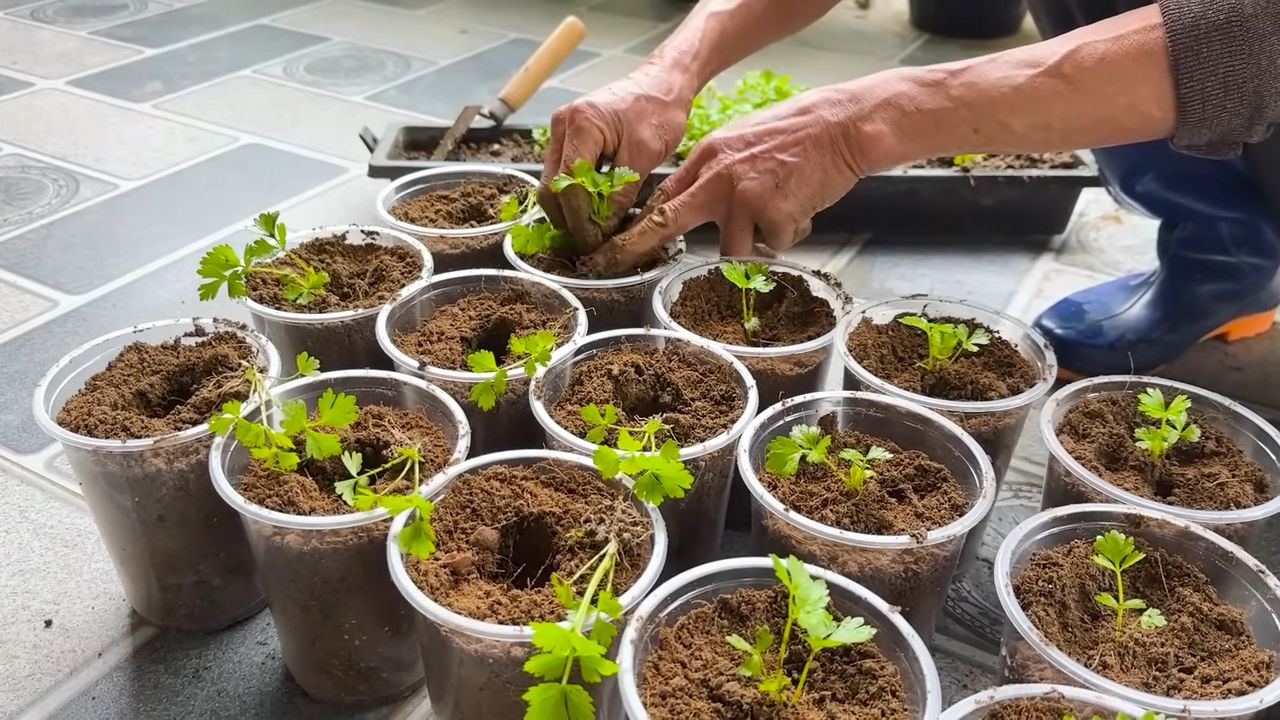
Umpflanzen in Erde (optional):
Nach etwa 1-2 Wochen, wenn der Selleriestrunk neue Wurzeln und Blätter gebildet hat, könnt ihr ihn in einen Topf mit Erde umpflanzen. Dies ist optional, aber es wird dem Sellerie helfen, stärker und größer zu werden.
1. Den Topf vorbereiten:
* Wählt einen Topf, der groß genug ist, um den Selleriestrunk und seine Wurzeln aufzunehmen. Ein Topf mit einem Durchmesser von 15-20 cm ist ideal.
* Füllt den Topf mit hochwertiger Pflanzerde.
2. Den Selleriestrunk umpflanzen:
* Nehmt den Selleriestrunk vorsichtig aus dem Gefäß mit den Steinen. Achtet darauf, die Wurzeln nicht zu beschädigen.
* Grabt ein kleines Loch in die Erde im Topf.
* Setzt den Selleriestrunk in das Loch und bedeckt die Wurzeln mit Erde.
* Drückt die Erde leicht an.
3. Gießen:
* Gießt den Sellerie nach dem Umpflanzen gründlich.
* Achtet darauf, dass die Erde feucht, aber nicht nass ist.
4. Pflege nach dem Umpflanzen:
* Stellt den Topf an einen hellen, sonnigen Platz.
* Gießt den Sellerie regelmäßig, aber vermeidet Staunässe.
* Düngt den Sellerie alle paar Wochen mit einem organischen Dünger.
Häufige Probleme und Lösungen:
* Fäulnis: Wenn der Selleriestrunk fault, ist das ein Zeichen dafür, dass er zu viel Wasser ausgesetzt ist oder dass das Wasser nicht sauber ist. Wechselt das Wasser häufiger und achtet darauf, dass der Strunk nicht komplett untergetaucht ist.
* Kein Wachstum: Wenn der Selleriestrunk nach einigen Tagen keine Anzeichen von Wachstum zeigt, kann das daran liegen, dass er nicht genug Licht bekommt oder dass er nicht gesund ist. Stellt ihn an einen helleren Ort und achtet darauf, dass der Strunk fest und gesund aussieht.
* Schimmel: Wenn sich Schimmel im Gefäß bildet, reinigt das Gefäß gründlich und wechselt das Wasser häufiger.
Zusätzliche Tipps:
* Ihr könnt verschiedene Selleriesorten ausprobieren, um zu sehen, welche am besten wachsen.
* Ihr könnt den Sellerie auch im Freien anpflanzen, wenn das Wetter warm genug ist.
* Wenn ihr den Sellerie nicht umpflanzen wollt, könnt ihr ihn auch einfach im Wasser weiterwachsen lassen. Er wird dann zwar nicht so groß, aber er wird trotzdem neue Blätter produzieren.
* Die neuen Sellerieblätter können wie frische Kräuter verwendet werden, um Suppen, Salate und andere Gerichte zu würzen.
Ich hoffe, diese Anleitung hilft euch dabei, euren eigenen Sellerie aus Strunk zu ziehen! Es ist ein wirklich lohnendes Projekt, das nicht nur Spaß macht, sondern auch dazu beiträgt, Lebensmittelverschwendung zu reduzieren und euren Gemüsegarten zu erweitern. Viel Erfolg und viel Spaß beim Gärtnern!
Conclusion
So, there you have it! Growing celery with rocks, a seemingly unconventional yet surprisingly effective method, offers a fantastic way to enjoy fresh, crisp celery right from your own kitchen. This DIY trick isn’t just about saving money; it’s about connecting with your food, reducing waste, and experiencing the satisfaction of nurturing something from scraps. Forget tossing those celery bases into the compost bin – now they’re a valuable resource for a continuous supply of this versatile vegetable.
This method is a must-try for several reasons. First, it’s incredibly simple. You don’t need a green thumb or extensive gardening knowledge to succeed. The process is straightforward and requires minimal effort, making it accessible to everyone, regardless of their gardening experience. Second, it’s sustainable. By regrowing celery from its base, you’re reducing food waste and minimizing your environmental impact. Third, it’s rewarding. Watching a new celery plant emerge from what was once considered trash is a truly gratifying experience.
But the fun doesn’t stop there! Feel free to experiment with different variations. Try using different types of rocks, from smooth river stones to decorative pebbles. You can also experiment with different containers, from glass jars to ceramic pots. Consider adding a diluted liquid fertilizer to the water every few weeks to give your celery a boost. You can even try transplanting your regrown celery into a larger pot with soil once it has established a strong root system for even more robust growth. Another exciting variation is to try regrowing other vegetables using similar methods. Lettuce, bok choy, and even some herbs can be regrown from their bases in water.
Don’t be afraid to get creative and adapt the method to suit your own preferences and resources. The key is to provide the celery base with a stable environment, access to water, and plenty of sunlight. With a little patience and care, you’ll be enjoying homegrown celery in no time.
We wholeheartedly encourage you to give this DIY trick a try. It’s a fun, easy, and rewarding way to grow your own food and reduce waste. Once you’ve experienced the joy of regrowing celery with rocks, we’re confident you’ll be hooked!
And most importantly, we want to hear about your experiences! Share your photos, tips, and stories in the comments below. Let us know what worked for you, what challenges you faced, and any creative variations you tried. Together, we can learn and inspire each other to embrace sustainable gardening practices and enjoy the delicious rewards of homegrown food. Let’s cultivate a community of resourceful gardeners, one celery stalk at a time! This method of growing celery with rocks is a great way to start your journey.
Frequently Asked Questions (FAQ)
1. What kind of celery works best for regrowing with rocks?
The best celery for regrowing is fresh, organic celery with a healthy-looking base. Look for celery stalks that are firm and crisp, with leaves that are vibrant green and not wilted or yellowing. The base should be intact and free from any signs of rot or decay. While organic celery is preferred, conventional celery can also be used. Just be sure to wash it thoroughly before starting the regrowing process. Avoid celery that is already starting to soften or has a slimy texture, as it is less likely to regrow successfully.
2. How long does it take to regrow celery using this method?
The time it takes to regrow celery with rocks can vary depending on several factors, including the quality of the celery base, the amount of sunlight it receives, and the temperature of the environment. Generally, you can expect to see new growth within 5-7 days. Small leaves will start to emerge from the center of the base. Over the next few weeks, the celery will continue to grow, and you’ll notice the leaves becoming larger and more developed. It typically takes around 3-4 weeks to grow a substantial amount of celery that is ready to harvest. Remember to be patient and provide the celery with consistent care, and you’ll be rewarded with fresh, homegrown celery in no time.
3. What kind of rocks should I use?
The type of rocks you use isn’t critical, but it’s best to use clean, non-toxic rocks that won’t leach harmful chemicals into the water. Smooth river rocks or pebbles are a good choice, as they are readily available and won’t damage the celery base. You can also use decorative glass beads or marbles. Avoid using rocks that are painted or treated with chemicals, as these could contaminate the water and harm the celery. Before using the rocks, wash them thoroughly with soap and water to remove any dirt or debris. The primary purpose of the rocks is to provide support for the celery base and keep it partially submerged in water, so choose rocks that are appropriately sized and shaped for this purpose.
4. How often should I change the water?
It’s important to change the water regularly to prevent the growth of bacteria and algae, which can harm the celery. Change the water every 1-2 days, or more frequently if it becomes cloudy or discolored. When changing the water, gently remove the celery base from the container and rinse it under cool water to remove any debris. Clean the container thoroughly with soap and water before refilling it with fresh water. Using filtered water can also help to prevent the buildup of minerals and chemicals that can affect the celery’s growth.
5. How much sunlight does the celery need?
Celery needs plenty of sunlight to grow properly. Place the container in a location that receives at least 6-8 hours of direct sunlight per day. A sunny windowsill is an ideal spot. If you don’t have a sunny windowsill, you can supplement with artificial light, such as a grow light. Position the grow light a few inches above the celery base and leave it on for 12-14 hours per day. Insufficient sunlight can result in stunted growth and pale, weak leaves.
6. Can I transplant the regrown celery into soil?
Yes, you can definitely transplant the regrown celery into soil once it has developed a strong root system. This will allow it to grow larger and produce more celery stalks. Wait until the roots are at least 2-3 inches long before transplanting. Choose a pot that is at least 6 inches in diameter and fill it with a well-draining potting mix. Gently remove the celery base from the water and plant it in the pot, making sure to cover the roots with soil. Water thoroughly after transplanting and keep the soil moist but not soggy. Place the pot in a sunny location and fertilize regularly with a balanced fertilizer.
7. What if my celery starts to rot?
If you notice any signs of rot, such as a slimy texture or a foul odor, it’s important to take action immediately to prevent the rot from spreading. Remove the affected parts of the celery base with a clean knife. Change the water more frequently and make sure the celery is receiving adequate sunlight. You can also try adding a small amount of hydrogen peroxide to the water to help kill any bacteria or fungi that may be causing the rot. If the rot continues to spread, it’s best to discard the celery base and start with a fresh one.
8. Can I eat the regrown celery?
Yes, you can absolutely eat the regrown celery! It will taste just like regular celery, although it may be slightly less crisp. The regrown celery is perfect for adding to salads, soups, stews, and other dishes. You can also use it to make celery juice or smoothies. Just be sure to wash the celery thoroughly before eating it.
9. Can I regrow celery indefinitely?
While you can regrow celery multiple times from the same base, the quality and size of the regrown celery may decrease with each successive regrowth. Eventually, the base will become exhausted and will no longer produce new growth. To ensure a continuous supply of fresh celery, it’s best to start with a new celery base every few weeks.
10. Is growing celery with rocks a good way to teach kids about gardening?
Absolutely! Growing celery with rocks is a fantastic way to introduce children to the wonders of gardening. It’s a simple, hands-on activity that allows them to witness the miracle of plant growth firsthand. They can learn about the importance of water, sunlight, and nutrients for plant development. It’s also a great way to teach them about sustainability and reducing food waste. Plus, they’ll be thrilled to be able to eat something they grew themselves!

Leave a Comment