
Plastic bottle kale planting: who knew such a simple household item could unlock a world of gardening possibilities? I’m so excited to share this incredibly easy and rewarding DIY trick with you! Forget expensive planters and complicated setups; we’re going back to basics and embracing the beauty of upcycling.
For centuries, resourceful gardeners have sought innovative ways to cultivate their own food, often driven by necessity and a deep connection to the earth. While the specific history of using plastic bottles for planting is relatively recent, it taps into that same spirit of ingenuity and sustainability. Think about it – our grandparents and great-grandparents were masters of making do, and this hack is a modern twist on that tradition.
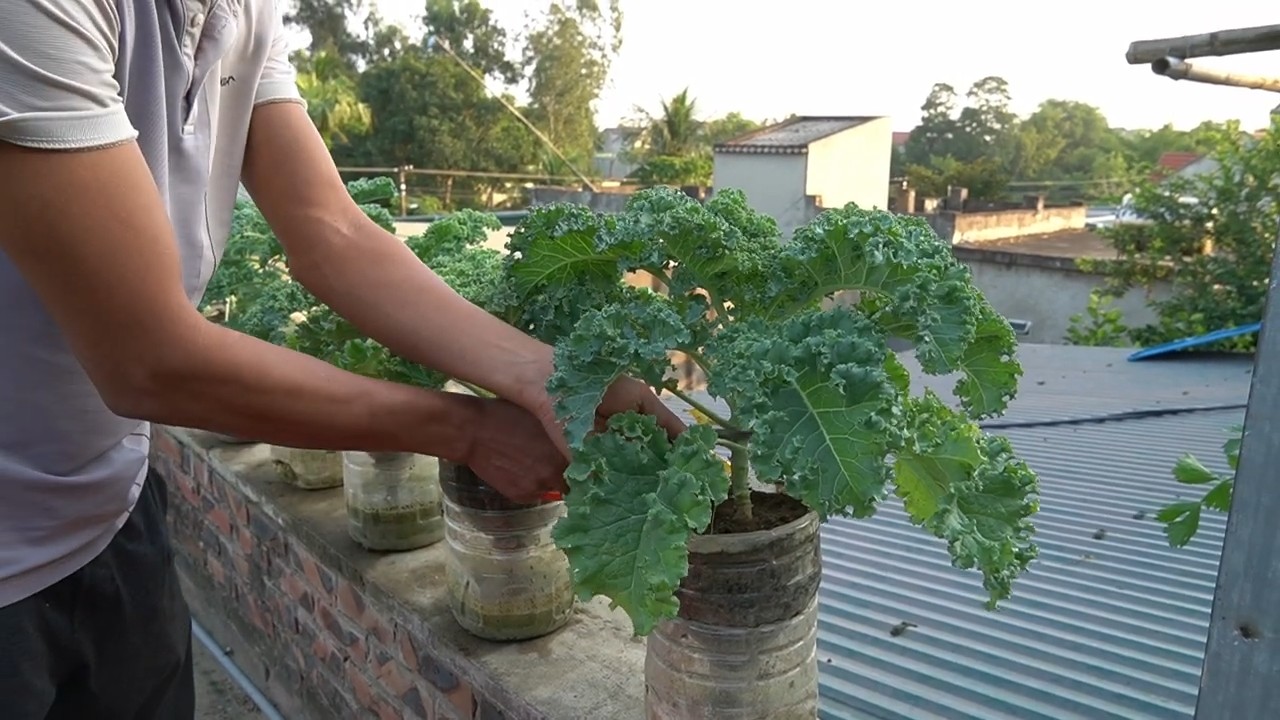
Why should you try plastic bottle kale planting? Well, for starters, it’s incredibly budget-friendly! But beyond the cost savings, it’s a fantastic way to maximize space, especially if you’re living in an apartment or have a small balcony. Kale is a nutritional powerhouse, packed with vitamins and antioxidants, and growing your own ensures you have access to fresh, organic greens right at your fingertips. Plus, let’s be honest, there’s something incredibly satisfying about nurturing a plant from seed to harvest. This DIY project is not only practical but also a fun and engaging activity for the whole family. So, grab those empty plastic bottles, and let’s get growing!
Upcycling-Wunder: Dein eigener Mini-Kohl-Garten aus Plastikflaschen!
Hey Leute! Habt ihr auch genug von langweiligen Plastikflaschen, die im Müll landen? Ich zeige euch heute, wie ihr aus diesen vermeintlichen Abfallprodukten einen super coolen und nachhaltigen Mini-Kohl-Garten zaubern könnt! Das ist nicht nur gut für die Umwelt, sondern auch für euren Geldbeutel, denn frischer Kohl aus dem eigenen Anbau schmeckt einfach am besten! Und das Beste: Es ist super einfach und macht richtig Spaß! Also, lasst uns loslegen!
Was du brauchst: Die Materialliste
Bevor wir starten, hier eine Liste mit allem, was du für dein Upcycling-Kohl-Projekt benötigst:
* Plastikflaschen: Am besten eignen sich große PET-Flaschen (z.B. von Wasser oder Saft). Je mehr, desto größer dein Kohl-Garten!
* Kohl-Samen: Wähle deine Lieblingssorte! Grünkohl, Palmkohl, Rosenkohl – alles ist möglich! Achte auf Bio-Qualität für gesunde Pflanzen.
* Erde: Hochwertige Pflanzerde ist wichtig für das Wachstum deiner Kohlpflanzen.
* Schere oder Cuttermesser: Zum Zuschneiden der Plastikflaschen. Sei vorsichtig!
* Bohrmaschine oder Nagel und Hammer: Für die Entwässerungslöcher.
* Gießkanne oder Sprühflasche: Zum Bewässern deiner kleinen Kohl-Babys.
* Optional:
* Handschuhe: Um deine Hände sauber zu halten.
* Etiketten und Stift: Zum Beschriften der Kohl-Sorten.
* Kleine Steine oder Tonscherben: Für eine bessere Drainage.
* Kompost: Für eine extra Portion Nährstoffe.
Phase 1: Die Vorbereitung – Flaschen-Recycling Deluxe
Jetzt geht’s ans Eingemachte! Wir verwandeln die Plastikflaschen in kleine, aber feine Pflanzgefäße.
1. Flaschen reinigen: Spüle die Plastikflaschen gründlich mit warmem Wasser und Spülmittel aus. Entferne alle Etiketten und Klebereste. Eine saubere Basis ist wichtig!
2. Flaschen zuschneiden: Hier gibt es verschiedene Möglichkeiten, je nachdem, wie du deinen Mini-Garten gestalten möchtest:
* Option 1: Hängende Pflanzgefäße: Schneide die Flasche etwa im oberen Drittel ab. Der obere Teil wird später umgedreht in den unteren Teil gesteckt und dient als Bewässerungssystem.
* Option 2: Stehende Pflanzgefäße: Schneide die Flasche horizontal in der Mitte durch. Du erhältst zwei gleich große Teile, die du als separate Pflanzgefäße nutzen kannst.
* Option 3: Vertikaler Garten: Schneide rechteckige Öffnungen in die Seiten der Flasche, sodass du mehrere Pflanzen übereinander anordnen kannst. Diese Variante ist ideal für kleine Balkone oder Wände.
Wichtig: Sei beim Schneiden vorsichtig und benutze am besten eine Schere oder ein Cuttermesser mit einer scharfen Klinge. Arbeite auf einer stabilen Unterlage und trage gegebenenfalls Handschuhe.
3. Entwässerungslöcher bohren: Damit das Wasser gut ablaufen kann und deine Kohlpflanzen nicht im Wasser stehen, bohre mit einer Bohrmaschine oder einem Nagel und Hammer ein paar kleine Löcher in den Boden der Flaschen. Das ist super wichtig, um Staunässe zu vermeiden!
4. Optional: Drainage vorbereiten: Lege eine Schicht kleine Steine oder Tonscherben auf den Boden der Flaschen. Das verbessert die Drainage und verhindert, dass die Erde die Löcher verstopft.
Phase 2: Die Bepflanzung – Kohl-Babys willkommen!
Jetzt kommt der spaßigste Teil: Wir bepflanzen unsere recycelten Flaschen mit Kohl-Samen!
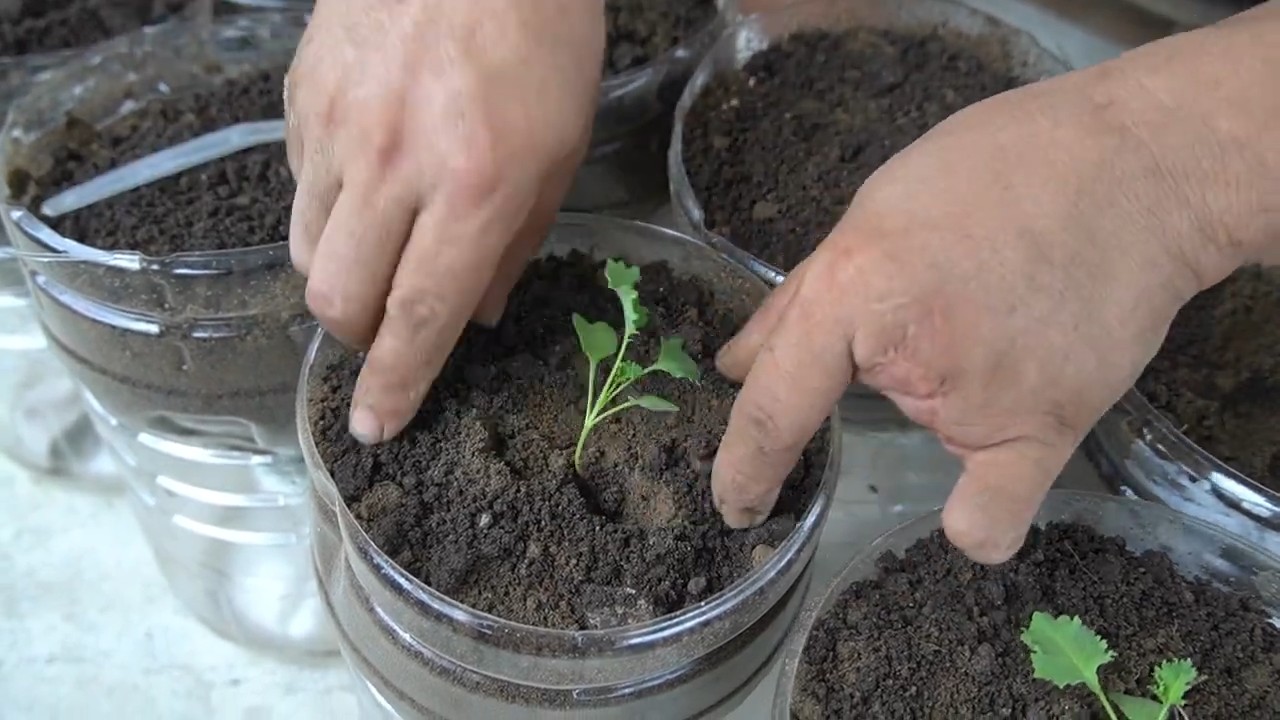
1. Erde einfüllen: Fülle die vorbereiteten Flaschen mit hochwertiger Pflanzerde. Lass etwa 2-3 cm Platz bis zum Rand.
2. Samen säen: Verteile die Kohl-Samen gleichmäßig auf der Erde. Achte auf die Angaben auf der Samenpackung bezüglich der Saattiefe. In der Regel sind das nur wenige Millimeter.
3. Samen bedecken: Bedecke die Samen vorsichtig mit einer dünnen Schicht Erde.
4. Angießen: Gieße die Erde vorsichtig mit einer Gießkanne oder Sprühflasche an. Die Erde sollte feucht, aber nicht nass sein.
5. Optional: Beschriften: Beschrifte die Flaschen mit den Namen der Kohl-Sorten, damit du den Überblick behältst.
Phase 3: Die Pflege – Liebe und Licht für deinen Kohl-Garten
Damit deine Kohlpflanzen prächtig gedeihen, brauchen sie regelmäßige Pflege.
1. Standort wählen: Stelle die bepflanzten Flaschen an einen hellen und sonnigen Standort. Kohl liebt die Sonne! Ein Südbalkon oder eine Fensterbank sind ideal.
2. Bewässerung: Halte die Erde gleichmäßig feucht. Gieße regelmäßig, aber vermeide Staunässe. Die Erde sollte sich leicht feucht anfühlen, wenn du sie berührst.
3. Düngen: Dünge deine Kohlpflanzen regelmäßig mit einem organischen Dünger. Das sorgt für kräftiges Wachstum und eine reiche Ernte.
4. Schutz vor Schädlingen: Kontrolliere deine Kohlpflanzen regelmäßig auf Schädlinge wie Kohlweißlinge oder Blattläuse. Bei Bedarf kannst du natürliche Schädlingsbekämpfungsmittel einsetzen.
5. Umpflanzen: Wenn die Kohlpflanzen zu groß für die Flaschen werden, kannst du sie in größere Töpfe oder ins Freiland umpflanzen.
Spezialtipps für den perfekten Kohl-Garten
* Kombination mit anderen Pflanzen: Kohl lässt sich gut mit anderen Pflanzen wie Ringelblumen, Kapuzinerkresse oder Kräutern kombinieren. Diese Pflanzen können Schädlinge abwehren und das Wachstum fördern.
* Mulchen: Bedecke die Erde mit einer Schicht Mulch (z.B. Stroh oder Rasenschnitt). Das hält die Feuchtigkeit im Boden und unterdrückt Unkraut.
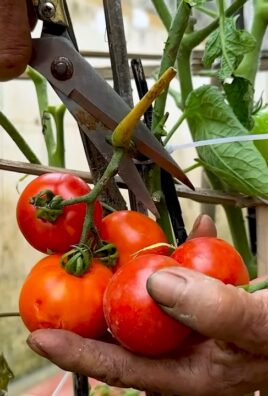
* Regelmäßiges Ernten: Ernte die äußeren Blätter des Kohls regelmäßig. Das fördert das Wachstum der inneren Blätter und verlängert die Erntezeit.
* Upcycling-Ideen: Nutze alte Joghurtbecher, Eierkartons oder andere Behälter als Anzuchttöpfe für deine Kohl-Samen.
* Experimentieren: Probiere verschiedene Kohl-Sorten und Anbaumethoden aus. So findest du heraus, was am besten für deinen Standort und deine Bedürfnisse geeignet ist.
Häufige Fehler vermeiden
* Staunässe: Achte darauf, dass das Wasser gut ablaufen kann und die Erde nicht zu nass ist.
* Zu wenig Licht: Kohl braucht viel Licht, um zu wachsen. Stelle die Pflanzen an einen sonnigen Standort.
* Falsche Erde: Verwende hochwertige Pflanzerde, die ausreichend Nährstoffe enthält.
* Vernachlässigung: Kontrolliere deine Kohlpflanzen regelmäßig und gieße und dünge sie bei Bedarf.
Fazit: Dein Beitrag zur Nachhaltigkeit
Mit diesem einfachen DIY-Projekt kannst du nicht nur deinen eigenen frischen Kohl anbauen, sondern auch einen Beitrag zur Nachhaltigkeit leisten. Du reduzierst Müll, sparst Geld und tust etwas Gutes für die Umwelt. Also, worauf wartest du noch? Schnapp dir ein paar Plastikflaschen und starte deinen eigenen Mini-Kohl-Garten! Ich bin sicher, du wirst begeistert sein! Viel Spaß beim Gärtnern!
Conclusion
So, there you have it! Transforming discarded plastic bottles into thriving kale planters is not just a clever upcycling project; it’s a sustainable, cost-effective, and incredibly rewarding way to grow your own fresh greens. We’ve walked you through the simple steps, highlighting how accessible and adaptable this method truly is. Forget expensive gardening supplies and complicated setups. With a few readily available plastic bottles, some soil, and a little bit of sunshine, you can cultivate a vibrant kale patch right on your balcony, patio, or even windowsill.
This DIY trick isn’t just about saving money; it’s about embracing a more eco-conscious lifestyle. By repurposing plastic waste, you’re actively contributing to reducing landfill waste and promoting a circular economy. Plus, there’s something incredibly satisfying about nurturing your own food from seed to table, knowing exactly where your produce comes from and how it was grown. The taste of homegrown kale, bursting with freshness and nutrients, is simply unmatched.
But the beauty of this project lies in its versatility. Feel free to experiment with different types of plastic bottles – larger bottles can accommodate more kale plants, while smaller bottles are perfect for starting seedlings. You can also get creative with the design of your planters. Paint them with vibrant colors, add decorative elements, or even create a vertical garden by hanging them on a wall or fence. Consider using different types of soil mixes to see what works best for your local climate and kale variety.
For those looking to take their kale cultivation to the next level, consider companion planting. Marigolds, for example, can help deter pests, while herbs like rosemary and thyme can add flavor and aroma to your garden. You can even interplant your kale with other leafy greens like spinach or lettuce to maximize your space and diversify your harvest.
We wholeheartedly encourage you to give this DIY plastic bottle kale planting method a try. It’s a fantastic project for beginners and experienced gardeners alike. It’s a wonderful way to get kids involved in gardening and teach them about sustainability. And most importantly, it’s a simple and effective way to enjoy fresh, healthy kale all year round.
Don’t be afraid to experiment, adapt, and personalize the process to suit your own needs and preferences. The possibilities are endless! And once you’ve harvested your first batch of homegrown kale, we’d love to hear about your experience. Share your photos, tips, and tricks with us in the comments below. Let’s inspire each other to create a more sustainable and delicious world, one plastic bottle kale planter at a time. We are confident that you will find this method of growing kale to be both rewarding and productive.
Frequently Asked Questions (FAQ)
What kind of plastic bottles are best for planting kale?
Ideally, you should use food-grade plastic bottles, such as those that previously contained water, juice, or soda. These are generally considered safe for growing edible plants. Avoid using bottles that contained harsh chemicals or cleaning products, as these could contaminate the soil and your kale. PET (Polyethylene Terephthalate) bottles, commonly used for water and soda, are a good choice. Make sure to thoroughly wash and rinse the bottles before using them to remove any residue. The size of the bottle will determine how many kale plants you can grow in each container. Larger bottles are better for mature plants, while smaller bottles are suitable for seedlings.
How do I ensure proper drainage in my plastic bottle planters?
Proper drainage is crucial for healthy kale growth. Without adequate drainage, the roots can become waterlogged, leading to root rot and other problems. To ensure good drainage, create several drainage holes in the bottom of the plastic bottle. You can use a drill, a nail, or even a heated skewer to make the holes. A good rule of thumb is to create at least four to five holes, each about ¼ inch in diameter. You can also add a layer of gravel or small stones to the bottom of the bottle before adding the soil. This will help to prevent the drainage holes from becoming clogged with soil.
What type of soil should I use for growing kale in plastic bottles?
Kale thrives in well-draining, nutrient-rich soil. A good potting mix specifically formulated for vegetables is an excellent choice. You can also create your own soil mix by combining equal parts of garden soil, compost, and perlite or vermiculite. Compost provides essential nutrients, while perlite or vermiculite improves drainage and aeration. Avoid using heavy clay soil, as it can become compacted and waterlogged. Before planting, amend the soil with a slow-release fertilizer to provide a steady supply of nutrients to your kale plants.
How much sunlight does kale need when grown in plastic bottles?
Kale requires at least 6 hours of direct sunlight per day to thrive. Choose a location that receives plenty of sunlight, such as a south-facing balcony or patio. If you don’t have access to a sunny outdoor space, you can supplement with grow lights. Place the grow lights about 6-12 inches above the kale plants and keep them on for 12-14 hours per day. Rotate the plastic bottle planters regularly to ensure that all sides of the kale plants receive adequate sunlight.
How often should I water my kale plants in plastic bottles?
The watering frequency will depend on the weather conditions, the type of soil you’re using, and the size of the plastic bottle. Generally, you should water your kale plants when the top inch of soil feels dry to the touch. Avoid overwatering, as this can lead to root rot. Water deeply, ensuring that the water drains out of the drainage holes. During hot, dry weather, you may need to water your kale plants more frequently. Check the soil moisture regularly and adjust your watering schedule accordingly.
How do I fertilize my kale plants grown in plastic bottles?
Kale is a heavy feeder and requires regular fertilization to produce a bountiful harvest. You can use a liquid fertilizer, a slow-release fertilizer, or a combination of both. For liquid fertilizers, follow the instructions on the label and apply every two to three weeks. For slow-release fertilizers, incorporate them into the soil at planting time and then reapply every few months. Choose a fertilizer that is specifically formulated for vegetables and that is rich in nitrogen, phosphorus, and potassium. You can also supplement with compost tea or worm castings to provide additional nutrients and beneficial microbes to the soil.
How do I protect my kale plants from pests and diseases?
Kale is susceptible to a variety of pests and diseases, including aphids, cabbage worms, and powdery mildew. To prevent pest and disease problems, start with healthy plants and provide them with optimal growing conditions. Inspect your kale plants regularly for signs of pests or diseases. If you spot any problems, take action immediately. You can use insecticidal soap or neem oil to control aphids and cabbage worms. For powdery mildew, improve air circulation and avoid overhead watering. You can also use a fungicide if necessary. Consider companion planting with herbs like rosemary and thyme, which can help to deter pests.
Can I grow different varieties of kale in plastic bottles?
Yes, you can grow different varieties of kale in plastic bottles. There are many different types of kale to choose from, including curly kale, lacinato kale (dinosaur kale), and red Russian kale. Each variety has its own unique flavor and texture. Experiment with different varieties to find your favorites. When growing multiple varieties of kale in plastic bottles, be sure to label each container so you can easily identify them.
How long does it take to harvest kale grown in plastic bottles?
The time it takes to harvest kale will depend on the variety you’re growing and the growing conditions. Generally, you can start harvesting kale leaves about 50-60 days after planting. Harvest the outer leaves first, leaving the inner leaves to continue growing. You can harvest kale leaves continuously throughout the growing season. The leaves are most tender and flavorful when they are young and small.
What are some creative ways to display my plastic bottle kale planters?
There are many creative ways to display your plastic bottle kale planters. You can hang them on a wall or fence to create a vertical garden. You can arrange them on a balcony or patio to create a mini vegetable garden. You can even paint the plastic bottles with vibrant colors and patterns to add a touch of personality to your display. Get creative and have fun with it! The possibilities are endless.
Leave a Comment