
Hanging garden celery growing might sound like something out of a fairytale, but trust me, it’s a totally achievable and incredibly rewarding DIY project! Forget those bland, store-bought stalks – imagine snipping fresh, crisp celery right from your own hanging garden, bursting with flavor and packed with nutrients.
The concept of hanging gardens has captivated imaginations for centuries, evoking images of the legendary Hanging Gardens of Babylon, a testament to human ingenuity and a desire to bring nature closer. While we might not be building ancient wonders, we can harness that same spirit to create our own miniature, edible paradises.
Why should you try this? Well, for starters, space is often a premium, especially for city dwellers. Hanging garden celery growing allows you to maximize your growing area, utilizing vertical space that would otherwise go unused. Plus, it’s a fantastic way to deter pests, keep your celery clean, and add a touch of unique beauty to your balcony, patio, or even indoors! I’m excited to share some simple, effective tricks and DIY hacks that will have you harvesting your own delicious celery in no time. Let’s get started!
DIY Hängegarten-Sellerie: Dein eigener knackiger Vorrat!
Hey Gartenfreunde! Habt ihr Lust auf frischen Sellerie, direkt aus eurem eigenen Hängegarten? Ich zeige euch, wie ihr mit einfachen Mitteln und ein bisschen Geduld euren eigenen Sellerie anbauen könnt – platzsparend und super dekorativ! Sellerie aus dem Hängegarten ist nicht nur lecker, sondern auch ein echter Hingucker. Los geht’s!
Was du brauchst:
* Sellerieknolle mit Grün: Am besten eine, die im Supermarkt noch frische, grüne Blätter hat. Das ist ein Zeichen, dass sie noch vital ist.
* Messer: Ein scharfes Messer ist wichtig, um die Knolle sauber zu bearbeiten.
* Zahnstocher: Die dienen als Halterung für die Knolle.
* Glas oder Gefäß: Ein Glas, eine Schüssel oder ein anderes Gefäß, das breit genug ist, um die Sellerieknolle aufzunehmen, ohne dass sie den Boden berührt.
* Wasser: Leitungswasser reicht völlig aus.
* Blumenerde: Hochwertige Blumenerde ist wichtig für das spätere Einpflanzen.
* Topf oder Hängeampel: Wähle einen Topf oder eine Hängeampel mit ausreichend Volumen.
* Optional: Flüssigdünger: Für eine optimale Nährstoffversorgung.
Sellerieknolle vorbereiten: Der Start in dein Sellerie-Abenteuer
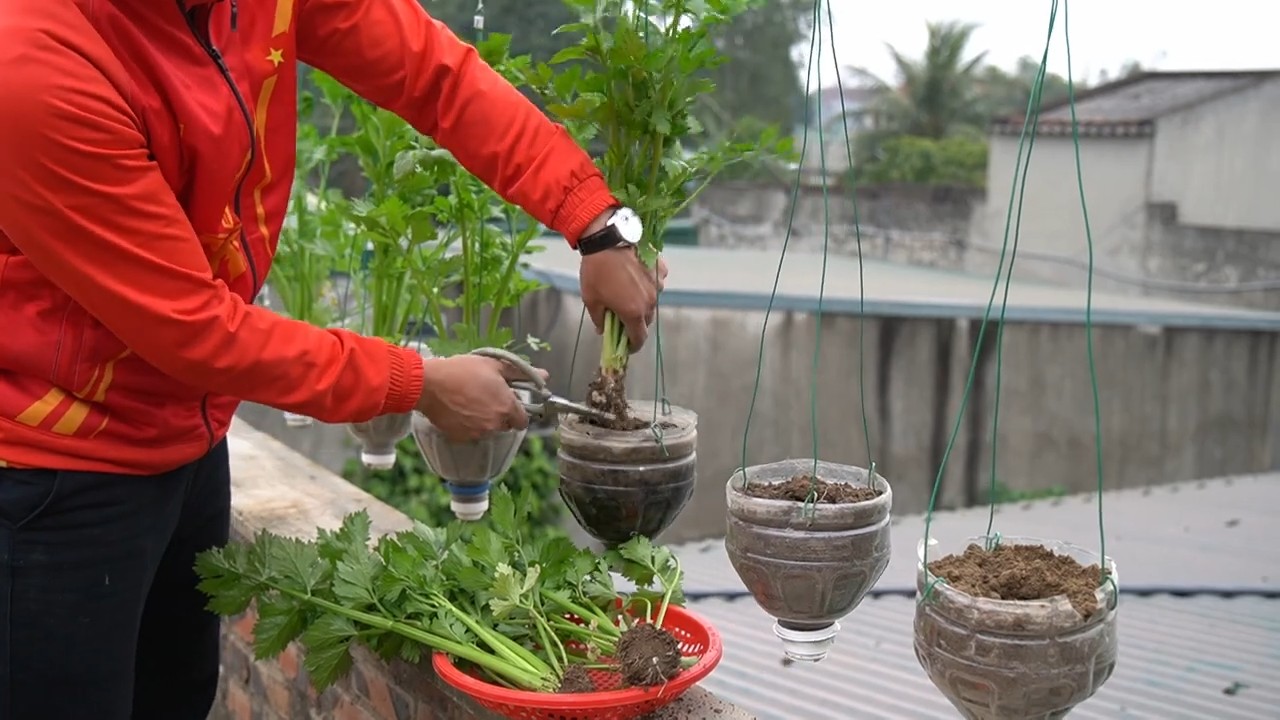
1. Knolle vorbereiten: Nimm deine Sellerieknolle und schneide den oberen Teil, etwa 2-3 cm unterhalb des Blattansatzes, mit einem scharfen Messer ab. Achte darauf, dass du die Blätter nicht beschädigst.
2. Zahnstocher anbringen: Stecke 3-4 Zahnstocher gleichmäßig verteilt in die Seiten der Sellerieknolle. Sie sollten etwa zur Hälfte in der Knolle stecken und als Halterung dienen.
3. Ins Wasser stellen: Fülle dein Glas oder Gefäß mit Wasser. Die Zahnstocher sollten die Knolle so halten, dass die Schnittfläche gerade so das Wasser berührt. Die Knolle selbst sollte nicht im Wasser liegen, da sie sonst faulen kann.
4. Standort wählen: Stelle das Glas an einen hellen, aber nicht direkt sonnigen Ort. Ein Fensterbrett ist ideal.
Die ersten Wurzeln: Geduld zahlt sich aus
1. Wasser wechseln: Wechsle das Wasser alle 1-2 Tage, um die Bildung von Bakterien zu verhindern.
2. Beobachten: Nach einigen Tagen (ca. 5-7) solltest du die ersten kleinen Wurzeln sehen. Sei geduldig, es kann auch etwas länger dauern.
3. Wurzelwachstum fördern: Sobald die Wurzeln etwa 2-3 cm lang sind, ist es Zeit für den nächsten Schritt.
Einpflanzen in Erde: Vom Wasser ins Beet (oder die Hängeampel!)
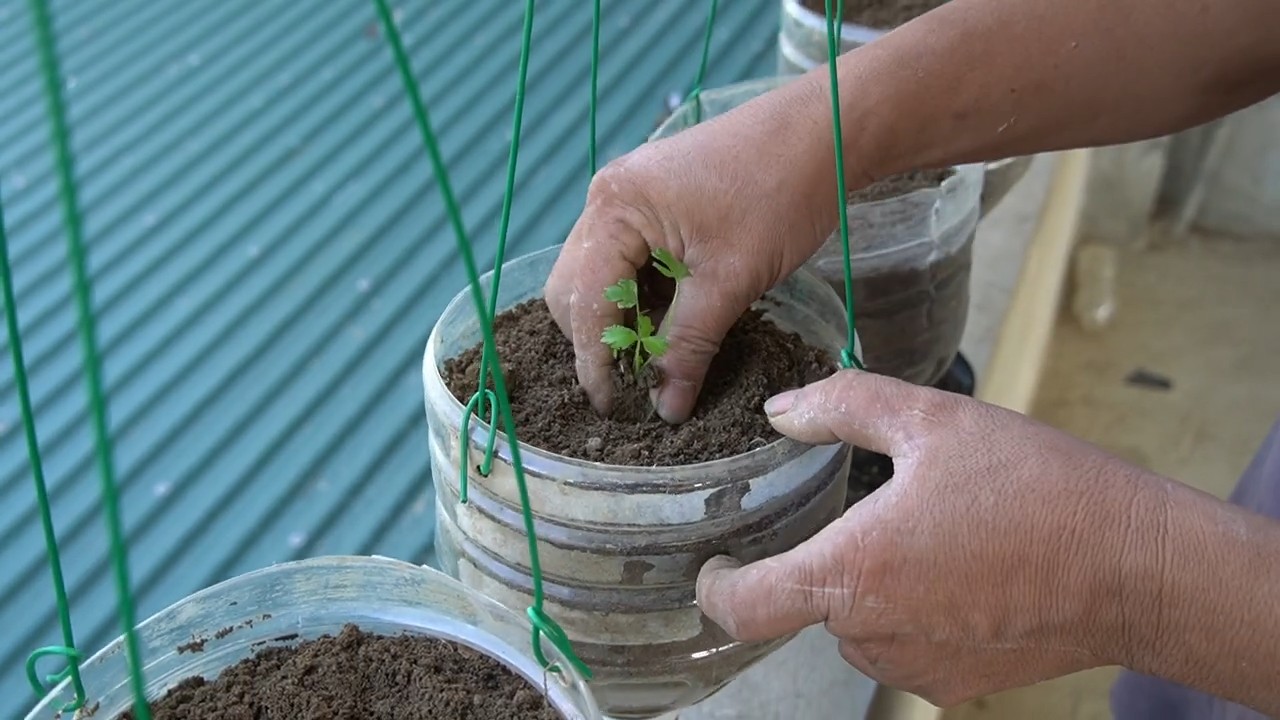
1. Topf vorbereiten: Fülle deinen Topf oder deine Hängeampel mit Blumenerde. Lass oben etwa 2-3 cm Platz.
2. Sellerie einpflanzen: Mach eine kleine Mulde in die Erde und setze die Sellerieknolle vorsichtig hinein. Die Wurzeln sollten gut mit Erde bedeckt sein. Der obere Teil der Knolle, wo die Blätter wachsen, sollte frei bleiben.
3. Angießen: Gieße die Sellerie gut an. Die Erde sollte feucht, aber nicht nass sein.
4. Standort wählen (Teil 2): Stelle den Topf oder die Hängeampel an einen hellen, aber nicht vollsonnigen Ort. Sellerie mag es gerne halbschattig.
Pflege und Ernte: Dein Sellerie-Glück
1. Gießen: Halte die Erde immer feucht, aber vermeide Staunässe. Am besten testest du mit dem Finger, ob die Erde trocken ist, bevor du gießt.
2. Düngen (optional): Wenn du möchtest, kannst du deinen Sellerie alle 2-3 Wochen mit einem Flüssigdünger düngen. Das fördert das Wachstum.
3. Blätter ernten: Du kannst die Sellerieblätter nach Bedarf ernten. Schneide sie einfach mit einer Schere ab. Sie sind super lecker in Suppen, Salaten oder als Würze.
4. Knolle ernten: Die Knolle selbst braucht etwas länger, um zu wachsen. Je nach Sorte und Standort kann es 3-4 Monate dauern, bis sie erntereif ist. Du erkennst es daran, dass die Knolle eine ansehnliche Größe erreicht hat und sich fest anfühlt.
5. Schädlinge im Auge behalten: Achte auf Schädlinge wie Blattläuse oder Schnecken. Bei Bedarf kannst du biologische Schädlingsbekämpfungsmittel einsetzen.
Hängegarten-Sellerie: Die Vorteile
* Platzsparend: Ideal für Balkone oder kleine Gärten.
* Dekorativ: Ein echter Hingucker auf deinem Balkon oder deiner Terrasse.
* Frischer Sellerie: Immer frischer Sellerie zur Hand, wenn du ihn brauchst.
* Nachhaltig: Du weißt genau, wo dein Sellerie herkommt und wie er angebaut wurde.
* Einfach: Auch für Anfänger geeignet.
Zusätzliche Tipps für deinen Hängegarten-Sellerie
* Sortenwahl: Es gibt verschiedene Selleriesorten. Informiere dich, welche Sorte für den Anbau im Topf oder in der Hängeampel geeignet ist.
* Sonnenschutz: An sehr heißen Tagen solltest du deinen Sellerie vor direkter Sonneneinstrahlung schützen.
* Überwinterung: Sellerie ist nicht winterhart. Wenn du ihn überwintern möchtest, musst du ihn frostfrei aufbewahren.
* Kombination mit anderen Pflanzen: Sellerie verträgt sich gut mit anderen Pflanzen wie Tomaten, Kohl oder Zwiebeln.
Häufige Probleme und Lösungen
* Gelbe Blätter: Können ein Zeichen für Nährstoffmangel sein. Dünge deinen Sellerie mit einem Flüssigdünger.
* Schlaffe Blätter: Können ein Zeichen für Wassermangel sein. Gieße deinen Sellerie regelmäßig.
* Schädlinge: Kontrolliere deinen Sellerie regelmäßig auf Schädlinge und bekämpfe sie bei Bedarf.
Fazit: Dein eigener Sellerie-Hängegarten ist möglich!
Mit ein bisschen Geduld und den richtigen Tipps und Tricks kannst du deinen eigenen Sellerie im Hängegarten anbauen. Es ist ein tolles Gefühl, frischen Sellerie aus dem eigenen Garten zu ernten und zu wissen, wo er herkommt. Also, worauf wartest du noch? Leg los und starte dein eigenes Sellerie-Abenteuer! Ich wünsche dir viel Erfolg und eine reiche Ernte!
Conclusion
So, there you have it! Transforming celery scraps into a thriving hanging garden is not just a fun project; it’s a testament to sustainable living and a delightful way to add fresh, homegrown flavor to your meals. This simple DIY trick offers a multitude of benefits, from reducing food waste and saving money to beautifying your space and providing a constant supply of crisp, flavorful celery.
Why is this a must-try? Because it’s incredibly easy, even for those without a green thumb. It requires minimal effort and resources, turning what would otherwise be kitchen waste into a vibrant, living decoration. Imagine the satisfaction of snipping fresh celery stalks from your own hanging garden to add to salads, soups, or even a refreshing green smoothie. The taste is noticeably fresher and more vibrant than store-bought celery, and you’ll know exactly where it came from.
Beyond the basic method, there are several exciting variations you can explore. Consider experimenting with different types of containers for your hanging garden. Upcycled plastic bottles, woven baskets lined with coconut coir, or even repurposed metal buckets can add a unique aesthetic to your space. You can also try companion planting. Herbs like parsley, chives, or even small varieties of lettuce can thrive alongside your celery, creating a diverse and fragrant hanging garden. Another variation is to focus on growing celery leaves. While the stalks take longer to mature, the leaves are quick to regrow and offer a concentrated celery flavor, perfect for garnishing dishes or adding to salads.
Don’t be afraid to get creative with your setup. Consider adding a small trellis or support system to encourage vertical growth. Experiment with different lighting conditions to find the sweet spot for your celery. And remember, patience is key. While celery is relatively easy to regrow, it does take time and consistent care to develop into a fully mature plant.
We wholeheartedly encourage you to try this hanging garden celery growing trick. It’s a rewarding and sustainable way to connect with nature, reduce waste, and enjoy the fresh, vibrant flavor of homegrown celery. Once you’ve created your own hanging garden, we’d love to hear about your experience! Share your photos, tips, and variations on social media using #HangingGardenCelery and inspire others to embrace this simple yet impactful DIY project. Let’s transform our kitchens into miniature gardens, one celery stalk at a time!
Frequently Asked Questions (FAQ)
1. What kind of celery works best for regrowing?
Any commercially available celery stalk will work for regrowing. Look for celery with a healthy, firm base and minimal browning or wilting. Organic celery is a great option if you want to avoid pesticides, but conventional celery will work just as well. The key is to ensure the base of the celery stalk, where the roots will emerge, is intact and healthy. Avoid celery that is overly dry or shows signs of rot.
2. How long does it take for celery to regrow?
The initial regrowth, where you see new leaves emerging from the center of the celery base, typically takes about 1-2 weeks. Transplanting the celery to soil will encourage stalk growth, which can take several weeks to months to fully mature. The exact timeframe depends on factors like sunlight, temperature, and nutrient availability. Be patient and consistent with watering and care, and you’ll eventually be rewarded with a harvestable celery plant.
3. What kind of soil is best for growing celery?
Celery thrives in rich, well-draining soil. A good potting mix amended with compost or other organic matter is ideal. The soil should be able to retain moisture without becoming waterlogged. You can also add a slow-release fertilizer to provide essential nutrients for healthy growth. Avoid heavy clay soils, as they can hinder root development.
4. How much sunlight does celery need?
Celery needs at least 6 hours of sunlight per day to thrive. A sunny windowsill or a spot on a balcony or patio that receives ample sunlight is ideal. If you don’t have enough natural light, you can supplement with grow lights. Insufficient sunlight can result in leggy growth and reduced flavor.
5. How often should I water my celery plant?
Celery needs consistent moisture to thrive. Water your plant regularly, keeping the soil consistently moist but not waterlogged. Check the soil moisture daily and water when the top inch feels dry to the touch. During hot weather, you may need to water more frequently. Avoid letting the soil dry out completely, as this can stress the plant.
6. Can I grow celery indoors year-round?
Yes, you can grow celery indoors year-round, provided you have adequate light and temperature control. Supplement with grow lights if necessary, and maintain a consistent temperature between 60-70°F (15-21°C). Indoor celery may not grow as large as outdoor celery, but you can still harvest the leaves and smaller stalks for fresh flavor.
7. How do I harvest celery from my hanging garden?
You can harvest celery stalks as they reach a desired size. Use a sharp knife or scissors to cut the stalks near the base of the plant. You can also harvest individual leaves as needed for garnishing or adding to salads. Regular harvesting encourages further growth and keeps the plant productive.
8. What are some common problems when growing celery, and how can I fix them?
Some common problems include pests like aphids and slugs, as well as diseases like celery blight. Inspect your plants regularly for signs of infestation or disease. Treat aphids with insecticidal soap or neem oil. Remove slugs by hand or use slug bait. Prevent celery blight by ensuring good air circulation and avoiding overhead watering.
9. Can I use fertilizer on my celery plant?
Yes, fertilizing your celery plant can promote healthy growth. Use a balanced fertilizer or a fertilizer specifically formulated for vegetables. Follow the instructions on the fertilizer package for application rates. Avoid over-fertilizing, as this can lead to excessive foliage growth at the expense of stalk development.
10. Is it better to grow celery from seed or regrow from scraps?
Regrowing from scraps is a faster and easier way to get started, especially for beginners. Growing from seed requires more time and effort, but it allows you to choose from a wider variety of celery cultivars. Both methods have their advantages, so choose the one that best suits your experience level and preferences. The hanging garden celery growing method is a great way to start.

Leave a Comment