
Cabbage growing plastic bottles – sounds a bit unconventional, right? But trust me, this simple DIY trick can revolutionize your home garden and help you cultivate the most luscious cabbages you’ve ever seen! For centuries, gardeners have sought innovative ways to protect their crops and maximize yields. From ancient Roman greenhouses to elaborate Victorian cloches, the quest for the perfect growing environment is a tale as old as agriculture itself.
Now, we’re bringing that spirit of innovation to your backyard with a modern twist: repurposing plastic bottles! Why should you bother with this seemingly quirky method? Well, think about it. Young cabbage seedlings are incredibly vulnerable to pests, harsh weather, and even the nibbling of hungry critters. Using plastic bottles creates a mini-greenhouse effect, shielding your precious plants from the elements and providing a safe haven for them to thrive. Plus, it’s an incredibly eco-friendly way to reuse those plastic bottles that might otherwise end up in a landfill. I’m excited to share this easy and effective method of cabbage growing plastic bottles with you, so you can enjoy a bountiful harvest of delicious, homegrown cabbages!
DIY Cabbage Growing in Recycled Plastic Bottles: A Gardener’s Guide
Hey there, fellow green thumbs! I’m so excited to share this super cool and eco-friendly way to grow cabbage using recycled plastic bottles. Not only is it a fantastic way to reuse those bottles that would otherwise end up in a landfill, but it also allows you to grow delicious, healthy cabbage even if you have limited space. Let’s dive in!
Why Grow Cabbage in Plastic Bottles?
Before we get started, let’s talk about why this method is so awesome:
* Space Saving: Perfect for balconies, patios, or small gardens. You can stack or hang the bottles to maximize vertical space.
* Recycling: Gives plastic bottles a new life, reducing waste and promoting sustainability.
* Easy to Manage: The controlled environment makes it easier to monitor soil moisture, temperature, and pest control.
* Cost-Effective: Requires minimal investment, especially if you already have plastic bottles and basic gardening supplies.
* Portable: You can easily move the bottles to chase the sun or protect them from harsh weather.
Materials You’ll Need
Okay, let’s gather our supplies. Here’s what you’ll need to get started:
* Plastic Bottles: Choose sturdy plastic bottles, preferably 2-liter soda bottles or larger water bottles. The more, the merrier!
* Cabbage Seeds or Seedlings: Select your favorite cabbage variety. I personally love growing ‘Golden Acre’ for its compact size and early maturity.
* Potting Mix: A well-draining potting mix is crucial for healthy cabbage growth.
* Drill or Sharp Knife: For creating drainage holes and cutting the bottles.
* Scissors: For trimming and shaping the bottles.
* Watering Can or Hose: For watering your cabbage plants.
* Fertilizer: A balanced, slow-release fertilizer or liquid fertilizer to feed your cabbage plants.
* Optional: Twine or rope for hanging the bottles, pebbles or gravel for drainage.
Preparing the Plastic Bottles
This is where we transform those ordinary bottles into mini cabbage gardens!
1. Clean the Bottles: Thoroughly wash the plastic bottles with soap and water to remove any residue. Rinse them well and let them dry completely. This is important to prevent any contamination that could harm your plants.
2. Cut the Bottles: There are a few ways you can cut the bottles, depending on how you want to grow your cabbage. Here are two popular methods:
* Method 1: Vertical Planter: Cut the bottle in half horizontally. Discard the bottle cap. The top half will be inverted and placed inside the bottom half, creating a self-watering system.
* Method 2: Hanging Planter: Cut a large rectangular opening on one side of the bottle, leaving the top and bottom intact. This creates a trough-like planter that can be hung.
3. Create Drainage Holes: This is super important! Use a drill or sharp knife to create several drainage holes in the bottom of each bottle. This will prevent waterlogging and root rot. I usually make about 5-6 holes, each about 1/4 inch in diameter.
4. Optional: Add Drainage Layer: Place a layer of pebbles or gravel at the bottom of each bottle to further improve drainage. This helps prevent the potting mix from becoming waterlogged.
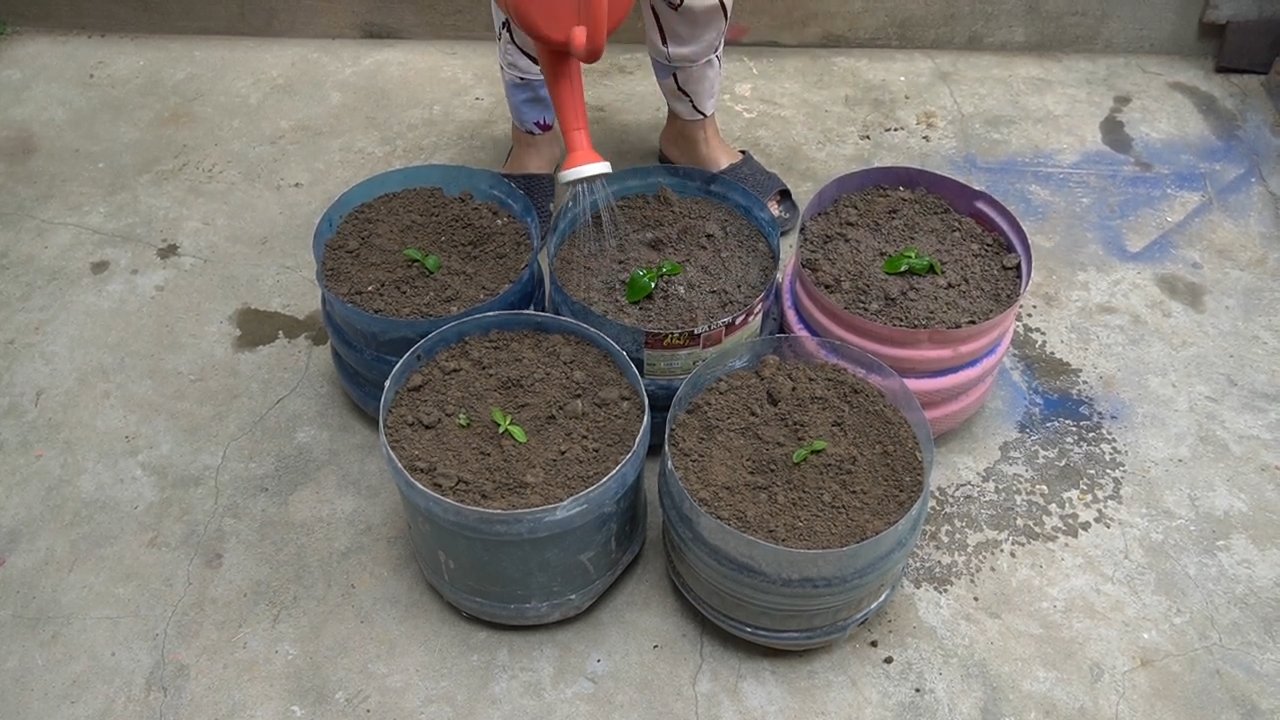
Planting Your Cabbage
Now for the fun part – planting our cabbage!
1. Fill the Bottles with Potting Mix: Fill each bottle with a high-quality potting mix, leaving about an inch of space at the top. Gently press down on the soil to remove any air pockets.
2. Plant the Seeds or Seedlings:
* From Seeds: Sow the cabbage seeds according to the package instructions. Generally, you’ll want to plant them about 1/4 inch deep. Water gently after planting.
* From Seedlings: Carefully remove the cabbage seedlings from their containers. Gently loosen the roots and plant them in the center of the bottle. Make sure the top of the root ball is level with the soil surface. Water thoroughly after planting.
3. Water Thoroughly: After planting, water the cabbage plants thoroughly until water drains out of the drainage holes. This helps settle the soil and encourages root growth.
Caring for Your Cabbage Plants
Caring for your cabbage plants in plastic bottles is pretty straightforward. Here’s what you need to do:
1. Sunlight: Cabbage needs at least 6 hours of sunlight per day. Place the bottles in a sunny location, such as a balcony, patio, or windowsill. If you don’t have enough natural light, you can supplement with grow lights.
2. Watering: Water your cabbage plants regularly, especially during hot, dry weather. Check the soil moisture by sticking your finger into the soil. If the top inch feels dry, it’s time to water. Avoid overwatering, as this can lead to root rot.
3. Fertilizing: Feed your cabbage plants every 2-3 weeks with a balanced fertilizer. You can use a slow-release fertilizer or a liquid fertilizer. Follow the package instructions for application rates. I like to use a fertilizer that’s high in nitrogen to promote leafy growth.
4. Pest Control: Keep an eye out for common cabbage pests, such as cabbage worms, aphids, and slugs. You can handpick pests off the plants, use insecticidal soap, or apply Bacillus thuringiensis (Bt) to control cabbage worms.
5. Support: As your cabbage plants grow, they may need support to prevent them from toppling over. You can use stakes or twine to support the plants.
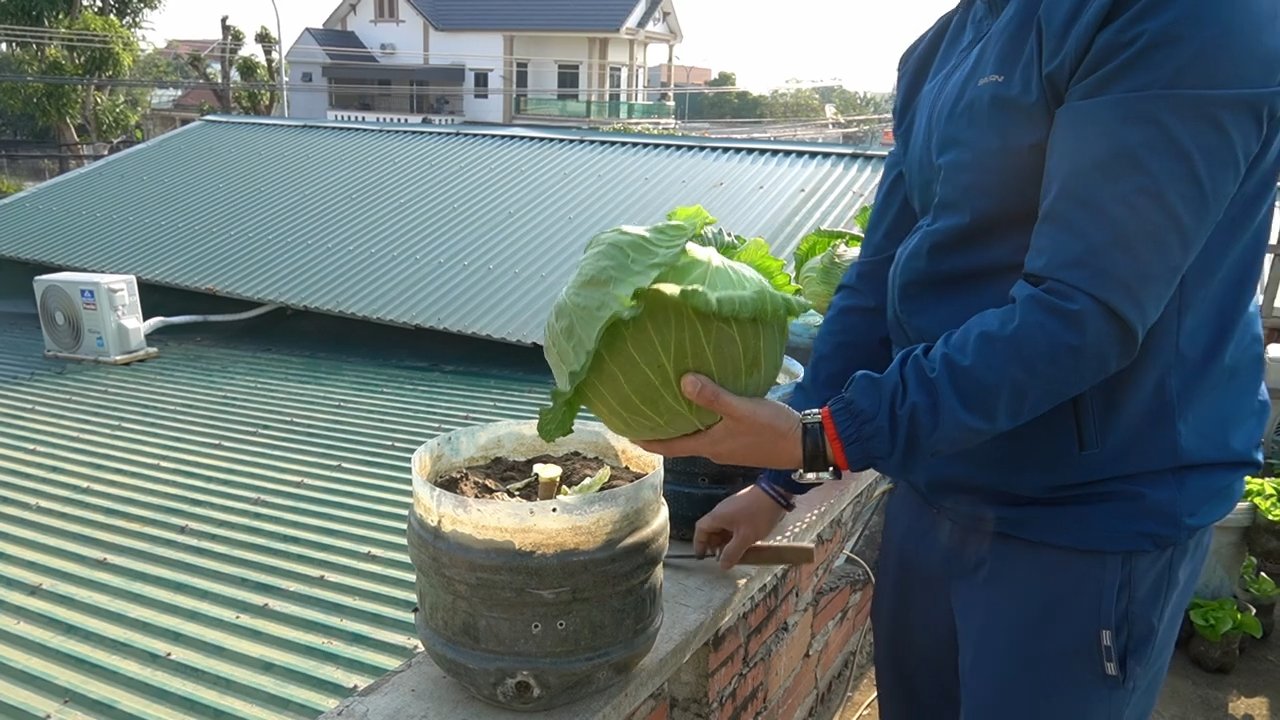
Harvesting Your Cabbage
The moment we’ve all been waiting for – harvesting our homegrown cabbage!
1. Check for Maturity: Cabbage is typically ready to harvest when the head is firm and compact. The size of the head will vary depending on the variety.
2. Harvesting: Use a sharp knife to cut the cabbage head from the stem. Leave a few outer leaves on the stem, as these can continue to produce small side shoots.
3. Enjoy Your Harvest: Enjoy your fresh, homegrown cabbage in salads, soups, stews, or any other dish you like.
Troubleshooting
Even with the best care, you might encounter some challenges. Here are a few common problems and how to fix them:
* Yellowing Leaves: This could be a sign of overwatering, underwatering, or nutrient deficiency. Check the soil moisture and adjust your watering schedule accordingly. Fertilize the plants with a balanced fertilizer.
* Stunted Growth: This could be due to lack of sunlight, poor soil, or pest infestation. Make sure the plants are getting enough sunlight and fertilize them regularly. Check for pests and take appropriate action.
* Root Rot: This is caused by overwatering and poor drainage. Make sure the bottles have adequate drainage holes and avoid overwatering. If root rot is severe, you may need to transplant the cabbage plants into fresh potting mix.
* Pest Infestation: Regularly inspect your cabbage plants for pests. Handpick pests off the plants, use insecticidal soap, or apply Bacillus thuringiensis (Bt) to control cabbage worms.
Tips for Success
Here are a few extra tips to help you succeed with growing cabbage in plastic bottles:
* Choose the Right Variety: Select a cabbage variety that is well-suited for container gardening. Compact varieties like ‘Golden Acre’ and ‘Dwarf Morden’ are good choices.
* Use High-Quality Potting Mix: A well-draining potting mix is essential for healthy cabbage growth. Avoid using garden soil, as it can become compacted and waterlogged.
* Provide Adequate Sunlight: Cabbage needs at least 6 hours of sunlight per day. Place the bottles in a sunny location or supplement with grow lights.
* Water Regularly: Water your cabbage plants regularly, especially during hot, dry weather. Check the soil moisture and water when the top inch feels dry.
* Fertilize Regularly: Feed your cabbage plants every 2-3 weeks with a balanced fertilizer.
* Monitor for Pests: Regularly inspect your cabbage plants for pests and take appropriate action.
* Rotate Your Crops: Avoid planting cabbage in the same bottles year after year. Rotate your crops to prevent soilborne diseases and pest infestations.
I hope this guide has inspired you to try growing cabbage in recycled plastic bottles. It’s a fun, rewarding, and eco-friendly way to enjoy fresh, homegrown cabbage. Happy gardening!
Conclusion
So, there you have it! Transforming discarded plastic bottles into mini-greenhouses for your cabbage seedlings is more than just a clever recycling hack; it’s a game-changer for your gardening success. We’ve explored how this simple, cost-effective method provides crucial protection against harsh weather, pesky pests, and even those nibbling critters that seem to have a particular fondness for young cabbage plants.
But why is this DIY trick a must-try? Because it empowers you to take control of your cabbage growing journey from the very beginning. You’re not just planting seeds and hoping for the best; you’re actively creating a nurturing environment that significantly increases your chances of a bountiful harvest. Think about it: stronger, healthier seedlings translate to more robust, disease-resistant cabbages later on. And who doesn’t want that?
Beyond the practical benefits, this method also fosters a deeper connection with your garden. You’re actively participating in the life cycle of your plants, nurturing them from tiny sprouts to leafy heads. It’s a rewarding experience that brings a sense of accomplishment and satisfaction.
Now, let’s talk about variations. While we’ve focused on using clear plastic bottles, you can experiment with different types of bottles. For example, slightly opaque bottles can provide additional shade during particularly hot days. You can also cut the bottles at different heights to adjust the level of protection. Consider using larger bottles for varieties of cabbage that tend to grow larger seedlings.
Another variation involves the soil you use. While standard potting mix works well, you can enrich it with compost or other organic matter to provide your seedlings with an extra boost of nutrients. Experiment with different soil blends to see what works best for your specific growing conditions.
Don’t be afraid to get creative! You can even decorate your bottle greenhouses with paint or markers to add a personal touch to your garden. This is a fun project that the whole family can enjoy.
Ultimately, the success of this DIY trick depends on your willingness to experiment and adapt. Observe your seedlings closely, adjust your watering schedule as needed, and don’t be afraid to try new things.
We wholeheartedly encourage you to give this DIY cabbage growing method a try. It’s a simple, effective, and environmentally friendly way to improve your gardening success. And most importantly, we want to hear about your experience! Share your photos, tips, and stories with us in the comments below. Let’s build a community of cabbage-growing enthusiasts who are passionate about sustainable gardening practices. Let us know what worked for you, what challenges you faced, and any creative variations you came up with. Together, we can learn and grow (literally!) together. So, grab those plastic bottles, get your hands dirty, and start growing some amazing cabbages!
Frequently Asked Questions (FAQ)
1. What types of plastic bottles are best for this method?
Ideally, you want to use clear plastic bottles that are relatively sturdy. Soda bottles, water bottles, and juice bottles all work well. Avoid using bottles that are too thin or flimsy, as they may not provide adequate protection. Make sure to thoroughly clean the bottles before using them to remove any residue that could harm your seedlings. Remove any labels and wash the inside and outside of the bottle with warm, soapy water. Rinse thoroughly to ensure no soap residue remains.
2. How do I prevent the bottles from overheating my seedlings?
Overheating can be a concern, especially in warmer climates. To prevent this, you can take a few precautions. First, make sure to vent the bottles by removing the cap or poking a few small holes in the sides. This will allow for air circulation and prevent the temperature inside the bottle from rising too high. You can also provide shade during the hottest part of the day by covering the bottles with a light cloth or moving them to a partially shaded area. Monitor the temperature inside the bottles regularly, especially during the first few days, to ensure that your seedlings are not getting too hot. If you notice any signs of heat stress, such as wilting or yellowing leaves, take immediate action to cool them down.
3. How often should I water my seedlings inside the bottles?
Watering frequency will depend on several factors, including the weather, the type of soil you’re using, and the size of the bottle. As a general rule, you should water your seedlings when the soil feels dry to the touch. Be careful not to overwater, as this can lead to root rot. When watering, gently pour water around the base of the seedlings, avoiding the leaves. You may need to water more frequently during hot, dry weather. Check the moisture level of the soil regularly and adjust your watering schedule accordingly.
4. When should I remove the plastic bottles from my cabbage seedlings?
The timing of removal depends on the weather conditions and the size of your seedlings. Generally, you can remove the bottles when the seedlings have outgrown them or when the weather has warmed up and the risk of frost has passed. A good indicator is when the seedlings start to touch the sides of the bottle. Before removing the bottles completely, you can gradually acclimate the seedlings to the outdoor environment by removing the caps for increasing periods of time each day. This will help them adjust to the temperature and humidity changes. Once the seedlings are strong enough, you can remove the bottles entirely.
5. Can I reuse the plastic bottles for other plants?
Absolutely! The plastic bottles can be reused for other plants, such as tomatoes, peppers, or herbs. Just make sure to clean them thoroughly before using them again. You can also use them to start seeds indoors or to protect young plants from pests. The possibilities are endless! Consider using them for other brassicas like broccoli or cauliflower.
6. What if I don’t have enough plastic bottles? Are there alternatives?
If you don’t have enough plastic bottles, there are several alternatives you can use. You can use cloches made from glass jars, row covers made from fabric, or even homemade mini-greenhouses made from wood and plastic sheeting. You can also purchase commercially available plant protectors from your local garden center. The key is to provide your seedlings with protection from the elements and pests.
7. My seedlings are getting leggy inside the bottles. What should I do?
Leggy seedlings are a sign that they are not getting enough light. To prevent this, make sure to place the bottles in a sunny location. If you are growing your seedlings indoors, you may need to supplement with artificial light. You can also try rotating the bottles regularly to ensure that all sides of the seedlings are exposed to the light. Another option is to thin out the seedlings to give them more space to grow.
8. Can I use this method for other types of plants besides cabbage?
Yes, this method can be used for other types of plants that benefit from early protection, such as broccoli, cauliflower, kale, and other leafy greens. It’s particularly useful for plants that are susceptible to frost damage or pest infestations. Experiment with different types of plants to see what works best in your garden.
9. How does this method help with pest control?
The plastic bottles act as a physical barrier, preventing pests such as slugs, snails, and cabbage white butterflies from reaching your seedlings. This reduces the need for pesticides and helps to keep your garden healthy and organic. Regularly inspect the bottles for any signs of pests and take action if necessary.
10. What kind of soil should I use for my cabbage seedlings?
A well-draining potting mix is ideal for cabbage seedlings. You can also amend your soil with compost or other organic matter to improve its fertility and drainage. Avoid using heavy clay soil, as it can become waterlogged and lead to root rot. A slightly acidic soil pH of around 6.0 to 6.5 is optimal for cabbage growth.
Leave a Comment