
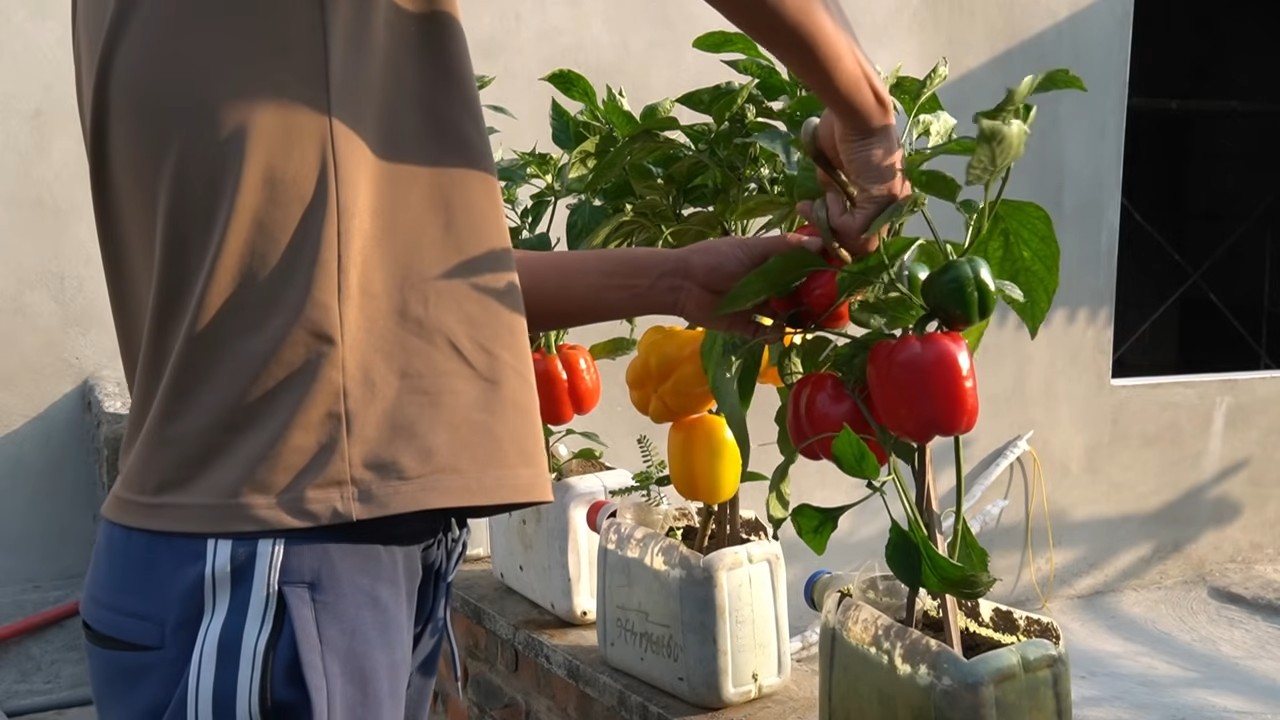
Balcony Bell Peppers in Bottles: Imagine plucking fresh, vibrant bell peppers right from your balcony, even if you only have a tiny outdoor space! Sounds like a dream, right? Well, get ready to turn that dream into a delicious reality with this super simple and rewarding DIY project. For centuries, resourceful gardeners have been finding innovative ways to maximize their yields, from ancient terrace farming to modern-day vertical gardens. This method taps into that same spirit of ingenuity, allowing you to enjoy the taste of homegrown goodness, no matter how limited your square footage.
Why should you try growing Balcony Bell Peppers in Bottles? Because it’s a game-changer! Many of us crave fresh, healthy produce but lack the space for a traditional garden. This DIY hack solves that problem beautifully. It’s cost-effective, eco-friendly (repurposing plastic bottles!), and incredibly satisfying to watch your little pepper plants thrive. Plus, store-bought bell peppers simply can’t compare to the flavor and freshness of homegrown ones. I’m excited to share this easy-to-follow guide that will have you harvesting your own balcony bell peppers in no time. Let’s get started!
DIY Balcony Bell Peppers: From Plastic Bottles to Bountiful Harvest!
Hey there, fellow balcony gardeners! Dreaming of fresh, crunchy bell peppers right outside your door? You don’t need a sprawling garden to make it happen. I’m going to show you how to transform ordinary plastic bottles into thriving bell pepper planters, perfect for your balcony, patio, or even a sunny windowsill. This is a super budget-friendly and space-saving way to enjoy homegrown goodness. Let’s get started!
What You’ll Need: The Essential Supplies
Before we dive in, let’s gather our materials. This project is all about repurposing, so feel free to get creative with what you have on hand.
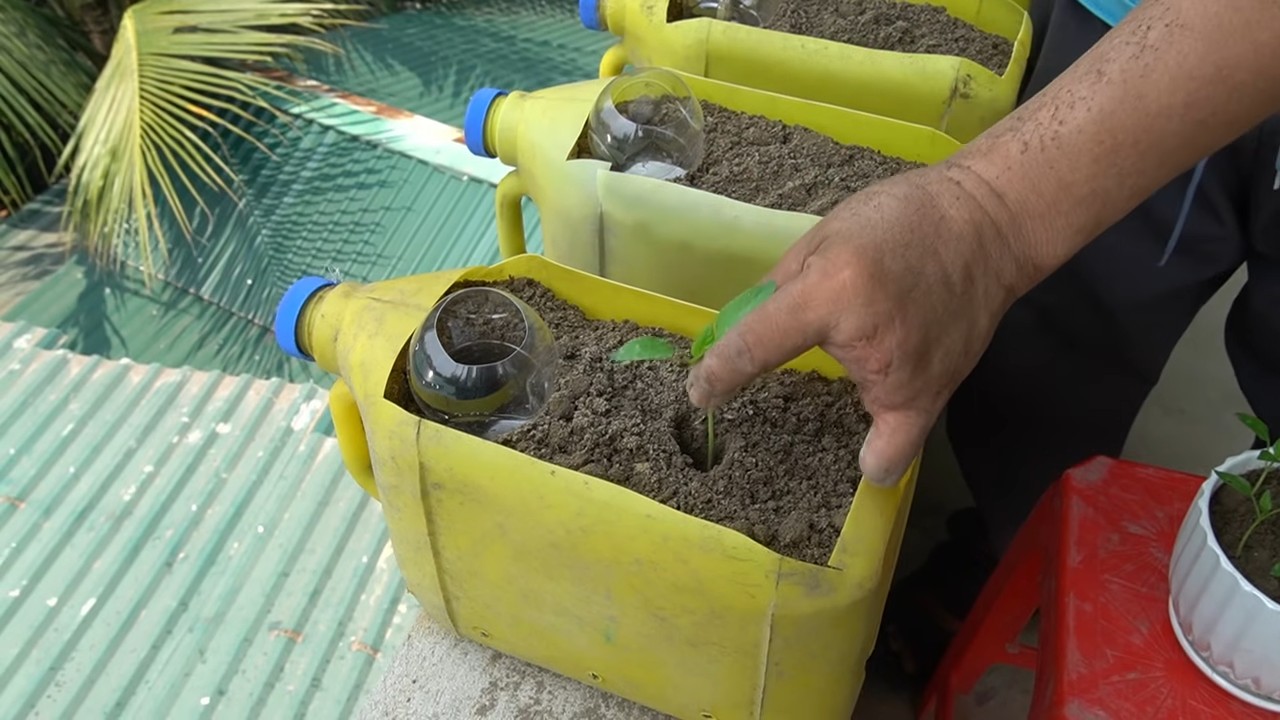
* Plastic Bottles: The stars of the show! I recommend using 2-liter soda bottles or larger water bottles. The bigger, the better, as bell peppers need room for their roots to grow. Aim for at least two bottles per plant.
* Bell Pepper Seeds or Seedlings: You can start from seeds or buy small seedlings from your local garden center. Seedlings will give you a head start, but starting from seed is incredibly rewarding.
* Potting Soil: Use a high-quality potting mix specifically formulated for vegetables. This will provide the necessary nutrients and drainage for healthy pepper plants.
* Scissors or Utility Knife: For cutting the plastic bottles. Be careful!
* Drill or Nail and Hammer: To create drainage holes in the bottom of the bottles.
* Watering Can or Hose: For watering your pepper plants.
* Optional:
* Gravel or Pebbles: To improve drainage at the bottom of the bottles.
* Twine or Rope: For hanging the bottles (if you want a hanging garden).
* Paint or Markers: To decorate your planters and make them look extra cute.
* Gloves: To protect your hands while working with soil.
Preparing the Plastic Bottle Planters: The Foundation for Success
This is where we transform those discarded bottles into functional planters. It’s easier than you think!
1. Clean the Bottles: Thoroughly wash the plastic bottles with soap and water to remove any residue. Rinse them well and let them dry completely. This is important to prevent any mold or bacteria from affecting your plants.
2. Cut the Bottles: This step depends on how you want to use your planters. I’ll show you two popular methods:
* Method 1: Single Bottle Planter: Cut the bottle in half horizontally. You’ll be using the bottom half as the planter and the top half (inverted) as a self-watering reservoir (more on that later!).
* Method 2: Two-Bottle Planter: Cut the top off one bottle (about a third of the way down) to create the planter. Cut the bottom off another bottle (again, about a third of the way up) to create a water reservoir. This method is great if you want a deeper planter.
3. Create Drainage Holes: This is crucial! Bell peppers don’t like soggy roots. Use a drill or a nail and hammer to create several drainage holes in the bottom of the bottle (or the bottom of the bottle you’re using as the planter). I usually make about 5-6 holes, spaced evenly.
4. (Optional) Add Gravel or Pebbles: Place a layer of gravel or pebbles at the bottom of the bottle to further improve drainage. This helps prevent the soil from becoming waterlogged.
5. (Optional) Decorate Your Planters: Now for the fun part! Get creative and decorate your planters with paint, markers, or anything else you like. This is a great way to personalize your balcony garden. Let the paint dry completely before moving on.
Planting Your Bell Peppers: Nurturing New Life
Now that our planters are ready, it’s time to plant our bell peppers!
1. Fill the Planter with Potting Soil: Fill the bottle with high-quality potting soil, leaving about an inch of space at the top. Gently pat down the soil to remove any air pockets.
2. Plant Your Seeds or Seedlings:
* From Seed: Sow the bell pepper seeds about ¼ inch deep in the soil. Water gently and keep the soil consistently moist. It can take 1-3 weeks for the seeds to germinate.
* From Seedling: Gently remove the seedling from its container. Loosen the roots slightly and place the seedling in the center of the bottle. Fill in around the seedling with potting soil, making sure the top of the root ball is level with the soil surface.
3. Water Thoroughly: Water the newly planted bell pepper thoroughly until water drains out of the drainage holes. This helps settle the soil and ensures the roots are well-hydrated.
Self-Watering Reservoir (Optional): Keeping Your Peppers Happy
If you chose Method 1 (single bottle planter), you can create a self-watering reservoir. This is especially helpful if you tend to forget to water your plants regularly.
1. Invert the Top Half of the Bottle: Take the top half of the bottle that you cut off earlier and invert it.
2. Place it Inside the Bottom Half: Place the inverted top half inside the bottom half of the bottle, so the bottle neck is pointing downwards into the soil.
3. Add Water to the Reservoir: Pour water into the top half of the bottle. The water will slowly seep through the bottle neck and into the soil, keeping it consistently moist.
4. Monitor the Water Level: Check the water level in the reservoir regularly and refill as needed.
Caring for Your Bell Pepper Plants: Ensuring a Bountiful Harvest
Now that your bell peppers are planted, it’s important to provide them with the care they need to thrive.
1. Sunlight: Bell peppers need at least 6-8 hours of sunlight per day. Place your planters in a sunny spot on your balcony or patio. If you don’t have enough sunlight, you can supplement with grow lights.
2. Watering: Water your bell pepper plants regularly, especially during hot weather. Check the soil moisture by sticking your finger into the soil. If the top inch of soil feels dry, it’s time to water. Avoid overwatering, as this can lead to root rot. If you’re using a self-watering reservoir, monitor the water level and refill as needed.
3. Fertilizing: Bell peppers are heavy feeders, meaning they need a lot of nutrients to grow and produce fruit. Fertilize your plants every 2-3 weeks with a balanced liquid fertilizer. Follow the instructions on the fertilizer label.
4. Support: As your bell pepper plants grow, they may need support to prevent them from falling over. You can use stakes, trellises, or tomato cages to provide support.
5. Pruning: Pruning can help improve air circulation and encourage fruit production. Remove any suckers (small shoots that grow from the base of the plant) and any yellowing or dead leaves.
6. Pest Control: Keep an eye out for pests such as aphids, whiteflies, and spider mites. If you notice any pests, treat them with an insecticidal soap or neem oil.
Harvesting Your Bell Peppers: The Sweet Reward
After a few months of care, your bell pepper plants will start producing fruit.
1. Harvest When Ripe: Bell peppers are typically ready to harvest when they are fully colored and firm to the touch. The color will depend on the variety you’re growing (green, red, yellow, orange, etc.).
2. Cut the Peppers: Use a sharp knife or scissors to cut the peppers from the plant, leaving a small stem attached.
3. Enjoy Your Harvest: Enjoy your homegrown bell peppers in salads, stir-fries, or any other dish you like. You can also freeze or can them for later use.
Troubleshooting: Addressing Common Issues
Even with the best care, you may encounter some challenges along the way. Here are some common issues and how to address them:
* Yellowing Leaves: This can be caused by overwatering, underwatering, nutrient deficiencies, or pests. Check the soil moisture, fertilize your plants, and inspect for pests.
* Blossom End Rot: This is a condition where the bottom of the pepper turns black and leathery. It’s usually caused by a calcium deficiency. Add calcium to the soil or use a calcium-rich fertilizer.
* Lack of Fruit: This can be caused by insufficient sunlight, poor pollination, or nutrient deficiencies. Make sure your plants are getting enough sunlight, hand-pollinate the flowers if necessary, and fertilize your plants.
* Pests: As mentioned earlier, keep an eye out for pests and treat them promptly with an appropriate insecticide.
Tips and Tricks for Success: Maximizing Your Harvest
Here are a few extra tips to help you get the most out of your balcony bell pepper garden:
*
Conclusion
So, there you have it – a simple, cost-effective, and incredibly rewarding way to cultivate vibrant bell peppers right on your balcony using repurposed plastic bottles. This DIY trick isn’t just about saving money; it’s about connecting with nature, reducing waste, and enjoying the unparalleled flavor of homegrown produce. Forget those bland, store-bought peppers; imagine the crisp, sweet taste of a bell pepper you nurtured from seedling to harvest, all within the cozy confines of your own balcony garden.
This method is a must-try for several compelling reasons. First, it’s incredibly space-efficient, making it perfect for apartment dwellers or anyone with limited gardening space. Second, it’s a fantastic way to recycle plastic bottles, turning potential waste into a thriving ecosystem. Third, it allows you to control the growing environment, ensuring your bell peppers receive the optimal amount of sunlight, water, and nutrients. Finally, and perhaps most importantly, it’s incredibly satisfying to watch your plants flourish and produce delicious, healthy food.
But don’t stop there! This technique is ripe for experimentation. Consider trying different varieties of bell peppers, from the classic green to the sweeter yellow, orange, or even purple. You could also experiment with different soil mixes to find what works best for your local climate and growing conditions. Adding companion plants like basil or marigolds can help deter pests and attract beneficial insects, further enhancing your balcony garden’s ecosystem. You can also try using self-watering bottles for even less maintenance.
Another variation to consider is vertical gardening. By hanging your bottle planters from a balcony railing or creating a vertical structure, you can maximize your growing space and create a stunning visual display. Just be sure to use sturdy supports and ensure the bottles are securely attached.
We are confident that this DIY project will bring you immense joy and a bountiful harvest. The beauty of this method lies in its simplicity and adaptability. It’s a fantastic way to introduce children to gardening, teaching them about the life cycle of plants and the importance of sustainability. It’s also a great way to de-stress and reconnect with nature, even in the heart of the city.
Don’t be intimidated if you’re a beginner gardener. This project is designed to be accessible to everyone, regardless of their experience level. With a little patience and attention, you’ll be harvesting your own delicious bell peppers in no time.
We encourage you to give this DIY balcony bell pepper project a try. Share your experiences, successes, and challenges in the comments below. We’d love to see photos of your balcony gardens and hear about any variations you’ve tried. Let’s create a community of balcony gardeners, sharing tips and inspiring each other to grow our own food, one bottle at a time. Embrace the joy of homegrown produce and discover the satisfaction of nurturing your own little slice of nature, right on your balcony. This is a simple and effective way to get started with **balcony bell peppers**.
Frequently Asked Questions (FAQ)
What type of plastic bottles are best for growing bell peppers?
Ideally, you should use sturdy, food-grade plastic bottles that are at least 2 liters in size. Clear or translucent bottles are preferable as they allow you to monitor the soil moisture levels. Avoid using bottles that have contained harmful chemicals or pesticides. Thoroughly wash and rinse the bottles before using them. Darker bottles can also be used, but you’ll need to be more diligent about checking the soil moisture.
What kind of soil should I use for my balcony bell peppers?
A well-draining potting mix is essential for growing healthy bell peppers in containers. Avoid using garden soil, as it can become compacted and restrict root growth. A good potting mix should contain a blend of peat moss, perlite, and vermiculite. You can also add compost or other organic matter to enrich the soil and provide essential nutrients. Consider a mix specifically formulated for vegetables.
How often should I water my bell peppers in bottles?
The frequency of watering will depend on several factors, including the weather, the size of the bottle, and the type of soil you’re using. Generally, you should water your bell peppers when the top inch of soil feels dry to the touch. Avoid overwatering, as this can lead to root rot. During hot, sunny weather, you may need to water your plants daily. In cooler weather, you may only need to water them every few days. A self-watering bottle system can help regulate moisture levels.
How much sunlight do bell peppers need?
Bell peppers require at least 6-8 hours of direct sunlight per day to thrive. Choose a location on your balcony that receives ample sunlight. If your balcony is shaded for part of the day, try to position your plants so that they receive the most sunlight possible. If you don’t have enough natural sunlight, you can supplement with grow lights.
Do I need to fertilize my bell peppers?
Yes, bell peppers are heavy feeders and require regular fertilization to produce a good crop. Use a balanced fertilizer that is specifically formulated for vegetables. Follow the instructions on the fertilizer package carefully. You can also use organic fertilizers, such as compost tea or fish emulsion. Fertilize your plants every 2-3 weeks during the growing season.
How do I protect my bell peppers from pests and diseases?
Regularly inspect your plants for signs of pests or diseases. Common pests that affect bell peppers include aphids, spider mites, and whiteflies. You can control these pests with insecticidal soap or neem oil. Diseases that can affect bell peppers include blossom end rot and fungal infections. Ensure proper watering and drainage to prevent blossom end rot. Use a fungicide to treat fungal infections. Companion planting with basil or marigolds can also help deter pests.
How long does it take for bell peppers to mature?
The time it takes for bell peppers to mature depends on the variety and growing conditions. Generally, it takes about 60-90 days from transplanting to harvest. You can harvest bell peppers when they are fully colored and firm to the touch.
Can I grow bell peppers in bottles indoors?
Yes, you can grow bell peppers in bottles indoors, but you will need to provide them with adequate light. Place your plants near a sunny window or use grow lights to supplement the natural light. You will also need to ensure proper ventilation and humidity levels.
What if my bell pepper plant is not producing fruit?
There are several reasons why your bell pepper plant may not be producing fruit. It could be due to insufficient sunlight, lack of pollination, or nutrient deficiencies. Ensure your plant is receiving at least 6-8 hours of direct sunlight per day. You can hand-pollinate the flowers by gently shaking the plant or using a small brush to transfer pollen from one flower to another. Fertilize your plant with a balanced fertilizer to provide essential nutrients.
Can I reuse the soil from my bell pepper plants?
It’s generally not recommended to reuse soil from your bell pepper plants, as it may contain pests or diseases. However, if you choose to reuse the soil, you should sterilize it first by baking it in the oven at 200 degrees Fahrenheit for 30 minutes. You should also amend the soil with fresh compost or other organic matter to replenish nutrients.
Leave a Comment