
Bean Sprout Growing at Home: Ever dreamt of having a constant supply of fresh, crunchy bean sprouts right at your fingertips? Imagine adding a burst of homegrown goodness to your salads, stir-fries, and sandwiches, all without a trip to the grocery store! This isn’t just a culinary fantasy; it’s a deliciously achievable reality with our easy-to-follow DIY guide.
The art of sprouting beans has ancient roots, dating back thousands of years in Asian cultures. It was a clever way to ensure a source of vital nutrients, especially during long winters or periods of scarcity. Today, while we have access to a global food supply, the appeal of growing your own bean sprouts remains strong. Why? Because it’s incredibly rewarding, cost-effective, and allows you to control exactly what you’re eating – no hidden preservatives or additives here!
Let’s face it, store-bought bean sprouts can sometimes be a gamble. They might be wilted, discolored, or even carry the risk of contamination. But with our simple bean sprout growing at home tricks, you can bypass all those worries and enjoy the freshest, most flavorful sprouts imaginable. I’m going to show you how to transform humble beans into a vibrant, nutritious harvest in just a few days. So, ditch the store-bought sprouts and get ready to embark on a fun and fulfilling home gardening adventure!
Growing Bean Sprouts at Home: A Simple DIY Guide
Hey there, fellow DIY enthusiasts! Ever thought about growing your own bean sprouts? It’s surprisingly easy, super rewarding, and gives you a constant supply of fresh, crunchy goodness for salads, stir-fries, and more. Plus, it’s a fantastic way to reduce your grocery bill and know exactly where your food is coming from. I’m going to walk you through the whole process, step-by-step, so you can enjoy homegrown bean sprouts in just a few days.
What You’ll Need
Before we dive in, let’s gather our supplies. The beauty of this project is that you probably already have most of these things lying around!
* Bean Seeds: Mung beans are the most common and easiest to sprout, but you can also use adzuki beans, lentils, or even chickpeas. Make sure they are specifically labeled for sprouting or food use, not treated for planting. I usually get mine from the bulk section of my local health food store.
* A Wide-Mouth Jar: A quart-sized mason jar works perfectly. You can also use a clean glass container.
* Sprouting Lid or Cheesecloth: A sprouting lid is ideal because it allows for easy rinsing and drainage. If you don’t have one, you can use a piece of cheesecloth secured with a rubber band.
* Water: Filtered water is best, but tap water is usually fine too.
* A Bowl or Tray: To prop the jar at an angle for drainage.
* A Dark Place: A cupboard or pantry works great.
Phase 1: Soaking the Beans
This is where the magic begins! Soaking the beans wakes them up and starts the germination process.
1. Rinse the Beans: Place about 2-3 tablespoons of bean seeds in your jar. Rinse them thoroughly under cool water to remove any debris or dust. I like to swish them around a bit to make sure they’re all clean.
2. Add Water: Fill the jar with cool, filtered water, ensuring the beans are completely submerged. They will expand quite a bit, so leave plenty of room. I usually add about three times the volume of water as beans.
3. Secure the Lid: Cover the jar with your sprouting lid or cheesecloth. If using cheesecloth, secure it tightly with a rubber band.
4. Soak for 8-12 Hours: Place the jar in a dark place at room temperature and let the beans soak for 8-12 hours. I usually soak them overnight so they’re ready to go in the morning.
Phase 2: Sprouting the Beans
Now comes the fun part – watching your little sprouts grow! This phase requires regular rinsing and drainage to keep the beans moist but not waterlogged.
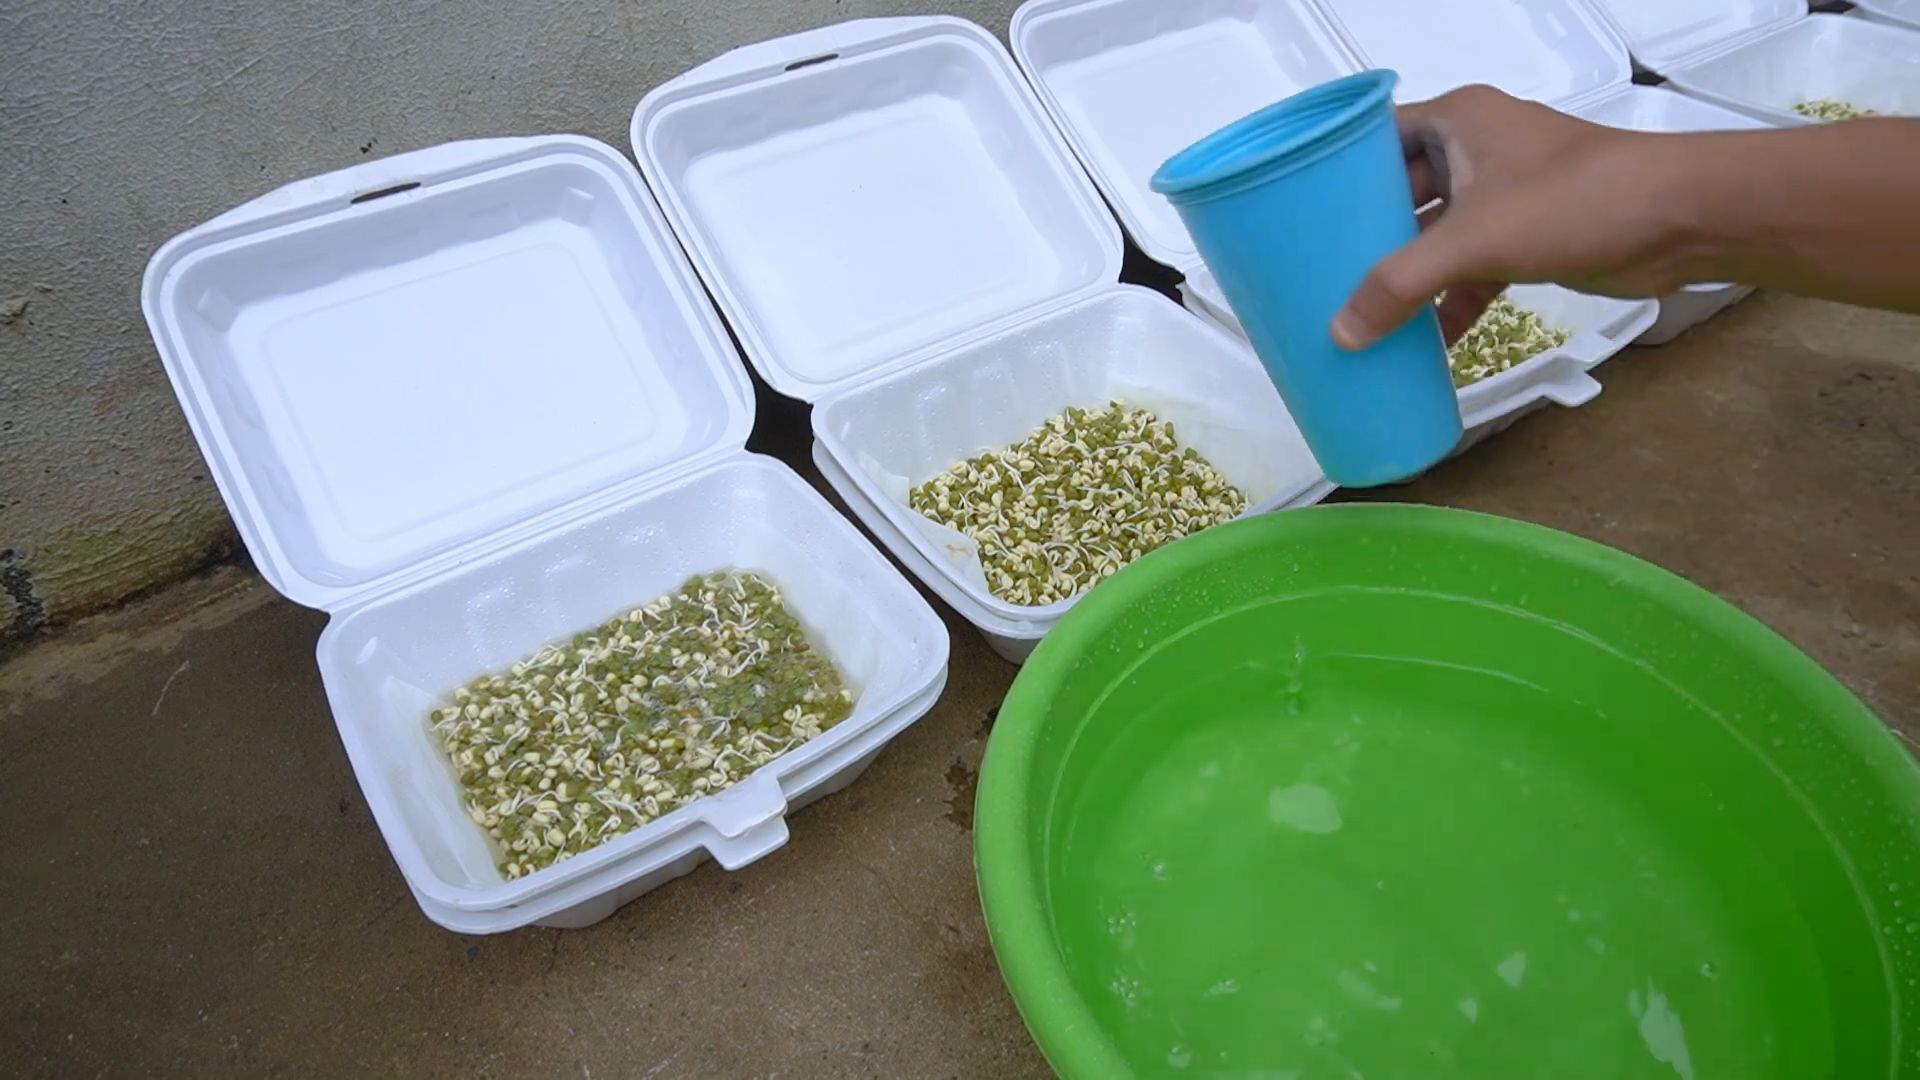
1. Drain and Rinse: After the soaking period, drain the water from the jar through the sprouting lid or cheesecloth. Rinse the beans thoroughly with cool water. This is crucial to prevent mold and bacteria growth.
2. Invert and Drain: After rinsing, invert the jar and prop it at an angle in a bowl or tray. This allows excess water to drain out and provides good air circulation. I usually use a small dish towel folded up to create the angle.
3. Repeat 2-3 Times Daily: Rinse and drain the beans 2-3 times a day for the next 3-5 days. Consistency is key here! Make sure to use cool, fresh water each time. I set reminders on my phone so I don’t forget.
4. Maintain Darkness: Keep the jar in a dark place between rinses. Darkness encourages the sprouts to grow long and white.
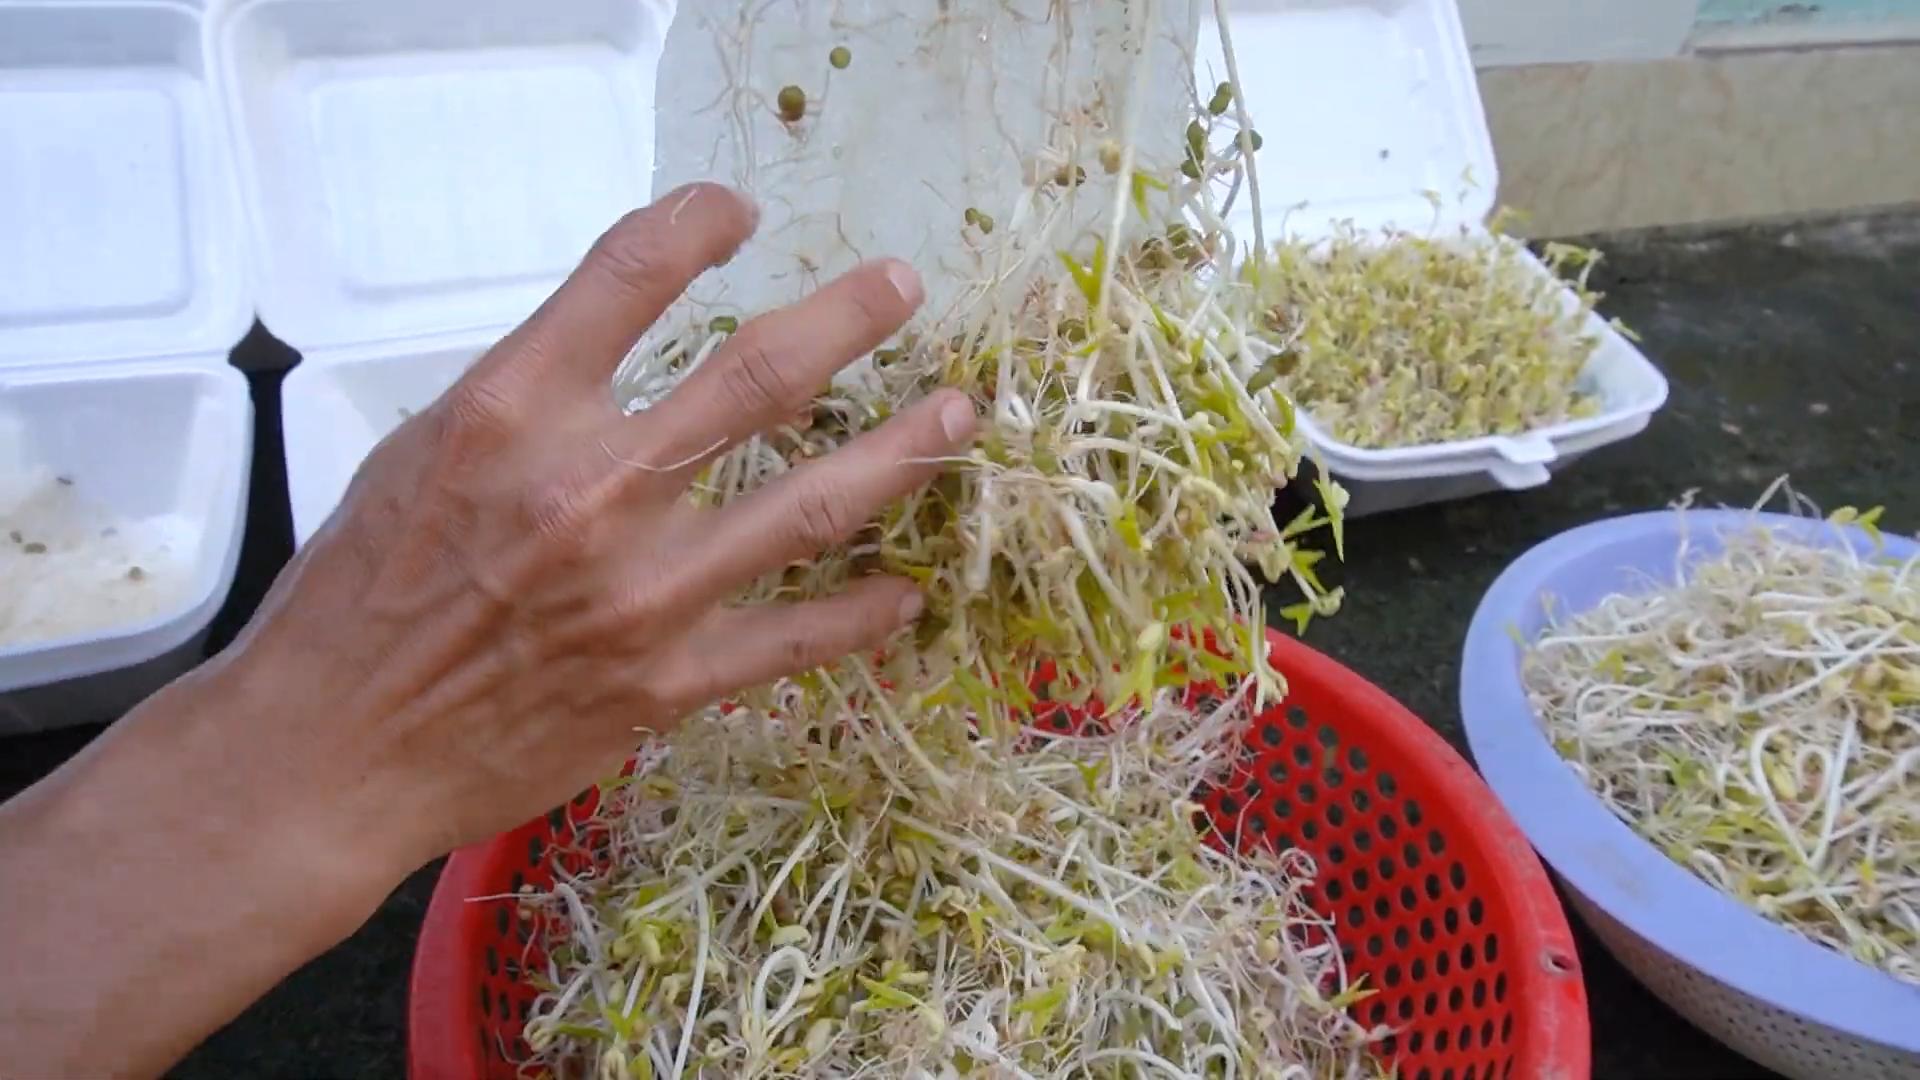
5. Observe Growth: You’ll start to see tiny sprouts emerging from the beans within a day or two. As they grow, they’ll fill the jar. It’s so exciting to watch!
Phase 3: Finishing and Harvesting
Almost there! This phase involves a little bit of sunlight and a final rinse to prepare your sprouts for consumption.
1. Expose to Sunlight (Optional): On the last day of sprouting, you can expose the sprouts to indirect sunlight for a few hours. This will help them develop chlorophyll and turn a light green color. This step is optional, but it adds a bit of extra nutrients and visual appeal.
2. Final Rinse: Give the sprouts one last thorough rinse.
3. Harvest: Your bean sprouts are ready to harvest when they are about 1-2 inches long.
4. Remove Hulls (Optional): Some people prefer to remove the hulls (the outer skins of the beans) before eating. This is a bit tedious, but it can improve the texture. You can do this by placing the sprouts in a large bowl of water and gently agitating them. The hulls will float to the surface and can be skimmed off.
5. Dry Thoroughly: Drain the sprouts well and pat them dry with a clean towel or paper towel. This will help them last longer in the refrigerator.
Storing Your Bean Sprouts
Proper storage is essential to keep your bean sprouts fresh and crunchy.
1. Refrigerate: Store the dried bean sprouts in an airtight container in the refrigerator.
2. Line with Paper Towels: Line the container with paper towels to absorb excess moisture.
3. Use Within a Week: Your homemade bean sprouts should stay fresh for about a week in the refrigerator.
4. Inspect Before Use: Before using, inspect the sprouts for any signs of spoilage, such as a slimy texture or a foul odor. Discard any sprouts that look or smell off.
Troubleshooting
Sometimes things don’t go exactly as planned. Here are a few common issues and how to address them:
* Mold Growth: Mold is usually caused by insufficient rinsing or poor drainage. If you see mold, discard the entire batch and start over, making sure to rinse the beans more frequently and thoroughly.
* Slow Growth: Slow growth can be due to low temperatures or insufficient moisture. Make sure the beans are kept at room temperature and are rinsed regularly.
* Unpleasant Odor: An unpleasant odor can indicate bacterial growth. This is usually caused by poor hygiene or contaminated water. Discard the batch and start over, using clean water and ensuring your jar and sprouting lid are thoroughly cleaned.
* Sprouts are Too Short: If you prefer longer sprouts, simply continue the rinsing and draining process for another day or two.
Tips and Tricks for Success
Here are a few extra tips to help you become a bean sprouting pro:
* Use High-Quality Beans: The quality of your beans will affect the success of your sprouting. Choose beans that are specifically labeled for sprouting or food use.
* Experiment with Different Beans: Once you’ve mastered mung beans, try sprouting other types of beans, such as adzuki beans, lentils, or chickpeas. Each type has a slightly different flavor and texture.
* Keep Everything Clean: Cleanliness is crucial to prevent mold and bacteria growth. Make sure to thoroughly clean your jar, sprouting lid, and any other equipment you use.
* Don’t Overcrowd the Jar: Using too many beans can lead to overcrowding and poor air circulation, which can increase the risk of mold growth. Start with a small amount of beans and adjust as needed.
* Enjoy Your Sprouts! Add your homemade bean sprouts to salads, stir-fries, sandwiches, or soups. They’re a delicious and nutritious addition to any meal!
Why Grow Your Own?
Growing your own bean sprouts is not only easy and fun, but it also offers several benefits:
* Freshness: Homegrown bean sprouts are much fresher than store-bought ones.
Hey there, fellow DIY enthusiasts! Ever thought about growing your own bean sprouts? It’s surprisingly easy, super rewarding, and gives you a constant supply of fresh, crunchy goodness for salads, stir-fries, and more. Plus, it’s a fantastic way to reduce your grocery bill and know exactly where your food is coming from. I’m going to walk you through the whole process, step-by-step, so you can enjoy homegrown bean sprouts in just a few days.
What You’ll Need
Before we dive in, let’s gather our supplies. The beauty of this project is that you probably already have most of these things lying around!
* Bean Seeds: Mung beans are the most common and easiest to sprout, but you can also use adzuki beans, lentils, or even chickpeas. Make sure they are specifically labeled for sprouting or food use, not treated for planting. I usually get mine from the bulk section of my local health food store.
* A Wide-Mouth Jar: A quart-sized mason jar works perfectly. You can also use a clean glass container.
* Sprouting Lid or Cheesecloth: A sprouting lid is ideal because it allows for easy rinsing and drainage. If you don’t have one, you can use a piece of cheesecloth secured with a rubber band.
* Water: Filtered water is best, but tap water is usually fine too.
* A Bowl or Tray: To prop the jar at an angle for drainage.
* A Dark Place: A cupboard or pantry works great.
Phase 1: Soaking the Beans
This is where the magic begins! Soaking the beans wakes them up and starts the germination process.
1. Rinse the Beans: Place about 2-3 tablespoons of bean seeds in your jar. Rinse them thoroughly under cool water to remove any debris or dust. I like to swish them around a bit to make sure they’re all clean.
2. Add Water: Fill the jar with cool, filtered water, ensuring the beans are completely submerged. They will expand quite a bit, so leave plenty of room. I usually add about three times the volume of water as beans.
3. Secure the Lid: Cover the jar with your sprouting lid or cheesecloth. If using cheesecloth, secure it tightly with a rubber band.
4. Soak for 8-12 Hours: Place the jar in a dark place at room temperature and let the beans soak for 8-12 hours. I usually soak them overnight so they’re ready to go in the morning.
Phase 2: Sprouting the Beans
Now comes the fun part – watching your little sprouts grow! This phase requires regular rinsing and drainage to keep the beans moist but not waterlogged.
1. Drain and Rinse: After the soaking period, drain the water from the jar through the sprouting lid or cheesecloth. Rinse the beans thoroughly with cool water. This is crucial to prevent mold and bacteria growth.
2. Invert and Drain: After rinsing, invert the jar and prop it at an angle in a bowl or tray. This allows excess water to drain out and provides good air circulation. I usually use a small dish towel folded up to create the angle.
3. Repeat 2-3 Times Daily: Rinse and drain the beans 2-3 times a day for the next 3-5 days. Consistency is key here! Make sure to use cool, fresh water each time. I set reminders on my phone so I don’t forget.
4. Maintain Darkness: Keep the jar in a dark place between rinses. Darkness encourages the sprouts to grow long and white.
5. Observe Growth: You’ll start to see tiny sprouts emerging from the beans within a day or two. As they grow, they’ll fill the jar. It’s so exciting to watch!
Phase 3: Finishing and Harvesting
Almost there! This phase involves a little bit of sunlight and a final rinse to prepare your sprouts for consumption.
1. Expose to Sunlight (Optional): On the last day of sprouting, you can expose the sprouts to indirect sunlight for a few hours. This will help them develop chlorophyll and turn a light green color. This step is optional, but it adds a bit of extra nutrients and visual appeal.
2. Final Rinse: Give the sprouts one last thorough rinse.
3. Harvest: Your bean sprouts are ready to harvest when they are about 1-2 inches long.
4. Remove Hulls (Optional): Some people prefer to remove the hulls (the outer skins of the beans) before eating. This is a bit tedious, but it can improve the texture. You can do this by placing the sprouts in a large bowl of water and gently agitating them. The hulls will float to the surface and can be skimmed off.
5. Dry Thoroughly: Drain the sprouts well and pat them dry with a clean towel or paper towel. This will help them last longer in the refrigerator.
Storing Your Bean Sprouts
Proper storage is essential to keep your bean sprouts fresh and crunchy.
1. Refrigerate: Store the dried bean sprouts in an airtight container in the refrigerator.
2. Line with Paper Towels: Line the container with paper towels to absorb excess moisture.
3. Use Within a Week: Your homemade bean sprouts should stay fresh for about a week in the refrigerator.
4. Inspect Before Use: Before using, inspect the sprouts for any signs of spoilage, such as a slimy texture or a foul odor. Discard any sprouts that look or smell off.
Troubleshooting
Sometimes things don’t go exactly as planned. Here are a few common issues and how to address them:
* Mold Growth: Mold is usually caused by insufficient rinsing or poor drainage. If you see mold, discard the entire batch and start over, making sure to rinse the beans more frequently and thoroughly.
* Slow Growth: Slow growth can be due to low temperatures or insufficient moisture. Make sure the beans are kept at room temperature and are rinsed regularly.
* Unpleasant Odor: An unpleasant odor can indicate bacterial growth. This is usually caused by poor hygiene or contaminated water. Discard the batch and start over, using clean water and ensuring your jar and sprouting lid are thoroughly cleaned.
* Sprouts are Too Short: If you prefer longer sprouts, simply continue the rinsing and draining process for another day or two.
Tips and Tricks for Success
Here are a few extra tips to help you become a bean sprouting pro:
* Use High-Quality Beans: The quality of your beans will affect the success of your sprouting. Choose beans that are specifically labeled for sprouting or food use.
* Experiment with Different Beans: Once you’ve mastered mung beans, try sprouting other types of beans, such as adzuki beans, lentils, or chickpeas. Each type has a slightly different flavor and texture.
* Keep Everything Clean: Cleanliness is crucial to prevent mold and bacteria growth. Make sure to thoroughly clean your jar, sprouting lid, and any other equipment you use.
* Don’t Overcrowd the Jar: Using too many beans can lead to overcrowding and poor air circulation, which can increase the risk of mold growth. Start with a small amount of beans and adjust as needed.
* Enjoy Your Sprouts! Add your homemade bean sprouts to salads, stir-fries, sandwiches, or soups. They’re a delicious and nutritious addition to any meal!
Why Grow Your Own?
Growing your own bean sprouts is not only easy and fun, but it also offers several benefits:
* Freshness: Homegrown bean sprouts are much fresher than store-bought ones.
* Cost Savings: Growing your own bean sprouts can save you money on groceries.
* Nutritional Value: Bean sprouts are packed with vitamins, minerals, and antioxidants.
* Sustainability: Growing your own food reduces your carbon footprint.
* Satisfaction: There’s nothing quite like the satisfaction of growing your own food!
So, what are you waiting for? Give it a try! I promise you’ll be amazed at how easy and rewarding it is to grow your own bean sprouts at home. Happy sprouting!
Conclusion
So, there you have it! Growing your own bean sprouts at home is not only incredibly easy and cost-effective, but it also provides you with a constant supply of fresh, crunchy goodness. Forget those limp, pre-packaged sprouts from the grocery store. With just a few simple supplies and a little patience, you can cultivate a vibrant batch of bean sprouts bursting with flavor and nutrients, right in your own kitchen.
This DIY trick is a must-try for several reasons. First, you have complete control over the growing environment, ensuring that your sprouts are free from harmful chemicals and pesticides. Second, the taste difference is remarkable. Homegrown bean sprouts are noticeably fresher and more flavorful than their store-bought counterparts. Third, it’s a fantastic way to reduce food waste and save money. You’ll only grow what you need, when you need it.
But the benefits don’t stop there. Growing bean sprouts is also a surprisingly rewarding experience. Watching those tiny seeds transform into crisp, edible sprouts is a miniature miracle of nature that you can witness firsthand. It’s a great project for kids, teaching them about plant life and where their food comes from.
Looking for variations? Experiment with different types of beans! Mung beans are the most common, but you can also try adzuki beans, lentils, or even chickpeas. Each variety will offer a slightly different flavor and texture. You can also adjust the growing time to achieve your desired sprout length. Some people prefer shorter, more delicate sprouts, while others like them longer and crunchier.
Consider adding a touch of flavor during the rinsing process. A splash of lemon juice or a dash of apple cider vinegar can add a subtle tang to your sprouts. Just be sure to rinse them thoroughly afterward to remove any excess acidity.
Ultimately, the best way to discover the magic of homegrown bean sprouts is to simply try it yourself. Don’t be intimidated by the process. It’s far simpler than you might think. Gather your supplies, follow the steps outlined above, and prepare to be amazed by the results.
We’re confident that once you’ve tasted the difference between homegrown and store-bought bean sprouts, you’ll never go back. So, ditch the plastic containers and embrace the joy of growing your own.
We encourage you to give this DIY bean sprout growing method a try. And most importantly, we want to hear about your experience! Share your photos, tips, and variations in the comments below. Let’s build a community of sprout enthusiasts and spread the word about this simple, sustainable, and delicious way to enjoy fresh produce at home. Let us know if you found this DIY trick helpful!
Frequently Asked Questions (FAQ)
What kind of beans can I use to grow bean sprouts?
The most common and readily available bean for sprouting is the mung bean. However, you can also successfully sprout other types of beans and legumes, including adzuki beans, lentils, chickpeas, and even soybeans. Keep in mind that each type of bean will have a slightly different flavor, texture, and sprouting time. Experiment to find your favorites! Avoid using kidney beans or other beans that are known to be toxic when raw; these require thorough cooking to be safe for consumption.
How long does it take to grow bean sprouts?
Generally, bean sprouts will be ready to harvest in 3 to 5 days. The exact time will depend on the type of bean, the temperature of your environment, and your personal preference for sprout length. Check your sprouts daily and rinse them regularly to ensure they stay moist and fresh. You’ll know they’re ready when they have developed a small root and a short stem with tiny leaves.
What if my bean sprouts start to smell bad?
A foul odor is a sign that your bean sprouts are not being properly rinsed or that they are contaminated with bacteria. Discard the batch immediately and thoroughly clean your sprouting container before starting a new batch. Make sure to rinse your sprouts at least twice a day with fresh, cool water. Proper ventilation is also crucial to prevent the growth of mold and bacteria.
Can I grow bean sprouts in direct sunlight?
No, direct sunlight can damage your bean sprouts and cause them to become bitter. Bean sprouts prefer a dark, cool environment. Keep your sprouting container in a cupboard, pantry, or other shaded area. A little indirect light is fine, but avoid exposing them to direct sunlight.
How do I store bean sprouts after they are grown?
Once your bean sprouts are ready, rinse them thoroughly and drain them well. Store them in an airtight container lined with a paper towel in the refrigerator. The paper towel will help absorb excess moisture and keep the sprouts fresh for up to a week.
Are bean sprouts safe to eat raw?
While homegrown bean sprouts are generally safe to eat raw, there is always a small risk of bacterial contamination. To minimize this risk, be sure to use clean water and equipment, rinse your sprouts thoroughly, and store them properly. If you are concerned about food safety, you can lightly cook your bean sprouts before eating them. Steaming, stir-frying, or blanching them for a few minutes will kill any harmful bacteria.
What are the nutritional benefits of bean sprouts?
Bean sprouts are a good source of vitamins, minerals, and fiber. They are low in calories and fat, making them a healthy addition to any diet. They are particularly rich in vitamin C, vitamin K, and folate. They also contain antioxidants, which can help protect your body against damage from free radicals.
Can I use tap water to grow bean sprouts?
Yes, you can use tap water to grow bean sprouts, but it’s best to use filtered water if your tap water contains high levels of chlorine or other chemicals. These chemicals can inhibit sprouting and affect the taste of your sprouts.
My bean sprouts are not sprouting. What am I doing wrong?
There could be several reasons why your bean sprouts are not sprouting. First, make sure your beans are fresh and viable. Old beans may not sprout properly. Second, ensure that your beans are being soaked for the correct amount of time. Over-soaking or under-soaking can both inhibit sprouting. Third, check the temperature of your environment. Bean sprouts prefer a cool environment, around 60-75°F (15-24°C). Finally, make sure your sprouts are being rinsed regularly and that they have adequate ventilation.
Can I reuse the same beans for multiple batches of sprouts?
No, you should not reuse the same beans for multiple batches of sprouts. Once beans have been soaked and sprouted, they are no longer viable for future sprouting. Using the same beans can also increase the risk of bacterial contamination. Always start with a fresh batch of beans for each sprouting session.
Leave a Comment