
Bell pepper color variety isn’t just about aesthetics; it’s a fascinating journey into the world of home gardening and unlocking the full potential of your homegrown produce! Have you ever wondered why some bell peppers are green, others yellow, orange, or even red? It’s more than just a visual treat; it’s a sign of ripeness and nutritional value. I’m excited to share some simple DIY tricks to help you understand and even influence the color of your bell peppers, right in your own backyard.
Bell peppers have a rich history, originating in South America and spreading throughout the world thanks to explorers and traders. They’ve become a staple in countless cuisines, adding flavor and vibrant color to dishes. But beyond their culinary appeal, understanding the science behind bell pepper color variety can empower you to become a more knowledgeable and successful gardener.
Let’s face it, waiting for your green bell peppers to turn red can feel like an eternity! Many gardeners struggle with getting their peppers to fully ripen and achieve their desired color. This DIY guide will provide you with practical tips and tricks to encourage color change, maximize your harvest, and enjoy the sweetest, most nutritious bell peppers possible. I’ll show you how simple adjustments to sunlight exposure, watering, and even a little plant pampering can make all the difference. Get ready to transform your pepper patch into a rainbow of deliciousness!
Growing a Rainbow: A Guide to Maximizing Bell Pepper Color Variety in Your Garden
Hey fellow gardeners! Ever dream of a vibrant bell pepper harvest bursting with reds, yellows, oranges, and even purples? I know I have! While you can’t magically change a pepper’s genetics, there are definitely things you can do to encourage a wider range of colors and healthier, more productive plants. Let’s dive into my tried-and-true methods for achieving a rainbow of bell peppers in your own backyard.
Understanding Bell Pepper Color Development
Before we get our hands dirty, let’s quickly understand how bell peppers get their color. Green bell peppers are simply unripe peppers. As they mature, they transition through different colors depending on their variety. Red, yellow, and orange peppers are all fully ripe. Some varieties, like purple bell peppers, are bred specifically for that color.
Key takeaway: Patience is key! Don’t pick your peppers too early if you’re aiming for a specific color.
Choosing the Right Bell Pepper Varieties
This is the most crucial step! You can’t get a rainbow without planting the right seeds or seedlings.
* Red Bell Peppers: ‘California Wonder’ is a classic, reliable choice. ‘Red Knight’ is another excellent option known for its disease resistance.
* Yellow Bell Peppers: ‘Golden Bell’ is a popular and productive variety. ‘Sweet Sunshine’ is another good choice, offering a slightly sweeter flavor.
* Orange Bell Peppers: ‘Orange Bell’ is, unsurprisingly, a solid choice. ‘Jupiter’ is a larger orange bell pepper with thick walls.
* Purple Bell Peppers: ‘Purple Beauty’ is a widely available and relatively easy-to-grow purple bell pepper. ‘Islander’ is another option, sometimes displaying streaks of green and purple.
* Other Colors: Don’t be afraid to experiment! You can find bell peppers in shades of brown, white, and even almost black. Look for specialty seed suppliers or local nurseries.
Pro Tip: Read seed packets carefully! They’ll tell you the expected color and maturity time for each variety.
Preparing Your Garden for Success
Bell peppers need a sunny spot and well-drained soil to thrive. Here’s how I prep my garden beds:
* Sunlight: Bell peppers need at least 6-8 hours of direct sunlight per day. Choose a location that gets plenty of sun throughout the growing season.
* Soil: Bell peppers prefer well-drained, fertile soil with a pH between 6.0 and 6.8.
* Soil Amendment: Amend your soil with plenty of compost or well-rotted manure before planting. This will improve drainage, add nutrients, and help retain moisture.
* Raised Beds (Optional): I personally love using raised beds for my peppers. They improve drainage and make it easier to control the soil quality.
Planting Your Bell Pepper Plants
Whether you’re starting from seeds or using transplants, proper planting is essential.
* Starting from Seeds: Start your seeds indoors 6-8 weeks before the last expected frost. Use a seed-starting mix and keep the soil consistently moist. Once the seedlings have a few sets of true leaves, you can transplant them into larger pots.
* Transplanting Seedlings: Wait until the danger of frost has passed and the soil has warmed up before transplanting your bell pepper seedlings into the garden.
* Spacing: Space your plants 18-24 inches apart in rows that are 24-36 inches apart. This will give them enough room to grow and allow for good air circulation.
* Planting Depth: Plant your seedlings at the same depth they were growing in their containers.
* Watering: Water thoroughly after planting.
Caring for Your Bell Pepper Plants
Consistent care is key to a bountiful and colorful harvest.
* Watering: Bell peppers need consistent moisture, especially during hot weather. Water deeply whenever the top inch of soil feels dry. Avoid overhead watering, as this can lead to fungal diseases. Drip irrigation or soaker hoses are ideal.
* Fertilizing: Feed your bell pepper plants with a balanced fertilizer every 2-3 weeks. Look for a fertilizer that is specifically formulated for vegetables. I like to use a liquid fertilizer diluted to half strength.
* Mulching: Apply a layer of mulch around your plants to help retain moisture, suppress weeds, and regulate soil temperature. Straw, wood chips, or shredded leaves are all good options.
* Staking or Caging: As your bell pepper plants grow, they may need support to prevent them from falling over, especially when loaded with fruit. Use stakes or cages to provide support.
* Pruning: Pruning isn’t strictly necessary, but it can help improve air circulation and encourage more fruit production. Remove any suckers (small shoots that grow from the base of the plant) and any yellowing or diseased leaves.
* Pest and Disease Control: Keep an eye out for common bell pepper pests like aphids, flea beetles, and pepper weevils. Use insecticidal soap or neem oil to control these pests. Prevent fungal diseases by providing good air circulation and avoiding overhead watering.
Troubleshooting Common Bell Pepper Problems
Even with the best care, you might encounter some problems along the way. Here are a few common issues and how to address them:
* Blossom End Rot: This is caused by a calcium deficiency and results in a dark, sunken spot on the bottom of the pepper. To prevent blossom end rot, ensure your soil has adequate calcium and water consistently. You can also add calcium to the soil by incorporating bone meal or crushed eggshells.
* Sunscald: This occurs when peppers are exposed to too much direct sunlight, causing them to develop white or yellow patches. Provide shade during the hottest part of the day or choose varieties that are more resistant to sunscald.
* Poor Fruit Set: Several factors can contribute to poor fruit set, including temperature extremes, lack of pollination, and nutrient deficiencies. Ensure your plants are getting enough sunlight, water, and nutrients. You can also hand-pollinate the flowers by gently shaking the plants.
Harvesting Your Colorful Bell Peppers
This is the moment we’ve been waiting for!
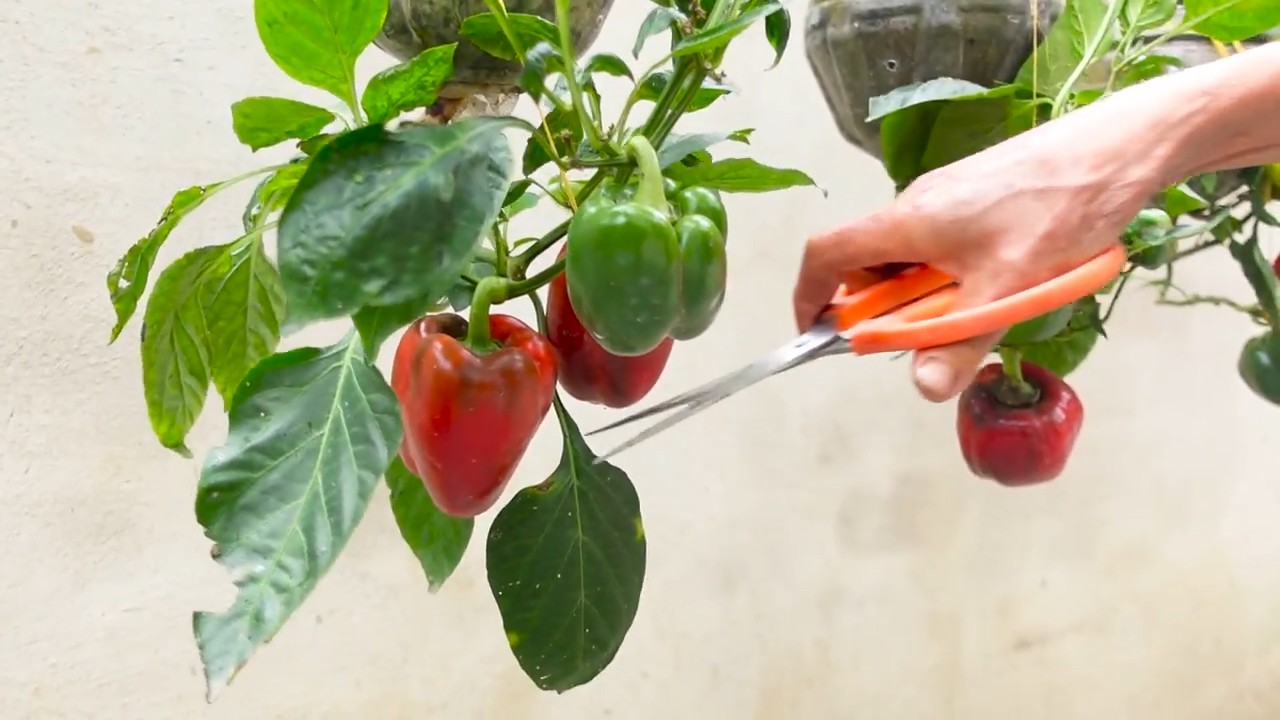
* When to Harvest: Harvest your bell peppers when they have reached their desired color and size. Remember, green peppers are unripe, so wait until they turn red, yellow, orange, or purple, depending on the variety.
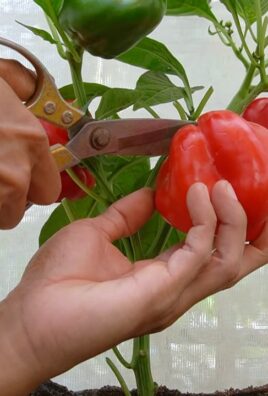
* How to Harvest: Use a sharp knife or pruning shears to cut the peppers from the plant. Leave a small piece of stem attached to the pepper.
* Storage: Store your bell peppers in the refrigerator for up to a week.
Encouraging Color Development: My Secret Tips
Okay, here are a few extra tips I’ve learned over the years to really maximize color development:
* Patience, Patience, Patience: I can’t stress this enough! Don’t pick your peppers too early. The longer they stay on the plant, the more time they have to develop their full color.
* Sunlight is Your Friend: Make sure your plants are getting plenty of sunlight. Sunlight is essential for the production of pigments that give peppers their color.
* Consistent Watering: Water stress can hinder color development. Keep the soil consistently moist, but not waterlogged.
* Potassium Boost: Potassium is important for fruit development and color. Consider using a fertilizer that is higher in potassium as your peppers begin to ripen.
* Avoid Over-Fertilizing with Nitrogen: Too much nitrogen can promote leafy growth at the expense of fruit production and color development.
* Protect from Extreme Heat: While sunlight is important, extreme heat can sometimes inhibit color development. If you live in a very hot climate, consider providing some shade during the hottest part of the day.
Enjoying Your Rainbow Harvest
Now that you’ve harvested your beautiful, colorful bell peppers, it’s time to enjoy them! Bell peppers are incredibly versatile and can be used in a wide variety of dishes.
* Raw: Slice them up and add them to salads, sandwiches, or veggie platters.
* Roasted: Roasting bell peppers brings out their sweetness and intensifies their flavor.
* Stuffed: Stuffed bell peppers are a classic and satisfying dish.
* Grilled: Grilled bell peppers are a delicious addition to any barbecue.
* Sautéed: Sautéed bell peppers are a quick and easy side dish.
* Pickled: Pickled bell peppers are a great way to preserve your harvest.
Bonus Tip: Save some seeds from your favorite bell peppers to plant next year! Just be aware that if you’re growing multiple varieties, cross-pollination can occur, so the seeds may not produce true-to-type plants.
Growing a rainbow of bell peppers is a rewarding experience. With a little planning, patience, and care, you can enjoy a vibrant and delicious harvest from your own garden. Happy gardening!
Conclusion
So, there you have it! Transforming your kitchen scraps into a vibrant array of bell pepper colors is not just a fun experiment; it’s a sustainable way to reduce waste, save money, and add a personal touch to your culinary creations. We’ve explored the simple yet effective method of coaxing new life from those seemingly discarded bell pepper seeds, unlocking the potential for a rainbow of homegrown goodness right in your own backyard or windowsill.
This DIY trick is a must-try for several compelling reasons. First and foremost, it’s incredibly rewarding to witness the entire life cycle of a plant, from tiny seed to mature, colorful fruit. There’s a unique satisfaction in knowing you nurtured that process yourself. Secondly, you gain control over the quality of your produce. You know exactly what went into growing your bell peppers – no mystery chemicals or pesticides, just good old-fashioned care and attention. Finally, and perhaps most practically, you can significantly cut down on your grocery bill, especially if you’re a frequent bell pepper consumer. Imagine the savings over time!
But the beauty of this method lies in its adaptability. Feel free to experiment with different varieties of bell peppers. Try saving seeds from organic bell peppers for an even healthier harvest. Consider different growing mediums, from traditional soil to hydroponic systems. You can even explore companion planting to enhance growth and deter pests naturally. Perhaps try planting basil or marigolds near your bell peppers.
For those with limited space, container gardening is an excellent option. Choose a pot that’s at least 12 inches in diameter to give your bell pepper plant ample room to grow. Place it in a sunny location, and remember to water it regularly. You can even bring your potted bell pepper plant indoors during colder months to extend its growing season.
Another variation to consider is the timing of your seed starting. While we’ve focused on starting seeds indoors, you can also direct sow them in your garden if you live in a warmer climate with a longer growing season. Just make sure the soil temperature is consistently above 65 degrees Fahrenheit.
Don’t be afraid to get creative with your bell pepper cultivation. Try different fertilizers, experiment with pruning techniques, and most importantly, observe your plants closely. They’ll tell you what they need.
We are confident that with a little patience and effort, you’ll be enjoying a bountiful harvest of colorful bell peppers in no time. This DIY trick is not only a fun project but also a step towards a more sustainable and self-sufficient lifestyle.
So, what are you waiting for? Gather your bell pepper seeds, prepare your growing medium, and embark on this exciting gardening adventure. We encourage you to try this DIY trick and share your experiences with us! Post photos of your seedlings, share your tips and tricks, and let us know what challenges you encountered and how you overcame them. Your feedback will not only inspire others but also help us refine this method even further. Let’s cultivate a community of bell pepper enthusiasts!
Remember, growing your own bell pepper color variety is more than just a gardening project; it’s a connection to nature, a celebration of sustainability, and a testament to the power of DIY. Happy gardening!
Frequently Asked Questions (FAQ)
1. What kind of bell peppers are best for saving seeds?
The best bell peppers for saving seeds are those that are fully ripe and have reached their mature color. This ensures that the seeds are fully developed and have the highest chance of germination. Choose bell peppers from healthy, disease-free plants. Organic bell peppers are also a great option if you want to avoid any potential pesticide residue. It’s also important to note that hybrid bell peppers may not produce offspring that are true to type, meaning the resulting plants may not have the same characteristics as the parent plant. For the most predictable results, opt for open-pollinated or heirloom varieties.
2. How long does it take for bell pepper seeds to germinate?
Bell pepper seeds typically take 7-21 days to germinate, but this can vary depending on several factors, including temperature, moisture, and seed quality. The ideal soil temperature for germination is between 75-85 degrees Fahrenheit. Keeping the soil consistently moist, but not waterlogged, is also crucial. Using a heat mat can help maintain the optimal soil temperature, especially if you’re starting seeds indoors in a cooler environment. If your seeds are old or of poor quality, they may take longer to germinate or may not germinate at all.
3. What kind of soil is best for growing bell peppers?
Bell peppers thrive in well-draining, fertile soil that is rich in organic matter. A slightly acidic to neutral pH (6.0-7.0) is ideal. You can improve the soil quality by adding compost, aged manure, or other organic amendments. Avoid heavy clay soils, as they can become waterlogged and hinder root growth. If you’re growing bell peppers in containers, use a high-quality potting mix specifically formulated for vegetables.
4. How much sunlight do bell peppers need?
Bell peppers require at least 6-8 hours of direct sunlight per day to produce a good harvest. Choose a sunny location in your garden or place your potted bell pepper plants in a spot that receives ample sunlight. If you’re growing bell peppers indoors, you may need to supplement with grow lights, especially during the winter months. Insufficient sunlight can result in leggy plants with poor fruit production.
5. How often should I water my bell pepper plants?
Water your bell pepper plants regularly, especially during hot, dry weather. Aim to keep the soil consistently moist, but not waterlogged. Water deeply and less frequently, rather than shallowly and more often. This encourages deep root growth, which makes the plants more drought-tolerant. Avoid overhead watering, as it can increase the risk of fungal diseases. Using a soaker hose or drip irrigation system is a good way to deliver water directly to the roots.
6. What are some common pests and diseases that affect bell peppers?
Common pests that affect bell peppers include aphids, whiteflies, spider mites, and pepper weevils. Diseases include blossom-end rot, fungal leaf spots, and viral diseases. Regularly inspect your plants for signs of pests or diseases. Use organic pest control methods, such as insecticidal soap or neem oil, to control pests. Ensure good air circulation to prevent fungal diseases. Blossom-end rot is caused by a calcium deficiency, so amend the soil with calcium-rich amendments or use a calcium spray.
7. How do I know when my bell peppers are ripe?
Bell peppers are typically ready to harvest when they have reached their mature color and size. The color will depend on the variety, but common colors include green, red, yellow, orange, and purple. The pepper should feel firm and slightly heavy for its size. You can harvest bell peppers at any stage of maturity, but the flavor will be milder when they are green and more intense when they are fully ripe. Use a sharp knife or pruning shears to cut the pepper from the plant, leaving a short stem attached.
8. Can I grow bell peppers indoors year-round?
Yes, you can grow bell peppers indoors year-round, but it requires providing them with the right conditions. This includes adequate sunlight (or grow lights), proper watering, fertilization, and pest control. Choose a compact bell pepper variety that is well-suited for container gardening. You may also need to hand-pollinate the flowers to ensure fruit set.
9. How do I prevent blossom-end rot in my bell peppers?
Blossom-end rot is a common problem in bell peppers, characterized by a dark, leathery spot on the bottom of the fruit. It is caused by a calcium deficiency, which can be due to insufficient calcium in the soil or the plant’s inability to absorb calcium. To prevent blossom-end rot, amend the soil with calcium-rich amendments, such as bone meal or crushed eggshells, before planting. Ensure consistent watering, as fluctuations in soil moisture can hinder calcium uptake. You can also use a calcium spray to provide the plants with a foliar application of calcium.
10. How can I encourage more fruit production on my bell pepper plants?
To encourage more fruit production on your bell pepper plants, provide them with optimal growing conditions, including plenty of sunlight, well-draining soil, and regular watering. Fertilize them with a balanced fertilizer or a fertilizer specifically formulated for vegetables. Prune away any suckers (small shoots that grow from the base of the plant) to encourage more energy to be directed towards fruit production. Hand-pollinate the flowers if necessary, especially if you’re growing bell peppers indoors.
Leave a Comment