
Bitter Gourd Home Harvest – the words alone might conjure up images of challenging cultivation and, well, a rather… acquired taste. But what if I told you that achieving a bountiful bitter gourd harvest right in your own backyard is not only possible but also surprisingly rewarding? For centuries, bitter gourd, also known as bitter melon, has been a staple in Asian cuisine and traditional medicine, revered for its health benefits and unique flavor profile. From stir-fries to teas, this intriguing vegetable has a rich history woven into various cultures.
Now, you might be thinking, “Why bother growing something that’s, well, bitter?” The truth is, freshly harvested bitter gourd from your own garden tastes significantly better than store-bought varieties. Plus, the satisfaction of nurturing a plant from seed to table is an experience unlike any other. More importantly, mastering the art of a successful bitter gourd home harvest means access to a nutrient-rich food source, free from harmful pesticides and bursting with flavor.
This DIY guide is your key to unlocking the secrets of growing thriving bitter gourd vines. We’ll delve into simple yet effective tricks and hacks that will transform your gardening efforts, even if you’re a complete beginner. Get ready to ditch the store-bought bitterness and embrace the sweet success of your own homegrown harvest!
Growing Bitter Gourd at Home: A DIY Guide to a Bountiful Harvest
Hey there, fellow gardening enthusiasts! Today, I’m super excited to share my tried-and-true method for growing bitter gourd (also known as bitter melon or karela) right in your backyard. Trust me, it’s easier than you think, and the satisfaction of harvesting your own fresh, healthy bitter gourds is absolutely worth it. Let’s dive in!
Choosing the Right Variety and Starting Seeds
First things first, let’s talk about choosing the right bitter gourd variety. There are several types available, differing in size, shape, and bitterness. Some popular choices include:
- Long Green: A common variety, known for its elongated shape and moderate bitterness.
- White Bitter Gourd: Milder in flavor compared to the green varieties.
- Chinese Bitter Gourd: Often shorter and thicker than the Indian varieties.
- Hybrid Varieties: These are often bred for higher yields and disease resistance.
I personally prefer the Long Green variety because it’s readily available and produces a good yield. Once you’ve chosen your variety, it’s time to start the seeds.
Here’s how I do it:
1. Soaking the Seeds: To improve germination, I soak the bitter gourd seeds in warm water for 24 hours. This helps to soften the hard outer shell and encourages sprouting. I usually use a small bowl and make sure the seeds are fully submerged.
2. Preparing Seed Trays or Pots: I use seed starting trays with individual cells, but small pots work just as well. Fill them with a good quality seed starting mix. This mix is usually lighter and better draining than regular potting soil, which is crucial for healthy seedling development.
3. Sowing the Seeds: Make a small hole (about half an inch deep) in the center of each cell or pot. Place one seed in each hole and gently cover it with the seed starting mix. Lightly water the soil to moisten it.
4. Creating a Greenhouse Effect: To maintain humidity and warmth, I cover the seed trays or pots with a clear plastic lid or plastic wrap. This creates a mini-greenhouse effect, which speeds up germination.
5. Finding the Right Spot: Place the trays or pots in a warm location with indirect sunlight. A temperature of around 75-85°F (24-29°C) is ideal for germination. I usually keep mine indoors near a sunny window.
6. Monitoring and Watering: Keep the soil consistently moist, but not waterlogged. Check the soil moisture daily and water gently when the top inch feels dry.
7. Waiting for Germination: Bitter gourd seeds typically germinate in 7-14 days. Once the seedlings emerge, remove the plastic cover to allow for better air circulation.
Preparing the Garden Bed
While your seedlings are growing, it’s time to prepare the garden bed where you’ll eventually transplant them. Bitter gourd plants need plenty of sunlight and well-drained soil.
Here’s my step-by-step guide to preparing the perfect garden bed:
1. Choosing the Right Location: Select a spot in your garden that receives at least 6-8 hours of direct sunlight per day. Bitter gourd plants thrive in sunny locations.
2. Soil Preparation: Bitter gourd prefers well-drained, fertile soil with a slightly acidic to neutral pH (6.0-7.0). If your soil is heavy clay or sandy, amend it with organic matter like compost or well-rotted manure. This will improve drainage, aeration, and nutrient content. I usually dig in a generous amount of compost – about 2-3 inches deep – and mix it thoroughly with the existing soil.
3. Adding Fertilizer: Incorporate a slow-release fertilizer into the soil before planting. This will provide the plants with essential nutrients throughout the growing season. I prefer using a balanced fertilizer with an NPK ratio of 10-10-10. Follow the instructions on the fertilizer package for the correct application rate.
4. Building a Trellis: Bitter gourd is a climbing vine, so it needs a sturdy trellis to support its growth. You can use a variety of materials to build a trellis, such as bamboo poles, wooden stakes, or metal fencing. I personally use a simple A-frame trellis made from bamboo poles. Make sure the trellis is at least 6-8 feet tall to accommodate the vigorous growth of the vines.
5. Spacing: If you’re planting multiple bitter gourd plants, space them about 2-3 feet apart along the trellis. This will allow them enough room to grow and spread out.
Transplanting Seedlings and Providing Support
Once your seedlings have developed a few sets of true leaves (usually about 4-6 weeks after sowing), they’re ready to be transplanted into the garden.
Here’s how I transplant my seedlings:
1. Hardening Off: Before transplanting, it’s important to harden off the seedlings. This means gradually exposing them to outdoor conditions over a period of 7-10 days. Start by placing the seedlings in a sheltered location outdoors for a few hours each day, gradually increasing the amount of time they spend outside. This will help them acclimate to the sun, wind, and temperature changes.
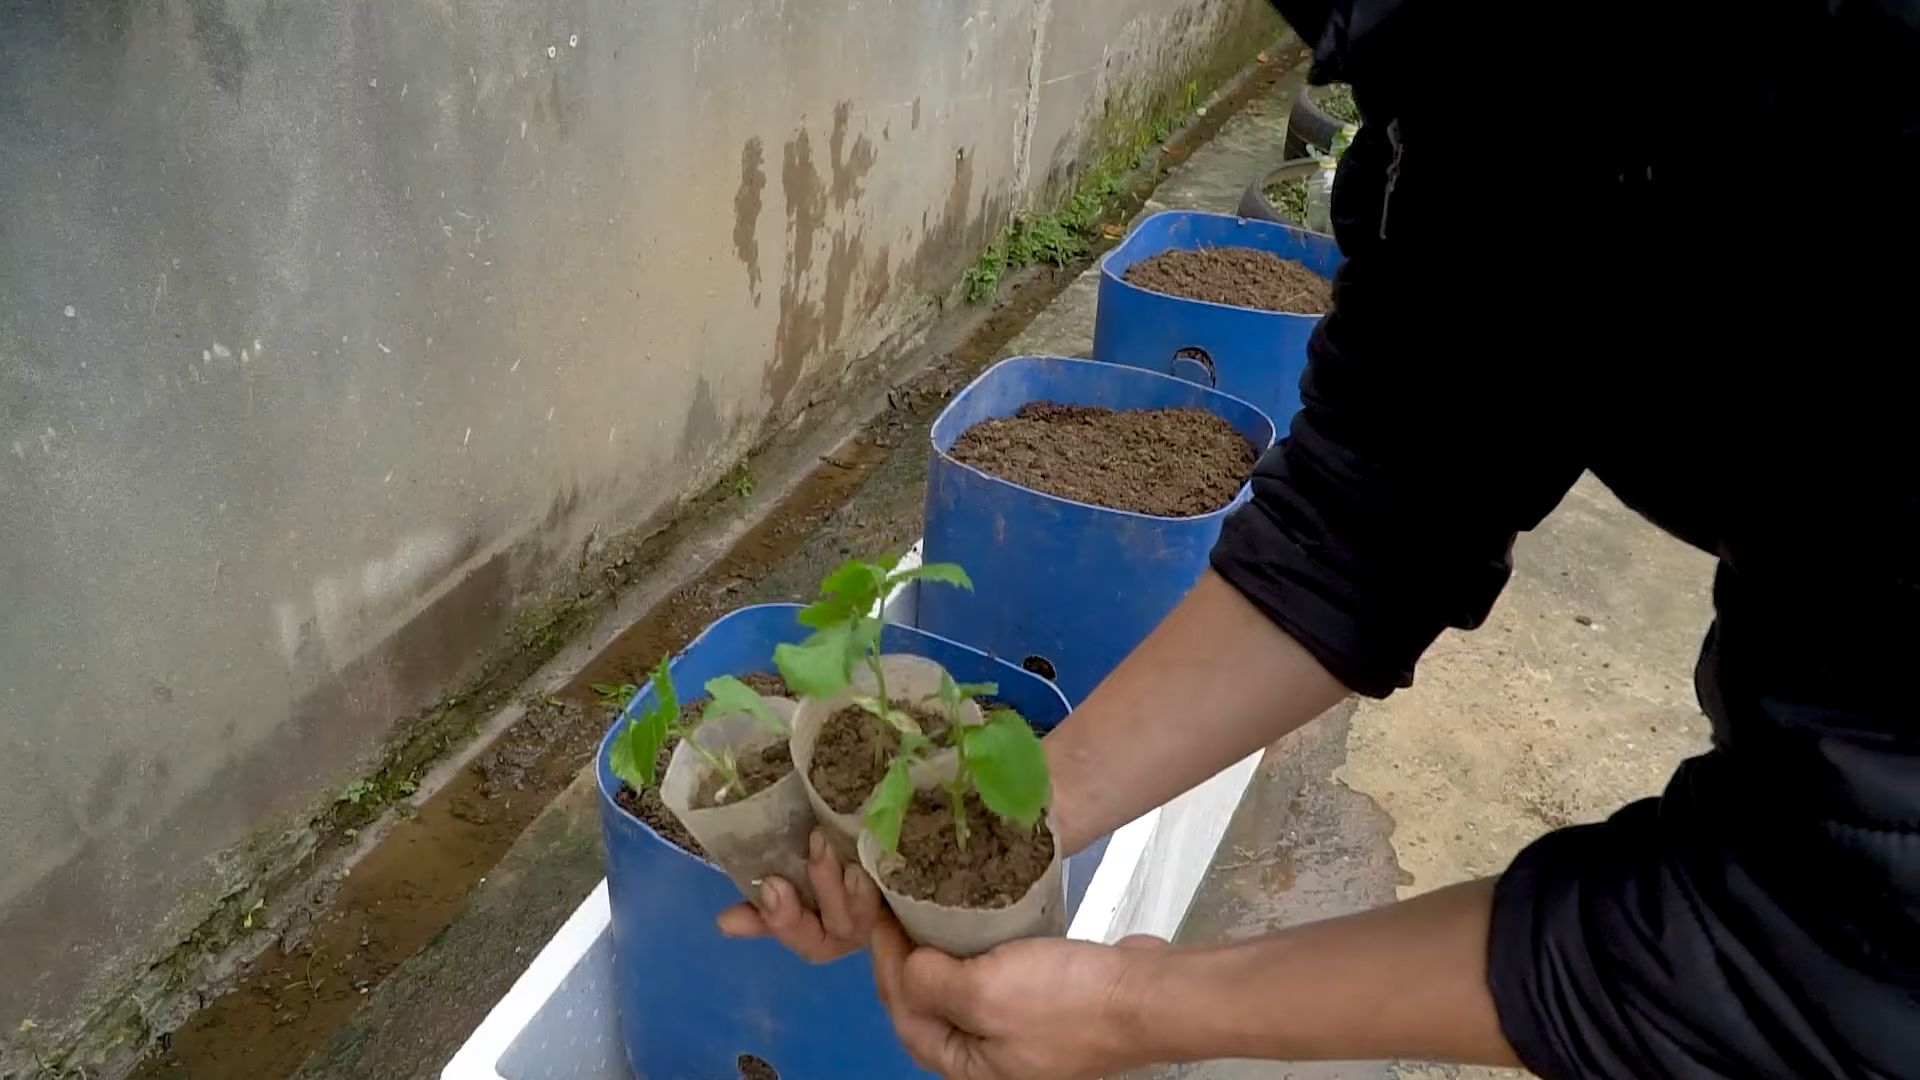
2. Transplanting: Choose a cloudy day or late afternoon to transplant the seedlings. This will minimize stress on the plants. Gently remove the seedlings from their trays or pots, being careful not to damage the roots.
3. Planting: Dig a hole in the prepared garden bed that is slightly larger than the root ball of the seedling. Place the seedling in the hole and backfill with soil, gently firming it around the base of the plant.
4. Watering: Water the newly transplanted seedlings thoroughly to help them establish their roots.
5. Training the Vines: As the bitter gourd vines grow, gently train them to climb the trellis. Use soft twine or plant ties to secure the vines to the trellis. This will help them grow upwards and prevent them from sprawling on the ground.
Caring for Your Bitter Gourd Plants
Now that your bitter gourd plants are in the ground, it’s important to provide them with the proper care to ensure a healthy and productive harvest.
Here’s my care routine:
1. Watering: Bitter gourd plants need consistent moisture, especially during hot, dry weather. Water deeply and regularly, aiming to keep the soil consistently moist but not waterlogged. I usually water my plants every 2-3 days, depending on the weather conditions.
2. Fertilizing: Feed your bitter gourd plants every 2-3 weeks with a balanced liquid fertilizer. This will provide them with the nutrients they need to grow and produce fruit. I like to use a fertilizer that is high in phosphorus and potassium, which promotes flowering and fruit development.
3. Mulching: Apply a layer of mulch around the base of the plants to help retain moisture, suppress weeds, and regulate soil temperature. I use organic mulch like straw or wood chips.
4. Pest and Disease Control: Bitter gourd plants can be susceptible to certain pests and diseases, such as aphids, spider mites, and powdery mildew. Regularly inspect your plants for any signs of infestation or disease. If you spot any problems, take action immediately. I prefer using organic pest control methods, such as insecticidal soap or neem oil. For powdery mildew, I use a baking soda solution (1 teaspoon baking soda per quart of water).
5. Pruning: Pruning can help to improve air circulation and sunlight penetration, which can reduce the risk of disease. I usually prune away any dead or yellowing leaves, as well as any overcrowded or unproductive vines.
Pollination and Harvesting
Bitter gourd plants produce both male and female flowers. The female flowers have a small, immature fruit behind them, while the male flowers do not. Pollination is necessary for the female flowers to develop into fruit.
Here’s what you need to know about pollination and harvesting:
1. Pollination: Bitter gourd plants are typically pollinated by insects, such as bees and butterflies. However, if you’re not seeing a lot of insect activity in your garden, you may need to hand-pollinate the flowers. To hand-pollinate, use a small paintbrush to transfer pollen from the male flowers to the female flowers.
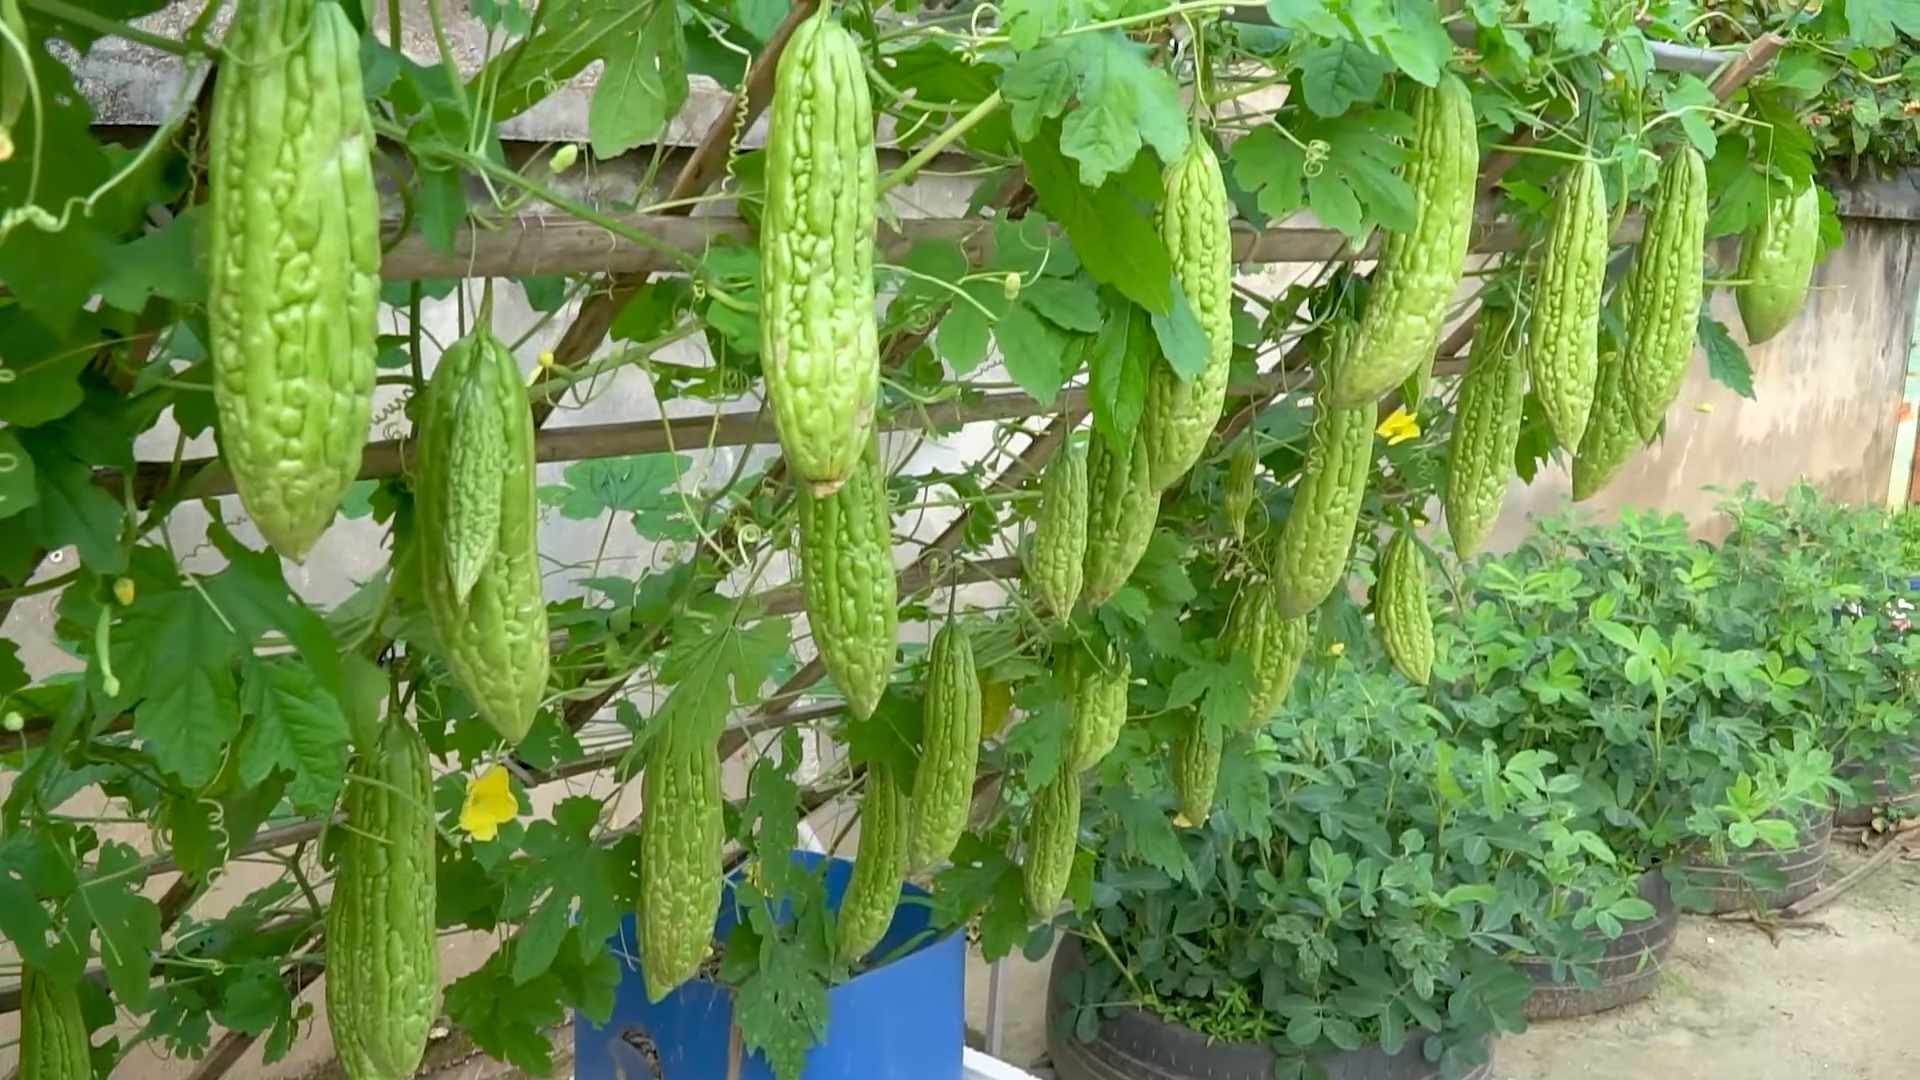
2. Harvesting: Bitter gourds are typically ready to harvest about 2-3 months after planting. The fruits should be firm and green, and the skin should be slightly waxy. Harvest the fruits when they are still relatively young and tender, as they become more bitter as they mature. Use a sharp knife or pruning shears to cut the fruits from the vine, leaving a short stem attached.
3. Successive Harvesting: Bitter gourd plants will continue to produce fruit throughout the growing season if you harvest them regularly. This encourages the plant to produce more flowers and fruits.
Troubleshooting Common Problems
Even with the best care, you may encounter some problems while
Conclusion
So, there you have it! Transforming your home-harvested bitter gourd from a potentially challenging ingredient into a culinary delight is entirely within your reach. This simple DIY trick, focusing on reducing bitterness through a combination of salting, blanching, and proper cooking techniques, is a game-changer for anyone looking to embrace the health benefits and unique flavor profile of this remarkable vegetable.
Why is this a must-try? Because it unlocks the true potential of your homegrown bitter gourd. No longer will you have to shy away from its intense bitterness. Instead, you’ll be able to enjoy its slightly bitter, yet complex, taste in a variety of dishes. Think of it: stir-fries bursting with flavor, stuffed bitter gourd simmered in a rich sauce, or even crispy, baked bitter gourd chips. The possibilities are endless!
But don’t stop there! Feel free to experiment with variations to suit your own taste preferences. For a spicier kick, add a pinch of red pepper flakes to the salting process. If you prefer a sweeter note, consider incorporating a touch of honey or maple syrup into your final dish. You can also explore different cooking methods, such as grilling or air frying, to achieve unique textures and flavors. Try adding a splash of lemon juice or vinegar during the cooking process to further balance the bitterness and brighten the overall taste.
Consider adding other vegetables to your bitter gourd dishes. Onions, garlic, bell peppers, and tomatoes all complement the flavor of bitter gourd beautifully. You can also add protein sources like tofu, chicken, or shrimp to create a complete and satisfying meal.
This DIY trick is not just about reducing bitterness; it’s about empowering you to confidently cook with bitter gourd and enjoy its many health benefits. It’s about transforming a potentially intimidating ingredient into a versatile and delicious addition to your culinary repertoire.
We wholeheartedly encourage you to try this DIY trick with your next batch of home-harvested bitter gourd. We are confident that you’ll be amazed by the difference it makes. Don’t be afraid to experiment, adapt the techniques to your liking, and most importantly, have fun in the kitchen!
Once you’ve tried it, we’d love to hear about your experience! Share your tips, variations, and favorite bitter gourd recipes in the comments below. Let’s build a community of bitter gourd enthusiasts and inspire others to embrace this often-overlooked vegetable. Your insights could be invaluable to someone else who is just starting their bitter gourd journey. So, go ahead, give it a try, and let us know what you think! We can’t wait to hear from you.
Frequently Asked Questions (FAQ)
Q: How long should I salt the bitter gourd?
A: The ideal salting time depends on the size and thickness of your bitter gourd slices. Generally, 30 minutes to an hour is sufficient. You’ll notice the bitter gourd releasing moisture as it sits in the salt. This is a good sign that the salting process is working. If you’re using thicker slices, you might want to extend the salting time slightly. Remember to rinse the bitter gourd thoroughly after salting to remove excess salt.
Q: Can I skip the blanching step?
A: While you can technically skip the blanching step, we highly recommend including it. Blanching helps to further reduce bitterness and also helps to soften the bitter gourd slightly, making it easier to cook. It also helps to preserve the vibrant green color of the bitter gourd. If you choose to skip blanching, be prepared for a potentially more bitter flavor and a slightly tougher texture.
Q: What’s the best way to blanch bitter gourd?
A: The best way to blanch bitter gourd is to bring a pot of water to a rolling boil. Add the bitter gourd slices and cook for 2-3 minutes. Immediately transfer the bitter gourd to an ice bath to stop the cooking process. This helps to preserve the color and texture of the vegetable. Drain the bitter gourd thoroughly before proceeding with your recipe.
Q: How do I know if the bitter gourd is cooked properly?
A: The cooking time for bitter gourd will vary depending on the recipe and the size of the pieces. Generally, you’ll want to cook it until it’s tender-crisp. Avoid overcooking, as this can make it mushy. Taste a piece of the bitter gourd to check for doneness. It should be slightly tender but still have a bit of bite.
Q: What are some good recipes to use with my less bitter bitter gourd?
A: There are countless ways to enjoy your less bitter bitter gourd! Some popular options include stir-fries with tofu or meat, stuffed bitter gourd with a savory filling, bitter gourd soup, and even bitter gourd chips. You can also add it to curries, stews, and omelets. Don’t be afraid to experiment and find your favorite ways to use this versatile vegetable. Search online for “bitter gourd recipes” to find a wealth of inspiration.
Q: Can I freeze bitter gourd after salting and blanching?
A: Yes, you can freeze bitter gourd after salting and blanching. This is a great way to preserve your harvest and enjoy it later. After blanching and draining the bitter gourd, spread it out on a baking sheet and freeze it for a few hours until solid. Then, transfer the frozen bitter gourd to a freezer bag or container. It will keep in the freezer for several months. When you’re ready to use it, simply thaw it in the refrigerator or add it directly to your cooking dish.
Q: I’m still finding my bitter gourd too bitter. What can I do?
A: If you’re still finding your bitter gourd too bitter, there are a few things you can try. First, make sure you’re salting it for a sufficient amount of time. You can also try increasing the salting time slightly. Another option is to add a small amount of sugar or honey to your dish to help balance the bitterness. You can also try pairing the bitter gourd with other ingredients that have strong flavors, such as garlic, ginger, or chili peppers.
Q: Does the size of the bitter gourd affect the bitterness?
A: Yes, generally, smaller, younger bitter gourds tend to be less bitter than larger, more mature ones. If you have the option, choose smaller bitter gourds for a milder flavor.
Q: Is bitter gourd good for you?
A: Absolutely! Bitter gourd is packed with nutrients and antioxidants. It’s a good source of vitamins A and C, as well as iron and potassium. It’s also believed to have several health benefits, including helping to regulate blood sugar levels, boosting the immune system, and improving digestion. Incorporating bitter gourd into your diet can be a great way to improve your overall health and well-being.
Q: Can I use this DIY trick on store-bought bitter gourd?
A: Yes, this DIY trick works equally well on store-bought bitter gourd. While home-harvested bitter gourd is often fresher, the same principles of salting, blanching, and proper cooking apply to both. So, feel free to use this technique to reduce the bitterness of any bitter gourd you find at your local grocery store.

Leave a Comment