
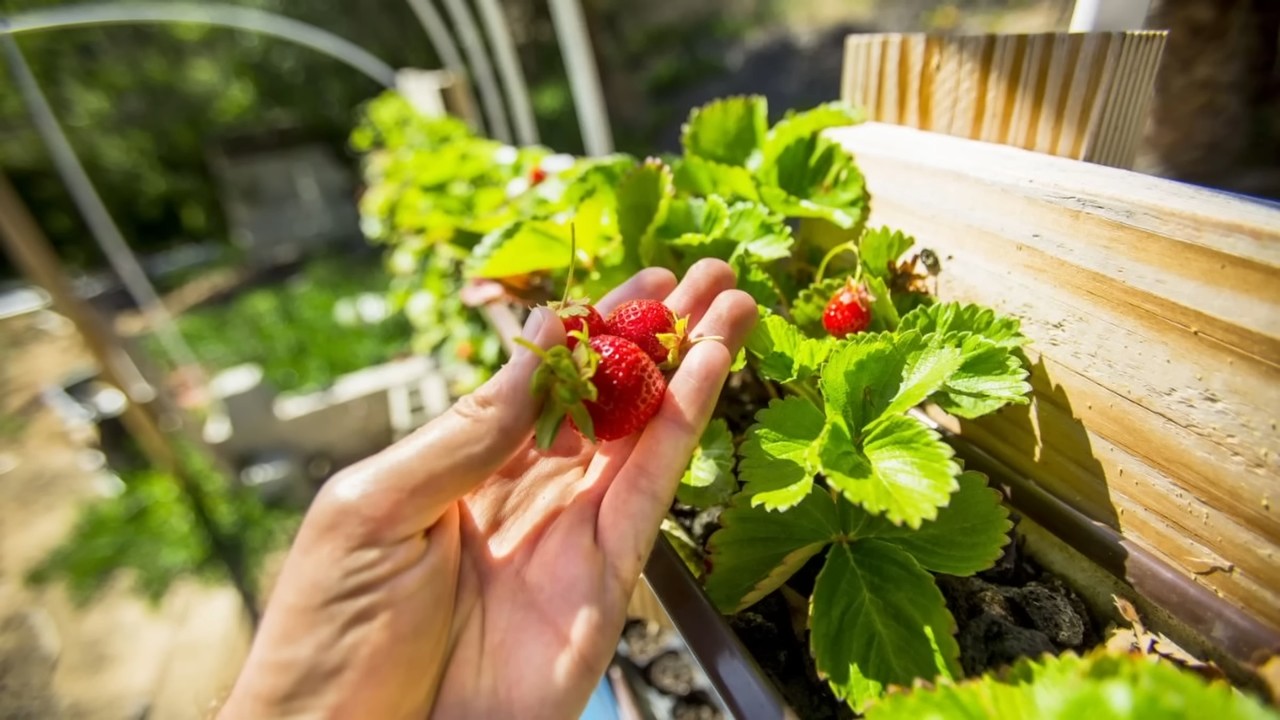
Boost Strawberry Yield Raised Beds: Dreaming of baskets overflowing with juicy, sun-ripened strawberries? I know I am! There’s nothing quite like the taste of a homegrown strawberry, and the satisfaction of nurturing your own little patch of deliciousness. But let’s be honest, sometimes our strawberry plants need a little help to reach their full potential. That’s where this DIY guide comes in!
For centuries, gardeners have sought ways to maximize their harvests, and the humble strawberry is no exception. From ancient Roman gardens to modern-day farms, people have experimented with different techniques to coax the sweetest and most abundant berries from their plants. Raised beds, in particular, have gained popularity for their ability to improve drainage, soil quality, and overall plant health.
Why should you consider these DIY tricks to boost strawberry yield raised beds? Well, many of us struggle with poor soil, limited space, or pesky pests that can decimate our strawberry crops. Raised beds offer a controlled environment where you can create the perfect growing conditions for your strawberries. Plus, with a few simple DIY hacks, you can significantly increase your yield and enjoy a bountiful harvest all season long. I’m excited to share some easy and effective methods that will help you achieve strawberry success, even if you’re a beginner gardener!
Boost Your Strawberry Yield: A DIY Raised Bed System for Strawberry Success!
Hey fellow gardeners! Are you dreaming of baskets overflowing with juicy, sun-ripened strawberries? I know I am! And if you’re like me, you’re always looking for ways to maximize your harvest. That’s why I’m so excited to share my DIY raised bed system specifically designed to boost strawberry yields. This project is perfect for beginners and experienced gardeners alike, and it’s a fantastic way to create the ideal environment for your strawberry plants to thrive.
Why Raised Beds for Strawberries?
Before we dive into the how-to, let’s quickly cover why raised beds are so beneficial for strawberries:
* Improved Drainage: Strawberries hate soggy roots! Raised beds provide excellent drainage, preventing root rot and other moisture-related problems.
* Warmer Soil: Raised beds warm up faster in the spring, giving your strawberry plants a head start on the growing season.
* Better Soil Control: You can customize the soil mix in your raised bed to create the perfect growing medium for strawberries, ensuring they get all the nutrients they need.
* Pest and Weed Control: Raised beds make it easier to manage pests and weeds, reducing competition for resources and keeping your plants healthy.
* Accessibility: Raised beds are easier on your back and knees, making gardening more enjoyable and accessible.
Materials You’ll Need
Okay, let’s gather our supplies! Here’s what you’ll need to build your strawberry-boosting raised bed:
* Untreated Lumber: I recommend using cedar or redwood, as they are naturally rot-resistant. You’ll need enough lumber to build the frame of your raised bed. For a standard 4ft x 8ft bed, you’ll need:
* Two 8-foot long boards
* Two 4-foot long boards
* Four corner posts (approximately 12-18 inches long)
* Hardware Cloth (Optional): This is a wire mesh that you can line the bottom of your raised bed with to prevent gophers and other burrowing pests from getting to your strawberries.
* Landscape Fabric: This will help prevent weeds from growing up into your raised bed.
* Soil Mix: A well-draining, slightly acidic soil mix is ideal for strawberries. I recommend a mix of:
* Compost (about 40%)
* Peat moss or coco coir (about 30%)
* Perlite or vermiculite (about 30%)
* Strawberry Plants: Choose a variety that is well-suited to your climate. June-bearing, everbearing, and day-neutral varieties are all popular choices.
* Gardening Gloves: To protect your hands.
* Measuring Tape: For accurate measurements.
* Saw: To cut the lumber.
* Drill: To assemble the frame.
* Screws or Nails: To secure the lumber together.
* Staple Gun: To attach the landscape fabric.
* Shovel or Trowel: To fill the raised bed with soil.
* Watering Can or Hose: To water your strawberry plants.
Building Your Strawberry Raised Bed: Step-by-Step
Alright, let’s get building! Here’s a detailed guide to constructing your raised bed:
Phase 1: Assembling the Frame
1. Cut the Lumber: If you purchased lumber that isn’t already cut to size, use your saw to cut the boards to the correct lengths (two 8-foot boards and two 4-foot boards). Also, cut the four corner posts to your desired length (12-18 inches is a good starting point).
2. Assemble the Frame: Lay the boards on a flat surface to form a rectangle. The 8-foot boards will be the long sides, and the 4-foot boards will be the short sides.
3. Attach the Corner Posts: Position the corner posts inside the corners of the rectangle. Use your drill and screws (or nails) to attach the corner posts to the boards. Make sure the posts are flush with the top and bottom edges of the boards. I usually use at least two screws per side for each corner post to ensure a sturdy connection.
4. Reinforce the Frame (Optional): For extra stability, especially if you’re building a larger raised bed, you can add additional support posts along the longer sides. Simply cut additional pieces of lumber to the desired length and attach them to the inside of the frame using screws or nails.
Phase 2: Preparing the Bed
1. Choose a Location: Select a sunny location for your raised bed. Strawberries need at least 6-8 hours of sunlight per day to produce a good crop. Make sure the location is also well-drained.
2. Prepare the Ground: Clear the area where you’ll be placing the raised bed. Remove any grass, weeds, or rocks. Level the ground as much as possible.
3. Install Hardware Cloth (Optional): If you’re concerned about gophers or other burrowing pests, line the bottom of the raised bed with hardware cloth. Cut the hardware cloth to size and staple it to the inside of the frame using your staple gun. Make sure the edges of the hardware cloth are securely attached to prevent pests from digging underneath.
4. Line with Landscape Fabric: Line the inside of the raised bed with landscape fabric. This will help prevent weeds from growing up into the bed and will also help retain moisture. Cut the landscape fabric to size and staple it to the inside of the frame, overlapping the edges slightly.
Phase 3: Filling and Planting
1. Fill with Soil Mix: Now it’s time to fill your raised bed with your prepared soil mix. Use a shovel or trowel to add the soil mix to the bed, filling it to within a few inches of the top.
2. Water the Soil: Water the soil thoroughly to help it settle.
3. Plant Your Strawberry Plants: Space your strawberry plants according to the variety you’ve chosen. Generally, June-bearing varieties should be spaced about 12-18 inches apart, while everbearing and day-neutral varieties can be spaced closer together, about 8-12 inches apart.
4. Planting Depth: When planting, make sure the crown of the plant (the point where the roots meet the stem) is level with the soil surface. Planting too deep can cause the crown to rot, while planting too shallow can dry out the roots.
5. Water Again: Water your newly planted strawberry plants thoroughly.
Maintaining Your Strawberry Raised Bed
Once your strawberry plants are in the ground, it’s important to provide them with proper care to ensure a bountiful harvest. Here are a few tips:
* Watering: Water your strawberry plants regularly, especially during dry periods. Aim to keep the soil consistently moist, but not soggy.
* Fertilizing: Fertilize your strawberry plants with a balanced fertilizer every few weeks during the growing season. Follow the instructions on the fertilizer package. I like to use a fertilizer specifically formulated for berries.
* Weeding: Keep your raised bed free of weeds. Weeds compete with your strawberry plants for resources and can also harbor pests and diseases.
* Pest Control: Monitor your strawberry plants for pests and diseases. Take action promptly if you notice any problems. Organic pest control methods, such as insecticidal soap or neem oil, are often effective.
* Mulching: Mulch around your strawberry plants with straw or wood chips. Mulch helps retain moisture, suppress weeds, and keep the berries clean.
* Pruning: Prune your strawberry plants regularly to remove runners and dead or diseased leaves. This will help improve air circulation and prevent disease. For June-bearing varieties, remove runners throughout the growing season to encourage fruit production. For everbearing and day-neutral varieties, you can allow some runners to develop to propagate new plants.
* Winter Protection: In colder climates, protect your strawberry plants during the winter by covering them with a layer of straw or burlap. This will help insulate the plants and prevent them from being damaged by frost.
Choosing the Right Strawberry Variety
Selecting the right strawberry variety is crucial for success. Here’s a quick rundown of the different types:
* June-Bearing: These varieties produce a large crop of strawberries in a short period, typically in June. They are a good choice if you want a large harvest for making jam or freezing.
* Everbearing: These varieties produce two or three smaller crops of strawberries throughout the growing season. They are a good choice if you want a continuous supply of fresh strawberries.
* Day-Neutral: These varieties produce strawberries continuously throughout the growing season, regardless of day length. They are a good choice if you live in a climate with a long growing season.
Consider your climate, growing season, and personal preferences when

Conclusion
So, there you have it! This simple, yet incredibly effective DIY trick to boost strawberry yield in raised beds is a game-changer for any home gardener, whether you’re a seasoned pro or just starting out. We’ve walked you through the process, highlighting the benefits of using readily available materials and a little bit of ingenuity to create an environment where your strawberry plants can truly thrive.
Why is this a must-try? Because it addresses several key factors that contribute to a bountiful strawberry harvest. Firstly, the raised bed itself provides excellent drainage and soil control, preventing root rot and allowing you to tailor the soil composition specifically for strawberries. Secondly, the addition of reflective mulch, like aluminum foil or even white plastic, significantly increases the amount of sunlight reaching the plants, leading to more robust growth and sweeter, juicier berries. Finally, the improved air circulation around the plants, facilitated by the raised bed and proper spacing, minimizes the risk of fungal diseases, a common problem for strawberry growers.
But the beauty of this DIY trick lies in its adaptability. Feel free to experiment with different types of reflective materials. While aluminum foil is a popular choice, you could also try white plastic sheeting, reflective mylar, or even strategically placed mirrors (exercise caution with mirrors to avoid creating fire hazards). Consider adding companion plants like basil or marigolds to your raised bed to further deter pests and attract beneficial insects. You can also adjust the height of your raised bed to suit your specific needs and preferences. A taller bed might be beneficial if you have back problems, while a shorter bed might be more suitable for children or those with limited mobility.
Don’t be afraid to get creative and personalize this DIY trick to fit your unique gardening style and environment. The key is to understand the underlying principles – optimal drainage, increased sunlight exposure, and improved air circulation – and then adapt the technique to achieve the best results in your own garden.
We are confident that by implementing this simple DIY trick, you’ll see a significant increase in your strawberry yield. Imagine baskets overflowing with plump, red, and incredibly delicious strawberries, all grown in your own backyard! It’s a rewarding experience that connects you with nature and provides you with a healthy and sustainable source of fresh fruit.
Now, it’s your turn! We wholeheartedly encourage you to try this DIY trick to boost strawberry yield in your raised beds. We’re eager to hear about your experiences, successes, and any variations you might discover. Share your photos, tips, and stories in the comments section below. Let’s create a community of strawberry enthusiasts and learn from each other’s gardening adventures. Happy gardening!
Frequently Asked Questions (FAQ)
What type of soil is best for strawberries in raised beds?
Strawberries thrive in well-draining, slightly acidic soil with a pH between 5.5 and 6.5. A good mix would be equal parts of compost, peat moss (or coconut coir as an eco-friendly alternative), and garden soil. Adding some slow-release fertilizer specifically formulated for berries can also be beneficial. Avoid heavy clay soils, as they retain too much moisture and can lead to root rot. Consider amending your soil with organic matter regularly to maintain its fertility and drainage.
How often should I water my strawberries in raised beds?
Watering frequency depends on the weather and soil conditions. Generally, strawberries need about 1 inch of water per week. Check the soil moisture regularly by sticking your finger about an inch deep into the soil. If it feels dry, it’s time to water. Water deeply and thoroughly, ensuring that the water reaches the roots. Avoid overhead watering, as this can promote fungal diseases. Drip irrigation or soaker hoses are excellent options for delivering water directly to the roots. During hot, dry periods, you may need to water more frequently.
What kind of reflective material is best to use?
Aluminum foil is a popular and effective choice due to its high reflectivity and affordability. However, white plastic sheeting is also a good option and may be more durable. Reflective mylar is another alternative, offering excellent reflectivity but potentially at a higher cost. Experiment with different materials to see what works best in your specific environment. Consider the durability and longevity of the material, as well as its potential impact on the environment. Remember to secure the reflective material properly to prevent it from blowing away in the wind.
How much sunlight do strawberries need?
Strawberries need at least 6-8 hours of direct sunlight per day to produce a bountiful harvest. The more sunlight they receive, the sweeter and more flavorful the berries will be. Choose a location for your raised bed that receives ample sunlight throughout the day. If you live in a particularly hot climate, some afternoon shade may be beneficial to prevent the plants from overheating.
How do I protect my strawberries from pests and diseases?
Regularly inspect your plants for signs of pests or diseases. Common strawberry pests include slugs, snails, aphids, and spider mites. You can control these pests with organic methods such as hand-picking, introducing beneficial insects, or using insecticidal soap. Fungal diseases like gray mold and powdery mildew can be prevented by ensuring good air circulation, avoiding overhead watering, and using disease-resistant varieties. Consider using row covers to protect your plants from birds and other animals.
Can I grow strawberries in raised beds in containers?
Yes, you can definitely grow strawberries in containers within a raised bed or even as standalone containers. Choose containers that are at least 12 inches in diameter to provide enough room for the roots to grow. Use a well-draining potting mix and follow the same watering and fertilization guidelines as for strawberries grown directly in the raised bed. Container-grown strawberries may require more frequent watering, as the soil tends to dry out faster.
What are some good companion plants for strawberries?
Several plants can benefit strawberries when grown together. Basil and marigolds are excellent choices for deterring pests. Borage attracts beneficial insects and improves pollination. Thyme can help to repel cabbage moths. Avoid planting strawberries near members of the nightshade family, such as tomatoes, peppers, and eggplants, as they can compete for nutrients and attract similar pests.
How often should I fertilize my strawberries?
Fertilize your strawberries in the spring, just as new growth begins to emerge. Use a balanced fertilizer specifically formulated for berries, following the instructions on the package. Avoid over-fertilizing, as this can lead to excessive foliage growth at the expense of fruit production. You can also amend the soil with compost or other organic matter throughout the growing season to provide a slow-release source of nutrients.
How do I overwinter my strawberry plants in raised beds?
In colder climates, it’s important to protect your strawberry plants from frost and freezing temperatures. Mulch heavily around the plants with straw or leaves to insulate the roots. You can also cover the raised bed with a row cover or tarp to provide additional protection. In milder climates, mulching may be sufficient. Remove the mulch in the spring as the weather warms up.
How long does it take for strawberries to produce fruit?
The time it takes for strawberries to produce fruit depends on the variety and the growing conditions. Generally, June-bearing strawberries produce a large crop of fruit in the spring, while everbearing strawberries produce smaller crops throughout the growing season. Day-neutral strawberries produce fruit continuously from spring to fall. You can expect to harvest your first strawberries about 30-45 days after flowering.


Leave a Comment