
Boost Watermelon Harvest: Dreaming of sinking your teeth into a juicy, homegrown watermelon this summer? I know I am! But let’s be honest, sometimes getting those watermelons to actually *grow* and thrive can feel like a real challenge. You’re not alone if you’ve struggled with small, bland, or simply nonexistent watermelons. That’s why I’m so excited to share some game-changing DIY tricks that will help you boost watermelon harvest and enjoy the sweet taste of success.
Watermelons have a rich history, dating back thousands of years to Africa, where they were prized for their hydrating properties in arid climates. Over time, different cultures have developed unique methods for cultivating these delicious fruits. Today, the desire to grow our own food, connect with nature, and enjoy the unparalleled flavor of a homegrown watermelon is stronger than ever.
But why do you need these DIY tricks? Because let’s face it, store-bought watermelons just don’t compare! Plus, by optimizing your growing techniques, you can significantly increase your yield, reduce waste, and enjoy a truly rewarding gardening experience. These simple yet effective hacks will help you overcome common watermelon growing challenges, from pollination issues to nutrient deficiencies, ensuring you get the biggest, sweetest, and most satisfying harvest possible. So, grab your gardening gloves, and let’s get started!
Wassermelonen-Ernte steigern: Mein ultimativer DIY-Leitfaden
Hey Leute! Wassermelonen sind der Inbegriff des Sommers, oder? Aber was, wenn ich euch sage, dass ihr eure Ernte deutlich steigern könnt, ohne ein Vermögen auszugeben? Ich habe jahrelang experimentiert und möchte meine bewährten DIY-Tricks mit euch teilen. Lasst uns gemeinsam dafür sorgen, dass eure Wassermelonen dieses Jahr riesig und saftig werden!
Die Grundlagen: Was Wassermelonen wirklich brauchen
Bevor wir uns in die DIY-Hacks stürzen, ist es wichtig zu verstehen, was Wassermelonen zum Gedeihen brauchen. Das sind die Schlüsselfaktoren:
* Sonne: Wassermelonen lieben die Sonne! Mindestens 6-8 Stunden direkte Sonneneinstrahlung pro Tag sind ein Muss.
* Wasser: Regelmäßige und ausreichende Bewässerung ist entscheidend, besonders während der Fruchtbildung.
* Nährstoffe: Wassermelonen sind Starkzehrer. Sie brauchen eine gute Balance aus Stickstoff, Phosphor und Kalium.
* Boden: Gut durchlässiger, sandiger Lehmboden mit einem pH-Wert zwischen 6,0 und 6,8 ist ideal.
* Bestäubung: Wassermelonen brauchen Bienen oder andere Bestäuber, um Früchte zu produzieren.
* Platz: Diese Pflanzen brauchen viel Platz zum Ausbreiten.
DIY-Hacks für eine üppige Wassermelonen-Ernte
Hier sind meine bewährten DIY-Methoden, um eure Wassermelonen-Ernte zu maximieren:
* Bodenverbesserung mit selbstgemachtem Kompost: Ein nährstoffreicher Boden ist das A und O.
* Bewässerungstricks für maximale Wassernutzung: Spart Wasser und sorgt für eine gleichmäßige Bewässerung.
* Natürliche Düngemittel für gesunde Pflanzen: Vermeidet chemische Dünger und fördert das Bodenleben.
* Bestäubungshilfe für eine sichere Fruchtbildung: Helft den Bienen auf die Sprünge.
* Schutz vor Schädlingen und Krankheiten mit natürlichen Mitteln: Haltet eure Pflanzen gesund und widerstandsfähig.
* Beschneidung für mehr Ertrag: Fördert die Fruchtbildung und reduziert das Risiko von Krankheiten.
* Sonnenreflektoren für eine bessere Reifung: Sorgt für eine gleichmäßige Reifung der Früchte.
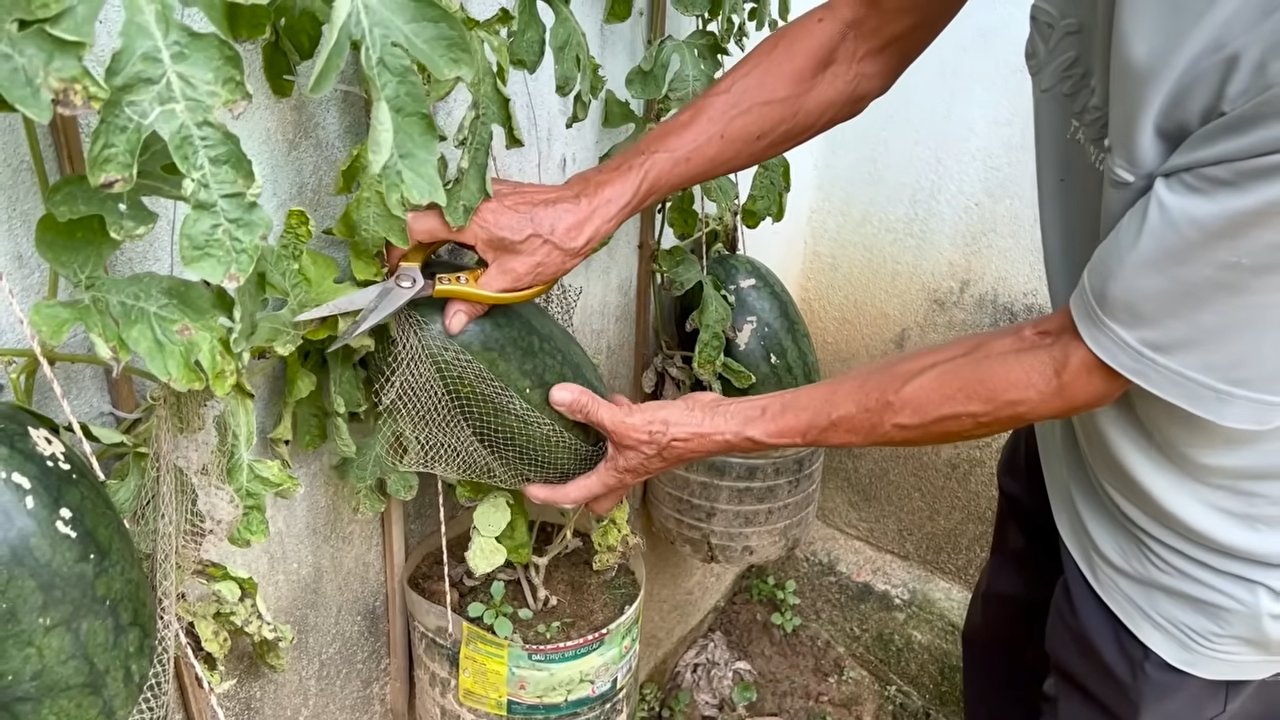
* Unterstützung für schwere Früchte: Verhindert, dass die Früchte abbrechen.
Selbstgemachter Kompost: Der Schlüssel zu einem nährstoffreichen Boden
Kompost ist Gold wert für eure Wassermelonen! Er verbessert die Bodenstruktur, speichert Wasser und liefert wichtige Nährstoffe.
Schritt-für-Schritt-Anleitung zur Kompostherstellung:
1. Sammelt eure Zutaten: Ihr braucht “grüne” Materialien (stickstoffreich) wie Grasschnitt, Gemüsereste und Kaffeesatz, sowie “braune” Materialien (kohlenstoffreich) wie Laub, Zweige und Zeitungspapier.
2. Baut einen Komposthaufen: Ihr könnt einen einfachen Haufen auf dem Boden anlegen oder einen Komposter verwenden. Schichtet die grünen und braunen Materialien abwechselnd.
3. Feuchtigkeit ist wichtig: Der Kompost sollte feucht, aber nicht nass sein. Gießt ihn bei Bedarf.
4. Wendet den Kompost regelmäßig: Das beschleunigt den Zersetzungsprozess.
5. Geduld ist gefragt: Es dauert einige Monate, bis der Kompost fertig ist. Er ist fertig, wenn er dunkelbraun und krümelig ist und einen erdigen Geruch hat.
Bewässerungstricks: Wasser sparen und optimal nutzen
Wassermelonen brauchen viel Wasser, aber es gibt clevere Wege, um Wasser zu sparen und sicherzustellen, dass die Pflanzen optimal versorgt werden.
DIY-Bewässerungsmethoden:
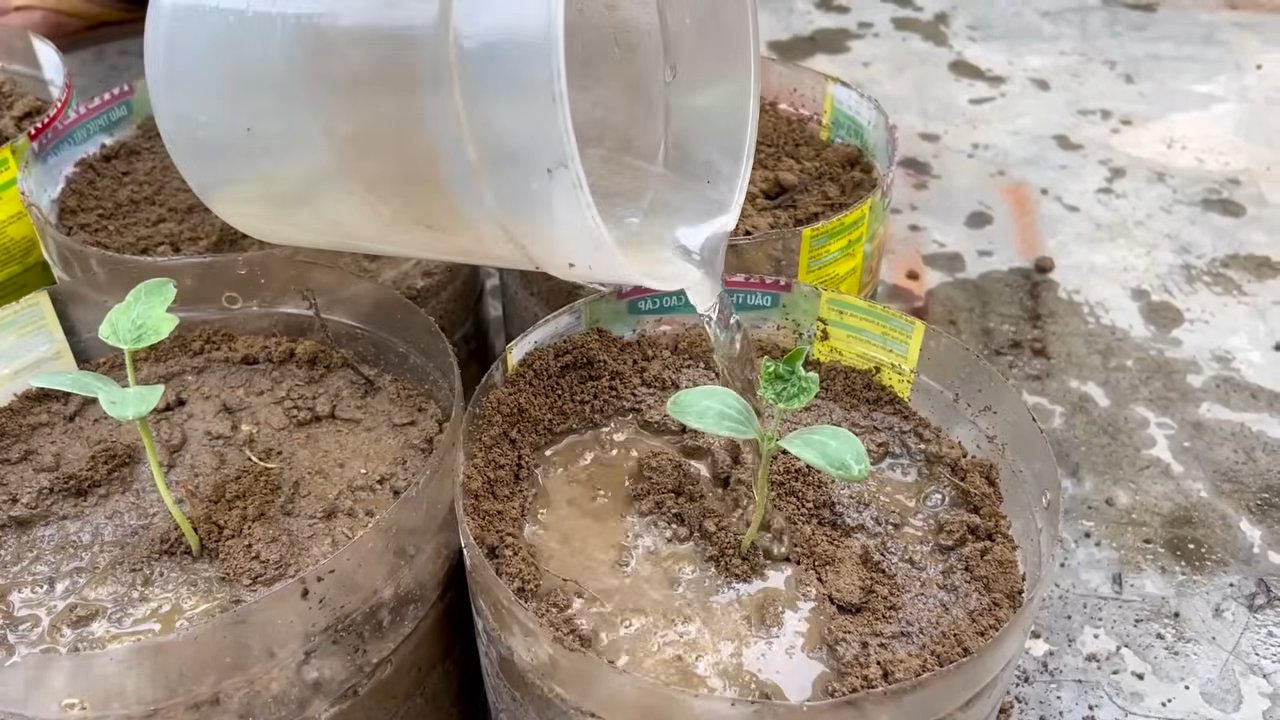
1. Tropfbewässerung mit PET-Flaschen: Schneidet den Boden einer PET-Flasche ab und bohrt kleine Löcher in den Deckel. Vergrabt die Flasche neben der Wassermelonenpflanze, so dass der Deckel etwa 5 cm aus dem Boden ragt. Füllt die Flasche regelmäßig mit Wasser. Das Wasser sickert langsam in den Boden und versorgt die Wurzeln direkt.
2. Mulchen mit Stroh oder Heu: Mulch hält den Boden feucht, reduziert die Verdunstung und unterdrückt Unkraut.
3. Bewässerung am frühen Morgen: Bewässert eure Wassermelonen am frühen Morgen, damit das Wasser Zeit hat, in den Boden einzusickern, bevor die Sonne es verdunsten lässt.
4. Beobachtet eure Pflanzen: Achtet auf Anzeichen von Wassermangel, wie z.B. welkende Blätter.
Natürliche Düngemittel: Gesunde Pflanzen ohne Chemie
Chemische Dünger können dem Boden schaden und das Bodenleben beeinträchtigen. Natürliche Düngemittel sind eine nachhaltige Alternative.
DIY-Düngemittelrezepte:
1. Brennnesseljauche: Brennnesseljauche ist ein hervorragender Stickstoffdünger. Sammelt Brennnesseln und weicht sie in einem Eimer mit Wasser ein. Lasst die Jauche einige Tage gären. Verdünnt die Jauche vor der Anwendung mit Wasser (1:10).
2. Banenschalen-Dünger: Bananenschalen sind reich an Kalium, das für die Fruchtbildung wichtig ist. Sammelt Bananenschalen und trocknet sie im Ofen oder in der Sonne. Zerkleinert die getrockneten Schalen und mischt sie unter die Erde um die Wassermelonenpflanzen.
3. Eierschalen-Dünger: Eierschalen sind reich an Kalzium, das für starke Zellwände wichtig ist. Sammelt Eierschalen und spült sie aus. Zerkleinert die Schalen und mischt sie unter die Erde um die Wassermelonenpflanzen.
4. Komposttee: Weicht Kompost in Wasser ein und lasst ihn einige Tage ziehen. Siebt den Tee ab und verwendet ihn zum Gießen der Wassermelonenpflanzen.
Bestäubungshilfe: Helft den Bienen auf die Sprünge
Wassermelonen sind auf Bestäubung angewiesen, um Früchte zu produzieren. Wenn es nicht genügend Bienen in eurem Garten gibt, könnt ihr die Bestäubung selbst übernehmen.
Manuelle Bestäubung:
1. Identifiziert die männlichen und weiblichen Blüten: Männliche Blüten haben einen dünnen Stiel, während weibliche Blüten einen kleinen Fruchtansatz unterhalb der Blüte haben.
2. Sammelt Pollen von den männlichen Blüten: Verwendet einen kleinen Pinsel, um Pollen von den männlichen Blüten zu sammeln.
3. Übertragt den Pollen auf die weiblichen Blüten: Bestäubt die weiblichen Blüten mit dem Pinsel.
4. Wiederholt den Vorgang: Bestäubt die weiblichen Blüten mehrmals, um sicherzustellen, dass sie befruchtet werden.
Schutz vor Schädlingen und Krankheiten: Natürliche Mittel
Wassermelonen können von verschiedenen Schädlingen und Krankheiten befallen werden. Hier sind einige natürliche Mittel, um eure Pflanzen zu schützen.
DIY-Schutzmaßnahmen:
1. Neemöl: Neemöl ist ein natürliches Insektizid und Fungizid. Sprüht eure Wassermelonenpflanzen regelmäßig mit Neemöl ein, um Schädlinge und Krankheiten abzuwehren.
2. Knoblauchspray: Knoblauchspray ist ein natürliches Insektizid. Zerkleinert Knoblauchzehen und weicht sie in Wasser ein. Siebt den Spray ab und verwendet ihn zum Besprühen der Wassermelonenpflanzen.
3. Kupferspray: Kupferspray ist ein natürliches Fungizid. Verwendet Kupferspray, um Pilzkrankheiten wie Mehltau zu bekämpfen.
4. Nützlinge fördern: Lockt Nützlinge wie Marienkäfer und Florfliegen in euren Garten, die Schädlinge fressen.
Beschneidung: Mehr Ertrag durch gezieltes Schneiden
Durch Beschneidung könnt ihr die Fruchtbildung fördern und das Risiko von Krankheiten reduzieren.
Beschneidungstechniken:
1.
Conclusion
So, there you have it! This simple, yet incredibly effective DIY trick to boost watermelon harvest is a game-changer for any gardener, whether you’re a seasoned pro or just starting out. We’ve walked you through the process, highlighting the benefits of increased fruit production, improved fruit quality, and a healthier, more resilient watermelon patch.
Why is this a must-try? Because it addresses a common challenge faced by watermelon growers: ensuring adequate pollination and nutrient uptake. By implementing this technique, you’re essentially giving your watermelons a helping hand, maximizing their potential to produce those juicy, sweet fruits we all crave. Imagine biting into a perfectly ripe, homegrown watermelon, knowing you played a direct role in its abundance. That’s the satisfaction this DIY trick delivers.
But the beauty of this method lies in its adaptability. Feel free to experiment with variations to suit your specific needs and growing conditions. For instance, if you’re dealing with particularly poor soil, consider adding a slow-release fertilizer directly to the planting hole. Or, if you’re in a region with high humidity, ensure adequate spacing between plants to promote air circulation and prevent fungal diseases. You can also try different types of organic matter, such as composted manure or leaf mold, to enrich the soil.
Don’t be afraid to get creative and tailor the technique to your unique garden environment. The key is to observe your plants closely and adjust your approach as needed. Remember, gardening is a learning process, and every season brings new opportunities to refine your skills.
We are confident that this DIY trick will significantly improve your watermelon harvest. It’s a small investment of time and effort that yields a substantial return in the form of delicious, homegrown watermelons.
Now, it’s your turn! We wholeheartedly encourage you to try this DIY trick and witness the difference it makes in your watermelon patch. Document your progress, take pictures, and share your experiences with us. We’re eager to hear your success stories, learn from your challenges, and build a community of passionate watermelon growers.
Let’s work together to unlock the full potential of our watermelon plants and enjoy a bountiful harvest season after season. Remember, the sweetest rewards come from the fruits (and vegetables!) of our labor. So, get out there, get your hands dirty, and get ready to enjoy the best watermelons you’ve ever tasted! This simple method to boost watermelon harvest is waiting for you to try it.
Frequently Asked Questions (FAQ)
Q: What type of soil is best for watermelons when using this DIY trick?
A: Watermelons thrive in well-drained, sandy loam soil with a pH between 6.0 and 6.8. However, the beauty of this DIY trick is that it can help improve the performance of watermelons even in less-than-ideal soil conditions. The addition of organic matter, such as compost or well-rotted manure, will improve soil structure, drainage, and nutrient availability. If your soil is heavy clay, consider amending it with sand and organic matter to improve drainage. If your soil is very sandy, the organic matter will help retain moisture and nutrients. Before planting, it’s always a good idea to conduct a soil test to determine the pH and nutrient levels. This will allow you to make any necessary amendments to ensure your watermelons have the best possible growing environment.
Q: How often should I water my watermelons after implementing this DIY trick?
A: Watermelons need consistent moisture, especially during fruit development. After implementing this DIY trick, water deeply and regularly, aiming for about 1-2 inches of water per week. The frequency of watering will depend on your climate, soil type, and the stage of growth. Check the soil moisture regularly by sticking your finger about an inch into the soil. If it feels dry, it’s time to water. Avoid overhead watering, as this can promote fungal diseases. Instead, use a soaker hose or drip irrigation to deliver water directly to the roots. During periods of drought or extreme heat, you may need to water more frequently. Mulching around the plants will also help retain moisture and reduce the need for frequent watering.
Q: What kind of fertilizer should I use, and how often should I fertilize after using this DIY trick?
A: Watermelons are heavy feeders and benefit from regular fertilization. When using this DIY trick, start with a balanced fertilizer (e.g., 10-10-10) at planting time. Then, switch to a fertilizer higher in phosphorus and potassium (e.g., 5-10-10) once the vines start to run and flowers appear. Phosphorus promotes root development and flowering, while potassium is essential for fruit development and sweetness. Apply fertilizer according to the package directions, typically every 2-3 weeks. You can also use organic fertilizers, such as compost tea or fish emulsion, which provide a slow-release source of nutrients. Avoid over-fertilizing, as this can lead to excessive vine growth and reduced fruit production. Monitor your plants closely and adjust your fertilization schedule as needed.
Q: Can I use this DIY trick for other types of melons besides watermelons?
A: Yes, this DIY trick can be adapted for other types of melons, such as cantaloupe, honeydew, and muskmelon. The principles of improving soil quality, providing adequate nutrients, and ensuring proper pollination apply to all melons. However, you may need to adjust the specific techniques based on the needs of each type of melon. For example, cantaloupes and muskmelons may benefit from slightly different fertilizer ratios or watering schedules. Research the specific requirements of the melon variety you are growing and adjust your approach accordingly. The key is to provide a healthy growing environment that supports strong vine growth, abundant flowering, and successful fruit development.
Q: What if I don’t have access to all the materials mentioned in the DIY trick? Can I still try it?
A: Absolutely! The core principle of this DIY trick is to improve soil quality and provide adequate nutrients to your watermelon plants. While the specific materials mentioned in the article are recommended, you can substitute them with whatever you have available. For example, if you don’t have access to compost, you can use well-rotted manure or leaf mold. If you don’t have bone meal, you can use another source of phosphorus, such as rock phosphate. The important thing is to focus on providing a rich, well-drained soil that is packed with organic matter and essential nutrients. Even a simplified version of this DIY trick can significantly improve your watermelon harvest. Don’t let a lack of specific materials discourage you from trying it.
Q: How do I know when my watermelons are ripe and ready to harvest after using this DIY trick?
A: Determining when a watermelon is ripe can be tricky, but there are several indicators to look for. First, check the tendril closest to the fruit stem. When it turns brown and dries out, the watermelon is usually ripe. Second, examine the underside of the watermelon where it rests on the ground. This spot, known as the ground spot, should turn from white to a creamy yellow. Third, thump the watermelon with your knuckles. A ripe watermelon will have a deep, hollow sound. Finally, consider the number of days since planting. Most watermelon varieties take 70-90 days to mature. Keep in mind that these are just general guidelines, and the best way to determine ripeness is to combine all of these indicators. With practice, you’ll develop a feel for when your watermelons are perfectly ripe and ready to enjoy.


Leave a Comment