
Bottle gardening kale: sounds a little crazy, right? But trust me, it’s one of the most rewarding and space-saving gardening hacks you’ll ever try! I remember my grandmother, a true gardening guru, always finding innovative ways to grow her own food, even when space was limited. While she didn’t use plastic bottles (glass was more her style!), her ingenuity sparked my own passion for resourceful gardening.
For centuries, humans have cultivated food in whatever space they could find, from rooftop gardens in ancient cities to window boxes in bustling metropolises. This DIY project taps into that same spirit of resourcefulness and allows you to enjoy fresh, homegrown kale, even if you only have a balcony or a sunny windowsill.
Why bottle gardening kale? Well, let’s face it, not everyone has a sprawling backyard. And even if you do, sometimes you just want a fun, low-maintenance project. This method is perfect for beginners, apartment dwellers, or anyone looking to reduce waste and grow their own delicious, nutritious greens. Plus, it’s incredibly satisfying to watch those tiny kale seedlings sprout and thrive in their recycled bottle homes. So, grab your empty plastic bottles, some soil, and let’s get growing! I’m excited to share my step-by-step guide to successful bottle gardening, ensuring you’ll be enjoying fresh kale salads in no time!
DIY-Kohl-Garten in Flaschen: So einfach geht’s!
Hey Leute! Habt ihr auch so Lust auf frisches, knackiges Gemüse, aber keinen Garten? Kein Problem! Ich zeige euch heute, wie ihr ganz einfach einen kleinen Kohl-Garten in PET-Flaschen anlegen könnt. Das ist nicht nur super platzsparend, sondern auch ein tolles Upcycling-Projekt. Lasst uns loslegen!
Was du brauchst:
* PET-Flaschen: Am besten 1,5- oder 2-Liter-Flaschen. Je mehr, desto mehr Kohl!
* Kohl-Samen: Grünkohl, Palmkohl, Rosenkohl – wähle deine Lieblingssorte!
* Anzuchterde: Spezielle Erde für die Aufzucht von Sämlingen.
* Blumenerde: Für das spätere Umpflanzen.
* Schere oder Cuttermesser: Zum Zuschneiden der Flaschen.
* Bohrmaschine oder Nagel und Hammer: Für die Entwässerungslöcher.
* Gießkanne oder Sprühflasche: Zum Bewässern.
* Optional: Kieselsteine oder Blähton für die Drainage.
* Optional: Etiketten und Stift zum Beschriften der Flaschen.
Vorbereitung der Flaschen:
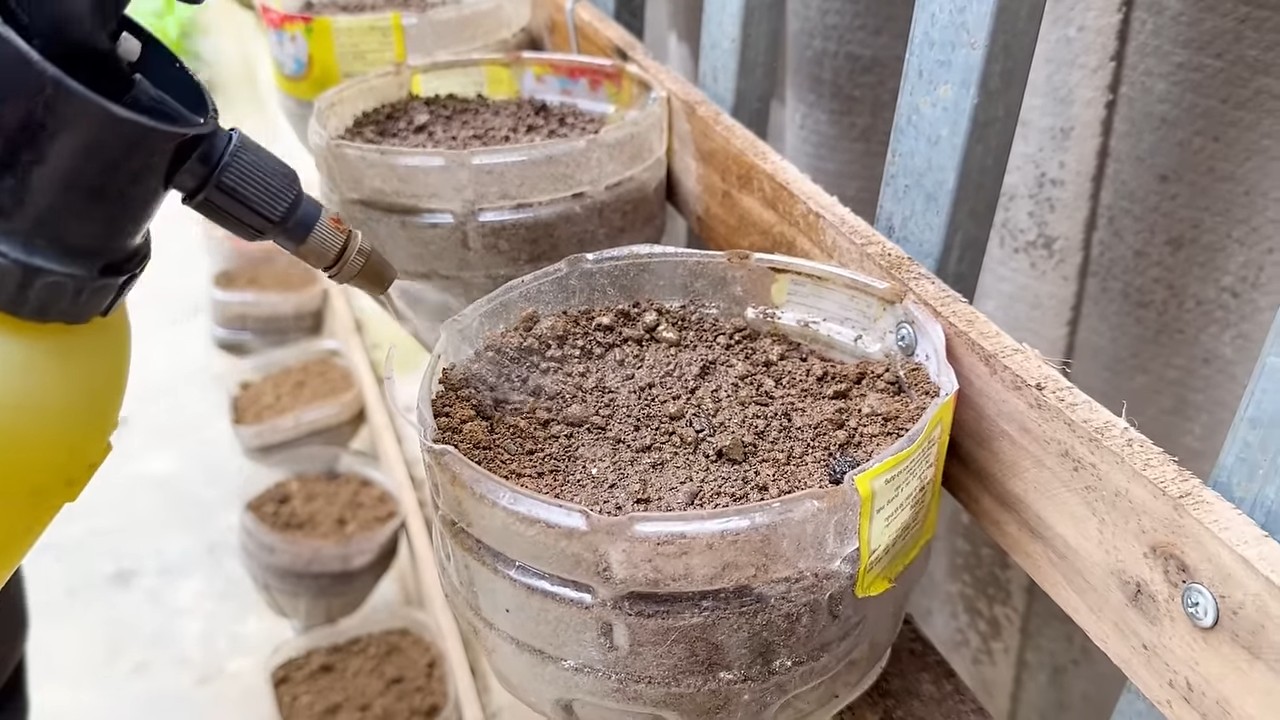
1. Reinigung: Zuerst müssen die PET-Flaschen gründlich gereinigt werden. Entferne alle Etiketten und spüle sie mit warmem Wasser und etwas Spülmittel aus. Achte darauf, dass keine Spülmittelreste zurückbleiben.
2. Zuschneiden: Jetzt kommt der spannende Teil! Schneide die Flaschen mit der Schere oder dem Cuttermesser in der Mitte durch. Du kannst sie entweder komplett halbieren oder den oberen Teil etwas kürzer lassen, damit er später als eine Art Mini-Gewächshaus dienen kann. Ich persönlich finde es praktischer, sie komplett zu halbieren, da man dann besser an die Pflanzen herankommt.
3. Entwässerungslöcher: Damit das Wasser gut ablaufen kann und keine Staunässe entsteht, bohre oder schlage mit Nagel und Hammer ein paar Löcher in den Boden der unteren Flaschenhälfte. Ich empfehle mindestens 3-4 Löcher pro Flasche.
4. Optional: Drainage: Um die Drainage zu verbessern, kannst du eine Schicht Kieselsteine oder Blähton auf den Boden der Flasche geben, bevor du die Erde einfüllst. Das verhindert, dass die Wurzeln im Wasser stehen.
Aussaat der Kohl-Samen:
1. Befüllen mit Anzuchterde: Fülle die vorbereiteten Flaschenhälften mit Anzuchterde. Lass dabei etwa 2-3 cm Platz bis zum Rand. Die Anzuchterde ist besonders nährstoffarm und locker, was ideal für die Keimung der Samen ist.
2. Aussaat: Verteile die Kohl-Samen gleichmäßig auf der Erde. Achte darauf, dass sie nicht zu dicht liegen, da die kleinen Pflänzchen sonst zu wenig Platz zum Wachsen haben. Ich säe meistens 2-3 Samen pro Flasche und dünne später aus, falls alle aufgehen.
3. Bedecken: Bedecke die Samen mit einer dünnen Schicht Anzuchterde (ca. 0,5 cm).
4. Bewässern: Befeuchte die Erde vorsichtig mit einer Gießkanne oder Sprühflasche. Die Erde sollte feucht, aber nicht nass sein.
5. Standort: Stelle die bepflanzten Flaschen an einen hellen und warmen Ort. Ein Fensterbrett ist ideal. Vermeide direkte Sonneneinstrahlung, da die Erde sonst zu schnell austrocknet.
6. Optional: Mini-Gewächshaus: Wenn du den oberen Teil der Flasche etwas kürzer gelassen hast, kannst du ihn jetzt umgedreht über die untere Hälfte stülpen, um ein Mini-Gewächshaus zu erzeugen. Das sorgt für ein feuchtwarmes Klima, das die Keimung beschleunigt. Achte aber darauf, dass du regelmäßig lüftest, um Schimmelbildung zu vermeiden.
Pflege der Sämlinge:
1. Bewässerung: Halte die Erde gleichmäßig feucht, aber vermeide Staunässe. Überprüfe die Feuchtigkeit der Erde regelmäßig mit dem Finger.
2. Lüften: Wenn du ein Mini-Gewächshaus verwendet hast, lüfte es regelmäßig, um Schimmelbildung zu vermeiden.
3. Drehen: Drehe die Flaschen regelmäßig, damit die Sämlinge gleichmäßig Licht bekommen und nicht schief wachsen.
4. Ausdünnen: Wenn mehrere Samen aufgegangen sind, dünne die Pflänzchen aus, sobald sie ein paar Blätter haben. Entferne die schwächsten Pflänzchen, damit die stärksten genug Platz zum Wachsen haben.
Umpflanzen:
1. Vorbereitung: Sobald die Sämlinge groß genug sind (ca. 5-10 cm hoch), ist es Zeit, sie in größere Töpfe oder Behälter umzupflanzen. Fülle die vorbereiteten Flaschenhälften mit Blumenerde.
2. Umpflanzen: Hebe die Sämlinge vorsichtig aus der Anzuchterde und setze sie in die Blumenerde. Achte darauf, dass die Wurzeln nicht beschädigt werden.
3. Bewässern: Gieße die umgepflanzten Kohlpflanzen gründlich.
4. Standort: Stelle die umgepflanzten Kohlpflanzen an einen sonnigen Standort. Kohl braucht viel Sonne, um gut zu wachsen.
Pflege der Kohlpflanzen:
1. Bewässerung: Gieße die Kohlpflanzen regelmäßig, besonders an heißen Tagen. Die Erde sollte immer feucht sein, aber vermeide Staunässe.
2. Düngung: Dünge die Kohlpflanzen regelmäßig mit einem organischen Dünger. Das sorgt für ein gesundes Wachstum und eine reiche Ernte. Ich verwende gerne Kompost oder Brennnesseljauche.
3. Schutz vor Schädlingen: Kohl ist leider anfällig für Schädlinge wie Kohlweißlinge oder Blattläuse. Kontrolliere die Pflanzen regelmäßig und entferne Schädlinge gegebenenfalls von Hand oder mit einem biologischen Schädlingsbekämpfungsmittel.
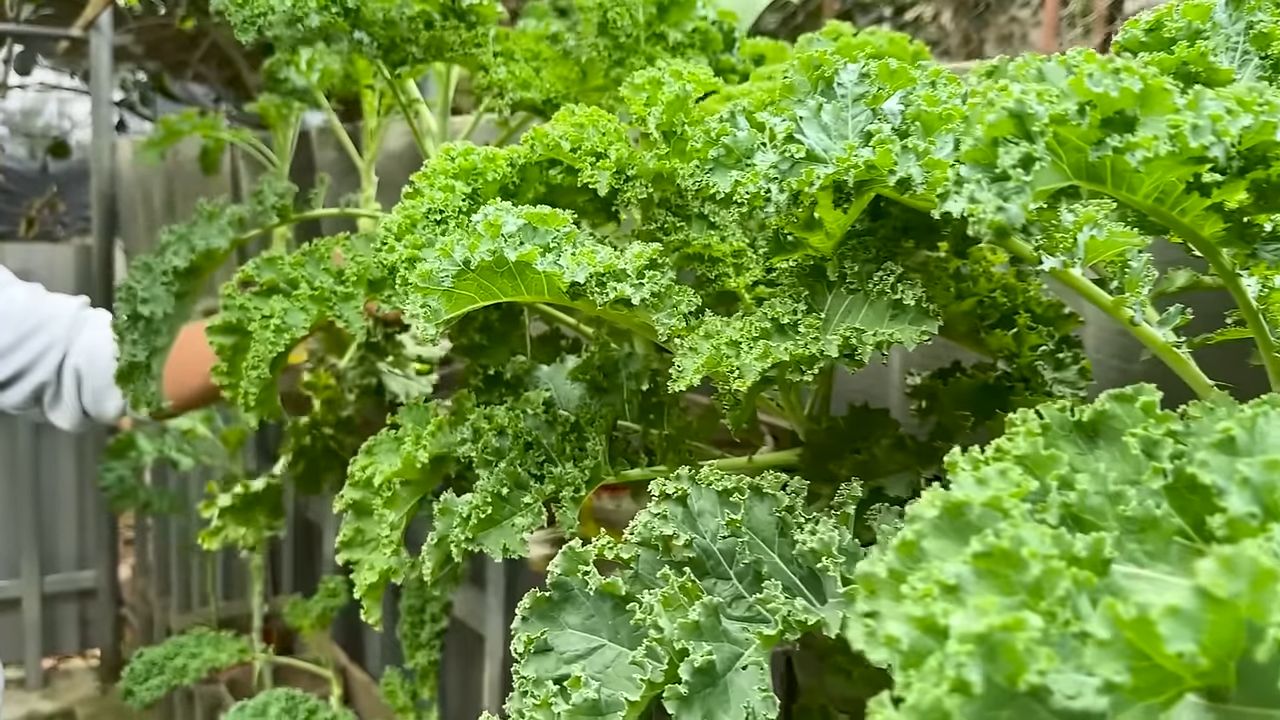
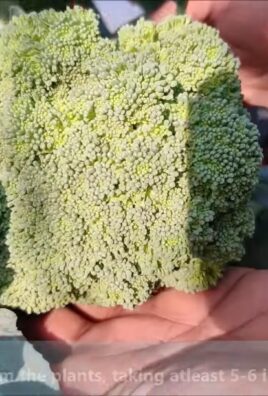
4. Ernte: Je nach Kohlsorte kannst du nach einigen Wochen oder Monaten mit der Ernte beginnen. Grünkohl und Palmkohl können nach und nach geerntet werden, während Rosenkohl erst geerntet wird, wenn die Röschen fest und geschlossen sind.
Zusätzliche Tipps:
* Beschriftung: Beschrifte die Flaschen mit dem Namen der Kohlsorte und dem Aussaatdatum. So behältst du den Überblick.
* Sortenwahl: Wähle Kohlsorten, die für den Anbau in Töpfen geeignet sind. Kleinwüchsige Sorten sind ideal.
* Belüftung: Achte auf eine gute Belüftung, um Pilzkrankheiten vorzubeugen.
* Winterharte Sorten: Wenn du auch im Winter frischen Kohl ernten möchtest, wähle winterharte Sorten wie Grünkohl oder Palmkohl.
* Upcycling: Nutze verschiedene Arten von PET-Flaschen, um einen abwechslungsreichen Kohl-Garten zu gestalten.
* Kreativität: Bemal die Flaschen oder beklebe sie mit bunten Aufklebern, um deinen Kohl-Garten noch individueller zu gestalten.
Häufige Probleme und Lösungen:
* Schimmelbildung: Wenn sich Schimmel auf der Erde bildet, reduziere die Bewässerung und sorge für eine bessere Belüftung.
* Gelbe Blätter: Gelbe Blätter können ein Zeichen für Nährstoffmangel sein. Dünge die Pflanzen mit einem organischen Dünger.
* Schädlinge: Kontrolliere die Pflanzen regelmäßig auf Schädlinge und bekämpfe sie gegebenenfalls mit einem biologischen Schädlingsbekämpfungsmittel.
* Staunässe: Achte darauf, dass das Wasser gut ablaufen kann und keine Staunässe entsteht. Verwende eine Drainage aus Kieselsteinen oder Blähton.
Ich hoffe, diese Anleitung hilft dir dabei, deinen eigenen kleinen Kohl-Garten in Flaschen anzulegen. Es ist wirklich einfacher als man denkt und macht super viel Spaß! Viel Erfolg und eine reiche Ernte!
Conclusion
So, there you have it! Transforming a humble plastic bottle into a thriving vertical garden for your kale is not just a fun project; it’s a sustainable, space-saving, and incredibly rewarding way to grow your own fresh greens. We’ve walked you through the simple steps, highlighting the benefits of this DIY approach, and hopefully, inspired you to give it a try.
Why is this bottle gardening kale trick a must-try? Because it addresses so many common gardening challenges. Limited space? No problem! This vertical setup maximizes your growing area. Worried about pests and soil-borne diseases? The elevated bottles offer a degree of protection. Want to reduce your environmental impact? Repurposing plastic bottles is a fantastic way to do just that. Plus, let’s be honest, there’s something deeply satisfying about nurturing life from something that would otherwise end up in a landfill.
But the beauty of this project lies in its adaptability. Feel free to experiment with different bottle sizes and shapes. Larger bottles can accommodate more kale plants or even different varieties. Consider painting the bottles to add a splash of color to your garden or to help regulate soil temperature. Darker colors will absorb more heat, which can be beneficial in cooler climates, while lighter colors will reflect sunlight, keeping the soil cooler in hotter regions.
Don’t limit yourself to just kale! While this guide focuses on kale, the same principles can be applied to other leafy greens like spinach, lettuce, and even herbs like parsley and basil. Just be sure to adjust the watering and sunlight requirements accordingly. You could even create a mixed salad garden in a single bottle tower!
We also encourage you to think about the drainage system. While the holes we suggested are a good starting point, you might need to adjust them based on your local climate and watering habits. If you live in a particularly rainy area, you might want to add more drainage holes to prevent waterlogging. Conversely, if you live in a dry climate, you might want to reduce the number of holes to conserve moisture.
The type of soil you use is also crucial. While a standard potting mix will work, consider adding some compost or other organic matter to improve drainage and nutrient content. You can also experiment with different soil amendments, such as perlite or vermiculite, to further improve drainage and aeration.
Finally, remember that gardening is a learning process. Don’t be discouraged if your first attempt isn’t perfect. Observe your plants closely, pay attention to their needs, and adjust your approach as necessary. The more you experiment, the more you’ll learn, and the more successful you’ll become.
So, grab some plastic bottles, gather your supplies, and get ready to embark on a fun and rewarding gardening adventure. We’re confident that you’ll be amazed at how easy and effective this bottle gardening kale method can be.
We can’t wait to hear about your experiences! Share your photos, tips, and questions in the comments below. Let’s build a community of bottle gardening enthusiasts and inspire others to grow their own food in a sustainable and creative way. Happy gardening!
Frequently Asked Questions (FAQ)
What kind of plastic bottles are best for bottle gardening kale?
Ideally, you should use food-grade plastic bottles, such as those that previously contained water, juice, or soda. Avoid using bottles that contained harsh chemicals or cleaning products, as these could contaminate the soil and harm your plants. PET (polyethylene terephthalate) bottles, commonly used for water and soda, are a good choice. Make sure to thoroughly clean the bottles with soap and water before using them. Consider the size of the bottle as well. Larger bottles will hold more soil and allow for more root growth, which is beneficial for kale. However, smaller bottles are easier to handle and can be a good option if you’re short on space.
How much sunlight does bottle gardening kale need?
Kale thrives in full sun, which means at least 6 hours of direct sunlight per day. However, it can also tolerate partial shade, especially in hotter climates. If you’re growing your kale indoors, you’ll need to supplement with grow lights to ensure it gets enough light. Observe your plants closely and adjust their position as needed to ensure they’re getting adequate sunlight. If the leaves are pale or leggy, it’s a sign that they’re not getting enough light. If the leaves are scorched or wilted, it’s a sign that they’re getting too much direct sunlight.
How often should I water my bottle gardening kale?
The frequency of watering will depend on several factors, including the size of the bottle, the type of soil, the climate, and the stage of growth of the kale plants. As a general rule, you should water your kale when the top inch of soil feels dry to the touch. Avoid overwatering, as this can lead to root rot. When watering, make sure to saturate the soil thoroughly, allowing excess water to drain out of the drainage holes. Check the drainage holes regularly to ensure they’re not clogged. In hotter climates, you may need to water more frequently, while in cooler climates, you may need to water less frequently.
What kind of soil should I use for bottle gardening kale?
A well-draining potting mix is essential for bottle gardening kale. You can use a commercially available potting mix or make your own by combining equal parts of peat moss, perlite, and vermiculite. Adding compost to the potting mix will provide additional nutrients and improve drainage. Avoid using garden soil, as it can be too heavy and compact, which can lead to poor drainage and root rot. The ideal soil pH for kale is between 6.0 and 7.5. You can test the pH of your soil using a soil testing kit and adjust it as needed.
How do I fertilize my bottle gardening kale?
Kale is a heavy feeder, so it’s important to fertilize it regularly. You can use a liquid fertilizer or a slow-release granular fertilizer. Follow the instructions on the fertilizer package carefully to avoid over-fertilizing. Over-fertilizing can burn the roots and damage the plants. A balanced fertilizer with equal parts of nitrogen, phosphorus, and potassium is a good choice for kale. You can also supplement with organic fertilizers, such as compost tea or fish emulsion. Fertilize your kale every 2-3 weeks during the growing season.
How do I protect my bottle gardening kale from pests and diseases?
Bottle gardening can help reduce the risk of pests and diseases, but it’s still important to take precautions. Inspect your plants regularly for signs of pests or diseases. Common pests that affect kale include aphids, cabbage worms, and flea beetles. You can control these pests with insecticidal soap, neem oil, or by hand-picking them off the plants. Common diseases that affect kale include powdery mildew and black rot. You can prevent these diseases by providing good air circulation, avoiding overwatering, and using disease-resistant varieties. If you notice any signs of pests or diseases, treat them promptly to prevent them from spreading.
Can I grow bottle gardening kale indoors?
Yes, you can grow bottle gardening kale indoors, but you’ll need to provide adequate light. Kale requires at least 6 hours of direct sunlight per day, so you’ll need to supplement with grow lights if you’re growing it indoors. Place the grow lights close to the plants and adjust their position as needed to ensure they’re getting enough light. You’ll also need to provide good air circulation to prevent diseases. A small fan can help with this. Keep in mind that indoor-grown kale may not be as productive as outdoor-grown kale, but it’s still a great way to enjoy fresh greens year-round.
How long does it take to grow bottle gardening kale?
The time it takes to grow bottle gardening kale will depend on several factors, including the variety of kale, the climate, and the growing conditions. In general, kale takes about 50-75 days to mature from seed. You can start harvesting the outer leaves when they’re about 6-8 inches long. Continue harvesting the outer leaves as needed, allowing the inner leaves to continue growing. Kale can be harvested throughout the growing season, and it even tastes better after a frost.
What are some variations I can try with bottle gardening kale?
There are many variations you can try with bottle gardening kale. You can experiment with different bottle sizes and shapes, different soil mixes, and different varieties of kale. You can also try adding other plants to your bottle garden, such as herbs or flowers. Consider painting the bottles to add a splash of color to your garden. You can also create a vertical garden by stacking the bottles on top of each other. Get creative and have fun! The possibilities are endless.
Leave a Comment