
Bowl Grown Mushrooms at Home: Imagine harvesting fresh, flavorful mushrooms right from your kitchen counter! Sounds like a dream, right? Well, it’s more achievable than you think! For centuries, cultivating mushrooms has been a revered practice, particularly in Eastern cultures where they’re not just food, but symbols of longevity and good health. From ancient cave dwellings to modern-day farms, the allure of growing these fascinating fungi has captivated generations.
But let’s be honest, the thought of mushroom cultivation can seem intimidating. All those spores, substrates, and sterile environments! That’s where this DIY guide comes in. I’m going to show you a simple, accessible method for bowl grown mushrooms at home, perfect for beginners and seasoned gardeners alike. Forget complicated setups and expensive equipment. This method utilizes readily available materials and requires minimal effort, making it a fun and rewarding project for anyone looking to add a touch of homegrown goodness to their meals.
Why do you need this trick? Because store-bought mushrooms, while convenient, often lack the vibrant flavor and freshness of homegrown varieties. Plus, you’ll know exactly what went into growing them – no pesticides or questionable practices! So, ditch the grocery store and get ready to embark on a fascinating journey into the world of mushroom cultivation. Let’s get growing!
Growing Mushrooms in a Bowl: A Beginner’s Guide
Hey there, fellow fungi enthusiasts! Ever dreamt of harvesting your own delicious mushrooms right from your kitchen counter? Well, dream no more! Growing mushrooms at home can seem intimidating, but with this simple bowl method, it’s surprisingly easy and rewarding. I’m going to walk you through the process step-by-step, so you can enjoy fresh, homegrown mushrooms in no time.
What You’ll Need: The Essentials
Before we dive in, let’s gather our supplies. This is a low-cost project, and you probably have some of these items already!
* A Bowl: Choose a bowl that’s at least 6 inches deep and 8 inches in diameter. A plastic or ceramic bowl works perfectly. Make sure it’s clean!
* Mushroom Spawn: This is the most crucial ingredient! Mushroom spawn is essentially mushroom “seeds.” You can purchase spawn online or at a local gardening supply store. Oyster mushrooms are a great choice for beginners because they’re relatively easy to grow and tolerate a wider range of conditions. Other options include shiitake, wine cap, or even button mushrooms, but oyster mushrooms are my personal recommendation for your first attempt.
* Substrate: The substrate is the material the mushrooms will grow on. For oyster mushrooms, straw is an excellent and readily available option. You can also use coffee grounds, cardboard, or a mixture of these. I’ll be using straw in this guide.
* Spray Bottle: You’ll need this to keep the substrate moist.
* Plastic Wrap or a Clear Plastic Bag: To create a humid environment.
* Rubbing Alcohol: For sanitizing your work area and tools.
* Gloves (Optional): To minimize contamination.
Preparing the Substrate: Straw Sterilization
One of the most important steps in mushroom cultivation is sterilizing the substrate. This eliminates competing molds and bacteria that could prevent your mushrooms from growing.
1. Chop the Straw: Cut the straw into smaller pieces, about 2-3 inches long. This will make it easier to pack into the bowl and for the mushroom mycelium to colonize.
2. Pasteurize the Straw: You can pasteurize the straw in a couple of ways. The goal is to heat it enough to kill off unwanted organisms but not so much that you destroy beneficial ones.
* Method 1: Hot Water Soak: This is the method I prefer. Fill a large pot or tub with hot water (around 160-180°F or 71-82°C). Submerge the chopped straw in the hot water and let it soak for at least 1 hour. This will kill off most of the contaminants.
* Method 2: Steaming: Place the chopped straw in a steamer basket over boiling water. Steam for about 1-2 hours. This method is a bit more involved but can be more effective at sterilizing the straw.
3. Drain the Straw: After pasteurization, carefully drain the straw. You want it to be moist but not soaking wet. Squeeze out any excess water. The straw should feel like a wrung-out sponge.
Inoculating the Substrate: Mixing Spawn and Straw
Now comes the fun part – introducing the mushroom spawn to the prepared substrate!
1. Sanitize Your Work Area: Before you start, wipe down your work surface and the inside of your bowl with rubbing alcohol. This will help prevent contamination.
2. Layer the Substrate and Spawn: Start by placing a layer of the pasteurized straw at the bottom of the bowl. Then, sprinkle a layer of mushroom spawn over the straw. Repeat this process, layering straw and spawn, until the bowl is almost full. Make sure the final layer is straw.
3. Compress the Substrate: Gently press down on the substrate to compact it slightly. This will help the mycelium spread throughout the straw.
4. Cover the Bowl: Cover the bowl with plastic wrap or a clear plastic bag. This will help maintain humidity. Poke a few small holes in the plastic to allow for air exchange.
Incubation: Waiting for Mycelium Growth
This is the waiting game! The mycelium needs time to colonize the substrate.
1. Find a Suitable Location: Place the bowl in a dark, warm location with a temperature between 65-75°F (18-24°C). A closet, basement, or under the sink are all good options.
2. Maintain Humidity: Check the substrate regularly. If it starts to dry out, mist it lightly with water from your spray bottle. You want to keep the substrate moist but not soggy.
3. Observe Mycelium Growth: After a week or two, you should start to see white, fuzzy growth spreading throughout the straw. This is the mushroom mycelium, and it’s a sign that your mushrooms are on their way! The entire substrate should be covered in mycelium within 2-4 weeks. This is called full colonization.
Fruiting: Encouraging Mushroom Formation
Once the substrate is fully colonized, it’s time to encourage the mushrooms to fruit.
1. Increase Airflow: Remove the plastic wrap or bag and place the bowl in a location with more airflow. This will help trigger fruiting.
2. Increase Light: While mushrooms don’t need direct sunlight, they do need some light to fruit properly. Place the bowl in a location with indirect light. A windowsill or a room with a bright light source is ideal.
3. Maintain Humidity: Continue to mist the substrate regularly to keep it moist. You can also create a humidity tent by placing a clear plastic bag loosely over the bowl.
4. Wait for Pins: After a few days, you should start to see small mushroom “pins” forming on the surface of the substrate. These are baby mushrooms!
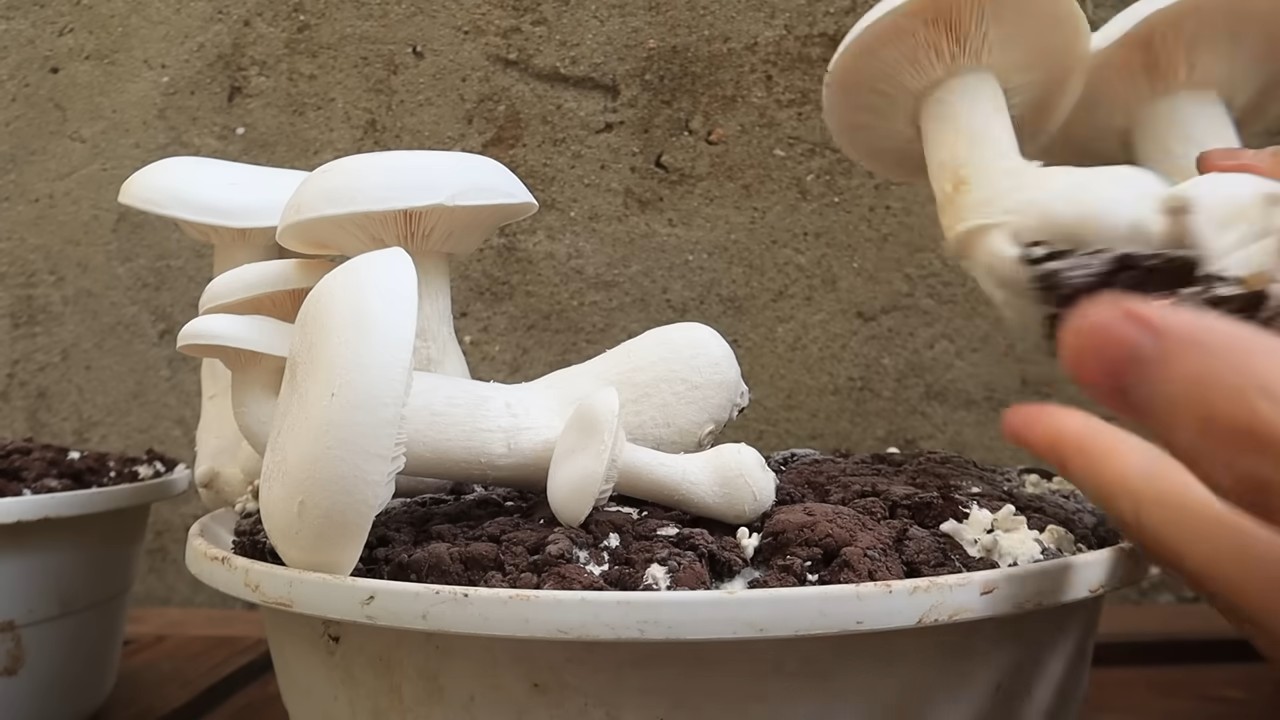
Harvesting: Enjoying Your Homegrown Mushrooms
The moment you’ve been waiting for!
1. Harvest When Mature: Harvest the mushrooms when the caps are fully formed but before they start to release spores. The edges of the caps will start to curl upwards slightly.
2. Twist and Pull: To harvest, gently twist the mushrooms at the base and pull them away from the substrate.
3. Enjoy Your Harvest: Your freshly harvested mushrooms are ready to be cooked and enjoyed! Store them in the refrigerator in a paper bag for up to a week.
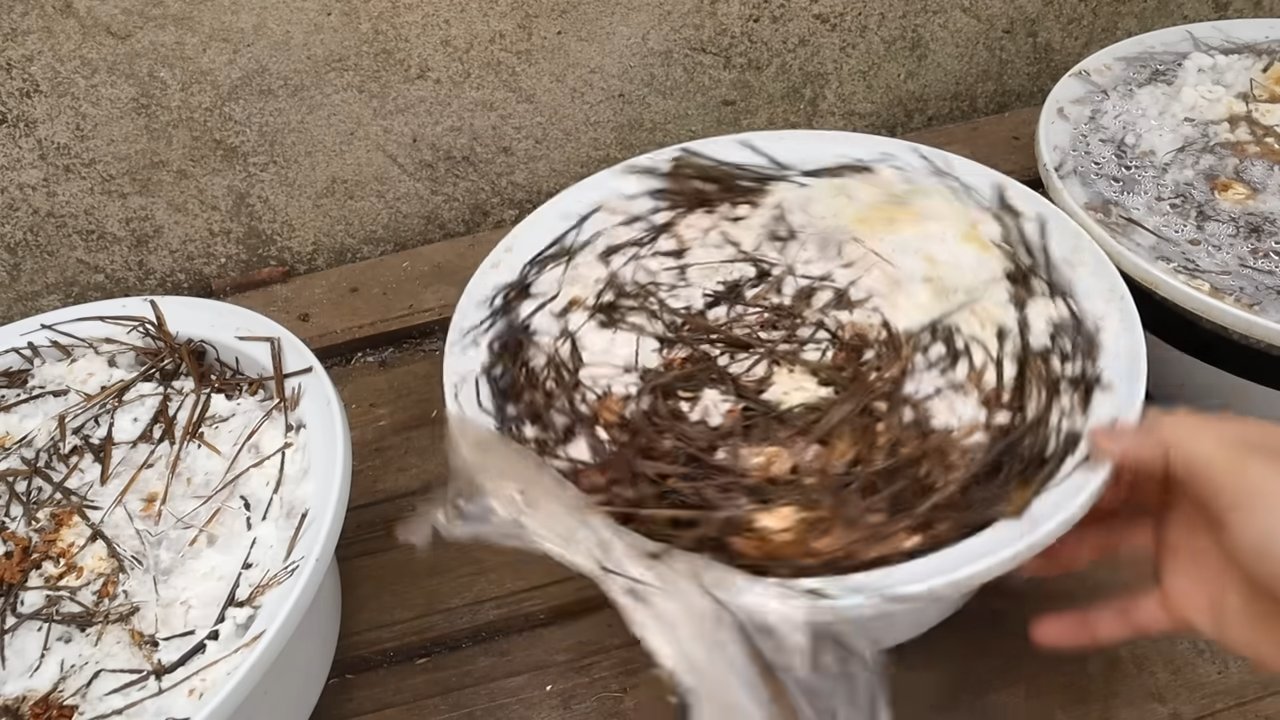
Second Flush and Beyond: Keeping the Harvest Coming
You can often get multiple flushes of mushrooms from the same substrate.
1. Soak the Substrate: After harvesting the first flush, soak the substrate in water for a few hours. This will rehydrate the mycelium and encourage it to produce more mushrooms.
2. Repeat the Fruiting Process: Drain the substrate and repeat the fruiting process described above.
3. Monitor for Contamination: Keep an eye out for any signs of contamination, such as green or black mold. If you see contamination, it’s best to discard the substrate.
Troubleshooting: Common Issues and Solutions
Even with the best intentions, things can sometimes go wrong. Here are some common issues and how to address them:
* No Mycelium Growth: This could be due to several factors, including contaminated substrate, incorrect temperature, or insufficient humidity. Make sure your substrate is properly sterilized, the temperature is within the ideal range, and the humidity is high enough.
* Slow Mycelium Growth: This could be due to low temperatures or insufficient airflow. Try moving the bowl to a warmer location and increasing airflow.
* Contamination: If you see green, black, or other colored mold growing on the substrate, it’s likely contaminated. Unfortunately, there’s not much you can do at this point except discard the substrate and start over. To prevent contamination, make sure to sterilize your substrate and work in a clean environment.
* Small Mushrooms: This could be due to insufficient humidity or nutrients. Make sure to mist the substrate regularly and consider adding a small amount of nutrient-rich material, such as coffee grounds, to the substrate.
* Mushrooms Not Fruiting: This could be due to insufficient light or airflow. Try moving the bowl to a location with more light and airflow.
Tips for Success: Making the Most of Your Mushroom Growing Journey
* Start Small: Don’t try to grow too many mushrooms at once. Start with a single bowl and gradually increase the scale as you gain experience.
* Be Patient: Mushroom growing takes time and patience. Don’t get discouraged if you don’t see results immediately.
* Keep Learning: There’s always more to learn about mushroom cultivation. Read books, watch videos, and connect with other mushroom growers to expand your knowledge.
* Experiment: Don’t be afraid to experiment with different substrates, growing conditions, and mushroom varieties. The more you experiment, the more you’ll learn.
* Have Fun! Growing mushrooms
Conclusion
So, there you have it! Growing your own mushrooms in a bowl at home is not only surprisingly simple, but it’s also incredibly rewarding. Forget those expensive, pre-packaged mushrooms from the grocery store. With a little patience and minimal effort, you can cultivate a continuous supply of fresh, flavorful fungi right on your kitchen counter.
Why is this DIY trick a must-try? Because it empowers you to take control of your food source, reduces your carbon footprint by eliminating transportation costs, and provides you with a culinary experience unlike any other. Imagine the satisfaction of harvesting your own mushrooms and incorporating them into your favorite dishes, knowing exactly where they came from and how they were grown. The taste is noticeably fresher and more vibrant than store-bought varieties.
But the benefits don’t stop there. This method is also a fantastic way to introduce children to the wonders of nature and the process of food cultivation. It’s an educational and engaging activity that can spark a lifelong interest in gardening and sustainable living.
Looking for variations? Absolutely! While oyster mushrooms are a great starting point due to their ease of cultivation, you can experiment with other varieties as you gain experience. Lion’s mane mushrooms, for example, are known for their unique texture and flavor, while shiitake mushrooms offer a more robust and earthy taste. Just be sure to research the specific growing requirements of each variety before you begin. You can also experiment with different substrates. While pasteurized straw is a common choice, you can also use coffee grounds, cardboard, or even hardwood sawdust, depending on the type of mushroom you’re growing.
Another fun variation is to add companion plants to your mushroom bowl. Herbs like parsley, thyme, or chives can create a symbiotic relationship, providing additional nutrients and moisture to the mushrooms while also adding a touch of greenery to your indoor garden.
Don’t be afraid to get creative and personalize your mushroom-growing experience. The possibilities are endless!
We wholeheartedly encourage you to give this DIY trick a try. It’s a fun, educational, and delicious way to connect with nature and enjoy the fruits (or rather, fungi) of your labor. Once you’ve harvested your first batch of homegrown mushrooms, we’d love to hear about your experience! Share your photos, tips, and recipes with us in the comments below. Let’s build a community of mushroom enthusiasts and inspire others to embrace the joys of home cultivation. Remember, the key to successful **bowl grown mushrooms** lies in patience, observation, and a willingness to learn. Happy growing!
Frequently Asked Questions (FAQ)
What type of mushrooms are easiest to grow in a bowl?
Oyster mushrooms are generally considered the easiest type of mushroom to grow in a bowl for beginners. They are relatively fast-growing, tolerant of a wider range of conditions, and readily available in spawn form. Other good options for beginners include shiitake and wine cap mushrooms, although these may require slightly more attention to detail. Avoid more demanding varieties like morels or truffles, which are notoriously difficult to cultivate even for experienced growers.
What kind of bowl should I use?
Almost any clean bowl will work, but consider the size and material. A bowl with a diameter of at least 8 inches is recommended to provide enough space for the mushrooms to grow. Plastic, glass, or ceramic bowls are all suitable. Ensure the bowl is thoroughly cleaned and sanitized before use to prevent contamination. A bowl with drainage holes is not necessary, as you will be controlling the moisture levels manually.
What is the best substrate for growing mushrooms in a bowl?
Pasteurized straw is a popular and readily available substrate for growing mushrooms in a bowl. It provides a good balance of nutrients and moisture retention. Other options include coffee grounds, cardboard, and hardwood sawdust. Coffee grounds are a great sustainable option, but they should be used in moderation as they can be quite acidic. Cardboard is another readily available and inexpensive option, but it may require more frequent watering. Hardwood sawdust is a good choice for certain types of mushrooms, such as shiitake, but it may be more difficult to source.
How do I pasteurize the substrate?
Pasteurization is essential to kill off any competing organisms that could hinder mushroom growth. The easiest way to pasteurize straw is to soak it in hot water (around 160-180°F or 71-82°C) for at least one hour. You can use a large pot or container and a thermometer to monitor the water temperature. After soaking, drain the straw thoroughly and allow it to cool before mixing it with the mushroom spawn. For other substrates like coffee grounds or cardboard, you can use a similar method or microwave them for a few minutes to kill off any contaminants.
How much mushroom spawn do I need?
A general rule of thumb is to use about 10-20% spawn by weight of the substrate. For example, if you’re using 1 kilogram of pasteurized straw, you would need 100-200 grams of mushroom spawn. It’s better to err on the side of using more spawn rather than less, as this will help the mushrooms colonize the substrate more quickly and reduce the risk of contamination.
How often should I water the mushrooms?
The frequency of watering will depend on the humidity levels in your environment and the type of substrate you’re using. The goal is to keep the substrate moist but not waterlogged. Check the moisture levels daily by feeling the substrate. If it feels dry to the touch, mist it lightly with water using a spray bottle. Avoid overwatering, as this can lead to mold growth and other problems.
How long does it take for mushrooms to grow?
The time it takes for mushrooms to grow will vary depending on the variety, the growing conditions, and the amount of spawn used. Oyster mushrooms typically take 1-2 weeks to colonize the substrate and another 1-2 weeks to produce fruiting bodies (the actual mushrooms). Shiitake mushrooms may take longer, typically 2-3 weeks for colonization and another 2-4 weeks for fruiting.
What are the signs of contamination?
Signs of contamination include the presence of mold, unusual odors, or discoloration of the substrate. Green, black, or blue mold are common contaminants. If you notice any of these signs, it’s best to discard the entire bowl to prevent the contamination from spreading.
Can I reuse the substrate after harvesting the mushrooms?
Yes, you can often get multiple flushes (harvests) from the same substrate. After harvesting the first flush, soak the substrate in water for a few hours to rehydrate it. Then, drain the water and place the bowl back in its growing location. You may get another flush of mushrooms within a few weeks. However, the yield of subsequent flushes may be lower than the first. Eventually, the substrate will become depleted of nutrients and will need to be replaced.
Where is the best place to put the bowl to grow mushrooms?
The ideal location for growing mushrooms in a bowl is a cool, dark, and humid environment. A basement, closet, or even under the kitchen sink can work well. Avoid direct sunlight, as this can dry out the substrate and inhibit mushroom growth. The temperature should be between 60-75°F (15-24°C). Humidity levels should be around 80-90%. You can increase humidity by placing a plastic bag over the bowl or using a humidifier.
Are bowl grown mushrooms safe to eat?
Yes, if you have correctly identified the mushroom species and grown them in a clean environment, they are safe to eat. Only consume mushrooms that you are 100% certain are edible. If you are unsure, consult with a mushroom expert or mycologist. Always cook mushrooms thoroughly before eating them.

Leave a Comment