
Bucket mushroom growing might sound like something out of a science fiction novel, but trust me, it’s a surprisingly simple and rewarding way to cultivate delicious, fresh mushrooms right in your own home! Forget those expensive grocery store prices and questionable origins – with a few basic supplies and a little know-how, you can become a mushroom maestro in no time.
Humans have been foraging for and cultivating mushrooms for centuries, with evidence suggesting mushroom consumption dating back to prehistoric times. Different cultures around the world have revered mushrooms for their culinary, medicinal, and even spiritual properties. Now, we’re bringing that ancient tradition into the modern age with a DIY twist!
Why should you try bucket mushroom growing? Well, for starters, it’s incredibly space-efficient, making it perfect for apartment dwellers or anyone with limited gardening space. Plus, it’s a fantastic way to recycle old buckets and other containers, turning waste into something wonderful and edible. But most importantly, growing your own mushrooms gives you complete control over the process, ensuring you’re enjoying the freshest, healthiest, and most flavorful fungi possible. I’m excited to show you how easy it is!
Grow Your Own Gourmet Mushrooms: A Bucket Tek Guide
Hey there, fellow fungi fanatics! Ever dreamt of harvesting your own delicious mushrooms right in your backyard (or even your apartment!)? Well, dream no more! Today, I’m going to walk you through the wonderful world of bucket mushroom cultivation. It’s a surprisingly simple and rewarding process, perfect for beginners and seasoned growers alike. We’ll be focusing on oyster mushrooms, as they’re relatively easy to grow and incredibly versatile in the kitchen. So, grab your supplies, and let’s get started!
What You’ll Need: The Essential Supplies
Before we dive into the nitty-gritty, let’s gather our supplies. Here’s a comprehensive list of everything you’ll need to create your own mushroom-growing bucket:
* A 5-gallon bucket with a lid: Make sure it’s clean and food-grade. You can often find these at hardware stores or even get them for free from bakeries or restaurants.
* Oyster mushroom spawn: This is the “seed” of your mushrooms. You can purchase it online from reputable mushroom suppliers. I recommend starting with a few pounds, depending on the size of your bucket.
* Substrate: This is the food source for your mushrooms. Straw is a fantastic and readily available option. You can also use hardwood sawdust, but straw is generally easier for beginners.
* Hydrated lime (Calcium Hydroxide): This is used to pasteurize the straw, killing off competing organisms. You can find it at garden centers or agricultural supply stores.
* Large pot or container for pasteurization: Big enough to submerge your straw.
* Drill with a 1/4-inch drill bit: For creating ventilation holes in the bucket.
* Gloves: To maintain cleanliness and prevent contamination.
* Spray bottle with water: For maintaining humidity.
* Optional: Micropore tape to cover the ventilation holes (helps maintain humidity and prevent contamination).
Preparing the Substrate: Pasteurization is Key
One of the most crucial steps in mushroom cultivation is pasteurizing the substrate. This process eliminates competing molds and bacteria, giving your oyster mushrooms a head start. We’ll be using a simple hot water pasteurization method.
1. Chop the Straw: If your straw is in long strands, chop it into smaller pieces, about 2-4 inches long. This makes it easier to pack into the bucket and allows the mycelium (the mushroom’s root system) to colonize it more effectively.
2. Hydrate the Lime: In a large container, mix the hydrated lime with water. The ratio is typically 1 tablespoon of hydrated lime per gallon of water. Stir well until the lime is fully dissolved. Be careful when handling hydrated lime, as it can be irritating to the skin and eyes. Wear gloves and eye protection.
3. Soak the Straw: Submerge the chopped straw in the lime water solution. Make sure all the straw is fully submerged. You might need to weigh it down with a brick or a heavy object. Let the straw soak for at least 12-24 hours. This will raise the pH of the straw, making it less hospitable to competing organisms.
4. Drain the Straw: After soaking, drain the straw thoroughly. You want it to be moist but not dripping wet. A good way to test this is to squeeze a handful of straw; you should only get a few drops of water.
Preparing the Bucket: Ventilation is Vital
Now that our substrate is ready, let’s prepare the bucket for its new inhabitants.
1. Drill Ventilation Holes: Using your drill and 1/4-inch drill bit, create ventilation holes around the bucket. Space them about 4-6 inches apart, both on the sides and the bottom. These holes will allow for air exchange, which is essential for mushroom growth.
2. Optional: Cover the Holes: If you live in a dry environment, you might want to cover the ventilation holes with micropore tape. This will help maintain humidity inside the bucket.
Layering and Spawning: The Heart of the Process
This is where the magic happens! We’ll be layering the pasteurized straw and oyster mushroom spawn in the bucket, creating the perfect environment for colonization.
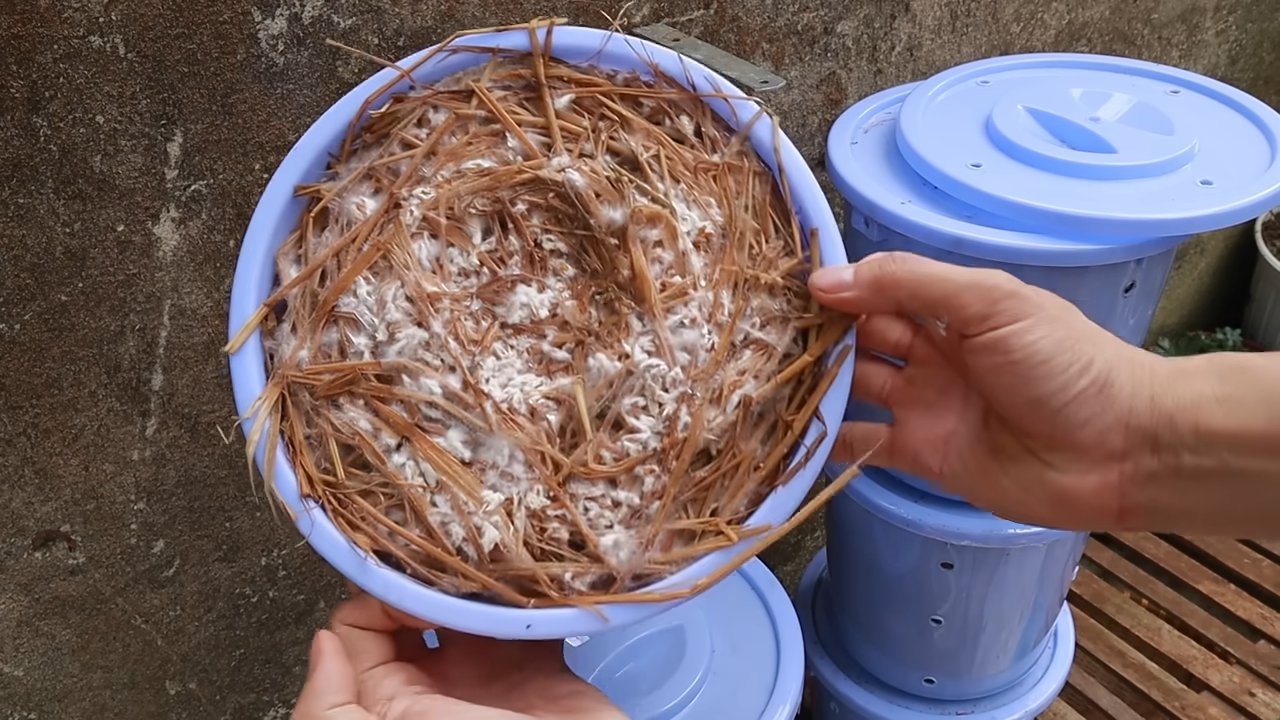
1. First Layer of Straw: Start by placing a layer of pasteurized straw at the bottom of the bucket, about 2-3 inches thick. Pack it down gently.
2. First Layer of Spawn: Sprinkle a generous layer of oyster mushroom spawn over the straw. Aim for about 1/4 to 1/2 inch of spawn coverage.
3. Repeat Layers: Continue layering straw and spawn, alternating between the two. Make sure the spawn is evenly distributed throughout the bucket.
4. Top Layer of Straw: Finish with a final layer of straw on top. This will help retain moisture and protect the spawn.
5. Close the Lid: Place the lid on the bucket, but don’t seal it completely. You want some air exchange to occur.
Incubation: Patience is a Virtue
Now comes the waiting game. The incubation period is when the mycelium colonizes the straw, forming a network of white, thread-like structures.
1. Find a Suitable Location: Place the bucket in a dark, humid location with a temperature between 65-75°F (18-24°C). A basement, closet, or garage often works well.
2. Monitor Humidity: Check the bucket regularly to ensure the straw remains moist. If it starts to dry out, mist it lightly with water using your spray bottle.
3. Observe Colonization: After a few weeks, you should start to see white mycelium spreading throughout the straw. This is a good sign! The entire bucket should be fully colonized within 2-4 weeks, depending on the temperature and humidity.
Fruiting: The Moment of Truth
Once the bucket is fully colonized, it’s time to initiate fruiting, which is when the mushrooms start to form.
1. Increase Airflow: Remove the micropore tape (if you used it) from the ventilation holes to increase airflow.
2. Increase Light: Move the bucket to a location with indirect light. Direct sunlight can dry out the mushrooms.
3. Maintain Humidity: Mist the bucket regularly with water to maintain high humidity. You can also place a plastic bag over the bucket to create a humidity tent, but make sure to leave some openings for air exchange.
4. Observe Pinning: After a few days, you should start to see small mushroom “pins” forming around the ventilation holes. These are the baby mushrooms!
Harvesting: Reap the Rewards
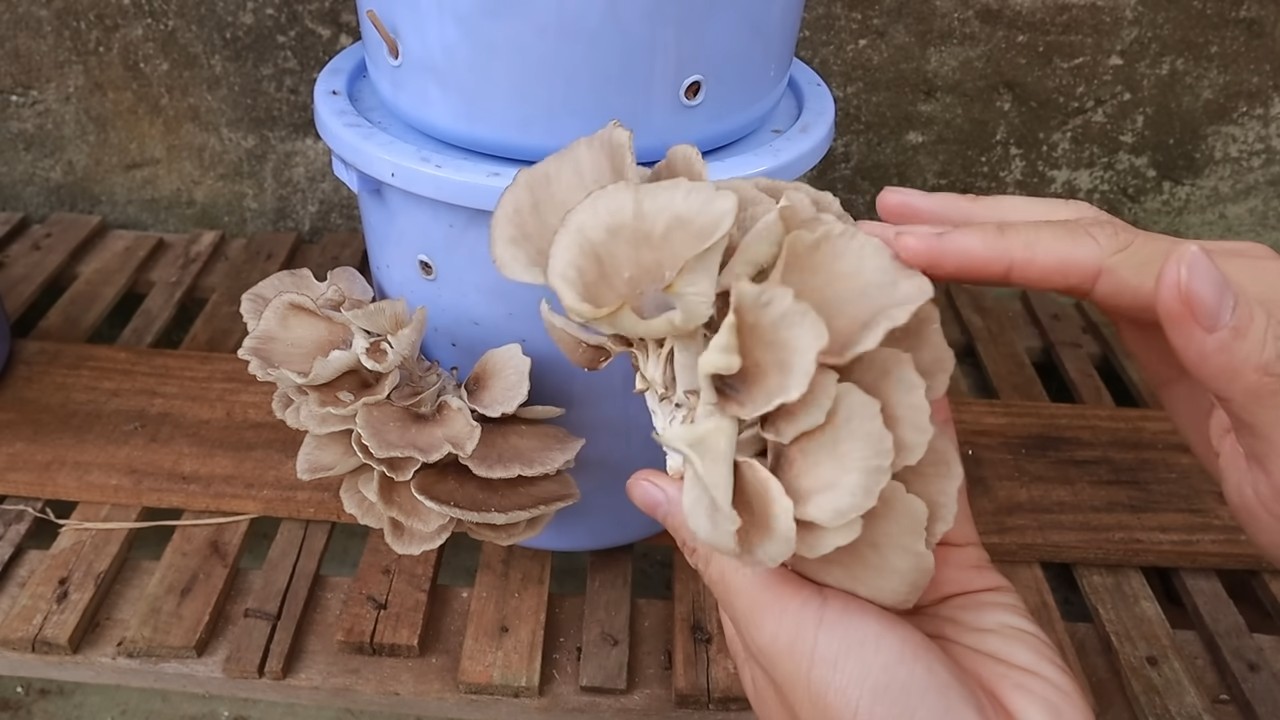
Congratulations! You’ve successfully grown your own oyster mushrooms. Now it’s time to harvest your bounty.
1. Harvest When Mature: Harvest the mushrooms when the caps are fully developed but before they start to release spores. The edges of the caps will start to curl upwards slightly when they’re ready.
2. Twist and Pull: To harvest, gently twist and pull the mushrooms from the bucket. Try to remove the entire cluster at once.
3. Enjoy Your Harvest: Your freshly harvested oyster mushrooms are ready to be cooked and enjoyed! They’re delicious sautéed, grilled, or added to soups and stews.
Subsequent Flushes: Keep the Harvest Coming
After the first harvest, you can often get several more “flushes” of mushrooms from the same bucket.
1. Soak the Substrate: After harvesting, soak the substrate in water for 12-24 hours. This will rehydrate the mycelium and encourage new growth.
2. Repeat Fruiting Conditions: Return the bucket to the fruiting conditions (increased airflow, light, and humidity).
3. Harvest Again: You should get another flush of mushrooms within a few weeks. You can repeat this process several times until the substrate is exhausted.
Troubleshooting: Common Issues and Solutions
Even with the best intentions, things can sometimes go wrong. Here are some common issues you might encounter and how to address them:
* Contamination: If you see green, black, or other colored molds growing in the bucket, it’s likely contaminated. Unfortunately, there’s not much you can do at this point except discard the substrate. To prevent contamination, make sure to pasteurize the substrate thoroughly and maintain cleanliness throughout the process.
* Slow Colonization: If the mycelium is colonizing the straw slowly, it could be due to low temperature or humidity. Make sure the bucket is in a warm, humid location.
* No Fruiting: If the bucket is fully colonized but no mushrooms are forming, it could be due to lack of airflow, light, or humidity. Increase airflow by removing the micropore tape, move the bucket to a location with indirect light, and mist it regularly with water.
* Small Mushrooms: If the mushrooms are small and stunted, it could be due to lack
Conclusion
So, there you have it! Transforming a simple bucket into a thriving mushroom farm is not just a fun project; it’s a gateway to fresh, delicious, and sustainable food right in your own home. We’ve walked you through the process, highlighting the ease and affordability of this method. But why is this DIY bucket mushroom growing method a must-try?
Firstly, it’s incredibly space-efficient. Whether you have a sprawling garden or a tiny balcony, a bucket takes up minimal room compared to traditional mushroom beds. Secondly, it’s a fantastic way to recycle and repurpose materials, contributing to a more eco-friendly lifestyle. Imagine turning discarded buckets into a source of gourmet mushrooms – it’s a win-win! Thirdly, and perhaps most importantly, the taste of homegrown mushrooms is simply unparalleled. Forget the bland, store-bought varieties; these are bursting with flavor and freshness.
But the beauty of this method lies in its adaptability. Feel free to experiment with different mushroom varieties. Oyster mushrooms are a great starting point due to their resilience and rapid growth, but don’t be afraid to branch out and try shiitake, lion’s mane, or even wine cap mushrooms once you’ve gained some experience. Each variety offers a unique flavor profile and texture, adding exciting diversity to your culinary creations.
Consider also experimenting with different substrates. While straw and coffee grounds are popular choices, you can also use wood chips, cardboard, or even cotton waste. Just be sure to properly pasteurize or sterilize your chosen substrate to eliminate any competing organisms.
Another variation to consider is the addition of companion plants. Certain herbs, such as basil or parsley, can help deter pests and improve the overall health of your mushroom farm. Plus, they add a touch of beauty to your setup.
Don’t be intimidated by the process. Mushroom growing might seem daunting at first, but with a little patience and attention to detail, you’ll be harvesting your own delicious mushrooms in no time. The satisfaction of nurturing these fungi from spawn to fruiting body is incredibly rewarding.
We wholeheartedly encourage you to give this DIY bucket mushroom growing method a try. It’s an engaging, educational, and ultimately delicious experience. And remember, the best way to learn is by doing. So, gather your materials, follow the steps outlined in this article, and embark on your own mushroom-growing adventure.
Once you’ve harvested your first batch of homegrown goodness, we’d love to hear about your experience! Share your photos, tips, and any variations you’ve tried in the comments section below. Let’s build a community of mushroom enthusiasts and learn from each other’s successes and challenges. Happy growing!
Frequently Asked Questions (FAQ)
What type of mushrooms grow best in a bucket?
Oyster mushrooms are generally considered the easiest and most forgiving variety for beginners using the bucket method. They are fast-growing, tolerate a wider range of conditions, and are less susceptible to contamination than some other types. Other good options include shiitake (though they require hardwood substrate and a longer incubation period), wine cap mushrooms (which can be grown outdoors in a bucket filled with wood chips), and lion’s mane (which prefers a supplemented sawdust substrate). The key is to research the specific needs of the mushroom variety you choose and ensure that your bucket setup provides the appropriate environment.
How long does it take to grow mushrooms in a bucket?
The time it takes to grow mushrooms in a bucket varies depending on the mushroom variety, the substrate used, and the environmental conditions. Oyster mushrooms, for example, can start fruiting within 2-3 weeks of inoculation, while shiitake mushrooms may take several months. Generally, you can expect to see the first signs of mycelial colonization (the white, thread-like growth of the mushroom fungus) within a week or two. Once the substrate is fully colonized, fruiting can be triggered by providing the right temperature, humidity, and light conditions. Be patient and monitor your bucket regularly for signs of growth.
What is the best substrate for bucket mushroom growing?
The best substrate depends on the type of mushroom you are growing. Oyster mushrooms thrive on a variety of substrates, including straw, coffee grounds, and cardboard. Shiitake mushrooms require hardwood sawdust or wood chips. Wine cap mushrooms prefer wood chips or straw. The substrate should be properly pasteurized or sterilized to kill any competing organisms before inoculation. Pasteurization can be achieved by soaking the substrate in hot water (around 160-180°F) for an hour or two. Sterilization requires higher temperatures and pressure, typically achieved using a pressure cooker.
How do I prevent contamination in my mushroom bucket?
Contamination is a common challenge in mushroom growing, but there are several steps you can take to minimize the risk. First, ensure that your substrate is properly pasteurized or sterilized. Second, use sterile techniques when inoculating the substrate with mushroom spawn. This includes wearing gloves, cleaning your tools with alcohol, and working in a clean environment. Third, maintain proper ventilation and humidity levels in your growing area. Stagnant air and excessive moisture can create favorable conditions for mold and bacteria. Finally, monitor your bucket regularly for signs of contamination, such as unusual colors or odors. If you detect contamination, remove the affected area immediately to prevent it from spreading.
How much light do mushrooms need in a bucket?
Mushrooms don’t need a lot of light, but they do need some light to fruit properly. Indirect sunlight or artificial light is sufficient. Avoid direct sunlight, as it can dry out the substrate and damage the mushrooms. A simple fluorescent light or LED grow light can provide adequate illumination. The amount of light needed varies depending on the mushroom variety, but generally, 12-16 hours of light per day is sufficient.
How often should I water my mushroom bucket?
The frequency of watering depends on the humidity levels in your growing area and the type of substrate you are using. The goal is to keep the substrate moist but not waterlogged. Check the moisture level of the substrate regularly by feeling it with your hand. If it feels dry, mist it with water. Avoid overwatering, as this can lead to contamination. A good rule of thumb is to mist the bucket once or twice a day, or as needed to maintain adequate moisture.
Can I grow mushrooms in a bucket outdoors?
Yes, you can grow mushrooms in a bucket outdoors, especially if you are growing wine cap mushrooms. However, you will need to protect the bucket from direct sunlight, heavy rain, and extreme temperatures. Choose a shady spot in your garden or on your patio. You may also need to provide additional watering during dry periods. Outdoor growing can be more challenging than indoor growing due to the unpredictable nature of the environment, but it can also be very rewarding.
What do I do after harvesting my mushrooms?
After harvesting your mushrooms, you can encourage a second or even third flush by providing the right conditions. Soak the substrate in water for 12-24 hours to rehydrate it. Then, drain the excess water and return the bucket to its growing area. Maintain proper temperature, humidity, and light levels. You may need to wait a few weeks for the next flush to appear. Once the substrate is exhausted, you can compost it and use it to enrich your garden soil.
Leave a Comment