
Clean Baking Pans Naturally – sounds like a dream, right? I know, I know, we’ve all been there, staring down at a baking pan caked with burnt-on food, wondering if it’s even worth the effort to try and salvage it. But trust me, it is! Before the age of disposable everything, resourceful homemakers relied on natural ingredients to keep their kitchens sparkling. Think about it – our grandmothers didn’t have harsh chemicals, yet their kitchens were immaculate! They knew the secrets to clean baking pans naturally, and now, I’m going to share those secrets with you.
Why is this DIY trick so essential? Well, for starters, those store-bought cleaners can be harsh on your skin, your lungs, and the environment. Plus, they can be expensive! But more importantly, a clean baking pan is crucial for even cooking and preventing that burnt taste from transferring to your delicious creations. Imagine baking a beautiful cake only to have it taste faintly of last week’s lasagna – no thank you!
This article is your ultimate guide to naturally cleaning those stubborn baking pans. We’ll explore simple, effective methods using ingredients you probably already have in your pantry. Get ready to say goodbye to elbow grease and hello to sparkling clean baking pans, the natural way!
DIY: Sparkling Clean Baking Pans Without Harsh Chemicals
Okay, let’s face it, burnt-on gunk on baking pans is the bane of every home cook’s existence. I’ve tried everything – scrubbing until my arms ache, soaking overnight, even resorting to those harsh chemical cleaners that make my eyes water. But I’ve finally discovered a natural, effective, and surprisingly easy way to get those pans looking almost new again. And the best part? You probably already have everything you need in your pantry!
This method uses the power of baking soda and vinegar, a classic cleaning combo, along with a little patience and elbow grease. Trust me, it’s worth it!
What You’ll Need:
* Baking soda
* White vinegar
* Dish soap
* Hot water
* Scrub brush or sponge (I prefer a non-scratch scrub brush)
* Paper towels or a clean cloth
* Optional: Rubber gloves (to protect your hands)
Step-by-Step Instructions:
Here’s how I tackle those stubborn baking pan stains:
1. Assess the Damage: Take a good look at your baking pan. How bad is the buildup? Is it just a light coating of grease, or are we talking layers of burnt-on food? This will help you determine how much baking soda and vinegar you’ll need and how long you’ll need to let it soak.
2. Create a Baking Soda Paste: In a small bowl, mix baking soda with a little bit of water to form a thick paste. The consistency should be similar to toothpaste. I usually start with about ½ cup of baking soda and add water a teaspoon at a time until I get the right consistency.
3. Coat the Pan: Using your fingers or a spatula, generously coat the entire surface of the baking pan with the baking soda paste, focusing on the areas with the most buildup. Don’t be shy – really slather it on! I like to make sure every bit of burnt-on food is covered.
4. Let it Sit (The First Soak): Now, let the baking soda paste sit on the pan for at least 30 minutes. For really tough stains, I sometimes let it sit for an hour or even longer. The baking soda will help to loosen the baked-on grime.
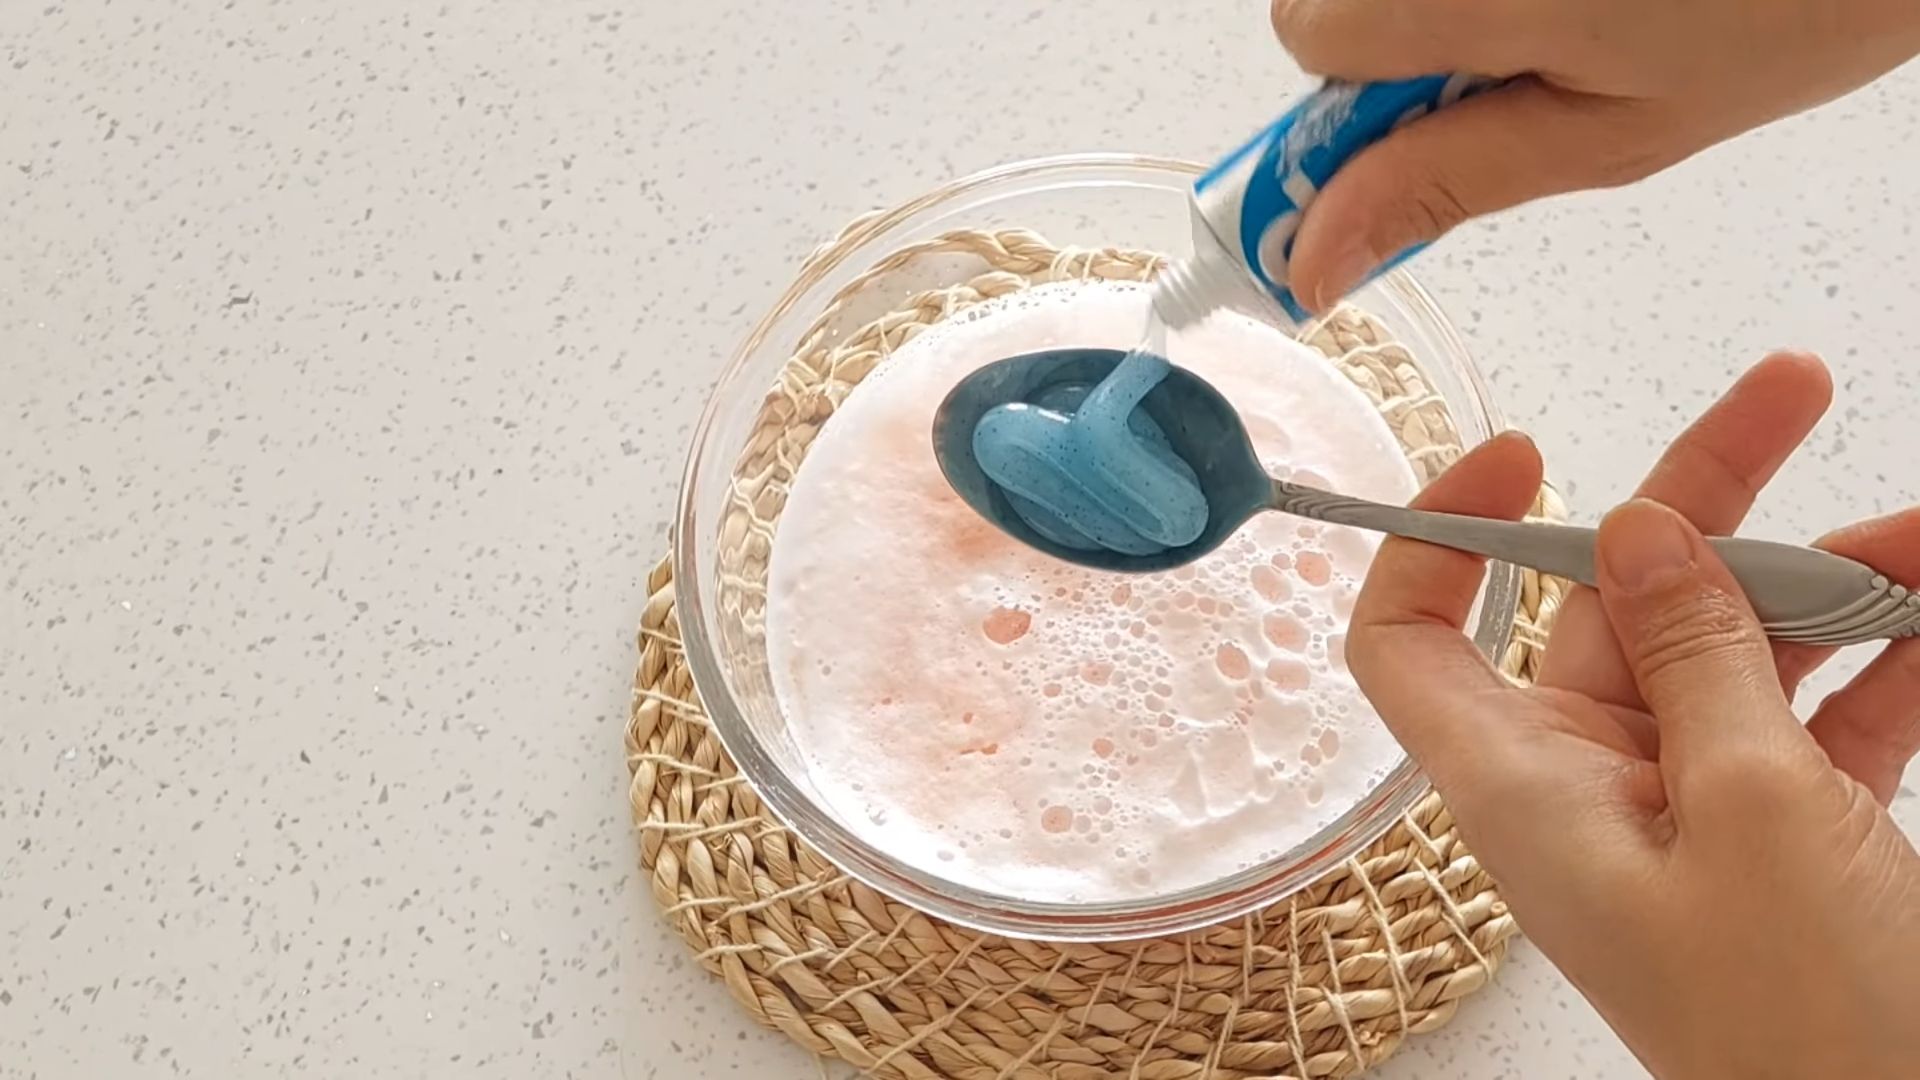
5. Add Vinegar: After the baking soda has had time to work its magic, pour a thin layer of white vinegar over the baking soda paste. You’ll see it start to fizz – that’s the chemical reaction between the baking soda and vinegar, and it’s exactly what we want!
6. The Second Soak (The Fizzing Action): Let the vinegar and baking soda mixture fizz for about 5-10 minutes. This fizzing action helps to further break down the burnt-on food.
7. Add Hot Water: After the fizzing subsides, carefully pour hot water into the baking pan until it’s completely submerged.
8. Dish Soap Boost: Add a squirt of dish soap to the hot water. This will help to cut through any remaining grease.
9. The Final Soak (The Long Game): Now, let the pan soak in the hot water, vinegar, baking soda, and dish soap mixture for at least 2 hours, or even overnight for really stubborn stains. The longer it soaks, the easier it will be to scrub off the gunk. I often leave mine overnight, especially if I’ve been putting off cleaning it for a while (oops!).
10. Scrub-a-Dub-Dub: After the soaking period, it’s time to scrub! Using a scrub brush or sponge, scrub the baking pan thoroughly. You should find that the burnt-on food comes off much easier than it would have before. If you encounter any particularly stubborn spots, you can make a fresh batch of baking soda paste and apply it directly to those areas, then scrub again.
11. Rinse Thoroughly: Once you’ve scrubbed away all the gunk, rinse the baking pan thoroughly with hot water to remove any remaining baking soda, vinegar, or dish soap residue.
12. Dry and Admire: Dry the baking pan with a clean cloth or paper towels. And there you have it – a sparkling clean baking pan without the use of harsh chemicals!
Dealing with Extra Stubborn Stains:
Sometimes, even with all the soaking and scrubbing, you might still have a few stubborn spots that just won’t budge. Don’t despair! Here are a few extra tips and tricks I’ve learned along the way:
* Baking Soda Power Scrub: For those really tough spots, make a thicker baking soda paste and apply it directly to the stain. Let it sit for a few minutes, then scrub vigorously with a scrub brush.
* Steel Wool (Use with Caution!): If you’re dealing with a stainless steel baking pan, you can try using steel wool to scrub away the stubborn stains. However, be very careful not to scratch the surface of the pan. I recommend testing it in an inconspicuous area first to make sure it doesn’t cause any damage. I personally avoid steel wool unless absolutely necessary.
* Boiling Water Boost: For really stubborn stains, you can try boiling water in the baking pan on the stovetop. Fill the pan with water, add a few tablespoons of baking soda, and bring it to a boil. Let it simmer for about 15-20 minutes, then carefully pour out the hot water and scrub the pan. Be extremely careful when handling boiling water!
* Lemon Juice Power: Lemon juice is a natural degreaser and can help to loosen stubborn stains. Cut a lemon in half and rub it directly onto the stained areas. Let it sit for about 30 minutes, then scrub and rinse. The acidity of the lemon juice helps break down the grime.
Preventing Future Buildup:
Of course, the best way to keep your baking pans clean is to prevent buildup in the first place. Here are a few tips to help you keep your pans looking their best:
* Line Your Pans: Whenever possible, line your baking pans with parchment paper or aluminum foil. This will create a barrier between the food and the pan, preventing food from sticking and burning on.
* Clean Immediately: The sooner you clean your baking pans after using them, the easier it will be to remove any food residue. Don’t let them sit overnight!
* Regular Cleaning: Even if you line your pans, it’s still a good idea to give them a thorough cleaning every once in a while to prevent buildup from accumulating.
* Avoid Abrasive Cleaners: Harsh abrasive cleaners can scratch the surface of your baking pans, making them more likely to stick and burn in the future. Stick to gentle cleaning methods like the baking soda and vinegar method described above.
Specific Pan Types:
* Aluminum Pans: This method works great on aluminum pans. Just be mindful of using steel wool, as it can scratch the surface.
* Stainless Steel Pans: Stainless steel is generally durable, so you can be a bit more aggressive with scrubbing if needed.
* Non-Stick Pans: Be extra gentle with non-stick pans! Avoid steel wool and abrasive cleaners, as they can damage the non-stick coating. Stick to a soft sponge and gentle scrubbing.
* Glass Pans: Glass pans are generally easy to clean with this method. Just be careful not to drop them, as they can break easily.
A Note on Safety:
* Always wear rubber gloves to protect your hands from the hot water and cleaning solutions.
* Be careful when handling boiling water.
* Avoid using steel wool on non-stick pans.
* If you’re using any chemical cleaners, be sure to follow the manufacturer’s instructions carefully.
I hope this guide helps you get your baking pans sparkling clean! It’s a simple, natural, and effective way to tackle those stubborn stains without resorting to harsh chemicals. Happy cleaning!

Conclusion
So, there you have it! A simple, effective, and eco-friendly way to clean baking pans naturally, banishing those stubborn stains and baked-on messes without resorting to harsh chemicals. This isn’t just about aesthetics; it’s about extending the life of your beloved baking pans and ensuring that your delicious creations are cooked on a truly clean surface.
Why is this DIY trick a must-try? Because it’s economical, readily accessible (you likely have all the ingredients in your pantry already!), and incredibly satisfying to witness the grime literally lift away. Plus, you’re doing your part for the environment by reducing your reliance on potentially harmful cleaning products.
But the beauty of this method lies in its adaptability. Feel free to experiment with variations to suit your specific needs. For instance, if you’re dealing with particularly stubborn stains, try increasing the amount of baking soda or letting the paste sit for a longer period. You could also add a few drops of lemon essential oil to the paste for an extra boost of cleaning power and a refreshing scent. For cast iron baking pans, be sure to re-season them after cleaning to maintain their non-stick properties. Remember to always test a small, inconspicuous area first, especially on delicate or coated baking pans.
Don’t be afraid to get creative! Some readers have found success by using a combination of baking soda and vinegar for a fizzing action that helps loosen tough residue. Others swear by adding a bit of dish soap to the paste for extra degreasing power. The key is to find what works best for your specific baking pans and the types of messes you typically encounter.
We’re confident that once you try this natural cleaning method, you’ll be amazed by the results. It’s a game-changer for anyone who loves to bake but dreads the cleanup. So, ditch the harsh chemicals and embrace the power of natural ingredients.
We wholeheartedly encourage you to give this DIY trick a try. It’s a simple, effective, and rewarding way to keep your baking pans sparkling clean. And most importantly, we want to hear about your experience! Share your before-and-after photos, your tips and tricks, and any variations you’ve discovered in the comments below. Let’s build a community of bakers who are passionate about both creating delicious treats and keeping their kitchens clean and green. Your feedback will not only help other readers but also inspire us to continue sharing valuable and practical DIY solutions. Happy baking and happy cleaning!
Frequently Asked Questions (FAQ)
What kind of baking pans does this method work on?
This natural cleaning method is generally safe and effective for a wide variety of baking pans, including those made of stainless steel, aluminum, glass, and even some non-stick surfaces. However, it’s always best to test a small, inconspicuous area first, especially on delicate or coated pans, to ensure that the cleaning paste doesn’t damage the finish. For cast iron baking pans, remember to re-season them after cleaning to maintain their non-stick properties and prevent rust. Avoid using this method on copper baking pans, as the baking soda can be abrasive and potentially scratch the surface.
How long should I let the baking soda paste sit on the baking pan?
The amount of time you let the baking soda paste sit on the baking pan depends on the severity of the stains and baked-on residue. For light stains, 30 minutes to an hour may be sufficient. For more stubborn messes, you can let the paste sit for several hours or even overnight. Just be sure to keep the paste moist by covering the pan with plastic wrap or a damp cloth. Check the pan periodically to see if the paste is starting to loosen the grime.
Can I use this method to clean burnt-on food?
Yes, this method is particularly effective for cleaning burnt-on food. The baking soda acts as a mild abrasive, helping to lift the burnt residue from the surface of the pan. For heavily burnt-on food, you may need to repeat the process several times or use a more concentrated paste. You can also try adding a bit of white vinegar to the baking soda paste for a fizzing action that helps to loosen the burnt food.
What if the stains are still there after using this method?
If the stains are still present after using this method, don’t despair! There are a few things you can try. First, make sure you’re using enough baking soda and that the paste is thick enough to adhere to the surface of the pan. Second, try letting the paste sit for a longer period. Third, you can try using a more abrasive scrubbing tool, such as a scouring pad or a steel wool pad (but be careful not to scratch the surface of the pan). Finally, you can try repeating the process several times. In some cases, particularly stubborn stains may require a commercial oven cleaner, but this natural method is often sufficient for most messes.
Is baking soda safe to use on non-stick baking pans?
While baking soda is generally considered safe for use on non-stick baking pans, it’s important to use it with caution. Baking soda is a mild abrasive, and excessive scrubbing can potentially damage the non-stick coating over time. To minimize the risk of damage, use a soft sponge or cloth to apply the baking soda paste and avoid using abrasive scrubbing tools. Also, be sure to rinse the pan thoroughly after cleaning to remove any residual baking soda. If you’re concerned about damaging your non-stick baking pans, you can try using a gentler cleaning method, such as soaking the pan in warm, soapy water.
Can I use this method to clean my oven?
While this method is primarily designed for cleaning baking pans, you can also use it to clean your oven. To clean your oven with baking soda, mix a paste of baking soda and water and spread it over the interior surfaces of the oven, avoiding the heating elements. Let the paste sit overnight, then wipe it away with a damp cloth. For stubborn stains, you can spray the paste with white vinegar before wiping it away.
How often should I clean my baking pans?
The frequency with which you should clean your baking pans depends on how often you use them and the types of messes you typically encounter. As a general rule, it’s a good idea to clean your baking pans after each use to prevent stains and baked-on residue from accumulating. However, if you only use your baking pans occasionally, you may be able to get away with cleaning them less frequently.
What are some other natural cleaning alternatives?
Besides baking soda, there are several other natural cleaning alternatives you can use to clean your baking pans. White vinegar is a great degreaser and can help to loosen stubborn stains. Lemon juice is a natural disinfectant and can also help to remove stains. Salt is a mild abrasive and can be used to scrub away grime. And hydrogen peroxide is a natural bleaching agent and can help to brighten stained surfaces. Experiment with different combinations of these natural ingredients to find what works best for you.

Leave a Comment