
Clean silver jewelry at home – it’s a phrase that probably conjures up images of tedious scrubbing and expensive polishing cloths, right? But what if I told you that sparkling silver is just a few common household items away? Forget those pricey jewelry cleaners! I’m about to share some incredibly easy and effective DIY tricks that will have your favorite silver pieces gleaming like new in no time.
Silver jewelry has been cherished for centuries, adorning royalty and commoners alike. From ancient Egyptian necklaces to Victorian lockets, silver holds a special place in our hearts and our history. But let’s face it, tarnish happens. That dull, dark film can make even the most beautiful piece look tired and neglected.
Why is this DIY approach so important? Well, for starters, it’s incredibly cost-effective. You likely already have everything you need in your pantry! Plus, many commercial jewelry cleaners contain harsh chemicals that can actually damage your silver over time. These DIY methods are gentler, safer, and just as effective. So, ditch the expensive cleaners and get ready to learn how to clean silver jewelry at home with these simple, yet powerful, hacks. I promise, you’ll be amazed at the results!
DIY Silver Jewelry Cleaning: Restore Your Shine!
Hey there, fellow jewelry lovers! Are your favorite silver pieces looking a little dull and lackluster? Don’t despair! You don’t need to spend a fortune on professional cleaning services or harsh chemicals. I’m going to show you a super easy and effective way to clean your silver jewelry right at home using things you probably already have in your kitchen. Get ready to bring back that dazzling shine!
What You’ll Need: The Supplies
Before we dive in, let’s gather everything we need. This is a pretty simple process, so the list is short and sweet:
* A non-reactive container (glass, ceramic, or plastic – avoid metal).
* Aluminum foil.
* Baking soda.
* Salt (table salt works just fine).
* Boiling water.
* A soft cloth or polishing cloth.
* An old toothbrush (soft bristles are key!).
* Tongs or tweezers (optional, but helpful for retrieving small pieces).
The Science Behind the Sparkle
Okay, a little bit of science! Silver tarnishes because it reacts with sulfur compounds in the air, forming silver sulfide, which is that dark, dull coating you see. This DIY method uses a chemical reaction to reverse that process. The aluminum foil attracts the sulfur from the silver sulfide, transferring it to the foil and leaving your silver clean and shiny. Pretty cool, right?
Step-by-Step Cleaning Guide
Alright, let’s get down to business! Follow these steps carefully, and you’ll be amazed at the results.
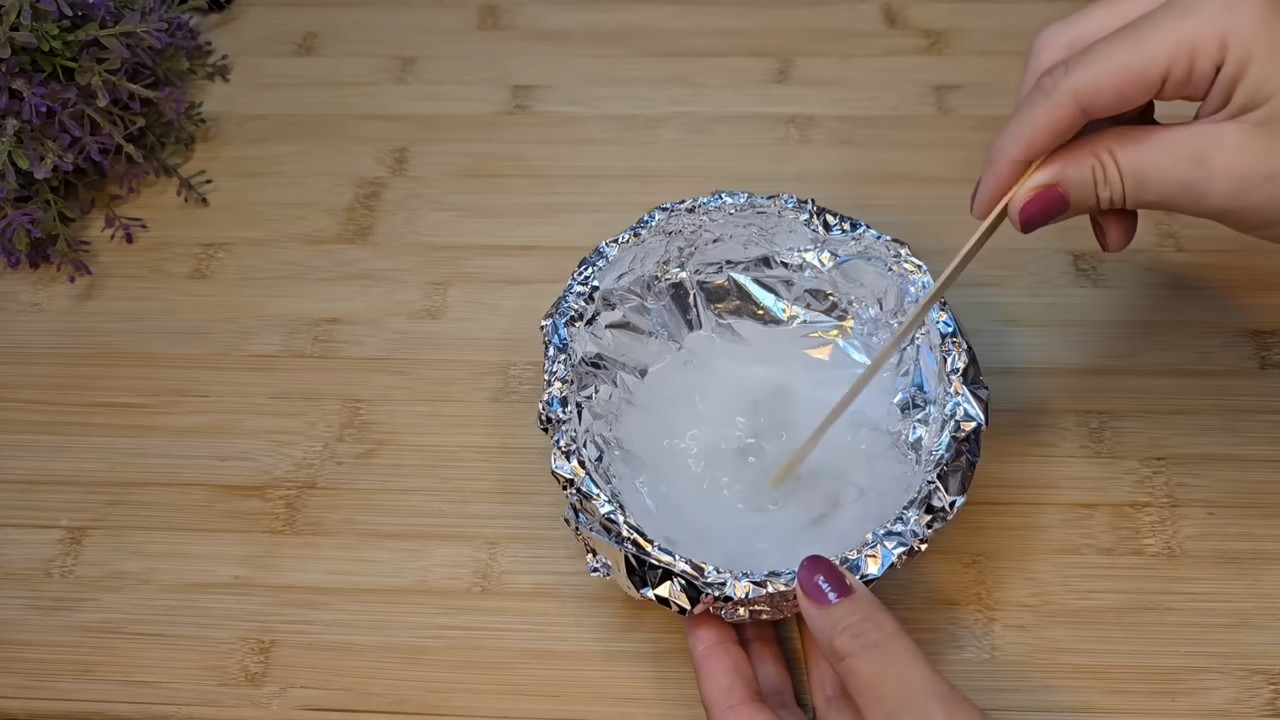
1. Prepare the Cleaning Solution: Line your non-reactive container with aluminum foil, shiny side up. Make sure the foil covers the entire bottom and sides of the container. This is crucial for the chemical reaction to work properly.
2. Add the Baking Soda and Salt: Pour in one tablespoon of baking soda and one tablespoon of salt for every cup of boiling water you’ll be using. The amount of water will depend on the size of your container and the amount of jewelry you’re cleaning.
3. Pour in the Boiling Water: Carefully pour the boiling water into the container. Be extremely cautious to avoid burns. The mixture will fizz a bit as the baking soda and salt dissolve.
4. Submerge Your Silver Jewelry: Gently place your silver jewelry into the solution, making sure each piece is touching the aluminum foil. This contact is essential for the tarnish removal process. Don’t overcrowd the container; if you have a lot of jewelry, you might want to do it in batches.
5. Let it Soak: Let the jewelry soak in the solution for 5-10 minutes. The amount of time needed will depend on the level of tarnish. You should start to see the tarnish disappearing and transferring to the aluminum foil. For heavily tarnished pieces, you might need to let them soak a little longer, but keep a close eye on them.
6. Remove and Rinse: Using tongs or tweezers (or carefully pouring the water out), remove the jewelry from the solution. Rinse each piece thoroughly under cool running water to remove any residue from the baking soda and salt.
7. Dry and Polish: Use a soft cloth or polishing cloth to gently dry and polish each piece of jewelry. This will help restore the shine and remove any remaining water spots.
8. Tackle Stubborn Spots: If you have any stubborn tarnish spots that didn’t come off completely, use an old toothbrush with soft bristles to gently scrub the area. You can dip the toothbrush in a little bit of the baking soda paste (mix baking soda with a tiny bit of water) for extra cleaning power. Be very gentle to avoid scratching the silver.
Dealing with Gemstones and Pearls
Now, a word of caution! This method is generally safe for most silver jewelry, but you need to be extra careful with pieces that have gemstones or pearls. The heat and the chemical reaction can potentially damage delicate stones.
* Gemstones: Some gemstones, like opals, emeralds, and turquoise, are particularly sensitive to heat and chemicals. If your jewelry has these stones, it’s best to avoid submerging them in the boiling water solution. Instead, you can try spot cleaning the silver parts with a soft cloth and a silver polishing solution specifically designed for jewelry with gemstones.
* Pearls: Pearls are very delicate and can be easily damaged by harsh chemicals and heat. Never submerge pearls in the boiling water solution. To clean pearls, gently wipe them with a soft, damp cloth. You can also use a special pearl cleaner if needed.
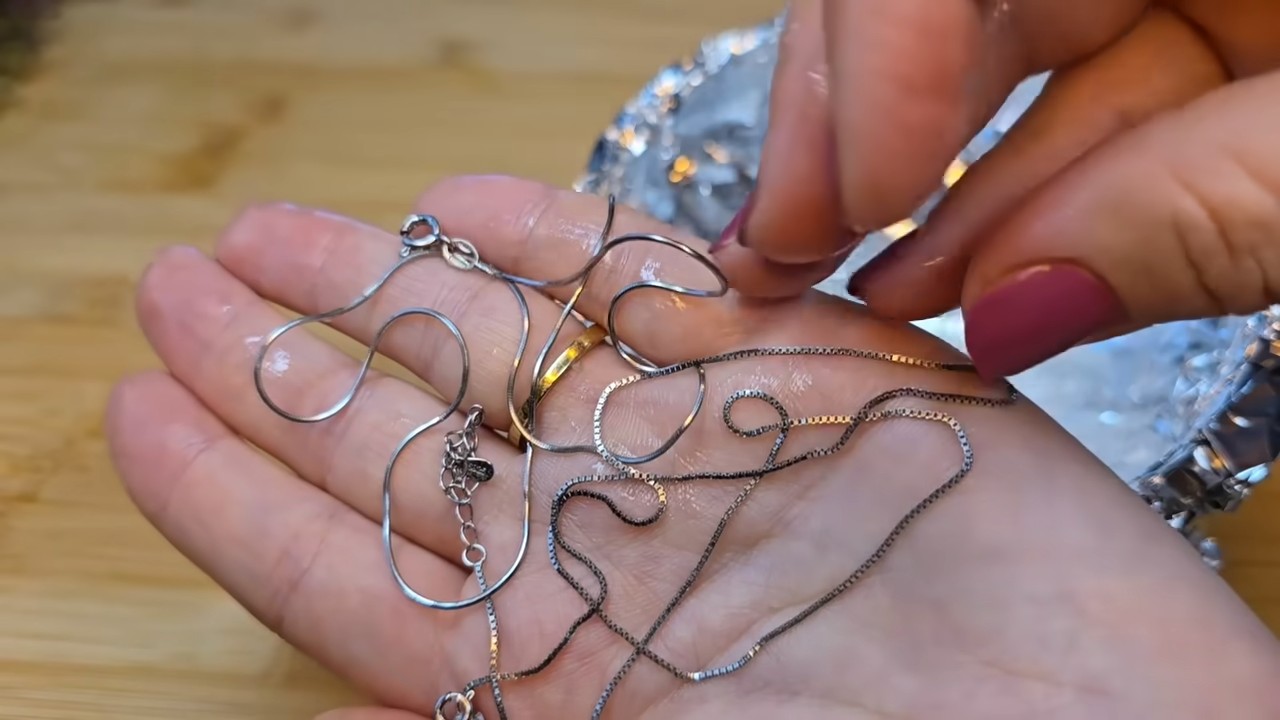
Cleaning Silver Chains
Silver chains can be a bit tricky to clean because of all the tiny links. Here’s a tip for cleaning chains effectively:
1. Use a Small Container: Choose a small container that’s just big enough to hold the chain. This will ensure that the chain is fully submerged in the cleaning solution.
2. Shake Gently: After submerging the chain, gently shake the container to help the solution reach all the nooks and crannies between the links.
3. Use a Soft Brush: If there’s still some tarnish stuck in the links, use a soft brush (like an old toothbrush) to gently scrub the chain.
4. Rinse Thoroughly: Rinse the chain very thoroughly under running water to remove all traces of the cleaning solution.
5. Dry Carefully: Lay the chain flat on a soft cloth to dry completely. You can also use a hairdryer on a low, cool setting to speed up the drying process.
Preventing Tarnish in the Future
Okay, now that your silver is sparkling again, let’s talk about how to keep it that way! Here are a few tips to help prevent tarnish:
* Store Your Silver Properly: Store your silver jewelry in airtight bags or containers to minimize exposure to air and moisture. You can also add a small piece of chalk or a silica gel packet to the container to absorb moisture.
* Avoid Contact with Chemicals: Remove your silver jewelry before showering, swimming, or using household cleaners. Chemicals like chlorine, bleach, and hairspray can accelerate tarnishing.
* Wear Your Silver Regularly: Surprisingly, wearing your silver jewelry can actually help prevent tarnish! The friction from wearing it helps to polish the surface and remove any developing tarnish.
* Polish Regularly: Use a silver polishing cloth to gently polish your silver jewelry every few weeks. This will help remove any early signs of tarnish and keep your silver looking its best.
Troubleshooting: What if it Doesn’t Work?
Sometimes, despite our best efforts, the tarnish just won’t budge. Here are a few things to consider if your silver isn’t getting clean:
* Not Enough Contact with Aluminum Foil: Make sure that every piece of jewelry is touching the aluminum foil. If there’s no contact, the chemical reaction won’t occur.
* Not Enough Baking Soda and Salt: Use the correct proportions of baking soda and salt to water. If you don’t use enough, the solution won’t be strong enough to remove the tarnish.
* Not Hot Enough Water: The water needs to be boiling hot for the reaction to work effectively.
* Heavily Tarnished Silver: If your silver is extremely tarnished, you might need to repeat the cleaning process or try a stronger silver cleaning solution.
* It’s Not Really Silver: Sometimes, what looks like silver is actually a silver-plated base metal. If the plating is worn away, the base metal underneath can tarnish differently and may not respond to this cleaning method.
A Note on Safety
While this DIY cleaning method is generally safe, it’s important to take a few precautions:
* Use Boiling Water Carefully: Be extremely careful when handling boiling water to avoid burns.
* Avoid Contact with Eyes: Avoid getting the cleaning solution in your eyes. If you do, rinse immediately with plenty of water.
* Ventilate the Area: Work in a well-ventilated area to avoid inhaling any fumes from the cleaning solution.
* Keep Out of Reach of Children and Pets: Keep all cleaning supplies out of reach of children and pets.
Final Thoughts
And there you have it! A simple, effective, and affordable way to clean your silver jewelry at home. I hope this guide has been helpful, and that your silver is now sparkling like new. Remember to take good care of your jewelry to prevent tarnish in the future, and enjoy wearing your beautiful, shiny pieces! Happy cleaning!
Conclusion
So, there you have it! This simple, effective, and surprisingly affordable DIY trick for cleaning silver jewelry at home is a game-changer. Forget expensive jewelry cleaners filled with harsh chemicals. Forget the tedious scrubbing that never seems to get into all the nooks and crannies. This method harnesses the power of basic household ingredients to restore the shine and luster to your beloved silver pieces, making them look as good as new.
Why is this a must-try? Because it’s not just about saving money; it’s about convenience and control. You can clean your silver jewelry whenever you want, without having to make a trip to the store or worry about damaging delicate pieces with abrasive cleaners. Plus, you likely already have everything you need in your pantry!
But the beauty of this DIY method lies in its adaptability. While the baking soda, aluminum foil, and hot water combination is a powerhouse, you can tailor it to your specific needs. For instance, if you’re dealing with heavily tarnished pieces, you might want to add a tablespoon of salt to the solution to boost its cleaning power. Alternatively, for particularly intricate designs, consider using a soft-bristled toothbrush to gently scrub away any remaining tarnish after the initial soak.
Another variation involves using a glass or ceramic dish instead of an aluminum one. While the aluminum foil is crucial for the chemical reaction that removes the tarnish, some people prefer to avoid direct contact between the jewelry and the foil. In this case, line the dish with aluminum foil, ensuring the jewelry is in contact with the foil through the solution.
For those with sensitive skin, wearing gloves during the process is always a good idea. Although the ingredients are generally safe, prolonged exposure to baking soda can sometimes cause irritation.
Ultimately, the key to success with this DIY silver cleaning method is experimentation. Don’t be afraid to adjust the soaking time or the amount of baking soda to find what works best for your specific jewelry and level of tarnish. Remember to always rinse your jewelry thoroughly with clean water and dry it completely with a soft cloth to prevent water spots.
We are confident that once you try this method, you’ll be amazed by the results. It’s a simple, effective, and safe way to keep your silver jewelry looking its best. So, gather your supplies, give it a try, and prepare to be impressed!
We encourage you to share your experiences with this DIY trick in the comments below. Let us know what worked for you, what variations you tried, and any tips you have for other readers. Your feedback is invaluable and helps us all learn and improve together. Show off your sparkling silver and let’s keep those precious pieces shining bright! This is the best way to clean silver jewelry at home.
Frequently Asked Questions (FAQ)
Q: What kind of silver jewelry can I clean with this method?
A: This method is generally safe for most types of silver jewelry, including sterling silver, silver-plated items, and even some pieces with gemstones. However, it’s always a good idea to test a small, inconspicuous area first, especially if your jewelry contains delicate or porous gemstones like pearls, opals, or turquoise. These stones can be damaged by prolonged exposure to water and baking soda. Avoid using this method on antique silver pieces with a deliberate patina, as it may remove the desired aged look.
Q: How does this DIY cleaning method actually work?
A: The magic lies in a chemical reaction called ion exchange. Tarnish on silver is primarily silver sulfide, which forms when silver reacts with sulfur in the air. The aluminum foil acts as a sacrificial metal. When the silver jewelry and aluminum foil are submerged in the hot water and baking soda solution, a galvanic cell is created. The baking soda acts as an electrolyte, facilitating the transfer of electrons. The silver sulfide on the jewelry reacts with the aluminum, causing the sulfur to transfer from the silver to the aluminum. This effectively reverses the tarnishing process, leaving you with clean silver and a darkened aluminum foil.
Q: How long should I soak my silver jewelry in the solution?
A: The soaking time depends on the level of tarnish. For lightly tarnished pieces, 5-10 minutes may be sufficient. For heavily tarnished items, you may need to soak them for up to 30 minutes or even longer. Check the jewelry periodically to monitor the progress. You’ll notice the tarnish transferring to the aluminum foil. If the foil becomes heavily discolored and the jewelry isn’t clean, you may need to replace the foil and the solution.
Q: Can I reuse the baking soda solution and aluminum foil?
A: No, it’s best to use fresh baking soda solution and aluminum foil for each cleaning session. The solution becomes less effective as it becomes saturated with sulfur, and the aluminum foil loses its ability to attract the tarnish.
Q: What if some tarnish remains after soaking?
A: If some tarnish persists, gently scrub the jewelry with a soft-bristled toothbrush and a paste made from baking soda and water. Be careful not to scratch the silver. Rinse thoroughly with clean water and dry completely.
Q: Is this method safe for jewelry with gemstones?
A: As mentioned earlier, exercise caution when cleaning jewelry with gemstones. Avoid soaking pieces with porous or delicate stones like pearls, opals, or turquoise. For these items, it’s best to use a damp, soft cloth to gently wipe the silver parts, avoiding contact with the stones. You can also use a specialized jewelry cleaner specifically designed for gemstones.
Q: How can I prevent my silver jewelry from tarnishing in the future?
A: Prevention is key! Store your silver jewelry in airtight containers or zip-lock bags to minimize exposure to air and moisture. You can also add anti-tarnish strips or cloths to the storage containers. Avoid wearing your silver jewelry while swimming, showering, or doing household chores, as exposure to chlorine, soap, and other chemicals can accelerate tarnishing. Regularly wipe your silver jewelry with a soft, dry cloth to remove any oils or dirt.
Q: Can I use this method to clean silver flatware or other silver items besides jewelry?
A: Yes, this method can be used to clean silver flatware and other silver items as well. Just make sure the item fits comfortably in the container and is in contact with the aluminum foil through the solution. For larger items, you may need to use a larger container and more baking soda and water.
Q: What type of aluminum foil should I use?
A: Regular household aluminum foil works perfectly fine. There’s no need to use heavy-duty foil. The important thing is that the foil is clean and free of any grease or residue.
Q: My silver jewelry has a black coating after cleaning. What happened?
A: This is likely silver sulfide that has been loosened but not completely removed. Try soaking the jewelry again with fresh solution and foil. If that doesn’t work, gently polish the jewelry with a silver polishing cloth.
Q: Can I use this method on gold jewelry?
A: While baking soda is generally safe for gold, it’s not the most effective cleaning method. For gold jewelry, it’s best to use a mild soap and water solution or a specialized gold jewelry cleaner.
Q: What if I don’t have baking soda? Can I use something else?
A: Baking soda is the key ingredient in this method. While some people suggest using washing soda (sodium carbonate) as an alternative, it’s more alkaline and can be harsher on delicate jewelry. It’s best to stick with baking soda for the safest and most effective results.
Q: Is there any risk of damaging my silver jewelry with this method?
A: When used correctly, this method is generally safe for most silver jewelry. However, it’s always a good idea to test a small, inconspicuous area first, especially if you’re unsure about the composition of your jewelry or if it contains delicate gemstones. Avoid prolonged soaking or excessive scrubbing, as this can potentially damage the surface of the silver.

Leave a Comment