
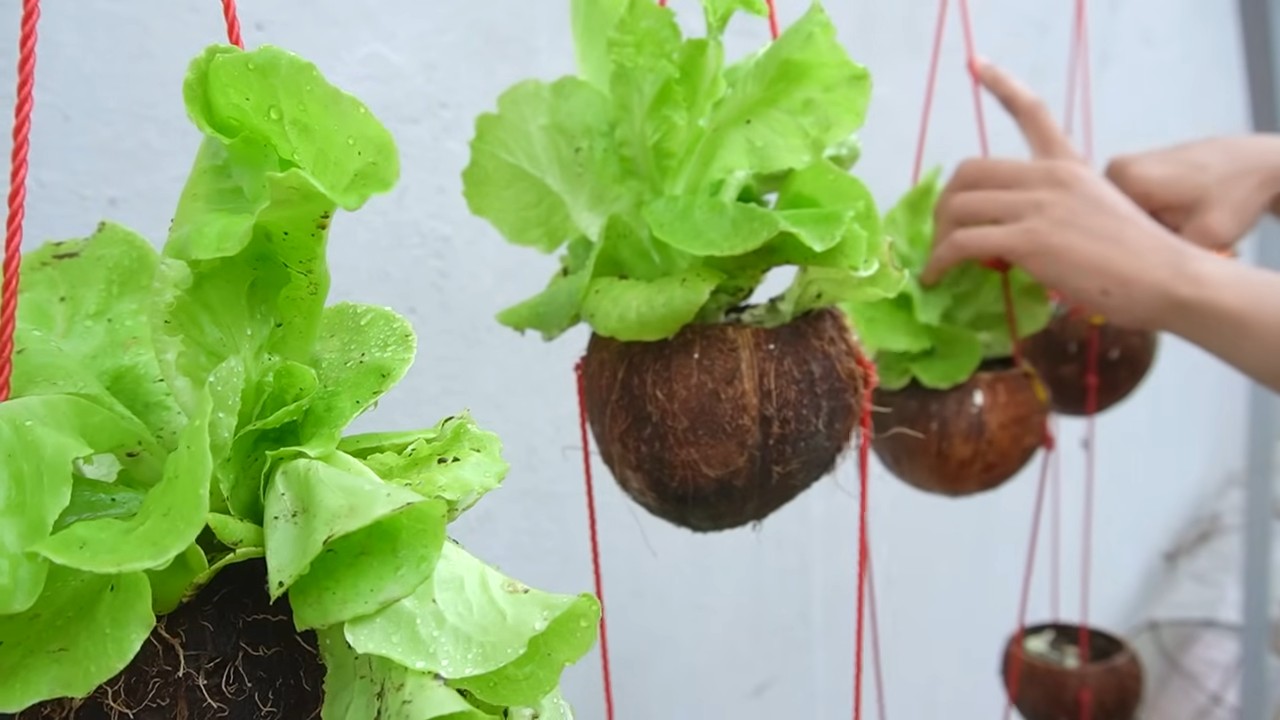
Coconut shell lettuce growing – sounds intriguing, right? I’m so excited to share this incredibly fun and sustainable DIY project with you! Forget those boring plastic pots; we’re going back to nature with a touch of tropical flair.
For centuries, resourceful gardeners around the world have utilized readily available materials for planting. Think about it – gourds, hollowed-out logs, even discarded shoes have found new life as planters. This tradition of repurposing and connecting with nature is something I deeply admire, and it’s what inspired me to explore coconut shell lettuce growing.
Why should you try this? Well, besides being incredibly eco-friendly (we’re talking about reducing waste!), coconut shells offer excellent drainage and aeration for your lettuce. Plus, let’s be honest, they look absolutely adorable! Imagine a cluster of vibrant green lettuce heads nestled in these rustic, natural containers. It’s a conversation starter and a beautiful addition to any balcony, patio, or even indoor windowsill.
But the real reason I think you’ll love this is because it’s so darn easy! Whether you’re a seasoned gardener or just starting out, coconut shell lettuce growing is a project you can tackle with confidence. I’m going to walk you through every step, from preparing the shells to harvesting your delicious, homegrown lettuce. Get ready to unleash your inner DIY enthusiast and enjoy the freshest lettuce you’ve ever tasted!
Kokosnussschalen-Salatgarten: Dein DIY-Leitfaden für Mini-Gemüsegärten
Hallo liebe Gartenfreunde! Habt ihr euch jemals gefragt, was ihr mit den leeren Kokosnussschalen anfangen sollt, nachdem ihr das köstliche Kokoswasser und -fleisch genossen habt? Wegwerfen? Bloß nicht! Wir verwandeln sie in bezaubernde Mini-Salatgärten! Dieser DIY-Hack ist nicht nur super nachhaltig, sondern auch eine tolle Möglichkeit, frischen Salat auf kleinstem Raum anzubauen – perfekt für Balkone, Fensterbänke oder sogar die Küchentheke. Lasst uns gemeinsam loslegen!
Was du brauchst: Die Materialliste
Bevor wir starten, hier eine Liste aller Materialien, die du für dein Kokosnussschalen-Salatgarten-Projekt benötigst:
* Leere Kokosnussschalen: Am besten halbiert und gründlich gereinigt. Achte darauf, dass keine Kokosfleischreste mehr vorhanden sind.
* Bohrmaschine mit Holzbohrer: Für die Entwässerungslöcher.
* Blumenerde: Hochwertige Blumenerde ist entscheidend für das Wachstum deines Salats.
* Salatsamen: Wähle deine Lieblingssorten! Pflücksalat, Rucola oder Feldsalat eignen sich besonders gut.
* Kleine Schaufel oder Löffel: Zum Befüllen der Kokosnussschalen mit Erde.
* Sprühflasche: Zum sanften Bewässern der Samen und jungen Pflanzen.
* Optional: Kokosfaser-Substrat (Coco Coir) zur Verbesserung der Drainage und Belüftung.
* Optional: Kleine Kieselsteine oder Tonscherben für den Boden der Kokosnussschale (zusätzliche Drainage).
* Optional: Klarlack oder Holzöl zur Versiegelung der Kokosnussschale (für längere Haltbarkeit).
Schritt-für-Schritt-Anleitung: Vom Abfall zum Salatparadies
Hier ist eine detaillierte Anleitung, wie du deine Kokosnussschalen in kleine Salatgärten verwandelst:
1. Vorbereitung der Kokosnussschalen:
* Reinigung: Stelle sicher, dass die Kokosnussschalen sauber und frei von Kokosfleischresten sind. Spüle sie gründlich mit warmem Wasser und etwas Spülmittel aus.
* Trocknung: Lasse die Schalen vollständig trocknen, bevor du mit dem nächsten Schritt fortfährst.
* Optional: Versiegelung: Wenn du möchtest, dass deine Kokosnussschalen länger halten, kannst du sie mit Klarlack oder Holzöl versiegeln. Trage eine dünne Schicht auf und lasse sie gut trocknen. Dies schützt das Material vor Feuchtigkeit und Verrottung.
2. Entwässerungslöcher bohren:
* Positionierung: Bohre mit der Bohrmaschine und einem Holzbohrer (ca. 5-8 mm Durchmesser) 3-4 kleine Löcher in den Boden jeder Kokosnussschale. Diese Löcher sind wichtig, damit überschüssiges Wasser ablaufen kann und die Wurzeln nicht faulen.
* Sicherheit: Trage beim Bohren eine Schutzbrille, um deine Augen vor Holzspänen zu schützen.
* Vorsicht: Bohre vorsichtig, um die Kokosnussschale nicht zu beschädigen. Übe nicht zu viel Druck aus.
3. Vorbereitung des Pflanzgefäßes:
* Drainageschicht: Lege eine dünne Schicht Kieselsteine oder Tonscherben auf den Boden jeder Kokosnussschale. Dies verbessert die Drainage zusätzlich und verhindert Staunässe.
* Optional: Kokosfaser-Substrat: Mische etwas Kokosfaser-Substrat (Coco Coir) unter die Blumenerde. Dies verbessert die Belüftung und Wasserspeicherung des Bodens.
4. Befüllen mit Erde:
* Füllhöhe: Fülle die Kokosnussschalen mit Blumenerde, bis etwa 2-3 cm unter dem Rand. Drücke die Erde leicht an.
* Qualität: Verwende hochwertige Blumenerde, die speziell für den Anbau von Gemüse geeignet ist.
5. Aussaat der Salatsamen:
* Aussaat: Streue die Salatsamen gleichmäßig über die Oberfläche der Erde. Beachte die Anweisungen auf der Samenpackung bezüglich der Aussaattiefe und des Abstands zwischen den Samen.
* Bedecken: Bedecke die Samen mit einer dünnen Schicht Erde (ca. 0,5 cm).
* Andrücken: Drücke die Erde leicht an, um einen guten Kontakt zwischen Samen und Erde zu gewährleisten.
6. Bewässerung:
* Sanftes Gießen: Befeuchte die Erde vorsichtig mit einer Sprühflasche. Vermeide es, die Samen wegzuspülen.
* Feuchtigkeit: Halte die Erde feucht, aber nicht nass.
7. Standortwahl:
* Licht: Stelle die Kokosnussschalen an einen hellen Ort, der mindestens 6 Stunden Sonnenlicht pro Tag erhält. Ein Südfenster oder ein sonniger Balkon sind ideal.
* Temperatur: Salatsamen keimen am besten bei Temperaturen zwischen 15 und 20 Grad Celsius.
8. Pflege:
* Bewässerung: Gieße die Salatpflanzen regelmäßig, sobald die oberste Erdschicht trocken ist. Vermeide Staunässe.
* Düngen: Dünge die Salatpflanzen alle 2-3 Wochen mit einem organischen Flüssigdünger. Beachte die Anweisungen auf der Düngerpackung.
* Unkraut entfernen: Entferne regelmäßig Unkraut, das in den Kokosnussschalen wächst.
* Schutz vor Schädlingen: Kontrolliere die Salatpflanzen regelmäßig auf Schädlinge wie Blattläuse oder Schnecken. Bei Bedarf kannst du biologische Schädlingsbekämpfungsmittel einsetzen.
9. Ernte:
* Erntezeitpunkt: Pflücksalat kann geerntet werden, sobald die Blätter eine ausreichende Größe erreicht haben. Schneide die äußeren Blätter ab, während die inneren Blätter weiterwachsen.
* Erntemethode: Schneide die Blätter mit einer Schere oder einem Messer ab.
* Genießen: Genieße deinen selbstgezogenen Salat!
Zusätzliche Tipps und Tricks: Für einen noch erfolgreicheren Salatgarten
* Sortenwahl: Experimentiere mit verschiedenen Salatsorten, um herauszufinden, welche dir am besten schmecken und in deinen Kokosnussschalen am besten wachsen.
* Fruchtfolge: Pflanze nach der Salaternte andere Gemüsearten in die Kokosnussschalen, um den Boden nicht einseitig zu belasten.
* Upcycling: Verwende alte Joghurtbecher oder andere kleine Behälter als Untersetzer für die Kokosnussschalen, um überschüssiges Wasser aufzufangen.
* Dekoration: Bemale die Kokosnussschalen mit bunten Farben oder Mustern, um deinen Salatgarten noch attraktiver zu gestalten.
* Vertikaler Garten: Befestige die Kokosnussschalen an einer Wand oder einem Zaun, um einen vertikalen Salatgarten zu schaffen.
Häufige Probleme und Lösungen: Damit dein Salat prächtig gedeiht
* Gelbe Blätter: Gelbe Blätter können ein Zeichen für Nährstoffmangel sein. Dünge die Salatpflanzen mit einem organischen Flüssigdünger.
* Schimmel: Schimmelbildung kann durch zu hohe Luftfeuchtigkeit oder Staunässe verursacht werden. Sorge für eine gute Belüftung und vermeide es, die Erde zu stark zu gießen.
* Schädlinge: Kontrolliere die Salatpflanzen regelmäßig auf Schädlinge und bekämpfe sie bei Bedarf mit biologischen Schädlingsbekämpfungsmitteln.
* Langsames Wachstum: Langsames Wachstum kann durch zu wenig Licht oder Nährstoffmangel verursacht werden. Stelle die Kokosnussschalen an einen helleren Ort und dünge die Salatpflanzen.
Ich hoffe, diese Anleitung hilft dir dabei, deinen eigenen kleinen Kokosnussschalen-Salat

Conclusion
So, there you have it! Transforming discarded coconut shells into charming and functional lettuce planters is not just a sustainable practice; it’s a rewarding and surprisingly simple way to bring fresh, homegrown greens right to your doorstep. We’ve explored how this DIY project breathes new life into what would otherwise be waste, turning it into a miniature ecosystem perfect for nurturing your favorite lettuce varieties.
But why is this coconut shell lettuce growing trick a must-try? Beyond the obvious environmental benefits of reducing waste and embracing upcycling, it offers a unique aesthetic appeal. Imagine a collection of these rustic, natural planters adorning your balcony, patio, or even a sunny windowsill. They add a touch of tropical charm and a conversation-starting element to your garden. More importantly, the coconut shell itself provides excellent drainage and aeration for the lettuce roots, contributing to healthier and more robust growth.
The beauty of this project lies in its adaptability. Feel free to experiment with different types of lettuce. Consider planting a mix of leafy greens like romaine, butterhead, and red leaf lettuce for a colorful and diverse harvest. You can also explore companion planting by adding herbs like basil or chives to your coconut shell planters. These herbs not only enhance the flavor of your lettuce but also help deter pests naturally.
For a more decorative touch, consider painting the coconut shells with non-toxic, weather-resistant paints. You can create intricate designs, add vibrant colors, or simply apply a clear coat to enhance the natural beauty of the shell. Another variation involves creating a hanging garden by attaching ropes or chains to the coconut shells, allowing you to suspend them from a balcony railing or pergola. This is a particularly effective solution for those with limited space.
Don’t be afraid to get creative with your soil mixture as well. While a standard potting mix works well, you can enrich it with compost or worm castings to provide your lettuce with an extra boost of nutrients. Consider adding a layer of coconut coir to the bottom of the shell to improve water retention and drainage.
We are confident that you’ll find this DIY project both enjoyable and fulfilling. It’s a fantastic way to connect with nature, reduce your environmental footprint, and enjoy the delicious taste of homegrown lettuce. So, gather your coconut shells, grab your gardening tools, and embark on this exciting adventure.
We encourage you to try this coconut shell lettuce growing method and share your experiences with us! Post pictures of your creations on social media using [Your Hashtag Here] and let us know what lettuce varieties you’re growing and any variations you’ve tried. We’re eager to see your creative interpretations and learn from your successes. Happy gardening!
Frequently Asked Questions (FAQ)
1. What kind of coconut shells are best for this project?
Ideally, you want to use mature coconut shells that are relatively intact. After consuming the coconut meat and water, carefully clean the shell, removing any remaining flesh or fibers. Ensure the shell is thoroughly dried before proceeding. Avoid using shells that are cracked or damaged, as they may not be able to hold the soil and plants effectively. Half shells are the easiest to work with, but you can also use whole shells if you create drainage holes in the bottom.
2. How do I prepare the coconut shell for planting?
Preparing the coconut shell is crucial for the success of your lettuce garden. First, thoroughly clean the shell with warm, soapy water to remove any residue. Next, drill drainage holes in the bottom of the shell to prevent waterlogging. The number and size of the holes will depend on the size of the shell, but aim for at least three to four holes that are about ¼ inch in diameter. If you’re using a whole shell, you’ll need to create a larger opening at the top for planting. You can use a saw or a sturdy knife to carefully cut the shell to your desired size and shape. Be cautious when working with sharp tools and wear appropriate safety gear.
3. What type of soil should I use for growing lettuce in coconut shells?
A well-draining potting mix is ideal for growing lettuce in coconut shells. You can purchase a pre-made potting mix from your local garden center or create your own by combining equal parts of peat moss, perlite, and vermiculite. Adding compost or worm castings to the mix will provide your lettuce with essential nutrients and improve soil fertility. Avoid using garden soil, as it can be too heavy and may not drain well, leading to root rot.
4. How often should I water my lettuce plants in coconut shells?
The frequency of watering will depend on the weather conditions, the type of soil you’re using, and the size of the coconut shell. Generally, you should water your lettuce plants when the top inch of soil feels dry to the touch. Avoid overwatering, as this can lead to root rot. Water thoroughly, ensuring that the water drains out of the drainage holes. During hot and dry weather, you may need to water your plants more frequently.
5. What kind of lettuce varieties are best suited for growing in coconut shells?
Many lettuce varieties thrive in coconut shells. Leaf lettuce varieties, such as romaine, butterhead, and red leaf lettuce, are particularly well-suited for container gardening. These varieties are relatively compact and can be harvested continuously as needed. Other options include loose-leaf lettuce varieties like Black Seeded Simpson and Salad Bowl. Avoid growing head lettuce varieties, such as iceberg lettuce, as they require more space and may not thrive in the limited confines of a coconut shell.
6. How much sunlight do lettuce plants need when grown in coconut shells?
Lettuce plants require at least six hours of sunlight per day to thrive. Place your coconut shell planters in a location that receives ample sunlight, such as a sunny balcony, patio, or windowsill. If you live in a particularly hot climate, provide some afternoon shade to prevent the lettuce leaves from wilting or burning.
7. How do I fertilize my lettuce plants in coconut shells?
Lettuce plants are relatively light feeders, but they still benefit from regular fertilization. You can use a liquid fertilizer specifically formulated for leafy greens, following the instructions on the label. Alternatively, you can amend the soil with compost or worm castings every few weeks to provide your lettuce with a slow-release source of nutrients. Avoid over-fertilizing, as this can lead to leggy growth and bitter-tasting leaves.
8. How do I protect my lettuce plants from pests and diseases?
Regularly inspect your lettuce plants for signs of pests or diseases. Common pests that affect lettuce include aphids, slugs, and snails. You can control these pests by handpicking them off the plants, using insecticidal soap, or applying diatomaceous earth. To prevent fungal diseases, ensure that your lettuce plants have good air circulation and avoid overwatering. If you notice any signs of disease, remove the affected leaves immediately.
9. How do I harvest lettuce from my coconut shell planters?
You can begin harvesting lettuce leaves as soon as they are large enough to eat. Simply snip off the outer leaves with scissors or a knife, leaving the inner leaves to continue growing. This cut-and-come-again method allows you to harvest lettuce continuously over several weeks. Harvest lettuce in the morning, when the leaves are crisp and flavorful.
10. How long will my lettuce plants last in coconut shells?
The lifespan of your lettuce plants will depend on the variety you’re growing and the growing conditions. Generally, lettuce plants will last for several weeks to a few months before bolting (going to seed). Bolting is triggered by hot weather and long days. Once lettuce plants bolt, the leaves become bitter and unpalatable. To extend the lifespan of your lettuce plants, provide them with shade during hot weather and harvest them regularly. You can also succession plant by sowing new seeds every few weeks to ensure a continuous supply of fresh lettuce.
Leave a Comment