
Container Potato Growing: Imagine harvesting a bounty of fresh, homegrown potatoes right from your patio or balcony! No sprawling garden needed. This DIY guide unlocks the secrets to successful container potato growing, a method that’s perfect for urban dwellers, apartment residents, or anyone with limited space.
Growing potatoes in containers isn’t just a modern convenience; it’s a revival of resourceful gardening techniques. Historically, potatoes have been a staple crop, feeding communities for centuries. From the Andean highlands where they originated to the Irish potato famine that shaped history, potatoes have always been deeply intertwined with human survival and culture. Now, we’re adapting this essential food source to fit our modern lifestyles.
Why should you embrace container potato growing? Well, for starters, it’s incredibly rewarding! There’s nothing quite like digging into a container and unearthing your own homegrown treasure. But beyond the satisfaction, it’s also a fantastic way to control soil quality, prevent pests and diseases, and enjoy fresh, organic potatoes without the back-breaking labor of traditional gardening. Plus, it’s a fun and educational activity for the whole family. I’m excited to share these simple yet effective DIY tricks that will have you harvesting delicious potatoes in no time!
Grow Your Own Spuds: A Beginner’s Guide to Container Potato Gardening
Hey there, fellow gardening enthusiasts! Ever dreamt of digging up your own fresh, homegrown potatoes? Well, you don’t need acres of land to make that dream a reality. Container potato gardening is a fantastic way to grow delicious potatoes, even if you only have a small balcony or patio. I’m going to walk you through everything you need to know to get started. Trust me, it’s easier than you think, and the reward of harvesting your own potatoes is incredibly satisfying!
What You’ll Need: The Potato Gardener’s Toolkit
Before we dive into the nitty-gritty, let’s gather our supplies. Here’s a checklist of everything you’ll need to successfully grow potatoes in containers:
* A Large Container: This is crucial! We’re talking at least a 10-gallon container, but bigger is generally better. Think large buckets, trash cans (with drainage holes!), or even grow bags specifically designed for potatoes. The deeper the container, the more potatoes you’ll harvest.
* Seed Potatoes: These aren’t seeds, but rather potatoes specifically grown for planting. You can find them at your local garden center or online. Choose certified disease-free seed potatoes for the best results.
* Well-Draining Potting Mix: Regular garden soil is too heavy for containers and can compact, hindering potato growth. Opt for a high-quality potting mix that drains well. I like to add some compost for extra nutrients.
* Compost (Optional but Recommended): Compost is like a superfood for your potatoes! It provides essential nutrients and improves soil structure.
* Watering Can or Hose: Potatoes need consistent moisture, so a reliable watering method is essential.
* Fertilizer (Optional): A balanced fertilizer can give your potatoes an extra boost, but it’s not strictly necessary if you’re using good quality potting mix and compost.
* Gardening Gloves: Protect your hands from dirt and potential irritants.
* A Shovel or Trowel: For planting and adding soil.
Choosing the Right Seed Potatoes: Variety is the Spice of Life (and Potatoes!)
Selecting the right seed potato variety is important for success. Consider your climate, taste preferences, and the size of your container. Here are a few popular choices:
* Yukon Gold: These are known for their creamy texture and buttery flavor. They’re a great all-purpose potato.
* Red Pontiac: These have a beautiful red skin and a slightly sweet flavor. They’re excellent for boiling and salads.
* Kennebec: These are a classic baking potato with a fluffy texture.
* Fingerling Potatoes: These are long, slender potatoes with a unique flavor and texture. They’re great roasted or in salads.
Once you’ve chosen your variety, you’ll need to “chit” your seed potatoes.
Chitting Your Seed Potatoes: Giving Them a Head Start
Chitting, or sprouting, your seed potatoes before planting gives them a head start and can result in an earlier harvest. Here’s how to do it:
1. Place your seed potatoes in a cool, bright location: An egg carton or a shallow box works well.
2. Allow them to sit for 2-3 weeks: You’ll notice small, green sprouts (called “eyes”) emerging from the potatoes.
3. Handle them carefully: Avoid breaking off the sprouts.
Planting Your Seed Potatoes: Getting Started
Now for the fun part – planting! Here’s a step-by-step guide:
1. Prepare your container: Make sure your container has adequate drainage holes. If not, drill some.
2. Add a layer of potting mix: Fill the bottom of the container with about 4-6 inches of potting mix.
3. Cut your seed potatoes (if necessary): If your seed potatoes are large (bigger than an egg), you can cut them into smaller pieces, ensuring that each piece has at least one or two “eyes.” Let the cut pieces dry for a day or two to prevent rotting.
4. Plant the seed potatoes: Place the seed potatoes (or pieces) on top of the potting mix, with the “eyes” facing upwards. Space them evenly if you’re planting multiple pieces in one container.
5. Cover with more potting mix: Cover the seed potatoes with another 4-6 inches of potting mix.
6. Water thoroughly: Water the container until the soil is evenly moist but not soggy.
“Hilling” Your Potatoes: The Secret to a Bountiful Harvest
“Hilling” is a crucial technique for growing potatoes in containers. As the potato plants grow, you’ll need to add more soil to the container, burying the stems. This encourages the plant to produce more potatoes along the buried stems.
1. Wait for the shoots to emerge: Once the potato plants have sprouted and are about 6-8 inches tall, it’s time to start hilling.
2. Add more potting mix: Add enough potting mix to cover the stems, leaving only the top few leaves exposed.
3. Repeat the process: Continue hilling every few weeks as the plants grow, until you’ve filled the container almost to the top.
4. Water after hilling: Water the container thoroughly after each hilling session.
Caring for Your Potato Plants: Water, Sun, and Love
Now that your potatoes are planted and hilled, it’s time to provide them with the care they need to thrive.
1. Watering: Potatoes need consistent moisture, especially during flowering and tuber formation. Water deeply whenever the top inch of soil feels dry to the touch. Avoid overwatering, as this can lead to rot.
2. Sunlight: Potatoes need at least 6-8 hours of sunlight per day. Place your container in a sunny location.
3. Fertilizing (Optional): If you’re using a balanced fertilizer, follow the instructions on the package. Avoid over-fertilizing, as this can lead to excessive foliage growth at the expense of tuber production.
4. Pest Control: Keep an eye out for pests like aphids, potato beetles, and flea beetles. Handpick them off the plants or use an organic insecticide if necessary.
5. Disease Prevention: Ensure good air circulation around the plants to prevent fungal diseases. Avoid overhead watering, which can promote disease.
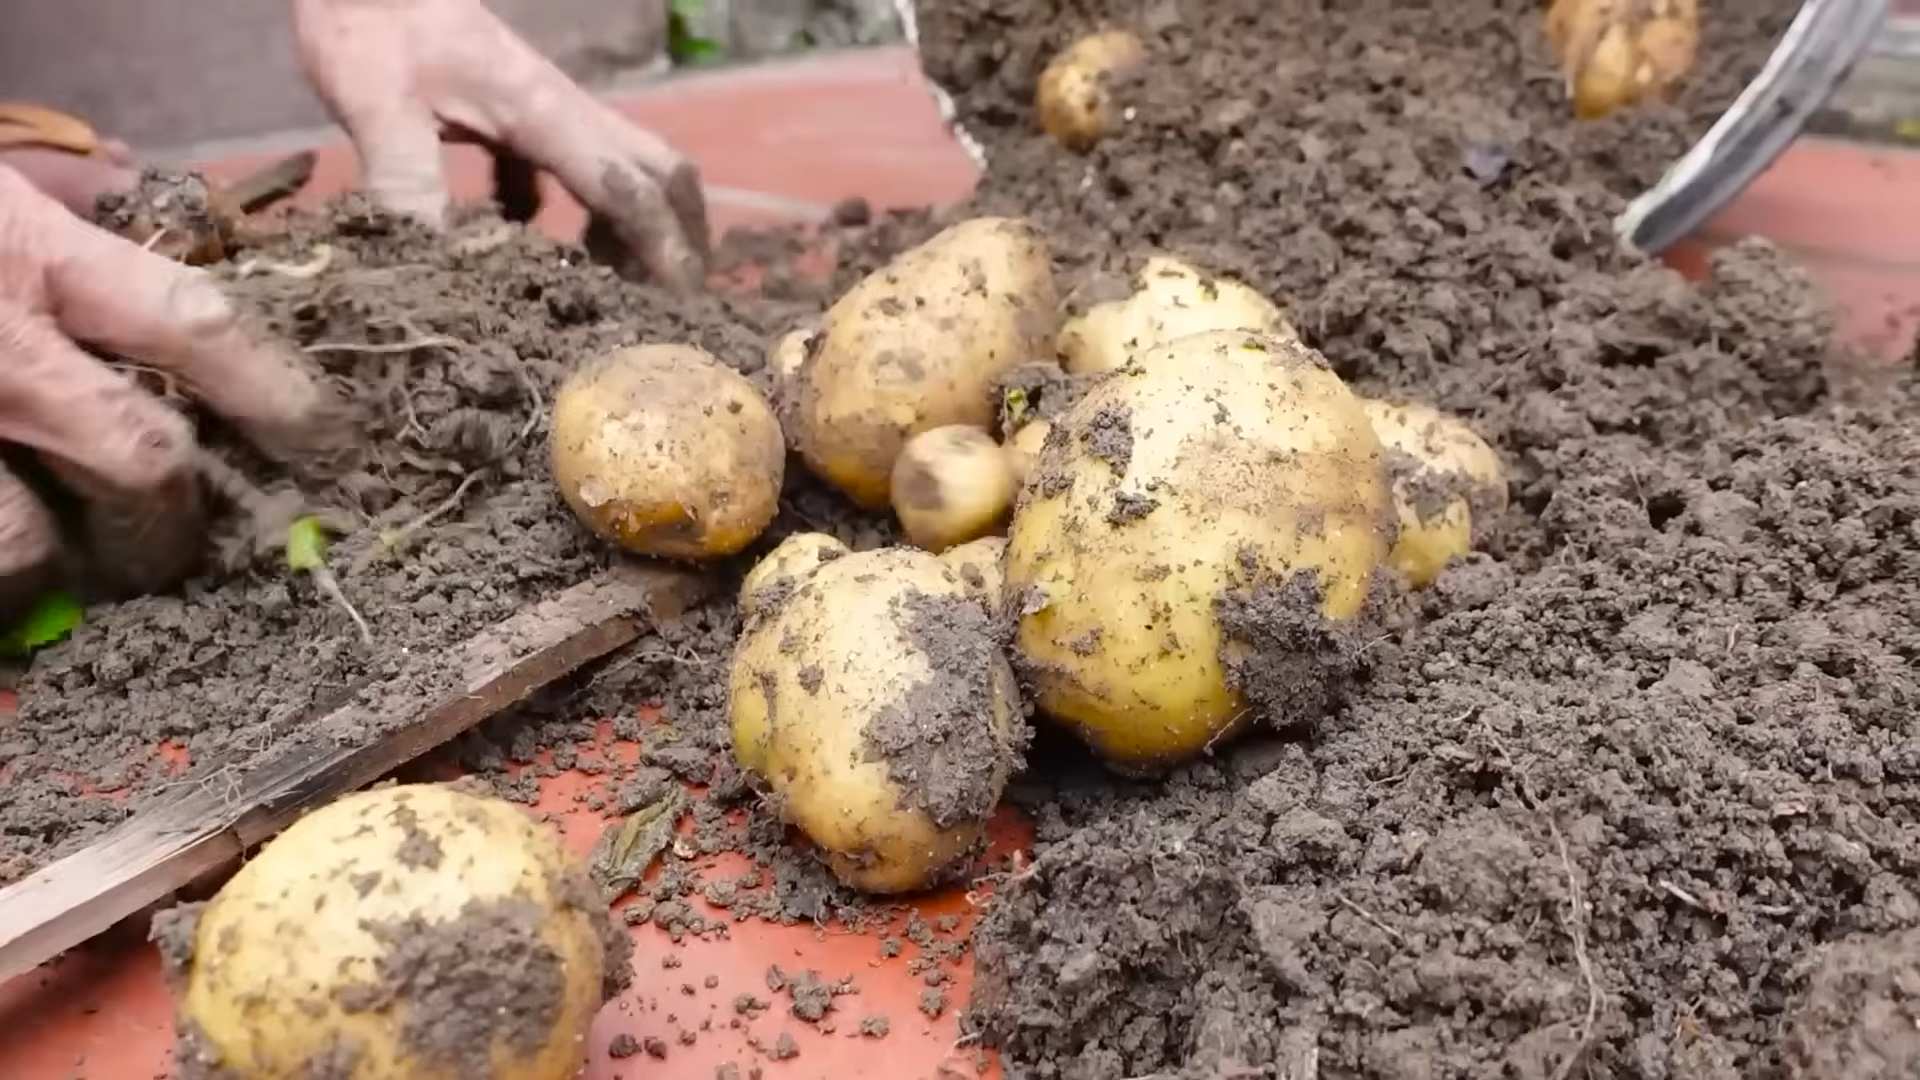
Harvesting Your Potatoes: The Moment of Truth!
The anticipation is killing me! Harvesting is the most rewarding part of growing potatoes. Here’s how to know when it’s time to dig in:
1. Check the foliage: The potato plants will start to flower, and the foliage will eventually turn yellow and die back. This is a sign that the potatoes are ready to harvest.
2. Test dig: Gently dig around the base of a plant to check the size of the potatoes. If they’re the size you want, it’s time to harvest.
3. Harvest carefully: Gently tip the container over and carefully remove the potatoes from the soil. Avoid damaging the potatoes with your shovel or trowel.
4. Cure your potatoes (optional): To improve their storage life, you can cure your potatoes by spreading them out in a cool, dark, and well-ventilated place for a week or two. This allows the skins to harden and heal any minor cuts or bruises.
Troubleshooting: Common Potato Growing Problems
Even with the best care, you might encounter some problems along the way. Here are a few common issues and how to address them:
* Potato Scab: This is a common fungal disease that causes rough, scabby patches on the potato skins. It’s usually not a serious problem, but it can affect the appearance of the potatoes. To prevent potato scab, avoid overwatering and maintain a slightly acidic soil pH.
* Early Blight: This is another fungal disease that causes dark spots on the leaves. To prevent early blight, ensure good air circulation around the plants and avoid overhead watering.
* Aphids: These small, sap-sucking insects can weaken potato plants. Handpick them off the plants or use an organic insecticide.
* Potato Beetles: These beetles can defoliate potato plants. Handpick them off the plants or use an organic insecticide.
Extending Your Potato Harvest: Succession Planting
Want to enjoy fresh potatoes all season long? Consider succession planting! Plant a new batch of seed potatoes every few weeks to extend your harvest. This will ensure a continuous supply of delicious, homegrown potatoes.
Storing Your Potatoes: Keeping Them Fresh
Proper storage is essential for preserving your potato harvest. Here are a few tips:
* Store in a cool, dark, and well-ventilated place: A root cellar is ideal, but a cool basement or garage will also work.
* Avoid storing potatoes near apples or onions: These fruits and vegetables release gases

Conclusion
So, there you have it! Growing your own potatoes in containers isn’t just a gardening trend; it’s a genuinely rewarding experience that brings fresh, flavorful potatoes right to your doorstep, even if you’re short on space. This DIY container potato growing method offers a fantastic alternative to traditional in-ground gardening, making it accessible to apartment dwellers, balcony gardeners, and anyone looking to maximize their yield in a limited area.
Why is this a must-try? Because it puts you in control. You dictate the soil quality, the watering schedule, and the overall environment, leading to healthier, more robust potato plants and a bountiful harvest. Imagine the satisfaction of digging into your own homegrown potatoes, knowing exactly where they came from and what went into nurturing them. The taste difference alone is worth the effort – store-bought potatoes simply can’t compare to the fresh, earthy flavor of homegrown spuds.
But the benefits extend beyond just taste. Container gardening is inherently more manageable. Weeding is easier, pest control is more targeted, and harvesting is a breeze. Plus, it’s a fantastic learning experience for both adults and children, teaching valuable lessons about plant life cycles, sustainable food practices, and the joy of growing your own food.
Ready to take your container potato growing to the next level? Consider experimenting with different potato varieties. Russets are great for baking, Yukon Golds are perfect for roasting, and fingerling potatoes add a gourmet touch to salads. You can also try companion planting. Marigolds can help deter pests, while basil can improve the flavor of your potatoes. Don’t be afraid to get creative with your container choices, either. While fabric grow bags are popular for their breathability, large plastic tubs or even repurposed containers can work just as well, as long as they have adequate drainage.
And speaking of drainage, remember that proper drainage is crucial for successful container potato growing. Soggy soil can lead to rot and disease, so make sure your containers have plenty of drainage holes and that you’re using a well-draining potting mix.
We encourage you to give this DIY container potato growing method a try. It’s easier than you think, and the rewards are well worth the effort. Once you’ve harvested your first batch of homegrown potatoes, we’d love to hear about your experience! Share your photos, tips, and tricks in the comments below. Let’s build a community of container potato growers and inspire others to embrace the joy of homegrown food. Happy growing!
Frequently Asked Questions (FAQ)
What kind of potatoes are best for container growing?
The beauty of container potato growing is that you can grow almost any variety! However, some varieties tend to perform better than others in containers. Determinate varieties, which produce all their potatoes at once, are generally a good choice because they don’t require as much space or hilling. Some popular determinate varieties for containers include Yukon Gold, Red Pontiac, and Irish Cobbler. Indeterminate varieties, which continue to produce potatoes throughout the growing season, can also be grown in containers, but they require more hilling and a larger container. Popular indeterminate varieties include Russet Burbank and fingerling potatoes. Ultimately, the best variety for you will depend on your personal preferences and the space you have available. Experiment with different varieties to see what works best in your specific growing conditions.
How big of a container do I need for growing potatoes?
Container size is crucial for successful potato growing. A general rule of thumb is to use a container that is at least 15 gallons in size. This will provide enough space for the potato plants to develop a healthy root system and produce a decent yield. For determinate varieties, a 15-gallon container is usually sufficient. However, for indeterminate varieties, you may want to consider using a larger container, such as a 20-gallon or even a 30-gallon container, to accommodate their continuous growth. The container should also be at least 12 inches deep to allow for proper hilling. Fabric grow bags are a popular choice because they allow for good drainage and aeration, but any large container with drainage holes will work.
What kind of soil should I use for container potato growing?
Potatoes need well-draining, nutrient-rich soil to thrive. Avoid using garden soil, as it can be too heavy and compact, leading to poor drainage and stunted growth. Instead, opt for a high-quality potting mix specifically formulated for containers. Look for a mix that contains a blend of peat moss, perlite, and vermiculite. These ingredients will help to improve drainage, aeration, and water retention. You can also amend your potting mix with compost or other organic matter to provide additional nutrients. A slightly acidic soil pH of around 6.0 to 6.5 is ideal for potato growing.
How often should I water my container potatoes?
Watering is essential for healthy potato growth, but it’s important to avoid overwatering, which can lead to root rot. Water your container potatoes deeply whenever the top inch of soil feels dry to the touch. The frequency of watering will depend on factors such as the weather, the size of your container, and the type of potting mix you’re using. In hot, dry weather, you may need to water your potatoes daily. In cooler, wetter weather, you may only need to water them every few days. Always check the soil moisture before watering to avoid overwatering.
How do I hill my container potatoes?
Hilling is a crucial step in container potato growing. As the potato plants grow, new potatoes will form along the stems. Hilling involves adding more soil to the container to cover the stems and encourage the formation of more potatoes. Start hilling when the potato plants are about 6 inches tall. Add a few inches of soil to the container, covering the lower part of the stems. Repeat this process every few weeks as the plants continue to grow, until the container is almost full. Hilling not only increases the yield of potatoes but also helps to protect the developing potatoes from sunlight, which can cause them to turn green and become bitter.
When and how do I harvest my container potatoes?
The timing of your potato harvest will depend on the variety you’re growing and the desired size of the potatoes. Generally, you can start harvesting “new potatoes” (small, immature potatoes) about 7-8 weeks after planting. To harvest new potatoes, simply reach into the container and carefully pull out a few potatoes. For a full harvest of mature potatoes, wait until the potato plants have flowered and the foliage has started to die back. This usually takes about 10-12 weeks. To harvest, gently tip the container over and carefully remove the potatoes from the soil. Be careful not to damage the potatoes during harvesting.
What are some common pests and diseases that affect container potatoes, and how can I prevent them?
Container potatoes are susceptible to several pests and diseases, including aphids, potato beetles, and blight. To prevent pest and disease problems, start with healthy seed potatoes and use a high-quality potting mix. Regularly inspect your potato plants for signs of pests or diseases. If you spot any problems, take action immediately. Aphids can be controlled with insecticidal soap or neem oil. Potato beetles can be handpicked or controlled with Bacillus thuringiensis (Bt). Blight is a fungal disease that can be prevented by ensuring good air circulation and avoiding overhead watering. If blight does occur, remove the affected foliage and treat the plants with a fungicide. Companion planting with marigolds can also help to deter pests.
Can I grow potatoes in containers indoors?
While it’s possible to grow potatoes indoors, it’s generally more challenging than growing them outdoors. Potatoes need plenty of sunlight to thrive, so you’ll need to provide them with supplemental lighting if you’re growing them indoors. You’ll also need to ensure good air circulation and maintain a consistent temperature. Indoor potato growing can be a fun experiment, but don’t expect the same yield as you would get from growing them outdoors.
How do I store my harvested potatoes?
Proper storage is essential for preserving the quality of your harvested potatoes. Store your potatoes in a cool, dark, and well-ventilated place. A root cellar is ideal, but a basement or garage can also work. Avoid storing potatoes in the refrigerator, as this can cause them to turn sweet. Store potatoes away from apples and onions, as these fruits and vegetables release ethylene gas, which can cause potatoes to sprout. Properly stored potatoes can last for several months.
Leave a Comment