
Cowpea garden low effort? Yes, you read that right! Imagine harvesting a bounty of delicious and nutritious cowpeas from your very own backyard, without breaking a sweat. Forget back-breaking labor and endless weeding; this guide is all about maximizing your yield with minimal effort.
Cowpeas, also known as black-eyed peas, have a rich history, deeply rooted in African and Southern American cultures. For generations, they’ve been a staple crop, prized for their resilience and nutritional value. They’re not just delicious; they’re packed with protein and fiber, making them a fantastic addition to any diet. But let’s be honest, sometimes gardening feels like a chore, right? That’s where these DIY tricks come in!
In today’s busy world, who has time to spend hours toiling in the garden? That’s why I’m so excited to share these simple yet effective methods for creating a cowpea garden low effort. Whether you’re a seasoned gardener or a complete beginner, these hacks will help you grow a thriving cowpea patch with minimal time and energy. We’ll cover everything from choosing the right varieties to implementing clever planting techniques that practically eliminate weeding. Get ready to enjoy fresh, homegrown cowpeas with ease!
Der faule Gärtner Weg zum Kuhbohnen-Paradies: Ein DIY-Guide für minimalen Aufwand
Hey Leute! Seid ihr auch so begeistert von frischem Gemüse aus dem eigenen Garten, aber habt wenig Zeit oder Lust auf stundenlange Gartenarbeit? Dann seid ihr hier genau richtig! Ich zeige euch, wie ihr mit minimalem Aufwand eine üppige Ernte von Kuhbohnen (auch Augenbohnen genannt) erzielen könnt. Kuhbohnen sind nicht nur super lecker, sondern auch unglaublich pflegeleicht und robust. Perfekt für faule Gärtner wie mich!
Warum Kuhbohnen?
Bevor wir loslegen, kurz ein paar Gründe, warum Kuhbohnen so genial sind:
* Anspruchslos: Sie wachsen auch in mageren Böden und vertragen Trockenheit besser als viele andere Bohnensorten.
* Schnellwüchsig: Ihr könnt schon wenige Wochen nach der Aussaat mit der Ernte beginnen.
* Stickstofffixierer: Sie verbessern den Boden, indem sie Stickstoff aus der Luft binden.
* Vielseitig: Ob frisch, getrocknet oder als Gründüngung – Kuhbohnen sind wahre Alleskönner.
* Lecker: Der nussige Geschmack ist einfach unwiderstehlich!
Was ihr braucht: Die Materialliste
Keine Sorge, ihr braucht keine teure Ausrüstung. Hier ist eine Liste mit den wichtigsten Dingen:
* Kuhbohnensamen: Am besten Bio-Saatgut von einer vertrauenswürdigen Quelle.
* Gartenwerkzeug: Eine Hacke oder Gartenkralle, eine Schaufel und eventuell eine Pflanzkelle.
* Kompost oder organischen Dünger: Für einen guten Start.
* Mulchmaterial: Stroh, Heu, Holzhackschnitzel oder Rasenschnitt.
* (Optional) Rankhilfe: Wenn ihr Buschbohnen habt, braucht ihr keine. Bei Stangenbohnen ist eine Rankhilfe sinnvoll.
* Gießkanne oder Gartenschlauch: Für die Bewässerung.
Schritt-für-Schritt-Anleitung: So geht’s!
Jetzt geht’s ans Eingemachte! Folgt einfach diesen Schritten, und schon bald könnt ihr eure eigenen Kuhbohnen ernten.
1. Der richtige Zeitpunkt: Wann säen?
Kuhbohnen sind wärmeliebend und sollten erst nach den letzten Frösten gesät werden. Das ist in der Regel ab Mitte Mai der Fall. Die Bodentemperatur sollte mindestens 15 Grad Celsius betragen. Ich warte meistens bis Ende Mai oder Anfang Juni, um ganz sicherzugehen.
2. Die Vorbereitung: Den Boden fit machen
Auch wenn Kuhbohnen anspruchslos sind, freuen sie sich über einen gut vorbereiteten Boden. So geht’s:
1. Boden lockern: Lockert den Boden mit einer Hacke oder Gartenkralle auf. Entfernt dabei Unkraut und Steine.
2. Kompost einarbeiten: Mischt Kompost oder organischen Dünger in den Boden ein. Das gibt den jungen Pflanzen einen guten Start. Ich nehme dafür immer meinen selbstgemachten Kompost.
3. Boden ebnen: Glättet die Oberfläche mit einer Harke.
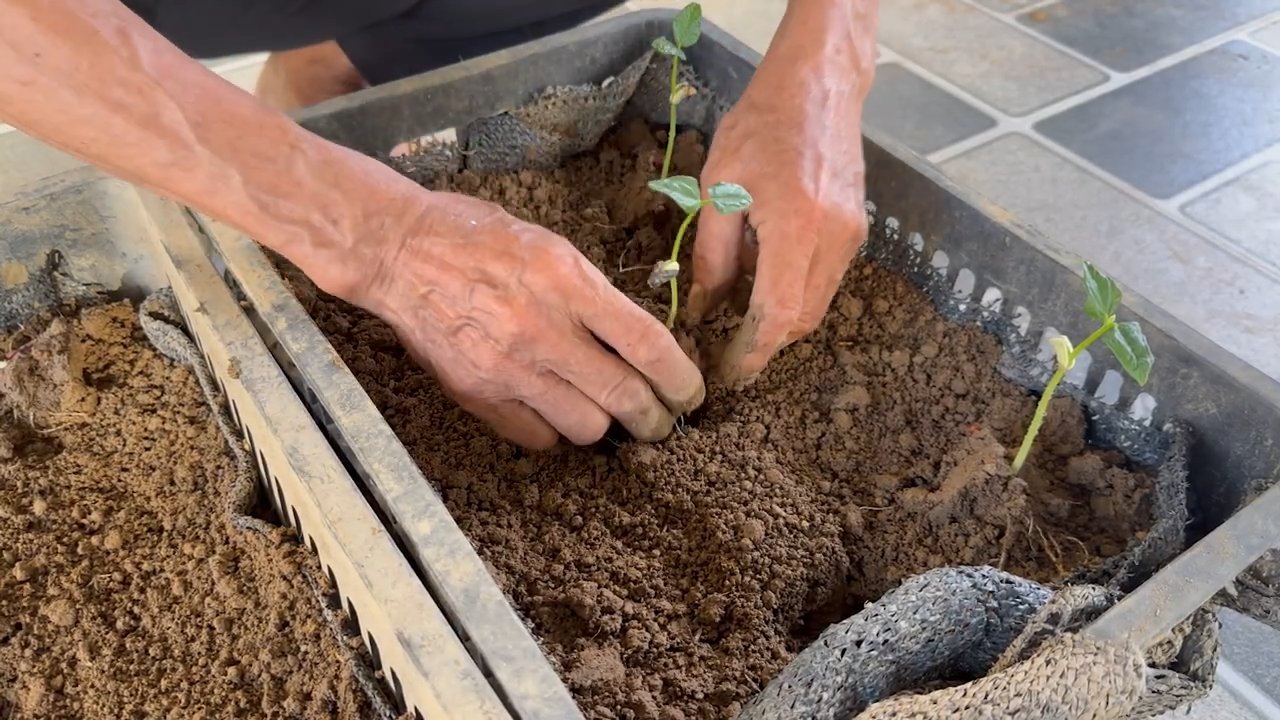
3. Die Aussaat: Ab in die Erde!
Jetzt kommen die Samen in die Erde. Hier gibt es zwei Möglichkeiten: Direktsaat oder Vorkultur. Ich bevorzuge die Direktsaat, weil sie einfacher ist.
1. Saatrillen ziehen: Zieht mit einer Hacke oder Pflanzkelle Saatrillen. Der Abstand zwischen den Reihen sollte etwa 40-60 cm betragen. Die Tiefe der Rillen sollte etwa 2-3 cm sein.
2. Samen auslegen: Legt die Samen in die Rillen. Der Abstand zwischen den Samen sollte etwa 5-10 cm betragen.
3. Rillen schließen: Schließt die Rillen mit Erde und drückt sie leicht an.
4. Gießen: Gießt die Erde vorsichtig an.
4. Die Pflege: Weniger ist mehr!
Kuhbohnen sind wirklich pflegeleicht. Hier sind die wichtigsten Punkte:
1. Gießen: Gießt die Pflanzen regelmäßig, besonders während der Keimung und Blütezeit. Vermeidet Staunässe.
2. Unkraut jäten: Entfernt regelmäßig Unkraut. Das ist besonders wichtig in der Anfangsphase.
3. Mulchen: Mulcht den Boden mit Stroh, Heu, Holzhackschnitzeln oder Rasenschnitt. Das hält den Boden feucht, unterdrückt Unkraut und schützt vor Erosion. Ich liebe es, mit Rasenschnitt zu mulchen, weil es so einfach ist.
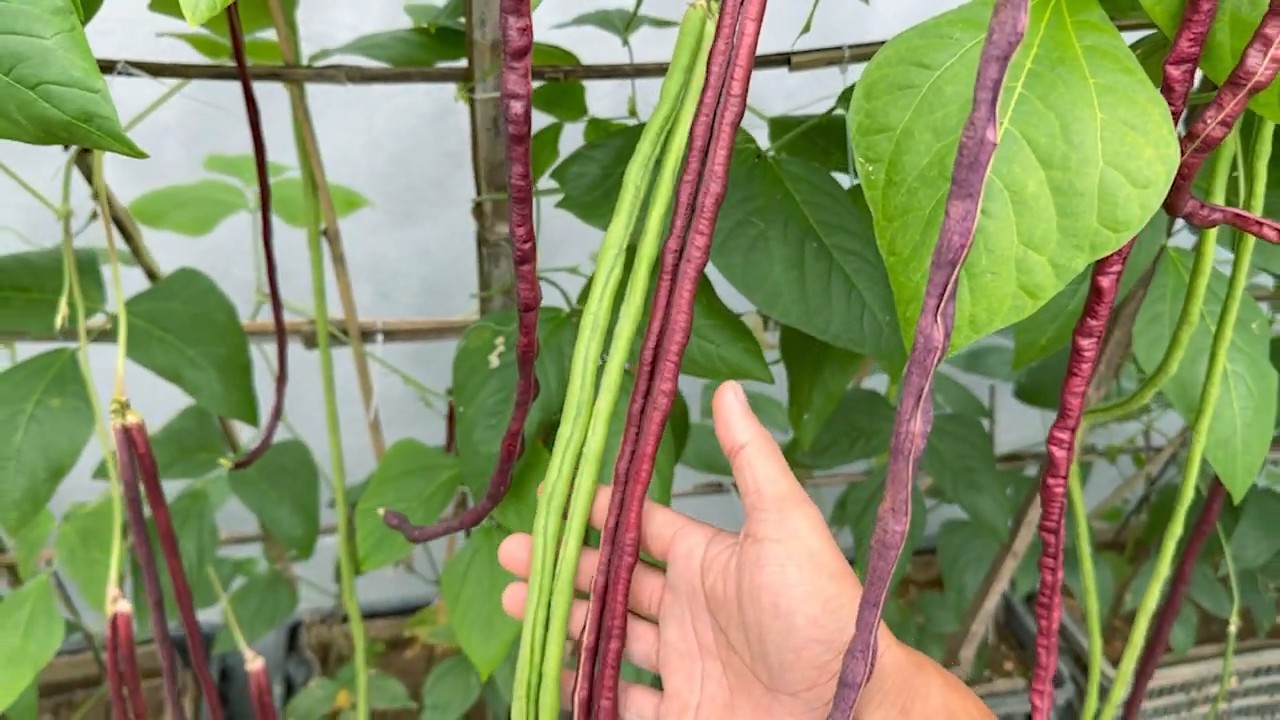
4. (Optional) Rankhilfe anbringen: Wenn ihr Stangenbohnen habt, solltet ihr eine Rankhilfe anbringen. Das kann ein Zaun, ein Spalier oder ein selbstgebautes Gerüst sein.
5. Die Ernte: Endlich ernten!
Je nach Sorte könnt ihr etwa 60-90 Tage nach der Aussaat mit der Ernte beginnen.
1. Erntezeitpunkt: Erntet die Kuhbohnen, wenn die Hülsen prall gefüllt sind, aber noch nicht trocken.
2. Erntetechnik: Pflückt die Hülsen vorsichtig ab.
3. Regelmäßig ernten: Erntet die Kuhbohnen regelmäßig, um die Produktion neuer Hülsen anzuregen.
Zusätzliche Tipps für faule Gärtner
Hier sind noch ein paar Tipps, die euch das Leben noch leichter machen:
* Mischkultur: Pflanzt Kuhbohnen zusammen mit anderen Pflanzen, die sich gegenseitig unterstützen. Gute Partner sind zum Beispiel Mais, Kürbis und Sonnenblumen.
* Gründüngung: Nutzt Kuhbohnen als Gründüngung, um den Boden zu verbessern. Sät sie nach der Ernte aus und lasst sie im Herbst absterben.
* Selbstversorger-Saatgut: Sammelt Samen von euren besten Pflanzen, um sie im nächsten Jahr wieder auszusäen. So spart ihr Geld und habt immer Saatgut zur Hand.
* Beobachten: Achtet auf Schädlinge und Krankheiten. Bei Bedarf könnt ihr natürliche Pflanzenschutzmittel einsetzen. Ich verwende am liebsten Brennnesseljauche.
Häufige Probleme und Lösungen
Auch beim Anbau von Kuhbohnen kann es zu Problemen kommen. Hier sind die häufigsten und wie ihr sie löst:
* Schnecken: Schnecken lieben junge Kuhbohnenpflanzen. Schützt eure Pflanzen mit Schneckenkorn oder Schneckenzäunen.
* Blattläuse: Blattläuse können die Pflanzen schwächen. Spritzt die Pflanzen mit einer Seifenlauge oder Brennnesseljauche ab.
* Pilzkrankheiten: Bei feuchtem Wetter können Pilzkrankheiten auftreten. Sorgt für eine gute Belüftung und entfernt befallene Blätter.
Kuhbohnen in der Küche: Leckere Rezepte
Kuhbohnen sind unglaublich vielseitig in der Küche. Hier sind ein paar Ideen:
* Frische Kuhbohnen: Kochen oder dünsten und als Beilage servieren.
* Getrocknete Kuhbohnen: Einweichen und in Eintöpfen, Suppen oder Salaten verwenden.
* Kuhbohnen-Salat: Mit Tomaten, Gurken, Zwiebeln und einem leckeren Dressing.
* Kuhbohnen-Eintopf: Mit Gemüse, Kartoffeln und Gewürzen.
Fazit: Ein entspannter Weg zum eigenen Gemüse
Mit diesen Tipps und Tricks könnt ihr ganz einfach und ohne viel Aufwand eure eigenen Kuhbohnen anbauen. Es ist wirklich ein tolles Gefühl, frisches Gemüse aus dem eigenen Garten zu ernten. Also, worauf wartet ihr noch? Legt los und werdet zum faulen Gärtner! Ich wünsche euch viel Erfolg und eine reiche Ernte!
Conclusion
So, there you have it! Creating a low-effort cowpea garden is not just a possibility; it’s a pathway to fresh, delicious, and nutritious food right outside your door, without the back-breaking labor often associated with traditional gardening. We’ve explored the key elements that make this approach so effective: choosing the right location, preparing the soil minimally, selecting the appropriate cowpea varieties, employing efficient watering techniques, and implementing simple pest control strategies.
Why is this DIY trick a must-try? Because it empowers you to grow your own food, connect with nature, and enjoy the satisfaction of harvesting your own bounty, all while minimizing the time and energy investment. In a world where convenience often comes at the expense of quality and sustainability, this method offers a refreshing alternative. Imagine stepping into your garden and picking fresh cowpeas for a summer salad, a hearty stew, or a flavorful side dish. The taste is simply unmatched by anything you can find in a store, and you’ll have the peace of mind knowing exactly where your food came from and how it was grown.
But the benefits extend beyond just taste and convenience. Growing your own cowpeas contributes to a more sustainable lifestyle by reducing your reliance on commercially produced food, which often involves long-distance transportation and environmentally damaging practices. Plus, gardening is a fantastic way to relieve stress, get some exercise, and spend time outdoors.
Ready to take your cowpea garden to the next level? Consider these variations and suggestions:
* Companion Planting: Enhance your cowpea garden by planting beneficial companion plants like basil, marigolds, or rosemary. These herbs can help deter pests and attract pollinators, further reducing the need for intervention.
* Succession Planting: Extend your harvest season by planting cowpeas in stages, a few weeks apart. This ensures a continuous supply of fresh beans throughout the summer.
* Vertical Gardening: If you have limited space, consider growing cowpeas on a trellis or fence. This not only saves space but also improves air circulation and reduces the risk of fungal diseases.
* Seed Saving: Save seeds from your best-performing cowpea plants to ensure a consistent supply of high-quality seeds for future seasons. This is a great way to adapt your cowpea garden to your specific climate and growing conditions.
* Soil Enrichment: While we’ve emphasized low-effort soil preparation, you can still improve your soil over time by adding compost or other organic matter. This will enhance its fertility and water-holding capacity, leading to even better yields.
We are confident that this low-effort approach to growing cowpeas will transform your gardening experience. It’s a simple, effective, and rewarding way to enjoy fresh, homegrown food without the hassle.
So, what are you waiting for? Grab your seeds, find a sunny spot, and get started on your own low-effort cowpea garden today! We encourage you to try this DIY trick and share your experiences with us. Let us know what varieties you’re growing, what challenges you’ve encountered, and what successes you’ve achieved. Together, we can create a community of gardeners who are passionate about growing their own food in a sustainable and enjoyable way. Share your photos and stories on social media using #LowEffortCowpeas and let’s inspire others to join the movement! We can’t wait to hear about your cowpea garden adventures!
Frequently Asked Questions (FAQ)
What exactly are cowpeas, and why should I grow them?
Cowpeas, also known as black-eyed peas, are a type of legume that are highly nutritious and easy to grow. They are packed with protein, fiber, vitamins, and minerals, making them a healthy addition to any diet. They are also relatively drought-tolerant and can thrive in poor soil conditions, making them an ideal crop for low-effort gardening. Furthermore, cowpeas are nitrogen-fixing plants, meaning they can improve soil fertility by converting atmospheric nitrogen into a form that plants can use. This reduces the need for synthetic fertilizers and promotes a healthier soil ecosystem.
How much space do I need for a low-effort cowpea garden?
The beauty of this method is its adaptability. You can grow cowpeas in a small raised bed, a container on your patio, or even a larger plot in your backyard. A good starting point is to allocate at least 2-3 square feet per plant. If you’re using a trellis or fence for vertical gardening, you can maximize your space even further. Remember to consider the mature size of the cowpea variety you choose, as some varieties can be more compact than others.
What kind of soil is best for cowpeas?
Cowpeas are surprisingly tolerant of a wide range of soil types, but they prefer well-drained soil with a slightly acidic to neutral pH (around 6.0 to 7.0). While you don’t need to amend the soil extensively for a low-effort garden, adding some compost or well-rotted manure can improve its fertility and water-holding capacity. Avoid heavy clay soils that retain too much water, as this can lead to root rot. If you have clay soil, consider growing cowpeas in raised beds or containers with a well-draining potting mix.
How often do I need to water my cowpea plants?
Cowpeas are relatively drought-tolerant, but they still need regular watering, especially during hot, dry periods. Water deeply and infrequently, allowing the soil to dry out slightly between waterings. Avoid overwatering, as this can lead to root rot. A good rule of thumb is to water when the top inch of soil feels dry to the touch. Mulching around your cowpea plants can help retain moisture and reduce the need for frequent watering.
What are some common pests and diseases that affect cowpeas, and how can I control them in a low-effort way?
Common pests that can affect cowpeas include aphids, bean beetles, and nematodes. Diseases include fungal infections like powdery mildew and root rot. For low-effort pest control, consider these strategies:
* Companion Planting: Plant herbs like basil or marigolds to deter pests.
* Handpicking: Regularly inspect your plants and handpick any pests you find.
* Neem Oil: Apply neem oil to control aphids and other soft-bodied insects.
* Good Air Circulation: Ensure good air circulation around your plants to prevent fungal diseases.
* Resistant Varieties: Choose cowpea varieties that are resistant to common diseases.
When is the best time to harvest cowpeas?
The timing of your harvest will depend on the variety of cowpea you’re growing and your personal preference. Cowpeas can be harvested at different stages of maturity:
* Snap Beans: Harvest the pods when they are young and tender, before the beans inside have fully developed.
* Shelled Beans: Harvest the pods when they are plump and the beans inside are fully developed but still green.
* Dry Beans: Allow the pods to dry completely on the plant before harvesting the beans for storage.
Can I grow cowpeas in containers?
Absolutely! Cowpeas are well-suited for container gardening, especially bush varieties. Choose a large container (at least 12 inches in diameter) with good drainage. Use a well-draining potting mix and provide adequate sunlight and water. You may need to fertilize your container-grown cowpeas more frequently than those grown in the ground.
How can I save seeds from my cowpea plants?
Saving seeds from your cowpea plants is a great way to ensure a consistent supply of high-quality seeds for future seasons. To save seeds, allow the pods to dry completely on the plant. Once the pods are dry and brittle, harvest them and shell the beans. Spread the beans out on a tray to dry completely for a few more days. Store the dried beans in an airtight container in a cool, dry place.
What are some delicious ways to use my homegrown cowpeas?
Cowpeas are incredibly versatile and can be used in a wide variety of dishes. Here are a few ideas:
* Southern-Style Black-Eyed Peas: A classic dish made with cowpeas, ham hocks, and spices.
* Cowpea Salad: A refreshing salad with cowpeas, vegetables, and a vinaigrette dressing.
* Cowpea Stew: A hearty stew with cowpeas, vegetables, and meat or poultry.
* Cowpea Fritters: Crispy fritters made with mashed cowpeas, spices, and herbs.
* Roasted Cowpeas: A simple and healthy snack made by roasting cowpeas with olive oil and spices.
Is growing a low-effort cowpea garden really that easy?
Yes! While all gardening requires some effort, this method is designed to minimize the time and energy investment. By following the tips and techniques outlined in this article, you can enjoy a bountiful harvest of fresh cowpeas without spending hours toiling in the garden. The key is to choose the right location, prepare the soil minimally, select the appropriate varieties, and implement efficient watering and pest control strategies. With a little planning and effort, you can create a thriving cowpea garden that provides you with fresh, delicious food for months to come.
Leave a Comment