
Dish Soap Baking Soda Cleaner: Your secret weapon for a sparkling home, without the harsh chemicals! Are you tired of spending a fortune on cleaning products that promise the world but leave you with lingering fumes and a lighter wallet? I know I was! That’s why I’m so excited to share these incredible DIY cleaning tricks using just two simple ingredients you probably already have in your kitchen: dish soap and baking soda.
Baking soda, also known as sodium bicarbonate, has been a household staple for centuries. Egyptians used a natural form of it as a cleaning agent, and its versatility has only grown since then. Combined with the grease-cutting power of dish soap, you’ve got a dynamic duo ready to tackle everything from stubborn stovetop stains to grimy bathroom tiles.
Why should you embrace this dish soap baking soda cleaner magic? Because it’s effective, affordable, and environmentally friendly! In a world increasingly concerned about the impact of harsh chemicals on our health and the planet, this DIY solution offers a safer and more sustainable alternative. Plus, who doesn’t love saving money? I’m going to show you how to create powerful cleaning solutions that are gentle on your surfaces and your budget. Get ready to ditch the store-bought cleaners and unlock the cleaning potential of these two humble ingredients!
“`html
DIY All-Purpose Cleaner: Dish Soap and Baking Soda Power!
Hey everyone! I’m so excited to share this super simple, yet incredibly effective, all-purpose cleaner recipe with you. I’ve been using it for months now, and honestly, I’m never going back to store-bought cleaners. It’s cheap, eco-friendly, and works like a charm on everything from kitchen counters to bathroom tiles. Plus, you probably already have the ingredients in your pantry!
Why I Love This Cleaner
Before we dive into the how-to, let me tell you why I’m so obsessed with this cleaner:
* It’s Budget-Friendly: Seriously, dish soap and baking soda are staples in most households, so you’re saving a ton of money compared to buying commercial cleaners.
* It’s Eco-Friendly: No harsh chemicals here! You’re reducing your environmental impact by using biodegradable ingredients.
* It’s Versatile: I use it on almost every surface in my house – countertops, sinks, tubs, tiles, even my stovetop!
* It’s Easy to Make: The recipe is so simple, even a kid could do it (with supervision, of course!).
* It’s Effective: Don’t let the simplicity fool you; this cleaner cuts through grease, grime, and soap scum like a pro.
What You’ll Need
Okay, let’s gather our supplies. Here’s what you’ll need to make this amazing cleaner:
* Dish Soap: I prefer using a natural dish soap, but any kind will work. Just avoid anything with bleach, as we don’t want any unexpected chemical reactions.
* Baking Soda: This is our gentle abrasive and deodorizer.
* Water: Tap water is perfectly fine.
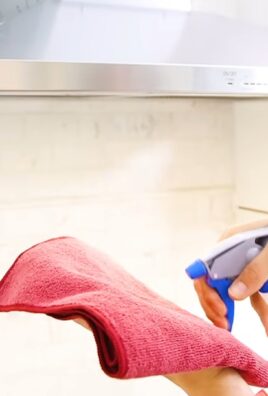
* Spray Bottle: A clean, empty spray bottle is essential for easy application. I recommend a 16-ounce bottle.
* Measuring Spoons: For accurate measurements.
* Small Bowl (Optional): For pre-mixing the baking soda paste.
* Spoon or Whisk (Optional): For mixing.
* Funnel (Optional): To help pour the mixture into the spray bottle.
Making the All-Purpose Cleaner: Step-by-Step
Alright, let’s get down to business! Here’s how to make your own all-purpose cleaner:
1. Prepare the Baking Soda Paste (Optional): For tougher cleaning jobs, I like to pre-mix a small amount of baking soda with a little water to form a paste. This helps to scrub away stubborn stains and grime. If you’re doing this, mix about 2 tablespoons of baking soda with 1 tablespoon of water in a small bowl until you get a thick, spreadable paste. Set this aside for now.
2. Measure the Dish Soap: Pour 1 tablespoon of dish soap into your clean spray bottle. It’s important not to use too much dish soap, as it can make the cleaner too sudsy.
3. Add the Baking Soda: Now, add 1 tablespoon of baking soda to the spray bottle. You might see a little fizzing – that’s perfectly normal! It’s just the baking soda reacting with the dish soap.
4. Fill with Water: Carefully fill the rest of the spray bottle with water. Leave a little bit of space at the top, as we’ll need to shake it up later.
5. Shake Well: Secure the spray bottle lid tightly and shake the mixture vigorously until the baking soda is completely dissolved. This might take a minute or two, so be patient.
6. Label Your Bottle: This is important! Label your spray bottle clearly as “All-Purpose Cleaner” so you don’t accidentally mix it up with something else.
Using Your New All-Purpose Cleaner
Now that you’ve made your cleaner, let’s put it to work! Here’s how I use it around my house:
1. Spray the Surface: Spray the cleaner liberally onto the surface you want to clean.
2. Let it Sit: Allow the cleaner to sit on the surface for a few minutes to loosen dirt and grime. For tougher stains, you can let it sit for up to 10 minutes.
3. Scrub (If Necessary): If you’re dealing with stubborn stains or grime, use a sponge, cloth, or scrub brush to scrub the surface. This is where the baking soda paste comes in handy! Apply a small amount of the paste to the affected area and scrub gently.
4. Wipe Clean: Wipe the surface clean with a damp cloth or sponge.
5. Dry (Optional): If you want to prevent water spots, you can dry the surface with a clean, dry cloth.
Where to Use This Cleaner (and Where Not To!)
This cleaner is incredibly versatile, but there are a few surfaces you should avoid:
* Granite and Marble: The baking soda can scratch these delicate surfaces.
* Wood Furniture: Prolonged exposure to water can damage wood furniture. If you want to use it on wood, test it in an inconspicuous area first and wipe it off immediately.
* Electronics: Never spray cleaner directly onto electronics. Instead, spray it onto a cloth and then wipe the surface.
Here are some of the places where I use this cleaner regularly:
* Kitchen Counters: It’s great for cleaning up spills and messes on kitchen counters.
* Sinks: It cuts through grease and grime in the kitchen sink and removes soap scum in the bathroom sink.
* Tubs and Showers: It’s effective at removing soap scum and mildew in the tub and shower.
* Tiles: It cleans tile floors and walls beautifully.
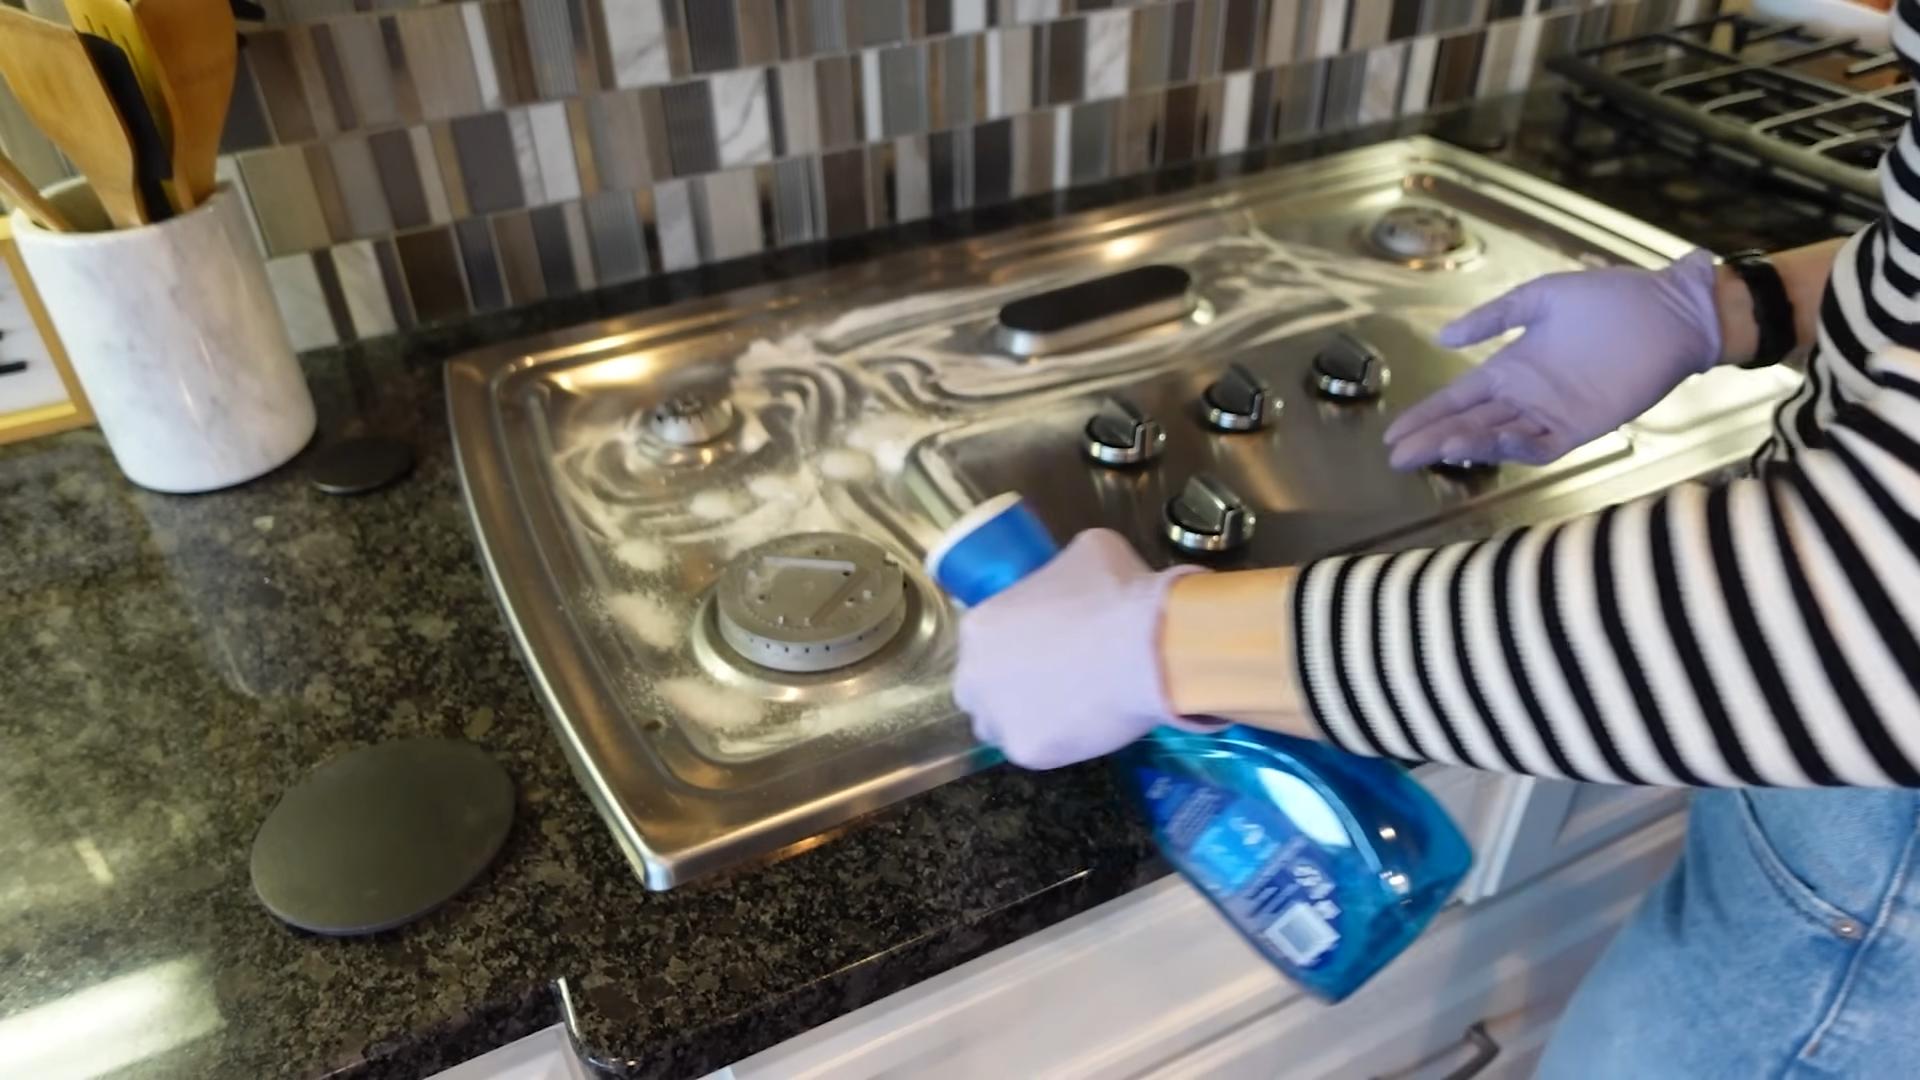
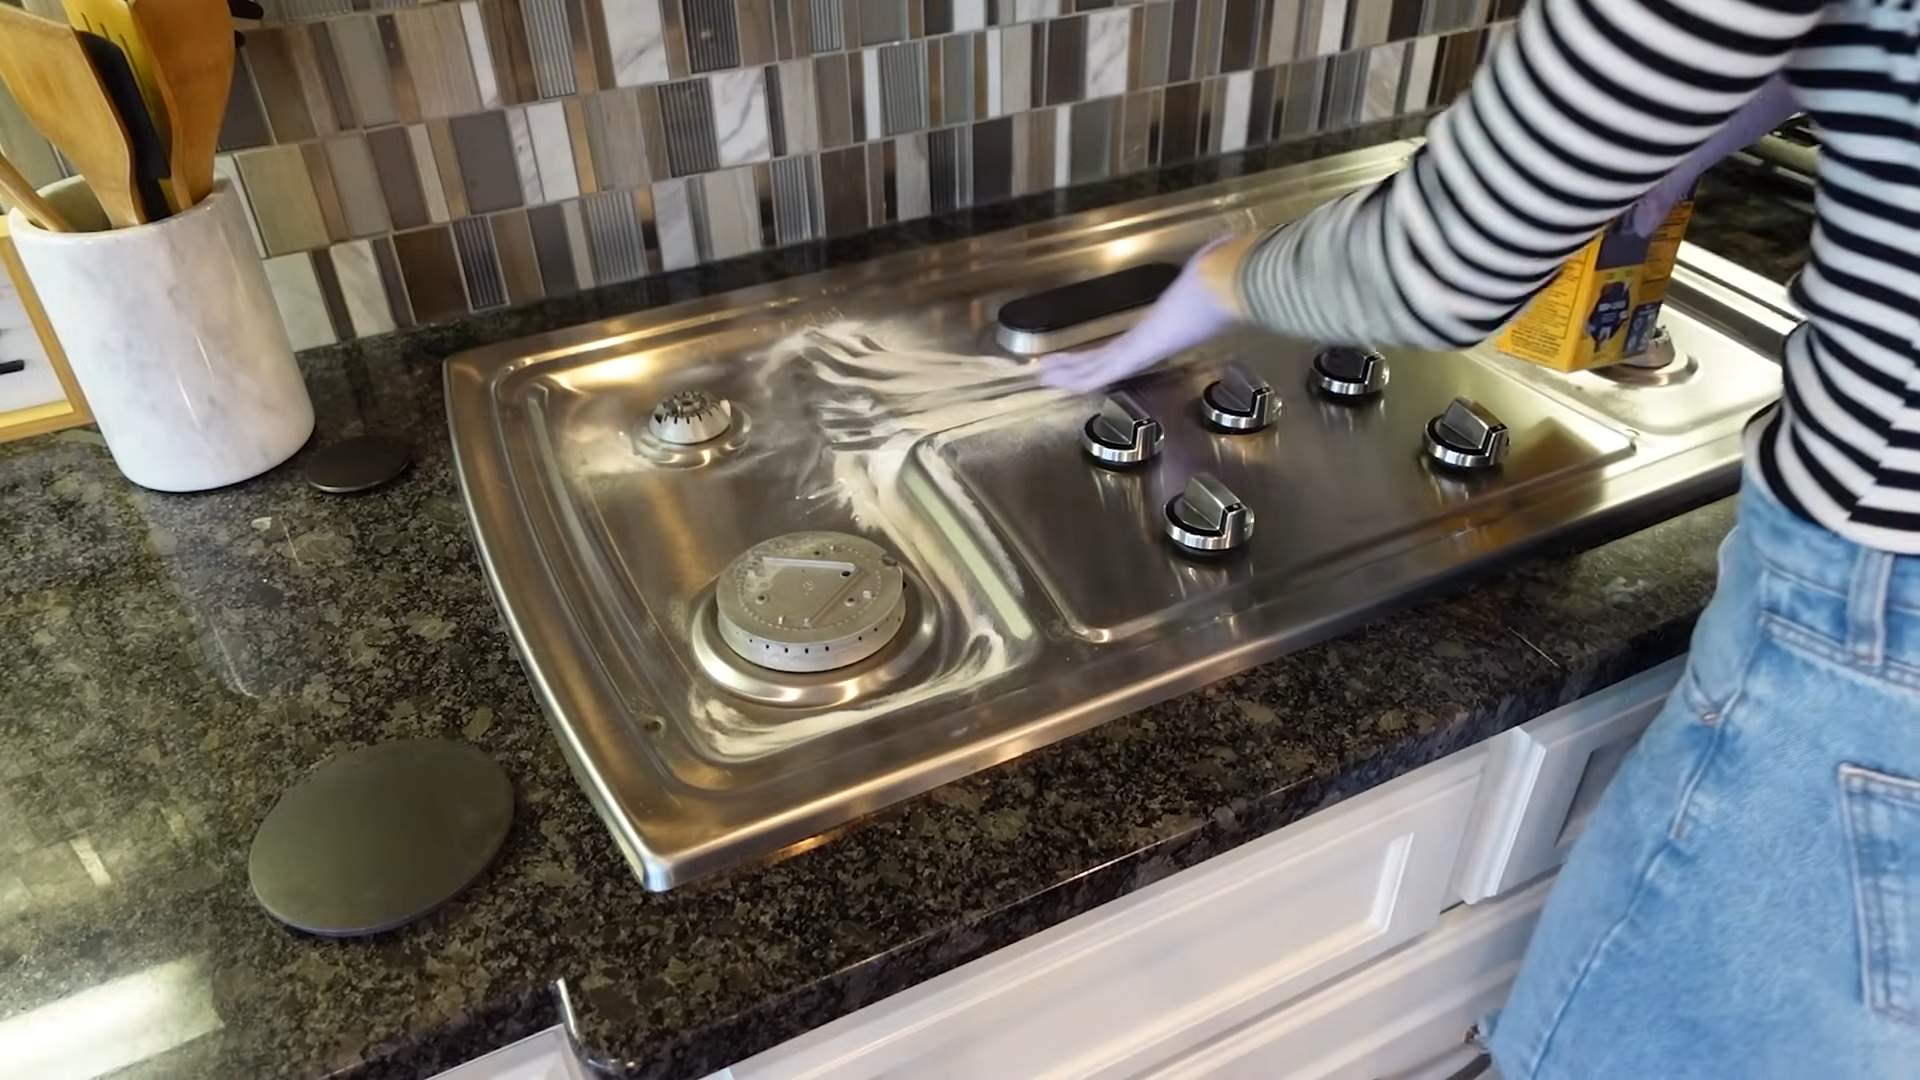
* Stovetop: It’s great for removing grease and food splatters from the stovetop.
* Microwave: It’s a safe and effective way to clean the inside of your microwave.
* Garbage Disposal: Pour some down the drain to freshen it up and eliminate odors.
Tips and Tricks for the Best Results
Here are a few extra tips and tricks to help you get the most out of your DIY all-purpose cleaner:
* Adjust the Ratios: Feel free to adjust the ratios of dish soap and baking soda to suit your needs. If you find the cleaner too sudsy, use less dish soap. If you need more scrubbing power, add more baking soda.
* Add Essential Oils: For a pleasant scent, add a few drops of your favorite essential oil to the spray bottle. Lemon, lavender, and tea tree oil are all great choices.
* Use Warm Water: Warm water helps to dissolve the baking soda more quickly and effectively.
* Shake Before Each Use: The baking soda may settle at the bottom of the bottle over time, so be sure to shake the cleaner well before each use.
* Test in an Inconspicuous Area: Before using the cleaner on a new surface, always test it in an inconspicuous area first to make sure it doesn’t damage the finish.
* Store in a Cool, Dark Place: Store your cleaner in a cool, dark place to prevent the ingredients from degrading.
* Make Small Batches: Since this cleaner is so easy to make, I recommend making small batches as needed. This ensures that the ingredients are always fresh and effective.
* For really tough stains on the stovetop: I like to sprinkle baking soda directly on the stain, then spray with the cleaner and let it sit for 15-20 minutes before scrubbing. It works wonders!
* To clean the microwave: Spray the cleaner inside, then microwave a bowl of water for a few minutes. The steam will loosen any stuck-on food, making it easy to wipe clean.
Troubleshooting
Sometimes, things don’t go exactly as planned. Here are a few common problems you might encounter and how to fix them:
* Cleaner is too sudsy: You’ve probably used too much dish soap. Try diluting the cleaner with more water.
* Baking soda isn’t dissolving: Make sure you’re using warm water and shaking the bottle vigorously. You can also try pre-dissolving the baking soda in a small amount of warm water before adding it to the spray bottle.
* Cleaner isn’t cleaning effectively: You may need to use more baking soda or let the cleaner sit on the surface for a longer period of time. You can also try using the baking soda paste for extra scrubbing power.
* Spray bottle is clogged: This can happen if the baking soda isn’t completely dissolved. Try running warm water through the spray nozzle to clear the clog.
I hope you enjoy making and using this DIY all-purpose cleaner as much as I do! It’s a simple, affordable, and effective way to keep your home clean and healthy. Happy cleaning!
Conclusion
So, there you have it! A simple, effective, and surprisingly powerful cleaning solution using just two ingredients you likely already have in your kitchen: dish soap and baking soda. This DIY cleaner isn’t just about saving money; it’s about creating a safer, healthier home environment free from harsh chemicals. The combination of dish soap, with its grease-cutting prowess, and baking soda, a gentle abrasive and deodorizer, creates a synergistic effect that tackles a wide range of cleaning challenges.
Why is this dish soap baking soda cleaner a must-try? Because it’s incredibly versatile. From scrubbing stubborn stains off your stovetop to revitalizing grimy grout in your bathroom, this dynamic duo delivers impressive results without the need for expensive, store-bought alternatives. It’s also a fantastic option for those with sensitivities to strong chemical smells or who are simply looking to reduce their environmental impact.
But the beauty of this DIY cleaner lies in its adaptability. Feel free to experiment with variations to suit your specific needs. For instance, adding a few drops of your favorite essential oil, like lemon or lavender, can infuse your cleaning solution with a pleasant, natural fragrance. For tougher stains, consider creating a paste with a higher concentration of baking soda and letting it sit on the affected area for a longer period before scrubbing. You can even add a splash of white vinegar for an extra boost of cleaning power, but be cautious when combining vinegar and baking soda, as it can create a fizzing reaction. Always test any new cleaning solution in an inconspicuous area first to ensure it doesn’t damage the surface.
We’ve found that this cleaner works wonders on everything from baked-on food residue in ovens to soap scum buildup in showers. It’s also surprisingly effective at removing stubborn stains from clothing and carpets. Just remember to always test a small, hidden area first to ensure colorfastness.
Ultimately, the best way to discover the full potential of this dish soap baking soda cleaner is to try it yourself. We’re confident that you’ll be amazed by its cleaning power and versatility. So, ditch the harsh chemicals and embrace the simplicity and effectiveness of this homemade solution.
We encourage you to give this DIY trick a try and share your experiences with us! Let us know what surfaces you’ve cleaned, what variations you’ve experimented with, and any tips or tricks you’ve discovered along the way. Your feedback will not only help other readers but also contribute to a community of eco-conscious cleaners who are passionate about creating a healthier and more sustainable home. Share your before-and-after photos, your favorite essential oil combinations, and any other insights you have. We can’t wait to hear from you!
Frequently Asked Questions (FAQ)
1. What types of dish soap work best for this cleaner?
Generally, any type of dish soap will work, but we recommend using a clear, unscented dish soap to avoid any potential discoloration or unwanted fragrances. A dish soap specifically designed for grease-cutting will provide the best results, especially for tackling tough stains and grime. Avoid using dish soaps that contain added moisturizers, as these can leave a residue on surfaces. Experiment with different brands to find one that you prefer and that works well with your water hardness.
2. Can I use this cleaner on all surfaces?
While this dish soap baking soda cleaner is generally safe for most surfaces, it’s always best to test it in an inconspicuous area first, especially on delicate or sensitive materials like marble, granite, or painted surfaces. The abrasive nature of baking soda can potentially scratch some surfaces, so use caution and avoid excessive scrubbing. Avoid using this cleaner on aluminum, as baking soda can cause it to tarnish. For surfaces that are prone to water spots, be sure to dry them thoroughly after cleaning.
3. How do I store the leftover cleaning solution?
You can store the leftover cleaning solution in a sealed container, such as a spray bottle or a jar, for up to a week. Over time, the baking soda may settle to the bottom, so be sure to shake the container well before each use. Avoid storing the solution in direct sunlight or in extreme temperatures, as this can affect its effectiveness. If you notice any changes in the color, consistency, or smell of the solution, discard it and make a fresh batch.
4. Can I add other ingredients to this cleaner?
Yes, you can definitely customize this cleaner by adding other ingredients to enhance its cleaning power or fragrance. As mentioned earlier, essential oils are a great way to add a natural scent. White vinegar can also be added for an extra boost of cleaning power, but be cautious when combining it with baking soda, as it can create a fizzing reaction. Other potential additions include lemon juice, borax, or washing soda, but always research the safety and compatibility of these ingredients before using them.
5. Is this cleaner safe for pets and children?
While this dish soap baking soda cleaner is generally considered safer than many commercial cleaning products, it’s still important to exercise caution when using it around pets and children. Keep the cleaning solution out of their reach and avoid spraying it directly on them. If your pet or child accidentally ingests the cleaner, contact your veterinarian or a poison control center immediately. Always rinse surfaces thoroughly after cleaning to remove any residue.
6. How do I make a paste with dish soap and baking soda?
To make a paste, simply mix dish soap and baking soda in a small bowl until you achieve a thick, spreadable consistency. The exact ratio will depend on the consistency of your dish soap and the desired thickness of the paste. Start with a small amount of dish soap and gradually add more until you reach the desired consistency. This paste is ideal for tackling stubborn stains and grime on surfaces like stovetops, ovens, and grout.
7. Can I use this cleaner to clean my oven?
Yes, this cleaner is very effective for cleaning ovens. To clean your oven, first remove any loose debris. Then, apply a generous layer of the dish soap and baking soda paste to the interior surfaces of the oven, avoiding the heating elements. Let the paste sit for several hours or overnight. Finally, scrub the oven with a sponge or brush and wipe away the residue with a damp cloth. For stubborn stains, you may need to repeat the process.
8. How do I clean grout with this cleaner?
To clean grout, apply the dish soap and baking soda paste to the grout lines. Let it sit for 10-15 minutes. Then, scrub the grout with a grout brush or an old toothbrush. Finally, rinse the grout with water and wipe away any residue. For heavily soiled grout, you may need to repeat the process or use a stronger cleaning solution.
9. What if the baking soda scratches my surfaces?
If you’re concerned about the baking soda scratching your surfaces, you can try using a gentler abrasive, such as cream of tartar or a non-abrasive cleaning pad. You can also dilute the baking soda with more dish soap or water to reduce its abrasiveness. Always test the cleaner in an inconspicuous area first to ensure it doesn’t damage the surface.
10. Can I use this cleaner to remove hard water stains?
While this cleaner can help to remove some hard water stains, it may not be as effective as specialized hard water stain removers. For stubborn hard water stains, you may need to use a stronger cleaning solution, such as vinegar or lemon juice. You can also try using a commercial hard water stain remover.
Leave a Comment