
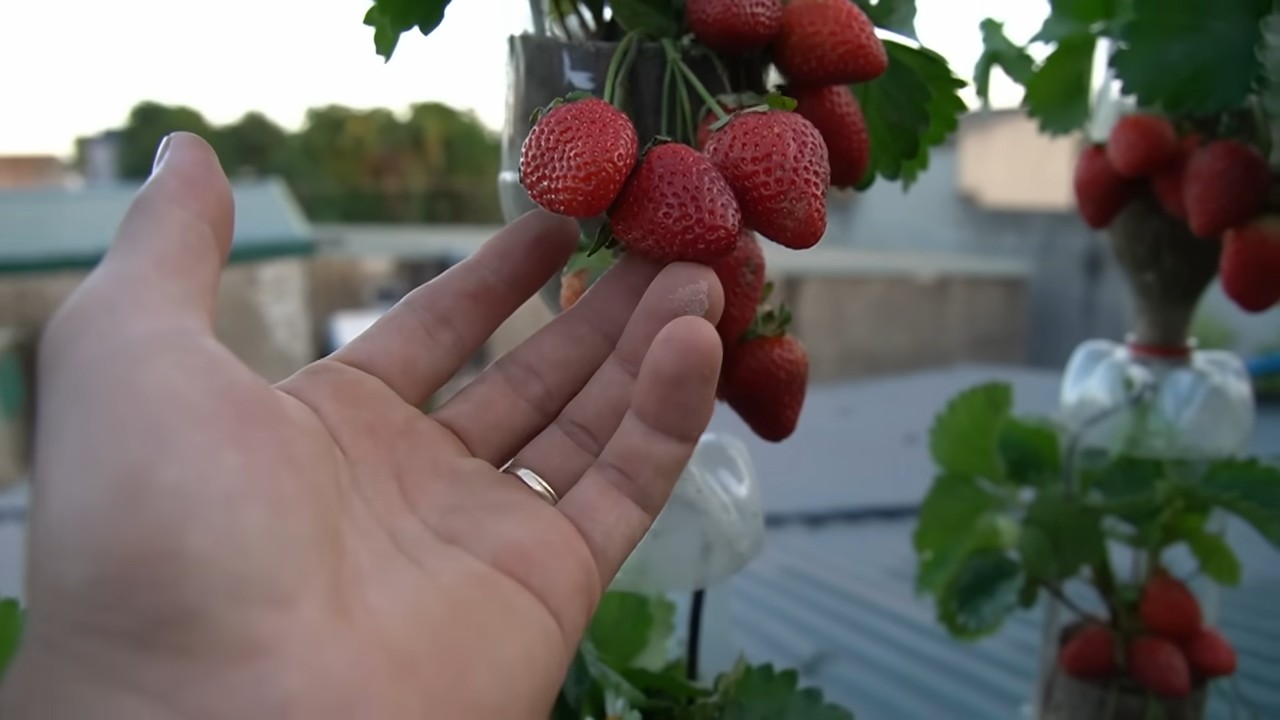
DIY Strawberry Tower: Imagine plucking juicy, sun-ripened strawberries right from your own backyard, without even bending over! Sounds like a dream, right? Well, it doesn’t have to be! I’m so excited to share a fantastic and space-saving project with you: building your very own DIY Strawberry Tower.
Growing strawberries has a rich history, dating back to ancient Rome, where they were prized for their medicinal properties. Over time, they’ve become a symbol of summer, sweetness, and simple pleasures. But let’s face it, traditional strawberry patches can be a bit of a hassle – weeds, pests, and backaches galore! That’s where this clever DIY trick comes in.
Why do you need a DIY Strawberry Tower? Because it’s the perfect solution for small spaces, urban gardens, or anyone who wants to enjoy fresh strawberries without the fuss. It’s a vertical gardening marvel that maximizes your yield while minimizing the space required. Plus, it’s a fun and rewarding project that you can complete in an afternoon. Get ready to impress your friends and family with your gardening skills and enjoy a bountiful harvest of delicious, homegrown strawberries! I can’t wait to show you how easy it is to create your own stunning and productive DIY Strawberry Tower.
Erdbeerturm selber bauen: Eine Schritt-für-Schritt-Anleitung
Hallo liebe Gartenfreunde! Ich zeige euch heute, wie ihr einen fantastischen Erdbeerturm selber bauen könnt. Das ist nicht nur eine tolle Möglichkeit, viele Erdbeeren auf kleinem Raum anzubauen, sondern auch ein echter Hingucker in eurem Garten oder auf dem Balkon. Keine Sorge, es ist einfacher als es aussieht! Lasst uns loslegen!
Was du für deinen Erdbeerturm brauchst:
* Ein großes Plastikrohr (ca. 150-200 cm lang, Durchmesser ca. 20-30 cm): Ich habe ein Abwasserrohr aus dem Baumarkt verwendet. Achtet darauf, dass es lebensmittelecht ist, wenn ihr ganz sicher gehen wollt.
* Ein kleineres Plastikrohr (ca. 150-200 cm lang, Durchmesser ca. 5-10 cm): Dieses Rohr dient zur Bewässerung.
* Bohrmaschine mit Lochsäge oder Bohraufsatz: Für die Löcher, in die später die Erdbeerpflanzen kommen.
* Bohrmaschine mit kleinem Bohrer: Für die Bewässerungslöcher im kleineren Rohr.
* Gartenvlies oder Unkrautvlies: Um das kleinere Rohr zu umwickeln.
* Kabelbinder oder Draht: Zum Fixieren des Vlieses.
* Erde: Am besten eine Mischung aus Gartenerde und Kompost.
* Erdbeerpflanzen: Je nach Größe des Turms und der Löcher, die ihr bohrt. Ich empfehle junge, kräftige Pflanzen.
* Schaufel oder Kelle: Zum Befüllen des Turms mit Erde.
* Handschuhe: Zum Schutz eurer Hände.
* Maßband oder Zollstock: Zum Abmessen der Löcher.
* Stift oder Marker: Zum Anzeichnen der Löcher.
* Optional: Kies oder Blähton: Für eine Drainageschicht am Boden des Turms.
* Optional: Endkappe für das große Rohr: Verhindert, dass Erde unten herausfällt.
Vorbereitung ist alles: Das große Rohr bearbeiten
1. Löcher anzeichnen: Nehmt euer Maßband und euren Stift zur Hand. Markiert auf dem großen Rohr die Stellen, an denen ihr die Löcher für die Erdbeerpflanzen haben möchtet. Ich habe meine Löcher versetzt angeordnet, damit die Pflanzen später genug Platz haben. Der Abstand zwischen den Löchern sollte etwa 20-25 cm betragen. Achtet darauf, dass die Löcher nicht zu nah am Rand des Rohrs sind.
2. Löcher bohren: Jetzt kommt die Bohrmaschine zum Einsatz! Mit der Lochsäge oder dem Bohraufsatz bohrt ihr die Löcher an den markierten Stellen. Die Größe der Löcher sollte so sein, dass die Erdbeerpflanzen gut hineinpassen, aber nicht herausfallen. Ich habe Löcher mit einem Durchmesser von etwa 8-10 cm gebohrt. Seid vorsichtig beim Bohren und tragt am besten eine Schutzbrille.
3. Entgraten: Nach dem Bohren können scharfe Kanten an den Löchern entstanden sein. Diese könnt ihr mit einem Messer oder einer Feile entfernen, damit sich die Pflanzen später nicht verletzen.
Das Bewässerungssystem: So bleiben deine Erdbeeren saftig
1. Löcher bohren: Nehmt das kleinere Rohr und bohrt mit dem kleinen Bohrer viele kleine Löcher hinein. Diese Löcher dienen dazu, das Wasser gleichmäßig im Turm zu verteilen. Ich habe alle paar Zentimeter Löcher gebohrt, rundherum um das Rohr.
2. Vlies umwickeln: Umwickelt das kleinere Rohr mit dem Gartenvlies oder Unkrautvlies. Das Vlies verhindert, dass die Erde die Löcher im Rohr verstopft. Fixiert das Vlies mit Kabelbindern oder Draht. Achtet darauf, dass das Vlies gut sitzt und nicht verrutscht.
Der Aufbau: So entsteht dein Erdbeerturm
1. Drainage (optional): Wenn ihr möchtet, könnt ihr am Boden des großen Rohrs eine Drainageschicht aus Kies oder Blähton einfüllen. Das verhindert Staunässe.
2. Kleines Rohr platzieren: Stellt das kleinere Rohr mittig in das große Rohr. Achtet darauf, dass es stabil steht.
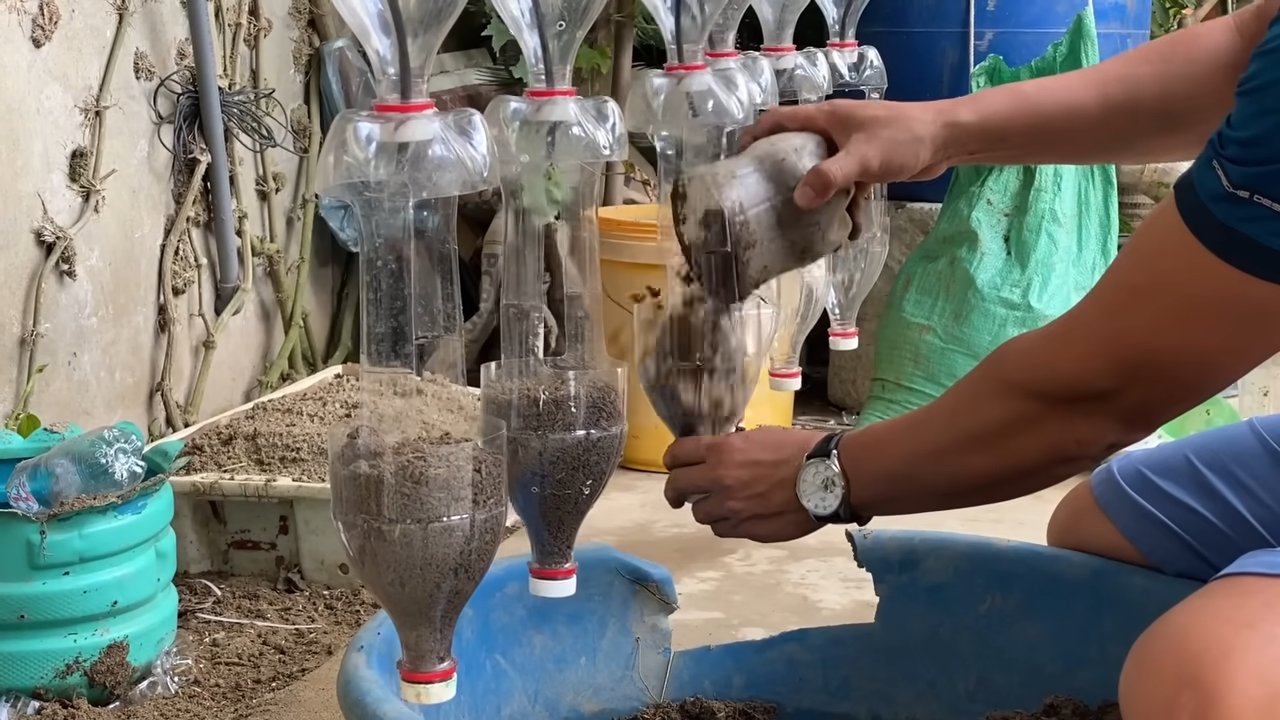
3. Erde einfüllen: Füllt nun das große Rohr mit Erde. Am besten verwendet ihr eine Mischung aus Gartenerde und Kompost. Füllt die Erde schichtweise ein und drückt sie leicht an. Achtet darauf, dass das kleinere Rohr weiterhin mittig steht.
4. Pflanzen einsetzen: Wenn ihr eine Schicht Erde eingefüllt habt, setzt ihr die ersten Erdbeerpflanzen in die Löcher. Achtet darauf, dass die Wurzeln der Pflanzen gut mit Erde bedeckt sind. Füllt dann die nächste Schicht Erde ein und setzt weitere Pflanzen ein. Wiederholt diesen Vorgang, bis der Turm voll ist.
5. Gießen: Gießt den Erdbeerturm gründlich, nachdem ihr alle Pflanzen eingesetzt habt. Das Wasser wird durch das kleinere Rohr gleichmäßig im Turm verteilt.
Der Feinschliff: Tipps und Tricks für deinen Erdbeerturm
* Standort: Wählt einen sonnigen Standort für euren Erdbeerturm. Erdbeeren lieben die Sonne!
* Bewässerung: Gießt den Erdbeerturm regelmäßig, besonders an heißen Tagen. Achtet darauf, dass die Erde immer leicht feucht ist.
* Düngung: Düngt die Erdbeerpflanzen regelmäßig mit einem speziellen Erdbeerdünger.
* Schutz vor Schädlingen: Kontrolliert die Pflanzen regelmäßig auf Schädlinge und behandelt sie gegebenenfalls.
* Ernte: Freut euch auf eine reiche Erdbeerernte! Pflückt die Erdbeeren, sobald sie rot und reif sind.
Noch ein paar persönliche Anmerkungen:
Ich habe meinen Erdbeerturm jetzt schon seit ein paar Jahren und bin total begeistert! Es ist wirklich eine tolle Möglichkeit, viele Erdbeeren auf kleinem Raum anzubauen. Und das Beste ist, dass die Erdbeeren nicht auf dem Boden liegen und dadurch sauberer bleiben. Außerdem ist der Erdbeerturm ein echter Hingucker in meinem Garten.
Ich hoffe, meine Anleitung hat euch gefallen und ihr habt jetzt Lust bekommen, euren eigenen Erdbeerturm zu bauen. Es ist wirklich nicht schwer und macht total viel Spaß! Wenn ihr Fragen habt, könnt ihr mir gerne einen Kommentar hinterlassen. Ich helfe euch gerne weiter!
Viel Spaß beim Gärtnern!
Conclusion
So, there you have it! Creating your own DIY Strawberry Tower isn’t just a fun weekend project; it’s a gateway to a bountiful harvest of delicious, homegrown strawberries right at your fingertips. Forget those expensive, store-bought berries that often lack flavor and freshness. With a little effort and creativity, you can cultivate a thriving strawberry patch in a compact, visually appealing structure.
Why is this DIY trick a must-try? Because it offers a multitude of benefits. First and foremost, it maximizes space. Whether you have a sprawling garden or a tiny balcony, a strawberry tower allows you to grow a significant number of plants in a small footprint. Second, it improves drainage and air circulation, which are crucial for healthy strawberry growth and preventing diseases. Third, it’s aesthetically pleasing! A strawberry tower adds a touch of rustic charm to any outdoor space, transforming it into a vibrant and productive oasis. Finally, and perhaps most importantly, it gives you complete control over the growing process. You can choose organic soil, use natural pest control methods, and ensure that your strawberries are free from harmful chemicals.
But the beauty of this project lies in its adaptability. Feel free to experiment with different materials. While we’ve focused on using terracotta pots, you could also repurpose plastic containers, wooden pallets, or even old tires. Get creative with the design! Consider adding cascading herbs like thyme or oregano between the strawberry plants for a fragrant and functional companion planting arrangement. You can also adjust the size and height of your tower to suit your specific needs and preferences. For a truly unique touch, paint or decorate your tower with vibrant colors and patterns.
Don’t be afraid to personalize your DIY Strawberry Tower. Think about the specific strawberry varieties you want to grow. Some varieties are better suited for container gardening than others. Research different types and choose those that thrive in your local climate and growing conditions. Consider adding a self-watering system to simplify maintenance, especially if you live in a hot or dry climate. A simple drip irrigation system can ensure that your plants receive consistent moisture without requiring daily watering.
The possibilities are endless! The key is to have fun and embrace the learning process. Gardening is a journey, not a destination. There will be challenges along the way, but the rewards of harvesting your own fresh, juicy strawberries are well worth the effort.
We wholeheartedly encourage you to try this DIY Strawberry Tower project. It’s a rewarding experience that will connect you with nature, enhance your outdoor space, and provide you with a delicious and healthy harvest. Once you’ve built your tower and started growing your strawberries, we’d love to hear about your experience! Share your photos, tips, and challenges in the comments section below. Let’s create a community of strawberry tower enthusiasts and inspire others to embrace the joys of homegrown gardening. We are confident that you will find that making your own DIY Strawberry Tower is a rewarding and delicious experience.
Frequently Asked Questions (FAQ)
What type of soil should I use for my strawberry tower?
The best soil for a strawberry tower is a well-draining potting mix that is rich in organic matter. Avoid using garden soil, as it can become compacted in containers and hinder drainage. Look for a potting mix specifically formulated for containers or raised beds. You can also amend your potting mix with compost or other organic materials to improve its fertility and water retention. A slightly acidic soil pH (around 6.0 to 6.5) is ideal for strawberries.
How often should I water my strawberry tower?
The frequency of watering will depend on several factors, including the weather, the type of soil you’re using, and the size of your tower. In general, you should water your strawberry tower whenever the top inch of soil feels dry to the touch. During hot, dry weather, you may need to water daily or even twice a day. Be careful not to overwater, as this can lead to root rot. Ensure that your tower has adequate drainage to prevent water from pooling at the bottom. A self-watering system can be a great way to maintain consistent moisture levels.
What kind of sunlight do strawberries need?
Strawberries need at least six to eight hours of direct sunlight per day to thrive. Choose a location for your strawberry tower that receives plenty of sunlight throughout the day. If you live in a particularly hot climate, you may need to provide some afternoon shade to protect the plants from scorching. Insufficient sunlight can result in poor fruit production and leggy growth.
How do I fertilize my strawberry tower?
Strawberries are heavy feeders and benefit from regular fertilization. Use a balanced fertilizer specifically formulated for strawberries or fruits and vegetables. Follow the instructions on the fertilizer packaging for application rates and frequency. You can also use organic fertilizers such as compost tea or fish emulsion. Fertilize your strawberry tower every two to four weeks during the growing season. Avoid over-fertilizing, as this can burn the roots and damage the plants.
How do I protect my strawberries from pests and diseases?
Strawberries are susceptible to a variety of pests and diseases, including aphids, spider mites, slugs, and fungal diseases. To prevent pest and disease problems, choose disease-resistant strawberry varieties, provide good air circulation, and avoid overwatering. Inspect your plants regularly for signs of pests or diseases and take action promptly. You can use organic pest control methods such as insecticidal soap or neem oil to control aphids and spider mites. Slugs can be controlled with beer traps or by handpicking them off the plants. To prevent fungal diseases, avoid overhead watering and ensure that your plants have good air circulation.
Can I grow strawberries in a tower indoors?
While it’s possible to grow strawberries in a tower indoors, it requires providing adequate light and pollination. You’ll need to supplement natural light with grow lights to ensure that the plants receive enough energy for photosynthesis. You’ll also need to manually pollinate the flowers using a small brush or cotton swab. Indoor strawberry towers can be a fun and rewarding project, but they require more attention and effort than outdoor towers.
What are some good strawberry varieties for growing in a tower?
Some good strawberry varieties for growing in a tower include everbearing varieties like “Seascape,” “Albion,” and “Ozark Beauty.” These varieties produce fruit throughout the growing season, rather than just in the spring. Day-neutral varieties like “Chandler” and “Tristar” are also good choices for container gardening. Choose varieties that are well-suited to your local climate and growing conditions.
How do I overwinter my strawberry tower?
In colder climates, you’ll need to protect your strawberry tower from freezing temperatures during the winter. You can move the tower to a sheltered location, such as a garage or shed, or wrap it in burlap or blankets to insulate the plants. Water the plants sparingly during the winter, only when the soil is dry to the touch. In the spring, gradually acclimate the plants to outdoor conditions before moving them back to their permanent location.
How long will my strawberry tower last?
The lifespan of your strawberry tower will depend on the materials you use and how well you maintain it. Terracotta pots can last for many years if they are properly cared for. Plastic containers may degrade over time, especially if they are exposed to sunlight. With proper care and maintenance, your strawberry tower can provide you with years of delicious homegrown strawberries.
Can I grow other plants in my strawberry tower besides strawberries?
Yes, you can grow other plants in your strawberry tower alongside your strawberries. Companion planting can be beneficial for strawberries, as certain plants can help to deter pests, attract pollinators, or improve soil health. Good companion plants for strawberries include herbs like basil, thyme, and oregano, as well as flowers like marigolds and nasturtiums. Avoid planting aggressive or invasive plants that could compete with the strawberries for resources.


Leave a Comment