
Double Pepper Yields Home gardens are the dream of every gardener, aren’t they? Imagine baskets overflowing with vibrant, juicy peppers, enough to spice up every meal and share with friends and neighbors. But sometimes, despite our best efforts, our pepper plants just don’t seem to produce as much as we’d hoped. That’s where this DIY guide comes in!
For centuries, humans have cultivated peppers, from the fiery chilies of South America to the sweet bell peppers we enjoy today. Pepper cultivation is deeply rooted in many cultures, with specific varieties and growing techniques passed down through generations. But even with all that accumulated knowledge, maximizing your pepper harvest can still feel like a challenge.
That’s why I’m so excited to share these simple yet effective DIY tricks to help you double pepper yields home. We’ll explore easy-to-implement techniques that address common issues like pollination, nutrient deficiencies, and pruning. These hacks are designed to be budget-friendly and accessible to gardeners of all skill levels. Whether you’re a seasoned pro or just starting out, you’ll find something here to boost your pepper production and enjoy a bountiful harvest. Let’s get started and unlock the secrets to a pepper-packed garden!
Doppelte Paprika-Ernte Zuhause: Mein DIY-Geheimnis
Hallo liebe Gartenfreunde! Ich freue mich riesig, euch heute mein persönliches Geheimnis für eine doppelte Paprika-Ernte zu verraten. Ja, ihr habt richtig gelesen! Mit ein paar einfachen Tricks und Kniffen, die ich euch jetzt zeigen werde, könnt auch ihr eure Paprikapflanzen zu Höchstleistungen anspornen. Keine Angst, es ist gar nicht so schwer, wie es vielleicht klingt. Ich bin selbst kein Profi-Gärtner, aber mit ein bisschen Geduld und Liebe zum Detail hat es bei mir wunderbar funktioniert. Also, krempeln wir die Ärmel hoch und legen los!
Was du für die doppelte Paprika-Ernte brauchst
Bevor wir starten, hier eine Liste der Dinge, die du bereithalten solltest. Keine Sorge, die meisten davon hast du wahrscheinlich schon zu Hause oder kannst sie leicht besorgen:
* Paprikasamen oder Jungpflanzen: Wähle deine Lieblingssorten! Ich persönlich mag eine Mischung aus milden und scharfen Paprika.
* Anzuchterde: Für den Start ist eine spezielle Anzuchterde ideal, da sie nährstoffarm ist und die Wurzelbildung fördert.
* Töpfe oder Anzuchtschalen: Je nachdem, ob du mit Samen oder Jungpflanzen startest.
* Größere Töpfe oder ein Hochbeet: Für die spätere Umpflanzung.
* Gute Blumenerde: Eine nährstoffreiche Blumenerde ist wichtig für das Wachstum und die Fruchtbildung.
* Kompost oder organischer Dünger: Für eine zusätzliche Nährstoffversorgung.
* Pflanzstäbe oder Rankhilfen: Paprikapflanzen können recht hoch werden und brauchen Unterstützung.
* Gartenschere oder Messer: Zum Ausgeizen und Ernten.
* Gießkanne oder Gartenschlauch: Für die regelmäßige Bewässerung.
* Mulchmaterial (z.B. Stroh oder Holzhackschnitzel): Um die Feuchtigkeit im Boden zu halten und Unkraut zu unterdrücken.
* Optional: Ein Gewächshaus oder eine Folientunnel, um die Wachstumsbedingungen zu optimieren.
Phase 1: Die Anzucht (wenn du mit Samen startest)
Wenn du deine Paprika selbst aus Samen ziehen möchtest, ist das eine tolle Möglichkeit, die Kontrolle über den gesamten Prozess zu haben. Hier sind die Schritte, die du befolgen solltest:
1. Samen vorbereiten: Lege die Paprikasamen für etwa 24 Stunden in lauwarmes Wasser. Das hilft, die Keimung zu beschleunigen.
2. Aussaat: Fülle deine Anzuchtschalen oder Töpfe mit Anzuchterde. Drücke die Erde leicht an und verteile die Samen gleichmäßig darauf. Bedecke die Samen mit einer dünnen Schicht Erde (ca. 0,5 cm).
3. Bewässerung: Befeuchte die Erde vorsichtig mit einer Sprühflasche. Vermeide es, die Samen wegzuschwemmen.
4. Wärme und Licht: Stelle die Anzuchtschalen an einen warmen und hellen Ort. Eine Temperatur von 22-25°C ist ideal. Du kannst auch eine Anzuchtlampe verwenden, um den Pflanzen ausreichend Licht zu geben.
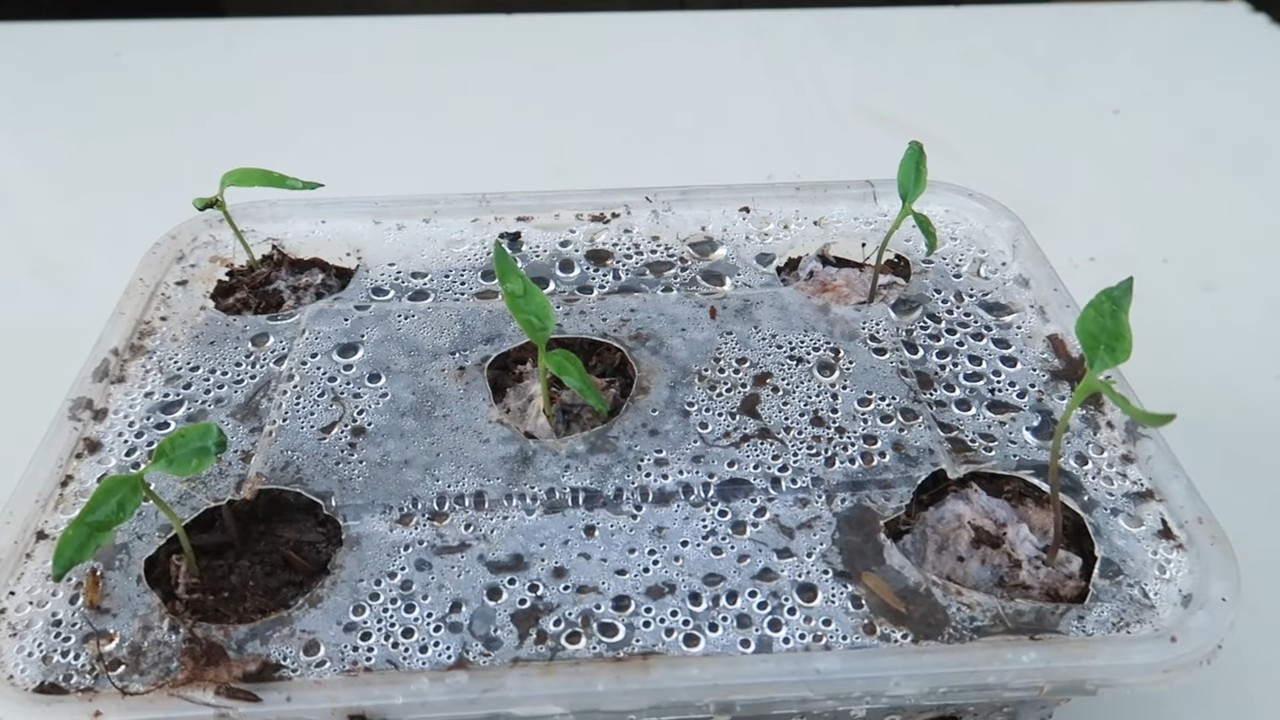
5. Feuchtigkeit halten: Decke die Anzuchtschalen mit einer Klarsichtfolie oder einem Deckel ab, um die Luftfeuchtigkeit zu erhöhen. Lüfte die Schalen täglich kurz, um Schimmelbildung zu vermeiden.
6. Keimung: Nach etwa 1-2 Wochen sollten die ersten Keimlinge erscheinen. Entferne die Folie oder den Deckel, sobald die Pflanzen aus der Erde kommen.
7. Pikieren: Wenn die Pflanzen 2-3 echte Blätter haben, ist es Zeit, sie zu pikieren. Das bedeutet, dass du sie vorsichtig aus den Anzuchtschalen nimmst und in einzelne Töpfe mit Blumenerde umpflanzt. Achte darauf, die Wurzeln nicht zu beschädigen.
Phase 2: Die Umpflanzung ins Freie oder ins Gewächshaus
Sobald die Paprikapflanzen kräftig genug sind und die Temperaturen steigen, können sie ins Freie oder ins Gewächshaus umgepflanzt werden. Hier sind die Schritte:
1. Abhärten: Bevor du die Pflanzen ins Freie pflanzt, solltest du sie langsam an die neuen Bedingungen gewöhnen. Stelle sie tagsüber für einige Stunden nach draußen und hole sie abends wieder rein. Wiederhole das für etwa eine Woche.
2. Standort vorbereiten: Wähle einen sonnigen und windgeschützten Standort für deine Paprikapflanzen. Der Boden sollte locker, durchlässig und nährstoffreich sein.
3. Pflanzlöcher ausheben: Grabe Pflanzlöcher, die etwas größer sind als die Wurzelballen der Pflanzen.
4. Pflanzen einsetzen: Setze die Paprikapflanzen vorsichtig in die Pflanzlöcher. Achte darauf, dass die Oberseite des Wurzelballens mit der Erdoberfläche abschließt.
5. Anfüllen und gießen: Fülle die Pflanzlöcher mit Erde auf und drücke sie leicht an. Gieße die Pflanzen anschließend gründlich.
6. Stützen anbringen: Stecke Pflanzstäbe neben die Pflanzen und binde sie locker daran fest. Das gibt ihnen Halt und verhindert, dass sie bei Wind umknicken.
7. Mulchen: Verteile eine Schicht Mulchmaterial um die Pflanzen herum. Das hilft, die Feuchtigkeit im Boden zu halten und Unkraut zu unterdrücken.
Phase 3: Die Pflege – Mein Geheimnis für die doppelte Ernte
Jetzt kommt der wichtigste Teil: die richtige Pflege! Hier sind meine besten Tipps und Tricks, um deine Paprikapflanzen zu Höchstleistungen anzuspornen:
1. Regelmäßiges Gießen: Paprikapflanzen brauchen regelmäßig Wasser, besonders während der Blüte- und Fruchtbildungsphase. Gieße sie am besten morgens, damit die Blätter bis zum Abend abtrocknen können. Vermeide Staunässe, da dies zu Wurzelfäule führen kann.
2. Richtig Düngen: Paprikapflanzen sind Starkzehrer und brauchen ausreichend Nährstoffe. Dünge sie regelmäßig mit einem organischen Dünger oder Kompost. Ich verwende gerne Brennnesseljauche, die ich selbst herstelle. Sie ist reich an Stickstoff und anderen wichtigen Nährstoffen.
3. Ausgeizen: Das Ausgeizen ist ein wichtiger Schritt, um die Ernte zu maximieren. Entferne regelmäßig die Seitentriebe, die sich in den Blattachseln bilden. Dadurch konzentriert sich die Pflanze auf die Bildung von Früchten und nicht auf das Wachstum von unnötigen Trieben.
* Wie geht das Ausgeizen? Suche nach den kleinen Trieben, die zwischen dem Hauptstamm und den Blättern wachsen. Knipse sie einfach mit den Fingern oder einer Gartenschere ab. Achte darauf, den Hauptstamm nicht zu beschädigen.
4. Blüten fördern: Um die Blütenbildung zu fördern, kannst du die Pflanzen mit einem speziellen Blühdünger düngen. Achte darauf, dass der Dünger reich an Phosphor und Kalium ist.
5. Bestäubung unterstützen: Paprikapflanzen sind Selbstbestäuber, aber du kannst die Bestäubung unterstützen, indem du die Pflanzen leicht schüttelst oder mit einem Pinsel über die Blüten streichst. Das hilft, den Pollen zu verteilen.
6. Schädlinge und Krankheiten bekämpfen: Achte auf Anzeichen von Schädlingen oder Krankheiten. Blattläuse, Spinnmilben und Mehltau können Paprikapflanzen befallen. Bekämpfe sie mit natürlichen Mitteln wie Neemöl oder Schmierseifenlösung.
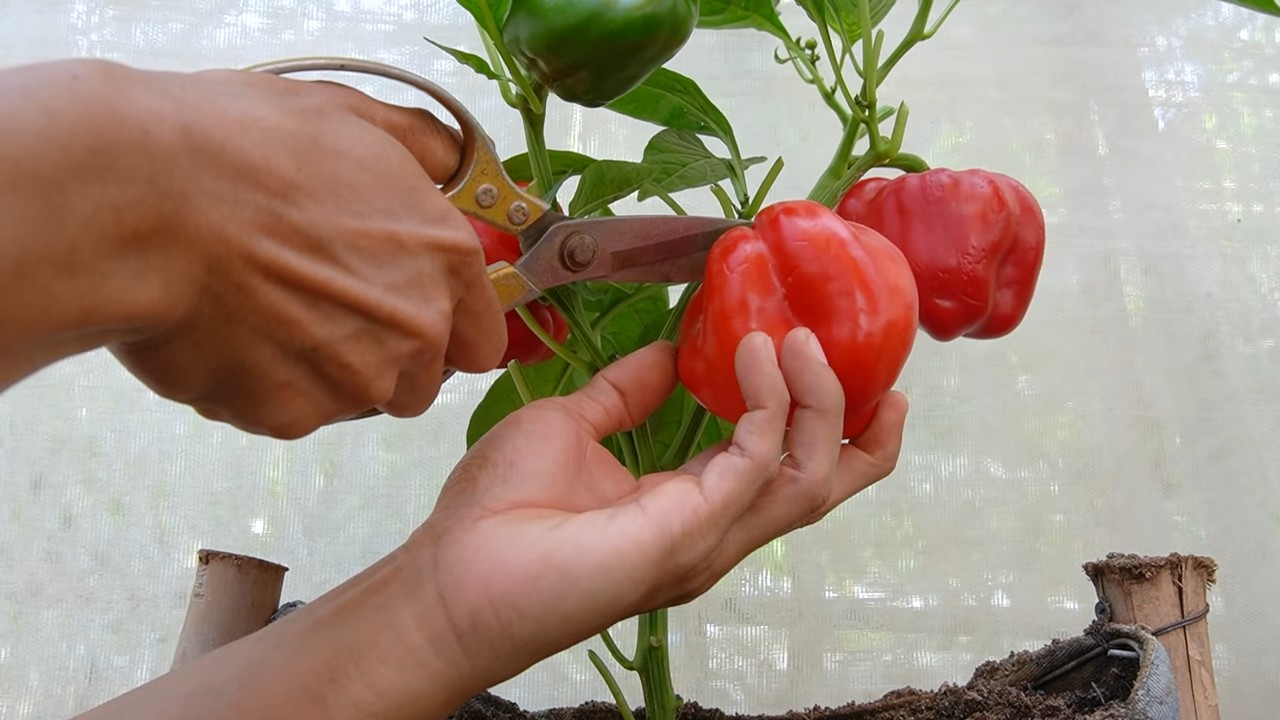
7. Regelmäßig ernten: Ernte die Paprika, sobald sie reif sind. Das regt die Pflanze an, weitere Früchte zu bilden. Schneide die Paprika mit einer Gartenschere ab, um die Pflanze nicht zu beschädigen.
8. Sonnenschutz: An sehr heißen Tagen kann es sinnvoll sein, die Paprikapflanzen vor direkter Sonneneinstrahlung zu schützen. Du kannst sie mit einem Schattiernetz abdecken oder sie an einen halbschattigen Ort stellen.
9. Bodenpflege: Lockere den Boden regelmäßig auf, um die Belüftung zu verbessern. Entferne Un
Conclusion
So, there you have it! This simple yet incredibly effective DIY trick for doubling pepper yields at home is more than just a gardening hack; it’s a game-changer for anyone looking to maximize their harvest and enjoy an abundance of fresh, flavorful peppers. We’ve walked you through the process, highlighting the benefits and providing clear, easy-to-follow instructions.
Why is this a must-try? Because it’s efficient, cost-effective, and yields impressive results. Imagine the satisfaction of harvesting twice as many peppers from the same plants, all thanks to a little strategic pruning and care. Think of the delicious salsas, sauces, and dishes you can create with your bumper crop! This method isn’t just about quantity; it’s about quality too. Healthier, more productive plants translate to more vibrant and flavorful peppers.
But don’t just take our word for it. We encourage you to experiment and adapt this technique to your specific growing conditions and pepper varieties. Perhaps you’ll find that a slightly different pruning schedule works best in your climate, or maybe you’ll discover that certain fertilizer combinations further enhance the results. The beauty of gardening lies in the constant learning and adaptation.
Consider these variations to personalize your approach:
* Experiment with different pepper varieties: Some peppers might respond even better to this technique than others. Try it on bell peppers, jalapeños, habaneros, and see which ones thrive the most.
* Adjust the pruning schedule: Depending on your climate and growing season, you might need to adjust the timing of your pruning. Observe your plants closely and adapt accordingly.
* Optimize your fertilization: Supplement your soil with a balanced fertilizer specifically formulated for peppers. This will provide your plants with the nutrients they need to support increased fruit production.
* Companion planting: Consider planting beneficial companion plants alongside your peppers to deter pests and attract pollinators. Marigolds, basil, and nasturtiums are excellent choices.
This DIY trick for doubling pepper yields is not just a one-time solution; it’s a sustainable practice that can transform your gardening experience. It empowers you to take control of your harvest and enjoy the fruits (or rather, vegetables) of your labor.
We are confident that you’ll be amazed by the results. So, grab your pruning shears, get your hands dirty, and prepare to be amazed by the abundance of peppers you’ll be harvesting.
We’re eager to hear about your experiences! Share your results, tips, and variations in the comments below. Let’s create a community of pepper-growing enthusiasts and learn from each other’s successes. Happy gardening!
Frequently Asked Questions (FAQ)
What types of peppers does this DIY trick work best for?
This technique is generally effective for most pepper varieties, including bell peppers, jalapeños, banana peppers, cayenne peppers, and even hotter varieties like habaneros and Scotch bonnets. However, some varieties might respond more favorably than others. It’s always a good idea to experiment and observe how different peppers react to the pruning and care. Smaller pepper varieties might not benefit as much as larger ones.
When is the best time to start pruning my pepper plants?
The ideal time to begin pruning is when your pepper plants are young and have developed several sets of true leaves, typically around 6-8 inches tall. Avoid pruning too early, as this can stunt their growth. You want the plant to be established enough to handle the stress of pruning. Also, avoid pruning during periods of extreme heat or drought, as this can further stress the plants.
How often should I prune my pepper plants using this method?
The initial pruning is the most crucial. After that, you can perform light maintenance pruning as needed to remove any dead or diseased leaves, or to improve airflow within the plant. Avoid excessive pruning, as this can reduce the plant’s overall energy and yield. Focus on removing suckers and any branches that are crossing or rubbing against each other.
What tools do I need for pruning pepper plants?
You’ll need a pair of clean, sharp pruning shears or scissors. Make sure your tools are sanitized to prevent the spread of diseases. A small bucket or container to collect the pruned leaves and stems is also helpful. Gloves are recommended to protect your hands from any potential irritants.
Will this DIY trick work in all climates?
This technique can be adapted to various climates, but you might need to adjust the timing of your pruning based on your local growing season. In warmer climates with longer growing seasons, you can start pruning earlier and continue for a longer period. In cooler climates with shorter growing seasons, you might need to start pruning later and focus on maximizing the plant’s energy for fruit production.
What kind of fertilizer should I use to support increased pepper yields?
A balanced fertilizer specifically formulated for peppers is ideal. Look for a fertilizer with a higher phosphorus content (the middle number in the NPK ratio), as phosphorus promotes flowering and fruit development. You can also supplement with compost or other organic matter to improve soil health and provide essential nutrients. Avoid over-fertilizing, as this can lead to excessive foliage growth at the expense of fruit production.
Can I use this technique on pepper plants grown in containers?
Yes, this technique is suitable for pepper plants grown in containers as well. Just make sure your containers are large enough to accommodate the plant’s root system and provide adequate drainage. Container-grown plants might require more frequent watering and fertilization than those grown in the ground.
What if I accidentally prune too much off my pepper plant?
Don’t panic! Pepper plants are generally resilient and can recover from minor pruning mistakes. Just avoid further pruning for a while and allow the plant to recover. Provide adequate water and nutrients to support its regrowth. In most cases, the plant will bounce back and continue to produce peppers.
How long does it take to see results from this DIY trick?
You should start to see results within a few weeks of pruning. The plant will begin to produce more flowers and set more fruit. The exact timing will depend on the pepper variety, your growing conditions, and the overall health of your plants. Be patient and continue to provide proper care, and you’ll be rewarded with a bountiful harvest.
What are some common problems that can affect pepper yields, and how can I prevent them?
Common problems include pests (such as aphids and whiteflies), diseases (such as blossom end rot and fungal infections), and nutrient deficiencies. To prevent these problems, practice good garden hygiene, inspect your plants regularly for signs of pests or diseases, and provide adequate water and nutrients. Consider using organic pest control methods, such as insecticidal soap or neem oil. Ensure proper soil drainage to prevent root rot.

Leave a Comment