
Drain Starfish DIY: Ever stared down at your shower drain, a tangled mess of hair and gunk clinging stubbornly to a creepy, multi-armed plastic starfish, and thought, “There has to be a better way?” I know I have! Those little drain strainers, while seemingly helpful, often become breeding grounds for unpleasantness. But fear not, fellow home dwellers, because I’m about to share some game-changing DIY tricks to banish those drain starfish blues forever!
The concept of keeping drains clear has been around for ages. Ancient civilizations understood the importance of sanitation, even if their methods were a bit…rustic. While they might not have had plastic starfish, they certainly dealt with clogged drains! Today, we have the advantage of modern materials and a little ingenuity to create effective and aesthetically pleasing solutions.
Why is this DIY so crucial? Because a clogged drain is more than just an inconvenience; it’s a potential health hazard and can lead to costly plumbing repairs. Plus, let’s be honest, nobody wants to deal with standing water and unpleasant odors. This Drain Starfish DIY guide will empower you to take control of your drains, save money, and create a cleaner, healthier home environment. So, grab your tools, and let’s dive in!
DIY Drain Starfish: Say Goodbye to Clogged Drains!
Okay, friends, let’s talk about something we all dread: clogged drains. Hair, soap scum, mysterious gunk – it all adds up to a slow-draining sink or shower, and nobody wants that! I’ve tried everything from chemical drain cleaners (which I really don’t like using) to those flimsy plastic drain snakes. Some worked okay, some didn’t work at all, and some just made the problem worse.
That’s why I’m so excited to share this super simple, super effective DIY drain starfish! It’s cheap, easy to make, and it actually works to prevent clogs before they even start. Trust me, once you try this, you’ll wonder why you didn’t do it sooner.
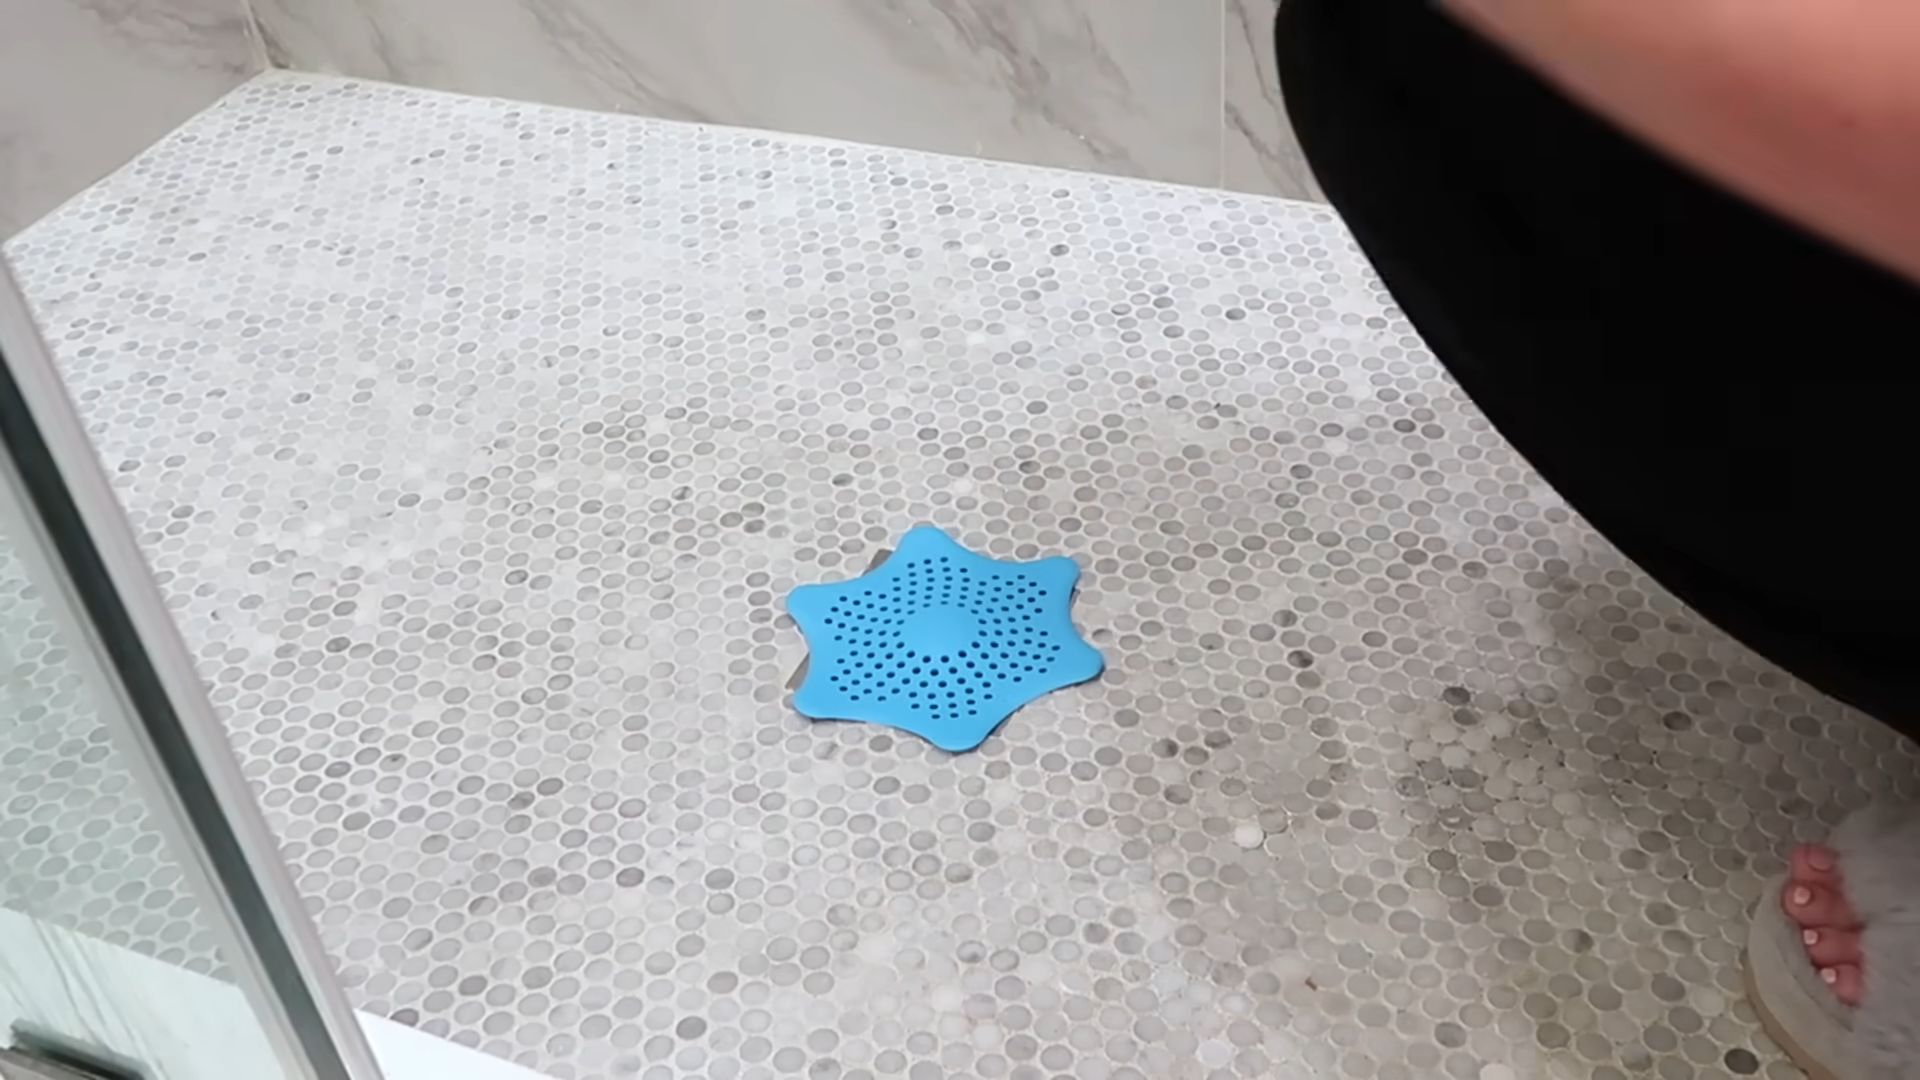
What is a Drain Starfish?
Basically, it’s a little contraption that sits right over your drain and catches hair and other debris before it goes down the pipe. The “starfish” design allows water to flow freely while trapping the nasties. You just lift it out every few days, clean it off, and pop it back in. So easy!
Materials You’ll Need:
* Plastic Canvas: You can find this at any craft store. It comes in sheets, and you’ll only need a small piece. I prefer the clear or white, but any color will work.
* Scissors or Craft Knife: For cutting the plastic canvas. A sharp pair of scissors works just fine, but a craft knife will give you cleaner edges.
* Needle-Nose Pliers (Optional): These can be helpful for bending the plastic canvas.
* Sandpaper (Optional): For smoothing any rough edges.
* Ruler or Measuring Tape: To ensure accurate cuts.
* Pencil or Marker: For marking the plastic canvas.
Step-by-Step Instructions:
Okay, let’s get started! This is so easy, I promise you’ll be done in no time.
Phase 1: Creating the Starfish Base
1. Measure Your Drain: The first thing you need to do is measure the diameter of your drain opening. This is crucial because you want your starfish to be big enough to cover the entire drain but not so big that it doesn’t fit properly. Write down this measurement – we’ll call it “Drain Diameter.”
2. Cut the Base Circle: On your plastic canvas, draw a circle that’s slightly larger than your “Drain Diameter.” I usually add about 1/4 inch to each side. This will give the starfish a little overhang to catch debris more effectively. Use your scissors or craft knife to carefully cut out the circle. Try to make the cut as smooth as possible.
3. Find the Center: Now, find the center of your plastic canvas circle. You can do this by folding the circle in half and then in half again. The point where the folds intersect is the center. Mark this point with your pencil or marker.
Phase 2: Adding the Starfish “Arms”
1. Plan the Arms: This is where the “starfish” part comes in! You’re going to cut slits into the circle to create the arms. I usually aim for 6-8 arms, but you can adjust this based on the size of your drain and your personal preference.
2. Mark the Slits: Starting from the center point you marked earlier, draw lines radiating outwards towards the edge of the circle. These lines will be where you make your cuts. Make sure the lines are evenly spaced around the circle. The length of the lines will determine how long the arms are. I recommend making them about 2/3 of the radius of the circle.
3. Cut the Slits: Carefully cut along the lines you just drew, starting from the edge of the circle and stopping at the center point. This will create the “arms” of your starfish.
Phase 3: Shaping and Finishing
1. Bend the Arms (Optional): This step is optional, but I find it helps the starfish catch more debris. Using your fingers or needle-nose pliers, gently bend each arm upwards slightly. This will create a little “lip” that will help trap hair and other gunk. Don’t bend them too much, just a slight curve is all you need.
2. Smooth the Edges: After cutting the plastic canvas, you might have some rough or sharp edges. This is where the sandpaper comes in handy. Gently sand down any rough edges to make them smooth and prevent them from scratching your sink or shower. If you don’t have sandpaper, you can use a nail file or even just rub the edges against a hard surface.
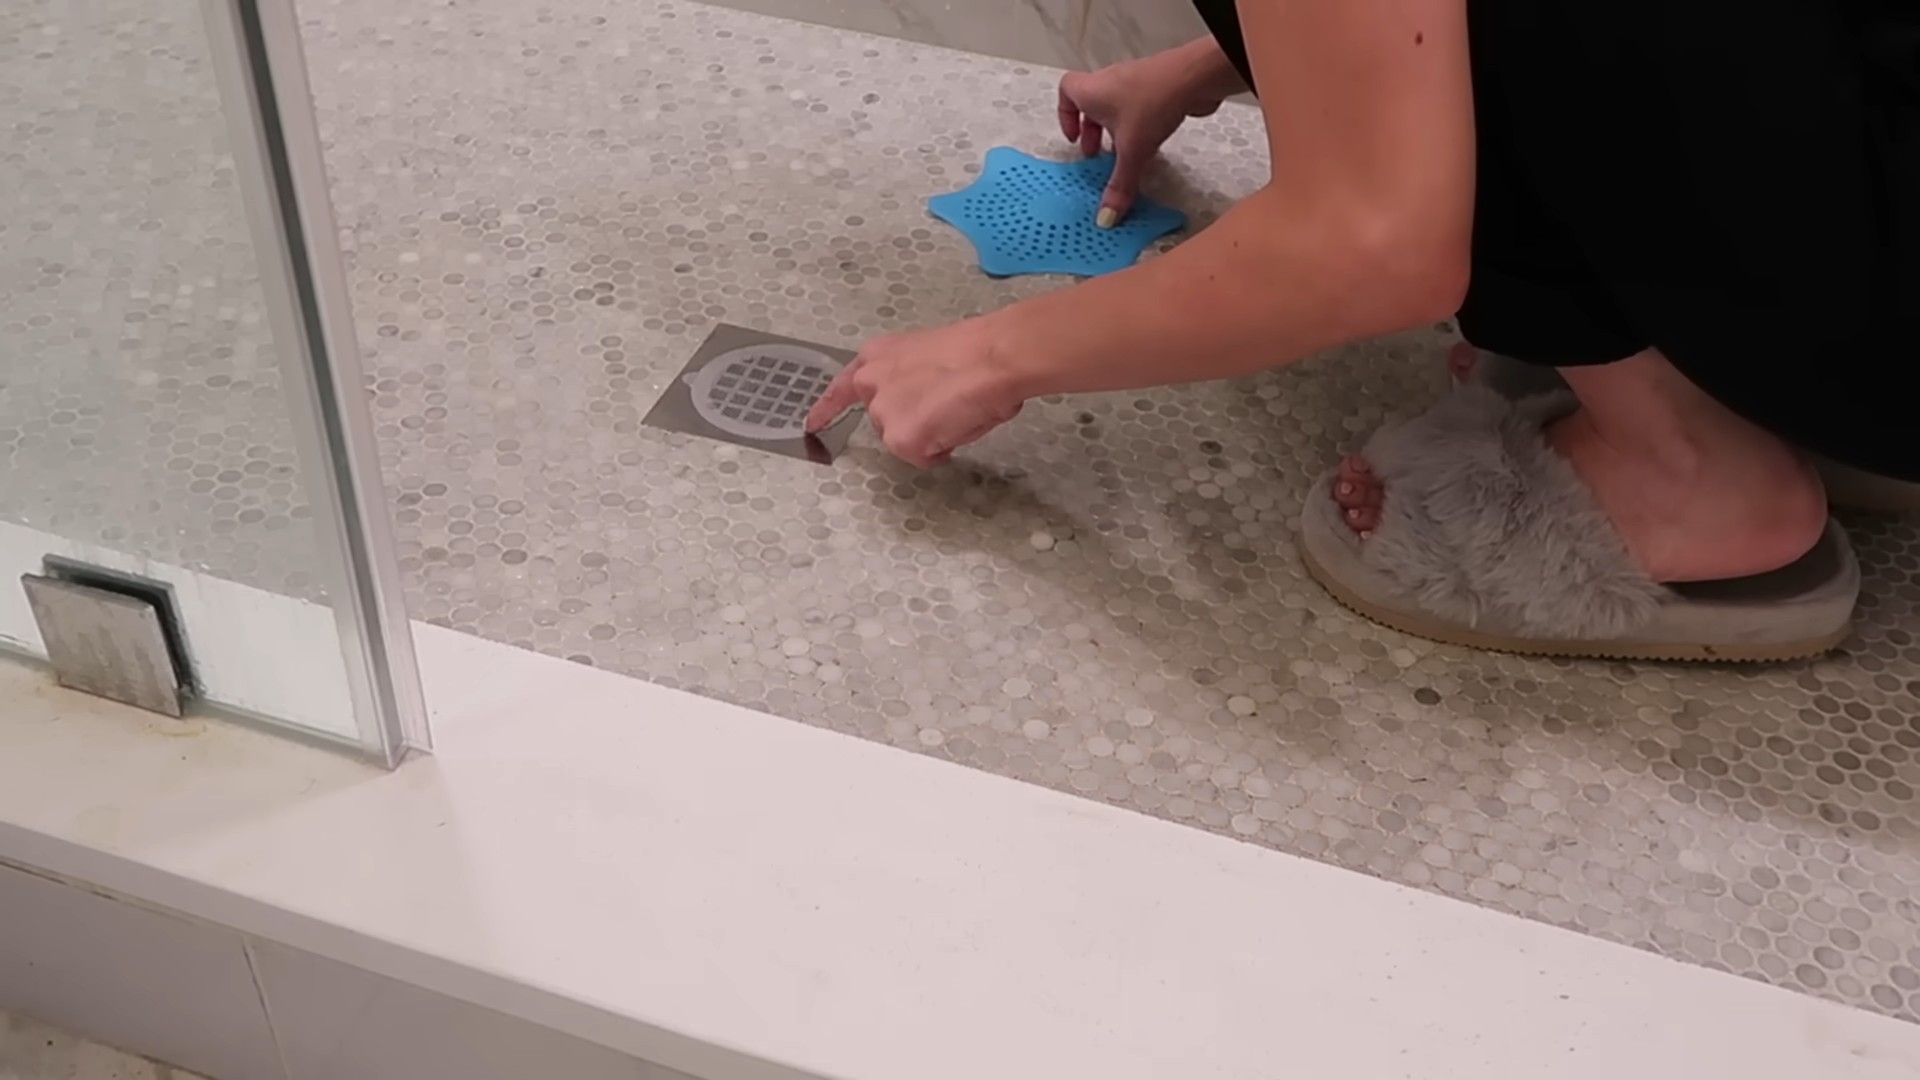
3. Test the Fit: Now, place your DIY drain starfish over your drain. Make sure it fits snugly and covers the entire opening. If it’s too big, you can trim it down a little. If it’s too small, well, you’ll have to start over (but don’t worry, it’s so cheap and easy to make!).
4. Adjust as Needed: Observe how the water drains with the starfish in place. If the water is draining slowly, you might need to make the slits a little wider or add more arms. You can also try bending the arms at a different angle. Experiment until you find what works best for your drain.
Tips and Tricks for Success:
* Use a Sturdy Plastic Canvas: Don’t go for the super cheap, flimsy stuff. A thicker plastic canvas will be more durable and last longer.
* Be Careful with Sharp Tools: Always use caution when using scissors or a craft knife. Cut away from yourself and use a cutting mat to protect your work surface.
* Clean Regularly: The key to keeping your drains clog-free is to clean your drain starfish regularly. I recommend doing this every few days, or whenever you notice it’s starting to accumulate debris.
* Experiment with Different Designs: Don’t be afraid to get creative! You can try different shapes and sizes for the arms, or even add multiple layers of plastic canvas for extra filtration.
* Consider the Drain Type: This DIY works best for standard round drains. If you have a different type of drain, you might need to adjust the design accordingly. For example, for a square drain, you could create a square starfish.
* Don’t Force It: If the starfish doesn’t fit easily into your drain, don’t force it. You could damage your drain or the starfish. Instead, trim it down a little until it fits comfortably.
* Safety First: Always wear gloves when cleaning your drain starfish, especially if you’re dealing with a lot of hair and gunk.
Troubleshooting:
* Starfish Keeps Floating: If your starfish keeps floating up, it might be too light. You can try adding a small weight to the center, such as a metal washer or a small stone. Just make sure the weight is securely attached and won’t rust or corrode.
* Water Drains Slowly: If the water is draining slowly, the slits might be too narrow or the arms might be too close together. Try widening the slits or adding more arms. You can also try bending the arms at a steeper angle.
* Starfish Doesn’t Catch Hair: If the starfish isn’t catching hair effectively, the arms might be too short or too far apart. Try making the arms longer or adding more arms. You can also try bending the arms upwards more to create a deeper “lip.”
* Starfish Breaks Easily: If your starfish is breaking easily, you might be using a flimsy plastic canvas. Try using a thicker, more durable plastic canvas. You can also try reinforcing the arms with glue or tape.
Why This Works:
The beauty of this DIY drain starfish is its simplicity. The plastic canvas allows water to flow freely while the arms trap hair and other debris. By catching these materials before they go down the drain, you’re preventing them from accumulating and causing clogs. Plus, it’s so easy to clean! Just lift it out, rinse it off, and pop it back in. No more messy drain snakes or harsh chemicals!
Alternative Materials:
While I prefer using plastic canvas because it’s durable and easy to work with, you can also experiment with other materials. Here are a few ideas:
* Thick Plastic Mesh: You can find this at some hardware stores or online. It’s similar to plastic canvas but has larger holes.
* Rubber Sheet: A thin rubber sheet can also be used to create a drain starfish. It’s more flexible than plastic canvas, but it might not be as durable.
* Metal Mesh: Metal mesh is a more durable option, but it can be more difficult to cut and shape. Make sure to use a rust-resistant metal.
Final Thoughts:
I hope you found this DIY drain starfish tutorial helpful! I’ve been using these in my sinks and showers for years, and they’ve made a huge difference in preventing clogs. It
Conclusion
So, there you have it! The Drain Starfish DIY – a simple, effective, and surprisingly satisfying solution to a common household problem. We’ve walked you through the steps, highlighting the ease and affordability of creating your own drain protector. But why is this DIY a must-try?
Firstly, it’s about reclaiming your time and sanity. No more wrestling with clogged drains, no more expensive plumbing bills for issues you can easily prevent. The Drain Starfish DIY is a proactive measure, stopping hair and debris before they even have a chance to cause a blockage. Think of it as a small investment in the long-term health of your plumbing system.
Secondly, it’s about customization. Store-bought drain protectors often come in limited sizes and styles, rarely fitting perfectly or complementing your bathroom decor. With this DIY, you have complete control. Choose your materials, colors, and even the shape of your starfish to create a drain protector that is both functional and aesthetically pleasing.
Thirdly, it’s about sustainability. By repurposing materials you likely already have at home, you’re reducing waste and contributing to a more eco-friendly lifestyle. It’s a small act, but every little bit helps.
Variations and Suggestions:
* Material Matters: While we’ve focused on using readily available plastic materials, feel free to experiment! Consider using silicone for a more flexible and durable starfish. You could even try using metal mesh for a more robust filter, although be careful of sharp edges.
* Color Coordination: Don’t be afraid to get creative with colors! Match your Drain Starfish to your bathroom tiles, shower curtain, or even your favorite bath toys. A pop of color can make this functional item a fun addition to your bathroom.
* Size and Shape: Adjust the size and shape of your starfish to perfectly fit your drain. For larger drains, create a larger starfish with more arms. For smaller drains, a more compact design might be more suitable. You can even experiment with different shapes altogether – a flower, a sun, or even a simple circle with strategically placed holes.
* Adding Weight: If your Drain Starfish tends to float, consider adding small weights to the tips of the arms. You can use small pebbles, metal washers, or even a dab of silicone caulk. Just make sure the weights are securely attached and won’t come loose and clog the drain themselves.
* Cleaning is Key: Remember to regularly clean your Drain Starfish to maintain its effectiveness. Simply remove it from the drain, rinse it under running water, and remove any accumulated hair or debris. A quick scrub with a brush can also help to remove stubborn buildup.
We are confident that once you try this Drain Starfish DIY, you’ll wonder how you ever lived without it. It’s a simple, effective, and customizable solution that will save you time, money, and frustration.
So, what are you waiting for? Gather your materials, unleash your creativity, and get crafting! We encourage you to try this DIY project and share your experiences with us. Post photos of your creations on social media using #DrainStarfishDIY and let us know how it’s working for you. We can’t wait to see your unique and innovative drain protectors! Your feedback will help others discover the benefits of this simple yet powerful DIY solution. Let’s conquer those clogged drains together, one starfish at a time!
Frequently Asked Questions (FAQ)
Q: What exactly is a Drain Starfish DIY, and why should I make one?
A: A Drain Starfish DIY is a homemade drain protector designed to catch hair and debris before they clog your drain. It’s a cost-effective and customizable alternative to store-bought drain strainers. You should make one because it prevents costly plumbing repairs, saves you time and effort on unclogging drains, and allows you to personalize your bathroom accessories. Plus, it’s a great way to repurpose materials you already have at home!
Q: What materials do I need to make a Drain Starfish?
A: The basic materials you’ll need are:
* A sheet of flexible plastic (like a plastic container lid, a yogurt container, or a plastic placemat).
* Scissors or a craft knife.
* A marker or pen.
* A template (optional, but helpful for creating a consistent shape).
* Optional: Sandpaper (for smoothing edges), glue or silicone (for adding weights), decorative elements (paint, glitter, etc.).
Q: How do I prevent the Drain Starfish from floating?
A: If your Drain Starfish tends to float, you can add small weights to the tips of the arms. Here are a few options:
* Small pebbles: Glue small pebbles to the underside of the arms.
* Metal washers: Attach metal washers using glue or silicone.
* Silicone caulk: Apply a small dab of silicone caulk to the underside of the arms.
Make sure the weights are securely attached and won’t come loose and clog the drain themselves.
Q: How often should I clean my Drain Starfish?
A: You should clean your Drain Starfish regularly, ideally every few days or at least once a week, depending on how much hair and debris it collects. Regular cleaning prevents buildup and ensures that it continues to function effectively.
Q: How do I clean my Drain Starfish?
A: Cleaning your Drain Starfish is easy:
1. Remove it from the drain.
2. Rinse it under running water to remove loose hair and debris.
3. Use a brush (like an old toothbrush) to scrub away any stubborn buildup.
4. If necessary, soak it in a solution of warm water and dish soap for a few minutes to loosen any remaining debris.
5. Rinse thoroughly and allow it to dry before placing it back in the drain.
Q: Can I use different materials besides plastic?
A: Yes, you can experiment with different materials, but consider these factors:
* Silicone: Silicone is a great option because it’s flexible, durable, and water-resistant.
* Metal mesh: Metal mesh can provide a more robust filter, but be careful of sharp edges. Make sure to smooth the edges to prevent cuts.
* Avoid absorbent materials: Do not use absorbent materials like fabric or cardboard, as they will become waterlogged and ineffective.
Q: My drain is a different size or shape. Can I still use this DIY?
A: Absolutely! The beauty of this DIY is its customizability. Adjust the size and shape of your Drain Starfish to perfectly fit your drain. For larger drains, create a larger starfish with more arms. For smaller drains, a more compact design might be more suitable. You can even experiment with different shapes altogether – a flower, a sun, or even a simple circle with strategically placed holes.
Q: Is this Drain Starfish DIY safe for all types of drains?
A: Generally, yes, this DIY is safe for most types of drains. However, be mindful of the materials you use. Avoid using materials that could corrode or damage your drain pipes. Also, ensure that the Drain Starfish is securely in place and won’t accidentally fall down the drain.
Q: What if my Drain Starfish doesn’t catch all the hair?
A: If your Drain Starfish isn’t catching all the hair, consider these adjustments:
* Increase the number of arms: More arms will provide more surface area to catch hair.
* Make the arms longer: Longer arms will extend further across the drain opening.
* Adjust the size of the holes: Smaller holes will catch finer hairs, but make sure they’re not too small, or they’ll clog easily.
* Ensure proper placement: Make sure the Drain Starfish is positioned correctly over the drain opening.
Q: Can I decorate my Drain Starfish?
A: Yes, you can definitely decorate your Drain Starfish! Use waterproof paint, glitter, or other decorative elements to personalize it and match your bathroom decor. Just make sure the decorations are securely attached and won’t come loose and clog the drain.
Q: Where can I share my Drain Starfish DIY creation?
A: We encourage you to share your creations on social media using #DrainStarfishDIY. You can also share your photos and experiences in the comments section of this article. We’d love to see your unique and innovative drain protectors!

Leave a Comment