
Grow Asparagus Quickly Easily with these simple, yet effective DIY tricks! Have you ever dreamed of harvesting your own delicious, tender asparagus spears right from your backyard? I know I have! For centuries, asparagus has been a prized vegetable, enjoyed by ancient Romans and Greeks for its unique flavor and purported medicinal properties. But let’s be honest, waiting years for your asparagus plants to mature can feel like an eternity.
That’s where these DIY hacks come in! We’re going to explore proven methods to accelerate asparagus growth, so you can enjoy a bountiful harvest much sooner than you thought possible. Imagine serving freshly picked asparagus at your next dinner party, knowing you nurtured it from a tiny crown to a thriving plant.
This article is your guide to unlocking the secrets of rapid asparagus cultivation. Whether you’re a seasoned gardener or just starting out, these tips will empower you to grow asparagus quickly easily and efficiently. Say goodbye to years of waiting and hello to a garden overflowing with this delectable spring vegetable! Let’s get started!

Growing Asparagus: A Speedy Guide for the Impatient Gardener
Okay, let’s be honest, asparagus is delicious, but waiting years for your first harvest can feel like an eternity. I get it! That’s why I’m going to share my secrets for getting a jumpstart on your asparagus patch and enjoying those tender spears sooner than you think. While asparagus traditionally takes 2-3 years to produce a significant harvest, these tips will help you accelerate the process and maximize your yield.
Choosing the Right Asparagus Variety
Before we even think about planting, selecting the right variety is crucial. Some varieties are simply faster growers and more productive than others.
* Jersey Knight: This is my go-to recommendation. It’s an all-male hybrid, meaning it focuses its energy on spear production rather than seed production. This translates to bigger, more abundant harvests. Plus, it’s disease-resistant, which is always a bonus.
* Jersey Giant: Similar to Jersey Knight, this is another excellent all-male hybrid known for its high yields and disease resistance.
* Millennium: This is a Canadian variety that’s incredibly cold-hardy, making it a great choice if you live in a colder climate. It’s also known for its early production.
* Guelph Millennium: Another Canadian variety, very similar to Millennium, with excellent cold hardiness and good spear quality.
Preparing Your Asparagus Bed: The Foundation for Success
Asparagus needs a well-prepared bed to thrive. Think of it as building a luxurious home for your plants 鈥?the better the foundation, the happier they’ll be.
* Sunlight: Asparagus needs at least 6-8 hours of direct sunlight per day. Choose a location that gets plenty of sun.
* Soil: Asparagus prefers well-drained, sandy loam soil with a pH between 6.5 and 7.0. If your soil is heavy clay, you’ll need to amend it with plenty of organic matter.
* Drainage: Good drainage is essential. Asparagus crowns will rot if they sit in soggy soil.
* Weed Control: Asparagus is a slow starter, so it’s important to eliminate weeds before planting. Weeds will compete for nutrients and sunlight, hindering your asparagus’s growth.
Step-by-Step Planting Guide
Now for the fun part 鈥?getting those asparagus crowns in the ground!
1. Timing is Key: Plant asparagus crowns in early spring, as soon as the soil can be worked. This is usually around the same time you’d plant other cool-season vegetables.
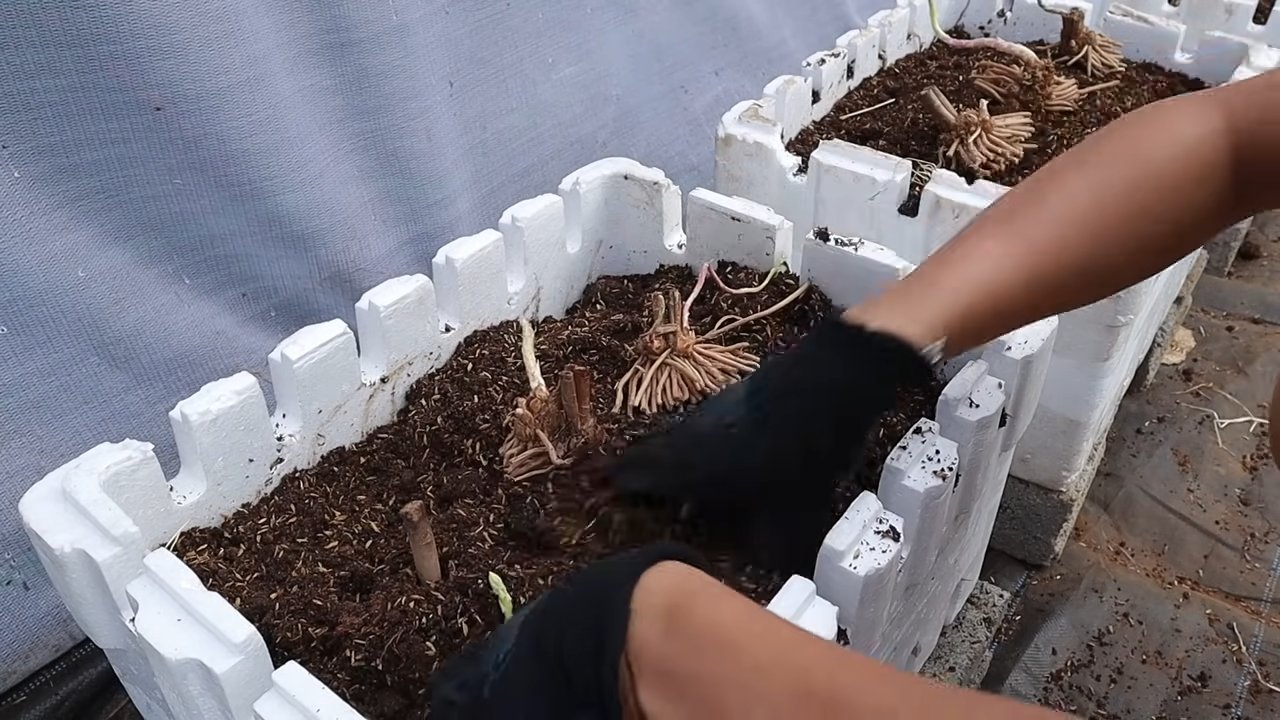
2. Dig a Trench: Dig a trench that’s about 12 inches wide and 6-8 inches deep. The length of the trench will depend on how many crowns you’re planting.
3. Amend the Soil: Mix plenty of compost or well-rotted manure into the soil you removed from the trench. This will provide your asparagus with the nutrients it needs to get off to a good start. I usually add a slow-release fertilizer formulated for vegetables at this stage as well.
4. Create a Ridge: Create a small ridge of soil down the center of the trench. This will help with drainage and prevent the crowns from sitting in water.
5. Space the Crowns: Place the asparagus crowns on the ridge, spacing them about 12-18 inches apart. Make sure the buds (the pointy parts) are facing upwards.
6. Cover the Crowns: Gently cover the crowns with about 2-3 inches of soil. Don’t bury them too deep at first.
7. Water Thoroughly: Water the trench well after planting. This will help settle the soil and encourage the crowns to start growing.
Year One: Nurturing Your Asparagus Patch
The first year is all about establishing a strong root system. Resist the urge to harvest any spears during this time.
1. Watering: Keep the soil consistently moist, but not waterlogged. Water deeply whenever the top inch of soil feels dry.
2. Weeding: Keep the asparagus bed free of weeds. Hand-pull weeds regularly to prevent them from competing with your asparagus.
3. Fertilizing: Fertilize your asparagus plants every 4-6 weeks with a balanced fertilizer. I like to use a fertilizer that’s high in phosphorus, which promotes root growth.
4. Mounding Soil: As the asparagus spears grow, gradually add more soil to the trench until it’s level with the surrounding ground. This will encourage the crowns to produce more spears.
5. Fern Development: Let the asparagus spears grow into ferns. These ferns are essential for photosynthesis and will help the plants store energy for the following year.
6. Fall Cleanup: In the fall, after the ferns have turned brown, cut them back to about 2 inches above the ground. This will help prevent disease and pests from overwintering in the asparagus bed.
Year Two: Patience is Still Key (Almost There!)
You’re getting closer! Continue to nurture your asparagus patch as you did in the first year.
1. Watering, Weeding, and Fertilizing: Continue to water, weed, and fertilize your asparagus plants as needed.
2. Limited Harvesting (Optional): If your plants are looking strong and healthy, you can harvest a few spears for a very short period (1-2 weeks). Only harvest spears that are at least 1/2 inch in diameter. Remember, the goal is still to let the plants establish themselves.
3. Fern Development and Fall Cleanup: Same as year one, let the spears grow into ferns and cut them back in the fall.
Year Three and Beyond: Harvest Time!
Finally! You’ve waited patiently, and now it’s time to reap the rewards of your hard work.
1. Harvesting: Harvest asparagus spears when they are 6-8 inches tall and about 1/2 inch in diameter. Snap the spears off at ground level.
2. Harvesting Period: Harvest asparagus for about 6-8 weeks in the spring. Stop harvesting when the spears start to become thin and spindly.
3. Watering, Weeding, and Fertilizing: Continue to water, weed, and fertilize your asparagus plants as needed.
4. Fern Development and Fall Cleanup: Let the spears grow into ferns and cut them back in the fall.
Boosting Growth: My Secret Weapons
Here are a few extra tips and tricks I’ve learned over the years to really boost asparagus growth:
* Mycorrhizae: When planting, sprinkle mycorrhizae fungi around the roots of the asparagus crowns. These beneficial fungi form a symbiotic relationship with the roots, helping them absorb more nutrients and water.
* Compost Tea: Water your asparagus plants with compost tea every few weeks. Compost tea is a nutrient-rich liquid that will give your plants a boost.
* Mulching: Mulch around your asparagus plants with straw, wood chips, or shredded leaves. Mulch will help retain moisture, suppress weeds, and regulate soil temperature.
* Salt: Asparagus is tolerant of salty soil, and some gardeners believe that adding a small amount of salt to the soil can help suppress weeds. However, be careful not to add too much salt, as it can harm other plants. I personally don’t use this method, but it’s worth mentioning.
* Crown Size Matters: Invest in larger, more mature crowns. While they might be slightly more expensive, they’ll establish faster and produce sooner. Look for crowns that are at least 1 year old.
* Consistent Watering is Key: Asparagus needs consistent moisture, especially during the first few years. Don’t let the soil dry out completely.
* Protect from Pests: Keep an eye out for common asparagus pests like asparagus beetles and asparagus miners. Treat infestations promptly to prevent damage to your plants.
Troubleshooting Common Asparagus Problems
Even with the best care, you might encounter some problems along the way. Here are a few common issues and how to address them:
* Yellowing Ferns: This could be a sign of nutrient deficiency, overwatering, or disease. Check the soil pH and nutrient levels, and make sure the soil is well-drained.
* Thin Spears: This could be a sign of overharvesting, nutrient deficiency, or stress. Stop harvesting for a while and fertilize your plants.
* Asparagus Beetles: These pests can damage the ferns and spears. Hand-pick them off the plants or use an insecticidal soap.
* Crown Rot: This is a fungal disease that can cause the crowns to rot. Prevent crown rot by planting in well-drained soil and avoiding overwatering.
Enjoying Your Harvest
Once you’re harvesting asparagus, there are endless ways to enjoy it. Roast it, grill it, steam it, or add it to salads, soups,
Conclusion
So, there you have it! Growing asparagus quickly and easily might seem like an oxymoron, but with these simple yet effective techniques, you can significantly accelerate the process and enjoy fresh, homegrown spears sooner than you ever thought possible. Forget the years of waiting traditionally associated with asparagus cultivation; these methods empower you to take control and witness the fruits (or rather, vegetables) of your labor in a fraction of the time.
This isn’t just about speed; it’s about maximizing your gardening efforts and ensuring a bountiful harvest. By starting with healthy crowns, providing optimal soil conditions, and employing strategic watering and feeding practices, you’re setting your asparagus bed up for long-term success. Think of it as an investment in delicious, nutritious meals for years to come.
But the beauty of gardening lies in experimentation! Feel free to adapt these techniques to your specific climate and soil conditions. For instance, if you live in a particularly hot and dry region, consider providing extra shade during the hottest part of the day. If your soil is naturally acidic, amend it with lime to achieve the ideal pH level.
Here are a few variations to consider:
* Vertical Asparagus Growing: If you’re short on space, explore vertical gardening techniques. You can train your asparagus plants to grow up trellises or supports, maximizing your yield in a limited area.
* Companion Planting: Experiment with companion plants that benefit asparagus, such as tomatoes, parsley, and marigolds. These plants can help deter pests and improve soil health.
* Different Asparagus Varieties: While ‘Jersey Knight’ is a popular choice, explore other asparagus varieties that may be better suited to your local climate or offer unique flavor profiles. ‘Purple Passion’ asparagus, for example, adds a vibrant color to your dishes and has a sweeter taste.
Ultimately, the key to successfully growing asparagus quickly and easily is to be proactive, observant, and willing to learn. Pay close attention to your plants’ needs, adjust your approach as necessary, and don’t be afraid to experiment.
We’re confident that these tips will help you achieve a thriving asparagus patch. Now, it’s your turn! Give these techniques a try and share your experiences with us. We’d love to hear about your successes, challenges, and any unique variations you’ve discovered. Post your photos and stories in the comments below, and let’s create a community of asparagus enthusiasts! Happy gardening!
Frequently Asked Questions (FAQ)
How long does it really take to grow asparagus from seed versus crowns?
Growing asparagus from seed is a significantly longer process than starting with crowns. From seed, it can take up to three years before you can harvest any spears. The first year is dedicated to establishing the plant, and the subsequent years are for allowing the crown to mature. Crowns, on the other hand, are already established plants, typically one to two years old. Planting crowns can reduce the waiting time to harvest to just one or two years, making it a much faster option for those eager to enjoy fresh asparagus.
What is the best type of soil for growing asparagus quickly?
Asparagus thrives in well-drained, sandy loam soil that is rich in organic matter. The soil should have a pH between 6.5 and 7.5. Good drainage is crucial because asparagus roots can rot if they sit in waterlogged soil. Amending the soil with compost or well-rotted manure before planting will improve its fertility and drainage, providing the ideal conditions for rapid growth. Avoid heavy clay soils, or amend them extensively with organic matter to improve drainage.
How often should I water my asparagus plants to promote fast growth?
Consistent watering is essential, especially during the first year after planting. Water deeply and regularly, ensuring the soil remains consistently moist but not waterlogged. Aim for about 1-2 inches of water per week, depending on rainfall. During hot, dry periods, you may need to water more frequently. Once the plants are established, they become more drought-tolerant, but regular watering will still promote faster and more vigorous growth. Mulching around the plants can help retain moisture and suppress weeds.
What kind of fertilizer should I use to encourage rapid asparagus growth?
Asparagus plants are heavy feeders and benefit from regular fertilization. In early spring, before the spears emerge, apply a balanced fertilizer such as 10-10-10 or 14-14-14. Alternatively, you can use organic fertilizers like composted manure or bone meal. Side-dress the plants with fertilizer again after the harvest season to replenish nutrients and support crown development for the following year. Avoid over-fertilizing, as this can lead to excessive foliage growth at the expense of spear production.
How deep should I plant asparagus crowns for optimal growth?
The planting depth is crucial for the success of your asparagus bed. Dig trenches that are about 6-8 inches deep and 12 inches wide. Create a small mound of soil in the center of the trench and place the asparagus crown on top, spreading the roots out around the mound. Cover the crown with about 2 inches of soil initially. As the spears emerge, gradually fill in the trench with soil until it is level with the surrounding ground. This method allows the crown to gradually adjust to its final depth and encourages strong root development.
When can I start harvesting asparagus spears after planting crowns?
Patience is key when it comes to harvesting asparagus. In the first year after planting crowns, it’s best to refrain from harvesting any spears. This allows the plants to focus on establishing a strong root system. In the second year, you can harvest lightly for a few weeks, taking only the thickest spears. In the third year and beyond, you can harvest more liberally for a longer period, typically 6-8 weeks. Avoid harvesting thin, spindly spears, as these are essential for nourishing the crown.
How do I protect my asparagus plants from pests and diseases?
Asparagus beetles are a common pest that can damage foliage and spears. Handpicking the beetles and their larvae is an effective control method. You can also use insecticidal soap or neem oil. Asparagus rust is a fungal disease that can cause orange pustules on the foliage. Ensure good air circulation around the plants and avoid overhead watering to prevent rust. Remove and destroy any infected foliage. Crop rotation and choosing rust-resistant varieties can also help prevent this disease.
Can I grow asparagus in containers?
Yes, you can grow asparagus in containers, although it requires a larger container than many other vegetables. Choose a container that is at least 18 inches deep and wide to accommodate the extensive root system. Use a well-draining potting mix and provide regular watering and fertilization. Container-grown asparagus may not produce as abundantly as plants grown in the ground, but it’s a viable option for those with limited space.
What are the best companion plants for asparagus?
Companion planting can benefit asparagus by deterring pests, improving soil health, and providing shade. Good companion plants for asparagus include:
* Tomatoes: Repel asparagus beetles.
* Parsley: Attracts beneficial insects.
* Marigolds: Repel nematodes and other soil pests.
* Basil: Improves flavor and repels asparagus beetles.
* Lettuce and Spinach: Provide ground cover and suppress weeds.
Avoid planting asparagus near onions, garlic, and other alliums, as they can inhibit its growth.
How do I overwinter my asparagus plants to ensure a good harvest next year?
After the harvest season, allow the asparagus foliage to turn yellow and brown naturally. This allows the plants to store energy in their roots for the following year. In late fall or early winter, cut the foliage back to the ground. Apply a layer of mulch, such as straw or compost, to protect the crowns from freezing temperatures. In early spring, remove the mulch to allow the new spears to emerge.

Leave a Comment